2017 FORD F150 heating
[x] Cancel search: heatingPage 100 of 599
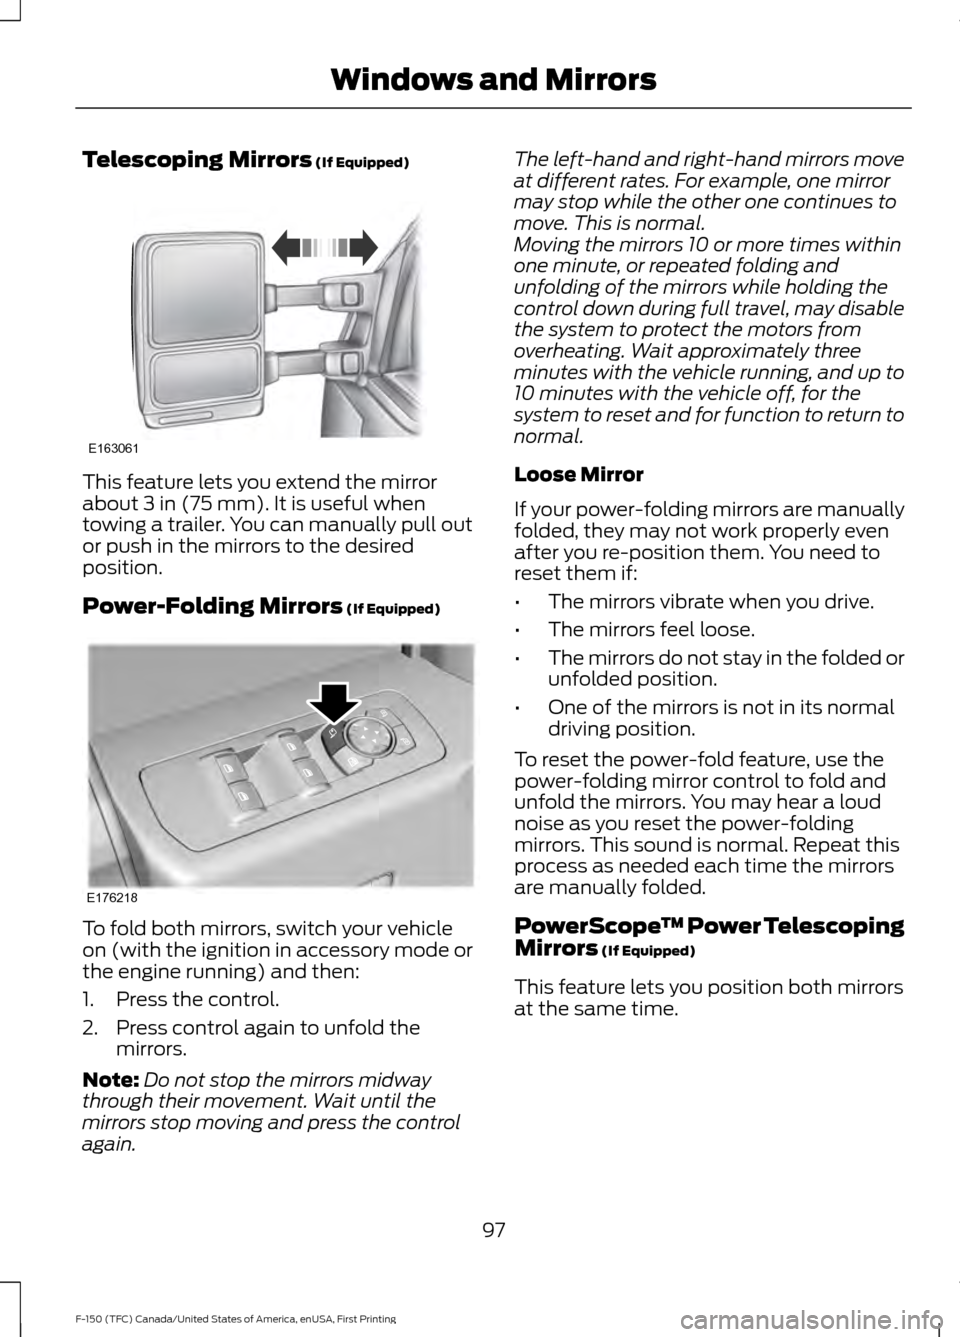
Telescoping Mirrors (If Equipped)
This feature lets you extend the mirror
about
3 in (75 mm). It is useful when
towing a trailer. You can manually pull out
or push in the mirrors to the desired
position.
Power-Folding Mirrors
(If Equipped) To fold both mirrors, switch your vehicle
on (with the ignition in accessory mode or
the engine running) and then:
1. Press the control.
2. Press control again to unfold the
mirrors.
Note: Do not stop the mirrors midway
through their movement. Wait until the
mirrors stop moving and press the control
again. The left-hand and right-hand mirrors move
at different rates. For example, one mirror
may stop while the other one continues to
move. This is normal.
Moving the mirrors 10 or more times within
one minute, or repeated folding and
unfolding of the mirrors while holding the
control down during full travel, may disable
the system to protect the motors from
overheating. Wait approximately three
minutes with the vehicle running, and up to
10 minutes with the vehicle off, for the
system to reset and for function to return to
normal.
Loose Mirror
If your power-folding mirrors are manually
folded, they may not work properly even
after you re-position them. You need to
reset them if:
•
The mirrors vibrate when you drive.
• The mirrors feel loose.
• The mirrors do not stay in the folded or
unfolded position.
• One of the mirrors is not in its normal
driving position.
To reset the power-fold feature, use the
power-folding mirror control to fold and
unfold the mirrors. You may hear a loud
noise as you reset the power-folding
mirrors. This sound is normal. Repeat this
process as needed each time the mirrors
are manually folded.
PowerScope ™ Power Telescoping
Mirrors
(If Equipped)
This feature lets you position both mirrors
at the same time.
97
F-150 (TFC) Canada/United States of America, enUSA, First Printing Windows and MirrorsE163061 E176218
Page 101 of 599

To adjust your mirrors, make sure you
switch your vehicle on (with the ignition in
accessory mode or the engine running) and
then:
1. Press and release the control. It lights.
2. Press the adjustment control to
position the mirrors.
•Press the left arrow to extend the
mirrors out. Press the right arrow to
retract the mirrors in.
• Press the up or down arrow to fold
the mirrors toward the window
glass. Press the up or down arrow
again to fold the mirrors out.
Note: Moving the mirrors 10 or more times
within one minute, or repeated folding and
unfolding of the mirrors while holding the
control down during full travel, may disable
the system to protect the motors from
overheating. Wait approximately three
minutes with the vehicle running, and up to
10 minutes with the vehicle off, for the
system to reset and for function to return to
normal.
Heated Exterior Mirrors (If Equipped)
See Heated Windows and Mirrors (page
147
). Memory Mirrors
(If Equipped)
You can save and recall the mirror
positions through the memory function.
See
Memory Function (page 154).
Auto-dimming Feature
(If Equipped)
The driver exterior mirror automatically
dims when the interior auto-dimming
mirror turns on.
Direction Indicator Mirrors (If Equipped)
While the vehicle is running, the
forward-facing portion of the appropriate
mirror housing blinks when you switch on
the direction indicator.
Puddle Lamps
(If Equipped)
The lamps on the bottom part of the mirror
housing light when you use your
transmitter to unlock the doors or when
you open a door.
Clearance Lamps
(If Equipped)
The lower, outer part of the mirror housings
light when you switch the headlamps or
parking lamps on.
Spot Lamps
(If Equipped)
The area lights are on the forward-facing
portion of the mirror housing. You can
switch them on and off by using the
controls located on the instrument panel.
See
Lighting (page 87).
360-Degree Camera
(If Equipped)
Each mirror includes a camera.
Integrated Blind Spot Mirror
(If
Equipped) WARNING
Objects in the blind spot mirror are
closer than they appear.
98
F-150 (TFC) Canada/United States of America, enUSA, First Printing Windows and MirrorsE176218
Page 148 of 599
Note:
Remove any snow, ice or leaves from
the air intake area at the base of the
windshield.
Note: To improve the time to reach a
comfortable temperature in hot weather,
drive with the windows open until you feel
cold air through the air vents.
Manual Climate Control
Note: To reduce fogging of the windshield
during humid weather, adjust the air
distribution control to the windshield air
vents position. Automatic Climate Control
Note:
Adjusting the settings when your
vehicle interior is extremely hot or cold is
not necessary. The system automatically
adjusts to heat or cool the interior to your
selected temperature as quickly as possible.
For the system to function efficiently, the
instrument panel and side air vents should
be fully open.
Note: If you select AUTO during cold
outside temperatures, the system directs
airflow to the windshield and side window
vents. In addition, the fan may run at a
slower speed until the engine warms up.
Note: If you select AUTO during hot outside
temperatures, or when the inside of the
vehicle is hot, the system automatically uses
recirculated air to maximize interior cooling.
When the interior reaches the selected
temperature, the system automatically
switches to using outside air.
Heating the Interior Quickly Vehicle with automatic climate control
Vehicle with manual climate control
Press the
AUTO button.
Adjust the fan speed to a high speed
setting.
1
Adjust the temperature control to the
desired setting.
Adjust the temperature control to the
full heat setting.
2
Select the footwell air vents using the
air distribution buttons.
3
145
F-150 (TFC) Canada/United States of America, enUSA, First Printing Climate Control
Page 149 of 599
Recommended Settings for Heating
Vehicle with automatic climate control
Vehicle with manual climate control
Press the AUTO button.
Adjust the fan speed to the center
setting.
1
Adjust the temperature control to the
desired setting. Use
72°F (22°C) as a
starting point, then adjust the setting as
necessary.
Adjust the temperature control to the
midway point of the hot settings.
2
Select the footwell air vents using the
air distribution buttons.
3
Cooling the Interior Quickly Vehicle with automatic climate control
Vehicle with manual climate control
Press the
MAX A/C button.
Adjust the temperature control to the
MAX A/C position.
1
Drive with the windows fully open until
you feel cold air through the air vents.
2
Recommended Settings for Cooling Vehicle with automatic climate control
Vehicle with manual climate control
Press the
AUTO button.
Adjust the fan speed to the center
setting.
1
Adjust the temperature control to the
desired setting. Use
72°F (22°C) as a
starting point, then adjust the setting as
necessary.
Adjust the temperature control to the
midway point of the cold settings.
2
Select the instrument panel air vents
using the air distribution buttons.
3
146
F-150 (TFC) Canada/United States of America, enUSA, First Printing Climate Control
Page 159 of 599
You can enable or disable this feature in
the information display. See Information
Displays (page 110).
REAR SEATS
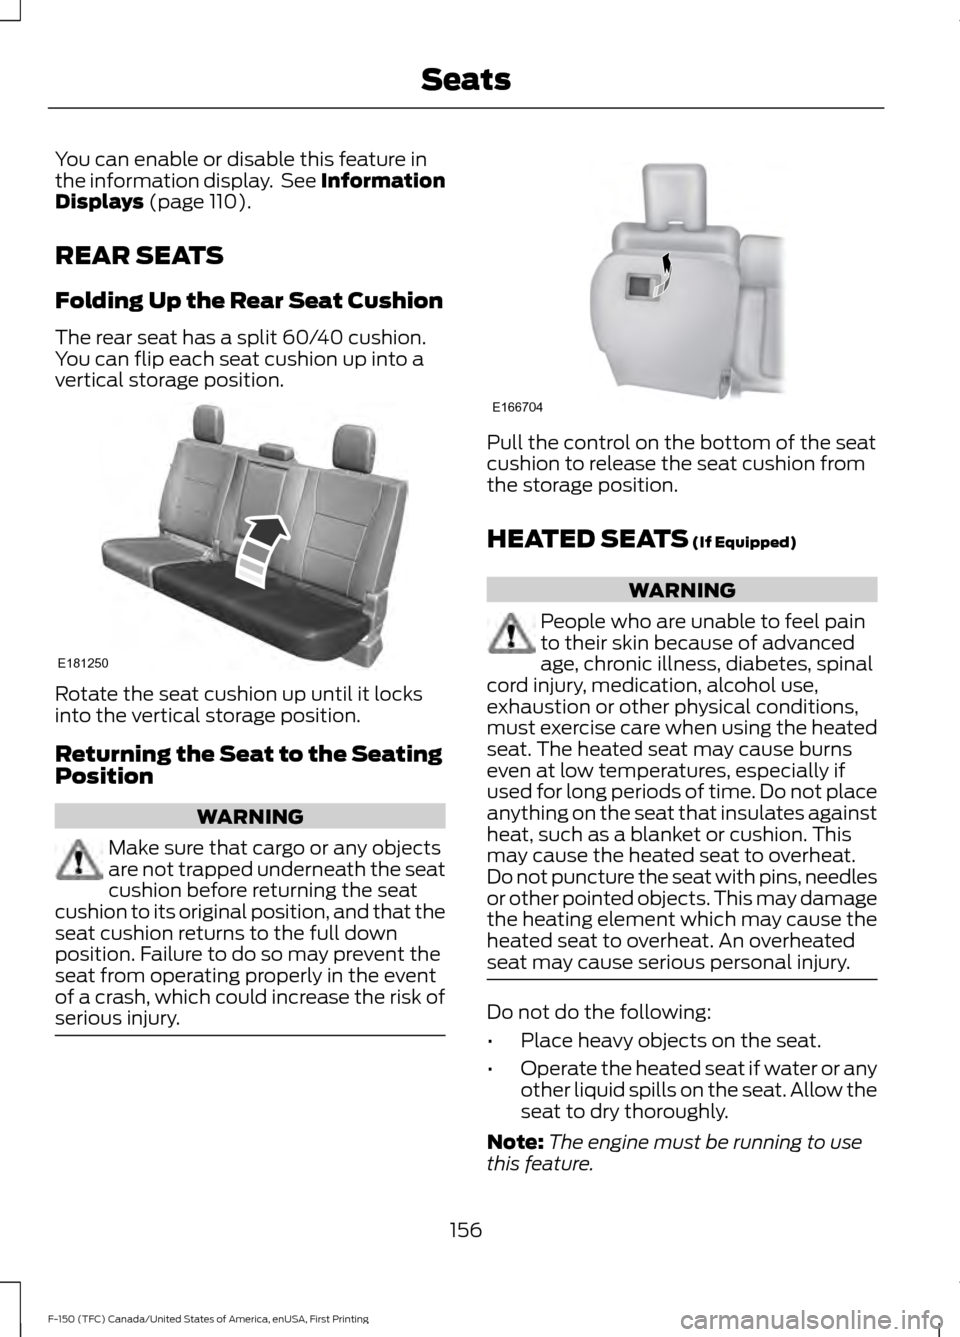
Folding Up the Rear Seat Cushion
The rear seat has a split 60/40 cushion.
You can flip each seat cushion up into a
vertical storage position. Rotate the seat cushion up until it locks
into the vertical storage position.
Returning the Seat to the Seating
Position
WARNING
Make sure that cargo or any objects
are not trapped underneath the seat
cushion before returning the seat
cushion to its original position, and that the
seat cushion returns to the full down
position. Failure to do so may prevent the
seat from operating properly in the event
of a crash, which could increase the risk of
serious injury. Pull the control on the bottom of the seat
cushion to release the seat cushion from
the storage position.
HEATED SEATS
(If Equipped)
WARNING
People who are unable to feel pain
to their skin because of advanced
age, chronic illness, diabetes, spinal
cord injury, medication, alcohol use,
exhaustion or other physical conditions,
must exercise care when using the heated
seat. The heated seat may cause burns
even at low temperatures, especially if
used for long periods of time. Do not place
anything on the seat that insulates against
heat, such as a blanket or cushion. This
may cause the heated seat to overheat.
Do not puncture the seat with pins, needles
or other pointed objects. This may damage
the heating element which may cause the
heated seat to overheat. An overheated
seat may cause serious personal injury. Do not do the following:
•
Place heavy objects on the seat.
• Operate the heated seat if water or any
other liquid spills on the seat. Allow the
seat to dry thoroughly.
Note: The engine must be running to use
this feature.
156
F-150 (TFC) Canada/United States of America, enUSA, First Printing SeatsE181250 E166704
Page 160 of 599
Press the heated seat symbol to cycle
through the various heat settings and off.
More indicator lights indicate warmer
settings.
Note:
The heated seats may remain on
after you remote start your vehicle, based
on your remote start settings. The heated
seats may also turn on when you start your
vehicle if they were on when you switched
your vehicle off.
Rear Heated Seats (If Equipped) WARNING
People who are unable to feel pain
to their skin because of advanced
age, chronic illness, diabetes, spinal
cord injury, medication, alcohol use,
exhaustion or other physical conditions,
must exercise care when using the heated
seat. The heated seat may cause burns
even at low temperatures, especially if
used for long periods of time. Do not place
anything on the seat that insulates against
heat, such as a blanket or cushion. This
may cause the heated seat to overheat.
Do not puncture the seat with pins, needles
or other pointed objects. This may damage
the heating element which may cause the
heated seat to overheat. An overheated
seat may cause serious personal injury. Do not do the following:
•
Place heavy objects on the seat.
• Operate the heated seat if water or any
other liquid spills on the seat. Allow the
seat to dry thoroughly.
Note: The engine must be running to use
this feature.
The rear seat heat controls are on the rear
of the center console. Press the heated seat symbol to cycle
through the various heat settings and off.
More indicator lights indicate warmer
settings.
The heated seat module resets at every
ignition run cycle. While the ignition is in
the on position, press the heated seat
switch to enable heating mode. When
activated, they turn off automatically when
you switch off the engine.
CLIMATE CONTROLLED SEATS
(If Equipped)
Heated Seats
157
F-150 (TFC) Canada/United States of America, enUSA, First Printing SeatsE146322 E146322
Page 161 of 599
WARNING
Persons who are unable to feel pain
to the skin because of advanced age,
chronic illness, diabetes, spinal cord
injury, medication, alcohol use, exhaustion,
or other physical conditions, must exercise
care when using the seat heater. The seat
heater may cause burns even at low
temperatures, especially if used for long
periods of time. Do not place anything on
the seat that insulates against heat, such
as a blanket or cushion, because this may
cause the seat heater to overheat. Do not
puncture the seat with pins, needles, or
other pointed objects because this may
damage the heating element which may
cause the seat heater to overheat. An
overheated seat may cause serious
personal injury. Note:
Do not do the following:
• Place heavy objects on the seat.
• Operate the seat heater if water or any
other liquid spills on the seat. Allow the
seat to dry thoroughly.
• Operate the heated seats unless the
engine is running. Doing so can cause
the battery to lose charge. Touch the heated seat symbol to cycle
through the various heat settings and off.
More indicator lights indicate warmer
settings. Cooled Seats
The cooled seats only function when the
engine is running.
To operate the cooled seats:
Touch the cooled seat symbol to cycle
through the various cooling settings and
off. More indicator lights indicate cooler
settings.
If the engine falls below 350 RPM while
the cooled seats are on, the feature turns
itself off. You need to reactivate it.
Climate controlled seat air filter
replacement
Your vehicle is equipped with lifetime air
filters that are integrated with the seats.
Regular maintenance or replacement is
not needed.
158
F-150 (TFC) Canada/United States of America, enUSA, First Printing SeatsE146322 E146309
Page 165 of 599
3.
Press and hold the function button you
want to program for 2 seconds, then
release. Repeat this step. Depending
on your brand of garage door opener,
you may need to repeat this sequence
a third time.
Gate Operator / Canadian
Programming
Canadian radio-frequency laws require
transmitter signals to “time-out” (or quit)
after several seconds of transmission –
which may not be long enough for
HomeLink to pick up the signal during
programming. Similar to this Canadian law,
some U.S. gate operators are designed to
“time-out” in the same manner.
Note: If programming a garage door opener
or gate operator, it is advised to unplug the
device during the “cycling” process to
prevent possible overheating.
1. Press and release, every two seconds,
your hand-held transmitter until the
HomeLink indicator light changes to a
rapidly blinking or continuously on light.
2. Release the hand-held transmitter button.
3. Continue programing HomeLink. See In-Vehicle Programming, Step 4.
Erasing the Function Button Codes
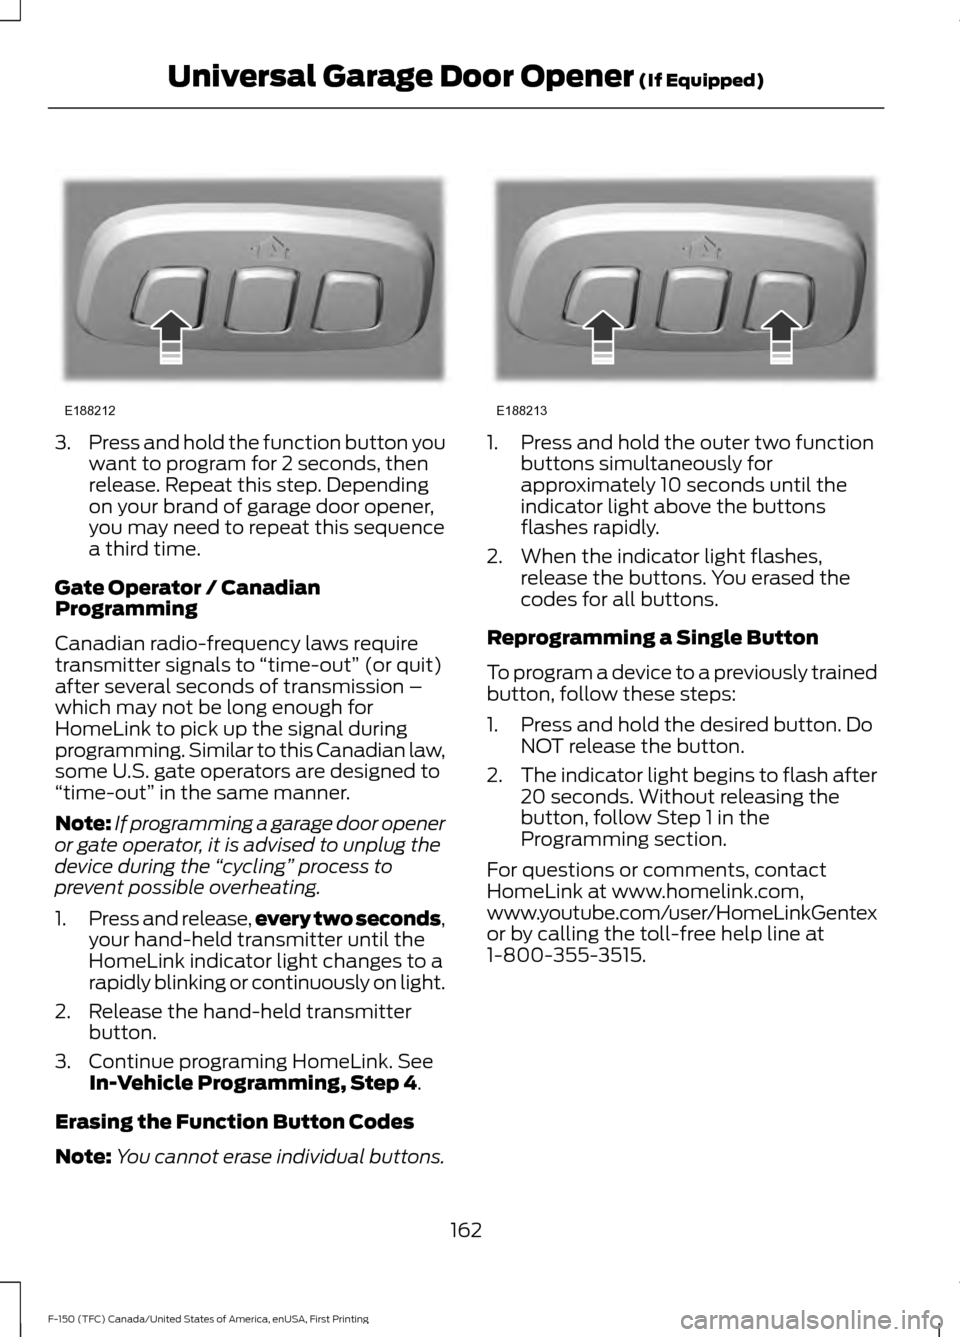
Note: You cannot erase individual buttons. 1. Press and hold the outer two function
buttons simultaneously for
approximately 10 seconds until the
indicator light above the buttons
flashes rapidly.
2. When the indicator light flashes, release the buttons. You erased the
codes for all buttons.
Reprogramming a Single Button
To program a device to a previously trained
button, follow these steps:
1. Press and hold the desired button. Do NOT release the button.
2. The indicator light begins to flash after
20 seconds. Without releasing the
button, follow Step 1 in the
Programming section.
For questions or comments, contact
HomeLink at www.homelink.com,
www.youtube.com/user/HomeLinkGentex
or by calling the toll-free help line at
1-800-355-3515.
162
F-150 (TFC) Canada/United States of America, enUSA, First Printing Universal Garage Door Opener
(If Equipped)E188212 E188213