2017 FORD EXPEDITION EL ignition
[x] Cancel search: ignitionPage 243 of 500
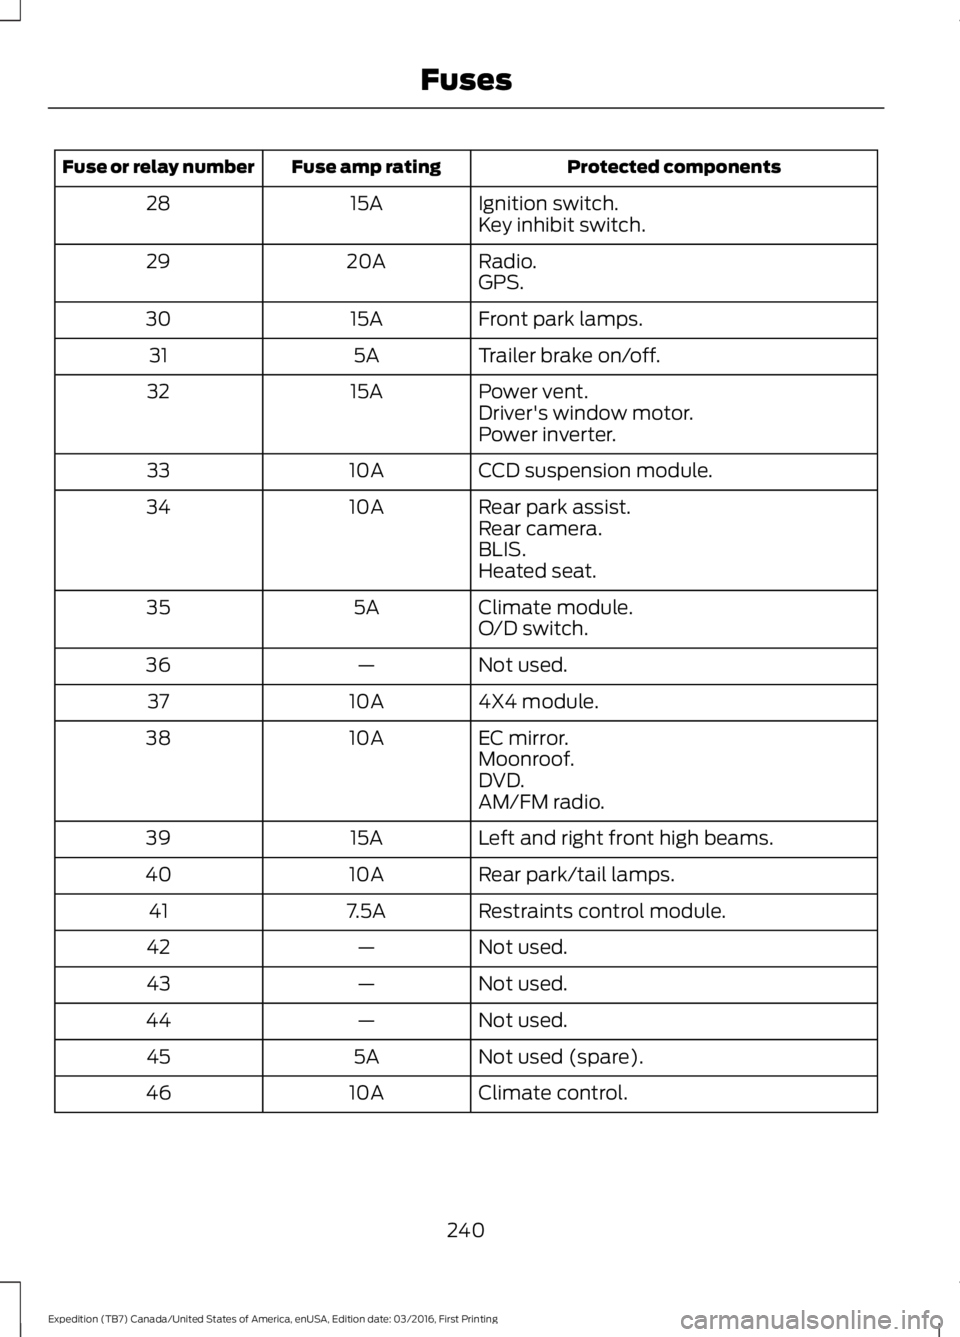
Protected componentsFuse amp ratingFuse or relay number
Ignition switch.15A28Key inhibit switch.
Radio.20A29GPS.
Front park lamps.15A30
Trailer brake on/off.5A31
Power vent.15A32Driver's window motor.Power inverter.
CCD suspension module.10A33
Rear park assist.10A34Rear camera.BLIS.Heated seat.
Climate module.5A35O/D switch.
Not used.—36
4X4 module.10A37
EC mirror.10A38Moonroof.DVD.AM/FM radio.
Left and right front high beams.15A39
Rear park/tail lamps.10A40
Restraints control module.7.5A41
Not used.—42
Not used.—43
Not used.—44
Not used (spare).5A45
Climate control.10A46
240
Expedition (TB7) Canada/United States of America, enUSA, Edition date: 03/2016, First Printing
Fuses
Page 258 of 500
After battery replacement, or in somecases after charging the battery with anexternal charger, the battery managementsystem requires eight hours of vehicle sleeptime to relearn the battery state of charge.During this time your vehicle must remainfully locked with the ignition switched off.
Note:Prior to relearning the battery stateof charge, the battery management systemmay temporarily disable some electricalsystems.
Electrical Accessory Installation
To make sure the battery managementsystem works correctly, do not connect anelectrical device ground connectiondirectly to the battery negative post. Thiscan cause inaccurate measurements ofthe battery condition and potentialincorrect system operation.
Note:If you add electrical accessories orcomponents to the vehicle, it may adverselyaffect battery performance and durability.This may also affect the performance ofother electrical systems in the vehicle.
CHECKING THE WIPER
BLADES
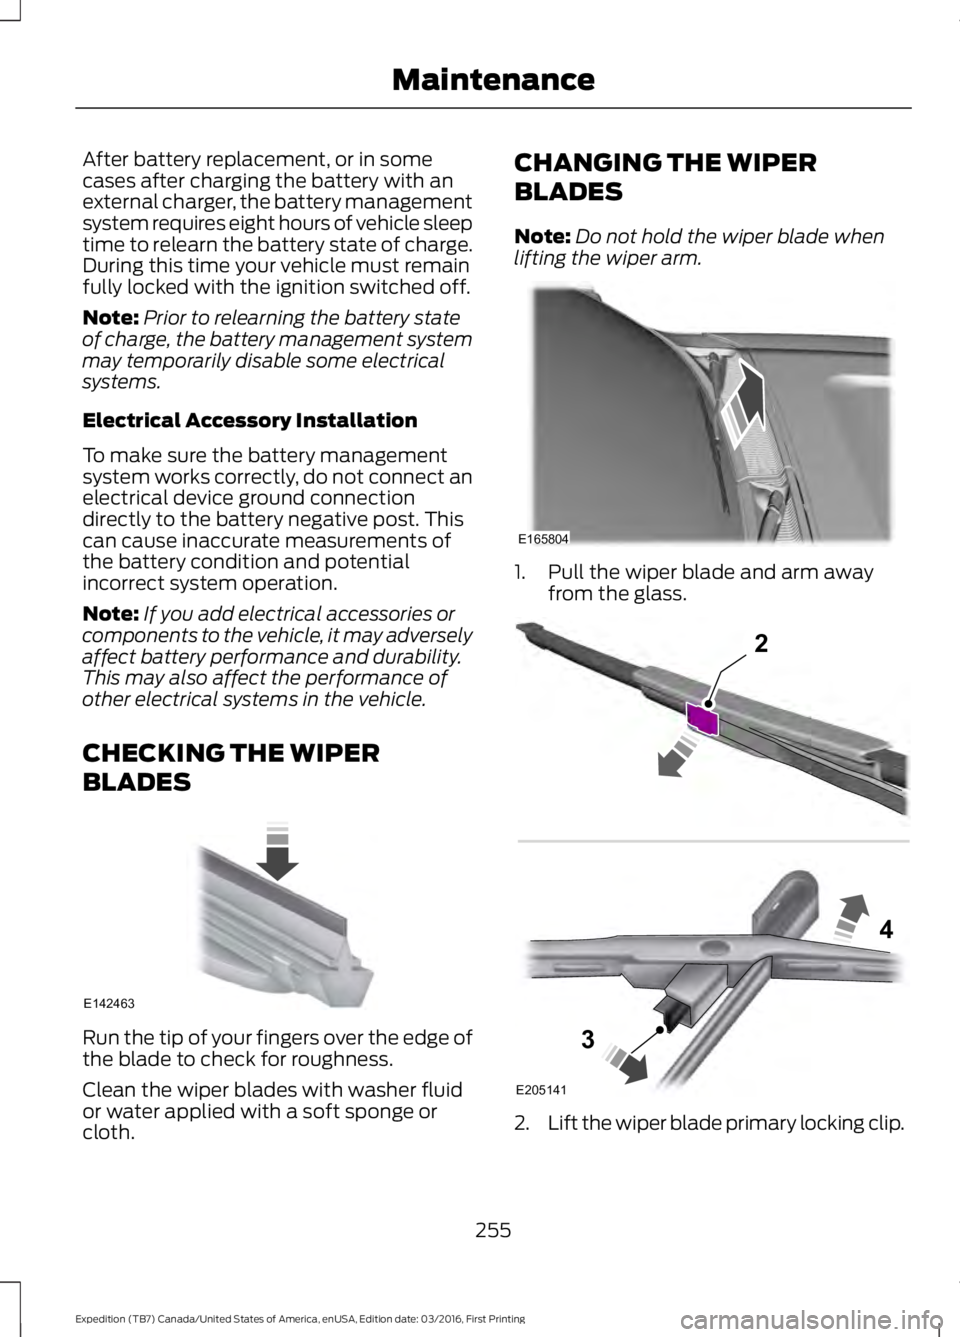
Run the tip of your fingers over the edge ofthe blade to check for roughness.
Clean the wiper blades with washer fluidor water applied with a soft sponge orcloth.
CHANGING THE WIPER
BLADES
Note:Do not hold the wiper blade whenlifting the wiper arm.
1. Pull the wiper blade and arm awayfrom the glass.
2.Lift the wiper blade primary locking clip.
255
Expedition (TB7) Canada/United States of America, enUSA, Edition date: 03/2016, First Printing
MaintenanceE142463 E165804 E205141
2
3
4
Page 260 of 500
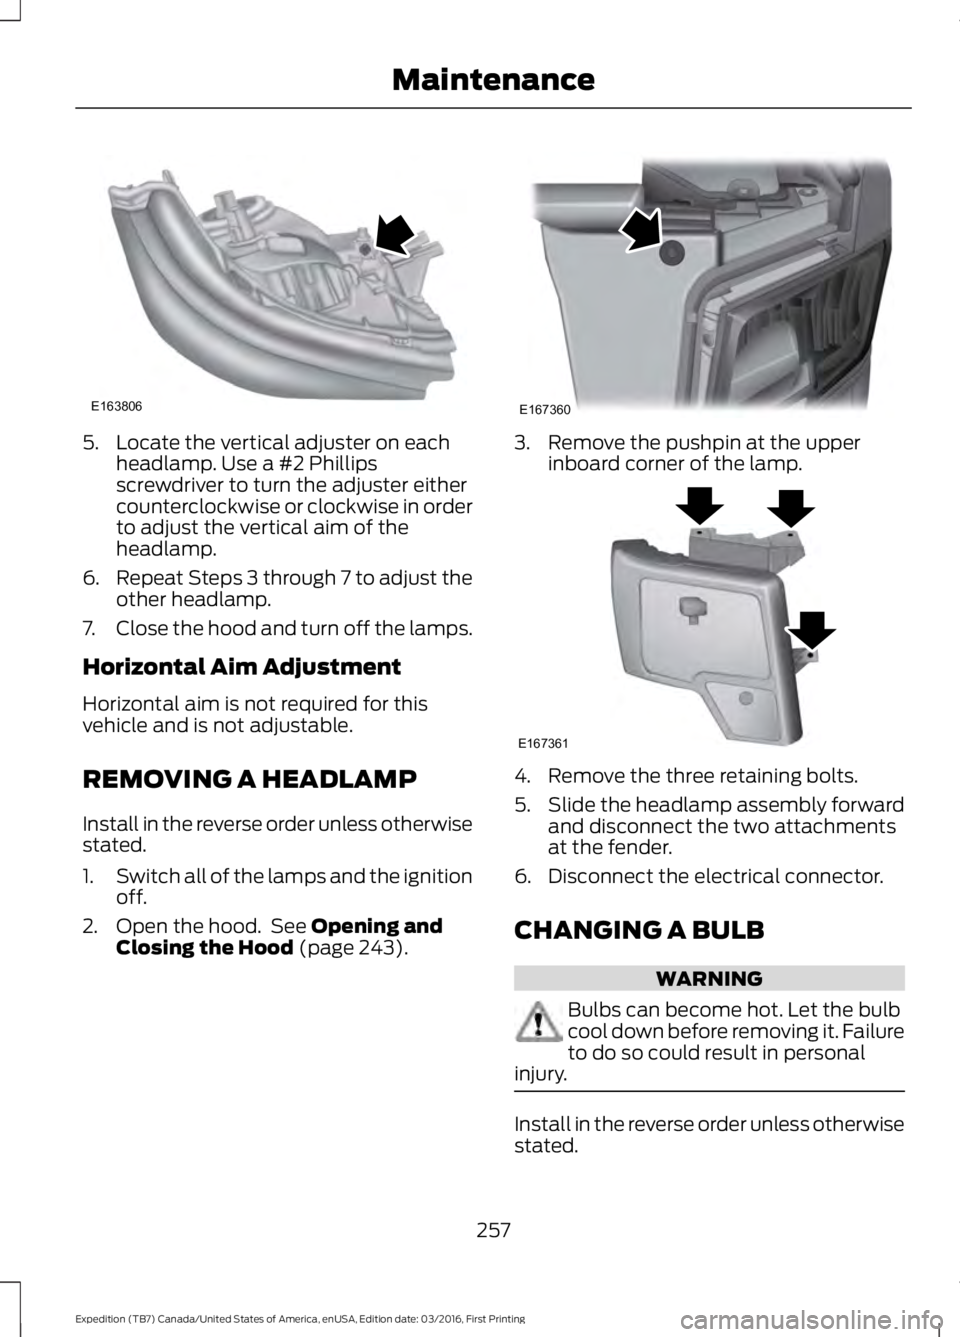
5. Locate the vertical adjuster on eachheadlamp. Use a #2 Phillipsscrewdriver to turn the adjuster eithercounterclockwise or clockwise in orderto adjust the vertical aim of theheadlamp.
6.Repeat Steps 3 through 7 to adjust theother headlamp.
7.Close the hood and turn off the lamps.
Horizontal Aim Adjustment
Horizontal aim is not required for thisvehicle and is not adjustable.
REMOVING A HEADLAMP
Install in the reverse order unless otherwisestated.
1.Switch all of the lamps and the ignitionoff.
2. Open the hood. See Opening andClosing the Hood (page 243).
3. Remove the pushpin at the upperinboard corner of the lamp.
4. Remove the three retaining bolts.
5.Slide the headlamp assembly forwardand disconnect the two attachmentsat the fender.
6. Disconnect the electrical connector.
CHANGING A BULB
WARNING
Bulbs can become hot. Let the bulbcool down before removing it. Failureto do so could result in personalinjury.
Install in the reverse order unless otherwisestated.
257
Expedition (TB7) Canada/United States of America, enUSA, Edition date: 03/2016, First Printing
MaintenanceE163806 E167360 E167361
Page 261 of 500
Note:If the bulb is accidentally touched,clean it with rubbing alcohol beforeinstalling it.
Headlamp Bulb
1.Switch all of the lamps and the ignitionoff.
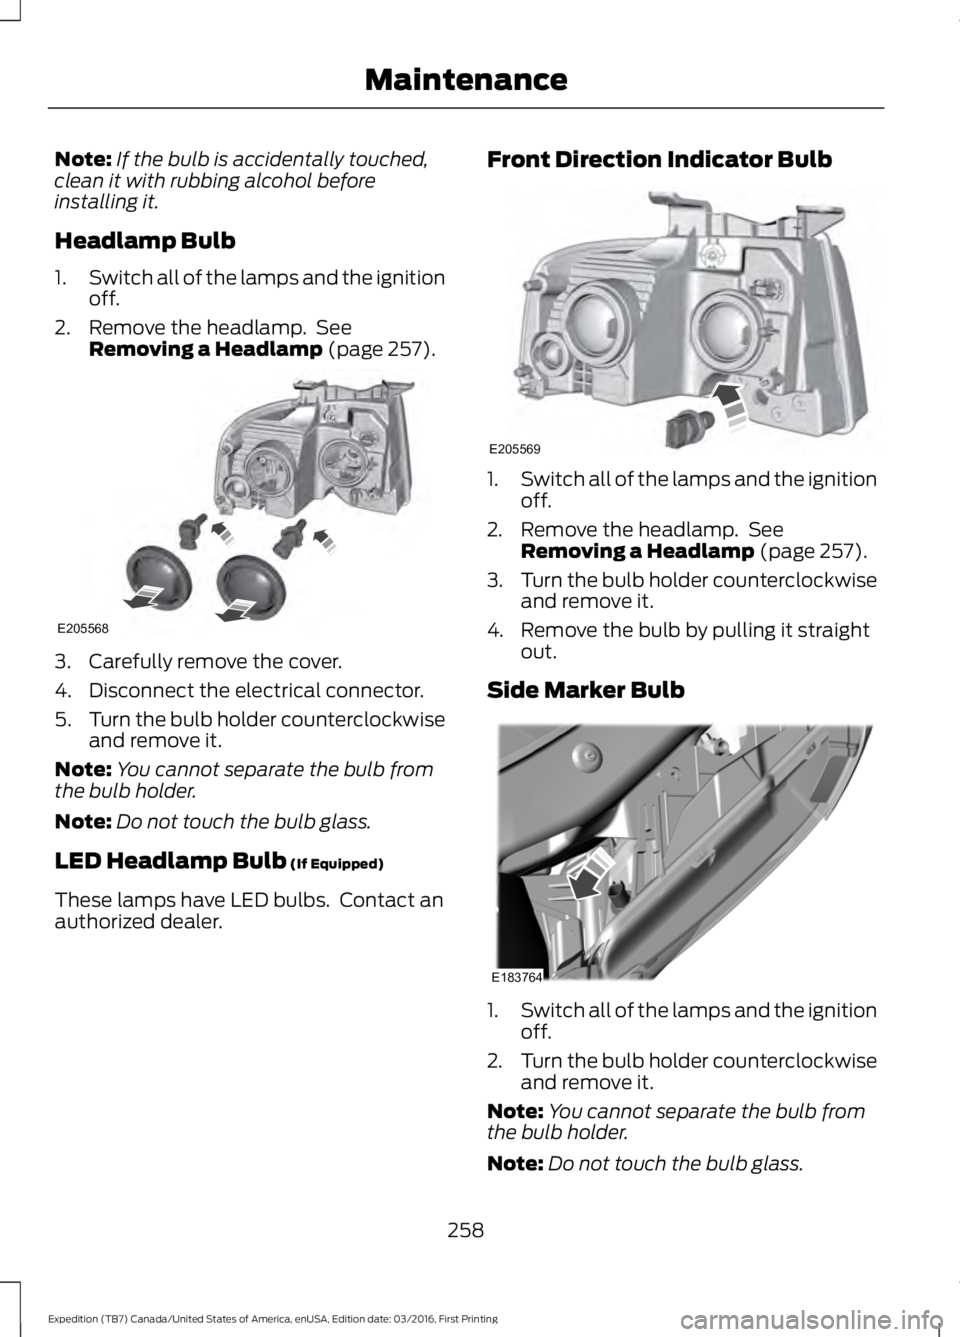
2. Remove the headlamp. SeeRemoving a Headlamp (page 257).
3. Carefully remove the cover.
4. Disconnect the electrical connector.
5.Turn the bulb holder counterclockwiseand remove it.
Note:You cannot separate the bulb fromthe bulb holder.
Note:Do not touch the bulb glass.
LED Headlamp Bulb (If Equipped)
These lamps have LED bulbs. Contact anauthorized dealer.
Front Direction Indicator Bulb
1.Switch all of the lamps and the ignitionoff.
2. Remove the headlamp. SeeRemoving a Headlamp (page 257).
3.Turn the bulb holder counterclockwiseand remove it.
4. Remove the bulb by pulling it straightout.
Side Marker Bulb
1.Switch all of the lamps and the ignitionoff.
2.Turn the bulb holder counterclockwiseand remove it.
Note:You cannot separate the bulb fromthe bulb holder.
Note:Do not touch the bulb glass.
258
Expedition (TB7) Canada/United States of America, enUSA, Edition date: 03/2016, First Printing
MaintenanceE205568 E205569 E183764
Page 262 of 500
LED Direction Indicator and SideMarker Bulbs (If Equipped)
These lamps have LED bulbs. Contact anauthorized dealer.
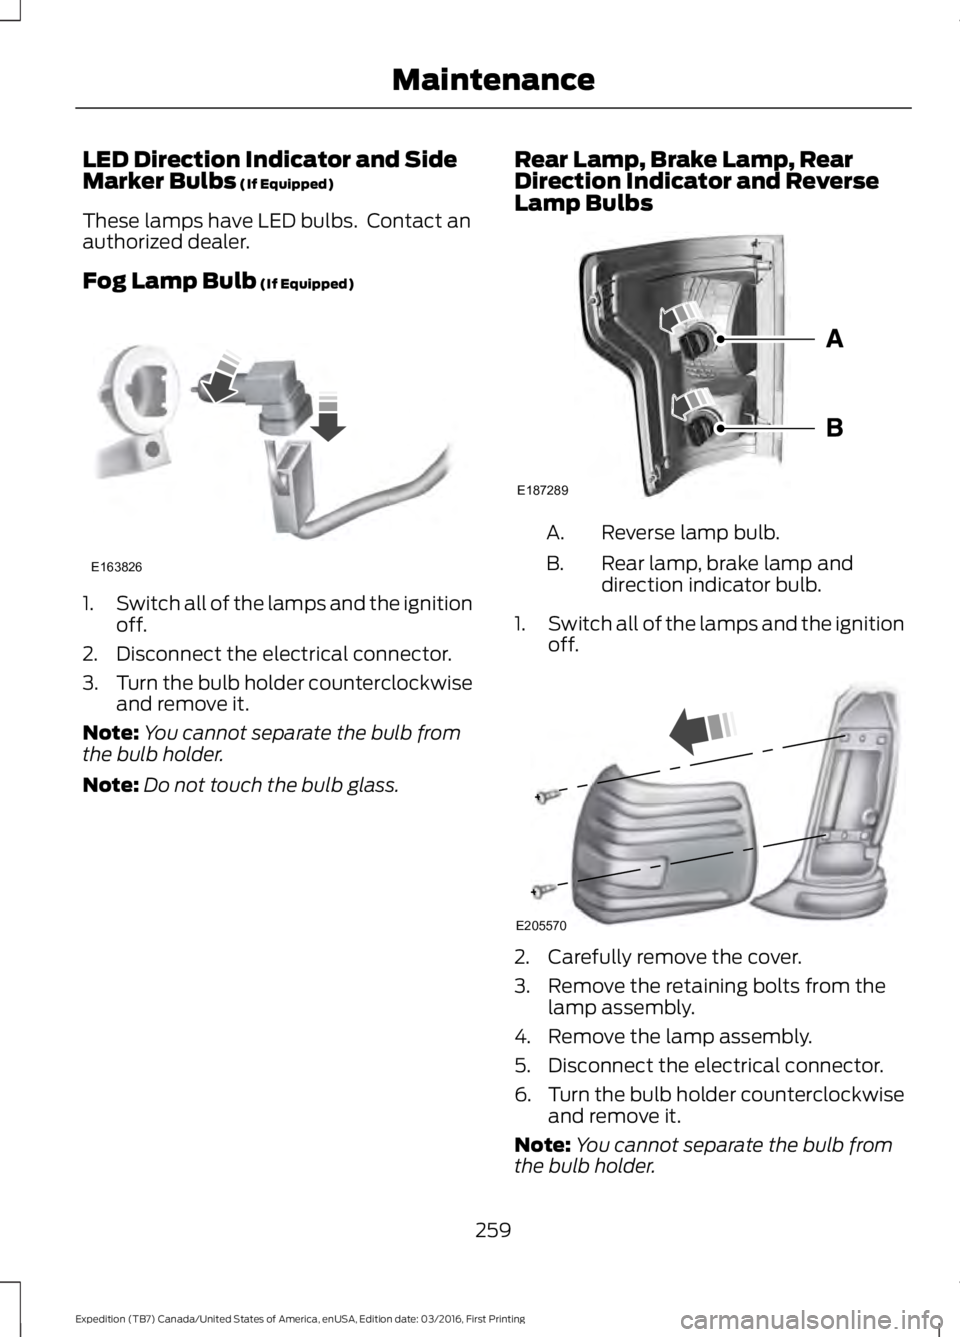
Fog Lamp Bulb (If Equipped)
1.Switch all of the lamps and the ignitionoff.
2. Disconnect the electrical connector.
3.Turn the bulb holder counterclockwiseand remove it.
Note:You cannot separate the bulb fromthe bulb holder.
Note:Do not touch the bulb glass.
Rear Lamp, Brake Lamp, RearDirection Indicator and ReverseLamp Bulbs
Reverse lamp bulb.A.
Rear lamp, brake lamp anddirection indicator bulb.B.
1.Switch all of the lamps and the ignitionoff.
2. Carefully remove the cover.
3. Remove the retaining bolts from thelamp assembly.
4. Remove the lamp assembly.
5. Disconnect the electrical connector.
6.Turn the bulb holder counterclockwiseand remove it.
Note:You cannot separate the bulb fromthe bulb holder.
259
Expedition (TB7) Canada/United States of America, enUSA, Edition date: 03/2016, First Printing
MaintenanceE163826 E187289 E205570
Page 263 of 500

LED Rear Lamp, Brake Lamp, RearDirection Indicator and ReverseLamp Bulbs (If Equipped)
These lamps have LED bulbs. Contact anauthorized dealer.
Central High-mounted Brake LampBulb
1.Switch all of the lamps and the ignitionoff.
2. Remove the retaining bolts from thelamp assembly.
3. Remove the lamp and unclip the bulbholder.
4. Remove the bulb by pulling it straightout.
LED Central High-mounted BrakeLamp Bulb (If Equipped)
These lamps have LED bulbs. Contact anauthorized dealer.
License Plate Lamp Bulb
1. Use a suitable tool, for example ascrewdriver, to carefully remove thelamp.
2.Turn the bulb holder counterclockwiseand remove it.
3. Remove the bulb by pulling it straightout.
Side Direction Indicator Bulb
These lamps have LED bulbs. Contact anauthorized dealer.
BULB SPECIFICATION CHART
Replacement bulbs are specified in thechart below. Headlamp bulbs must bemarked with an authorized D.O.T. markingfor North America to make sure they havethe proper lamp performance, lightbrightness, light pattern and safe visibility.The correct bulbs will not damage thelamp assembly or void the lamp assemblywarranty and will provide quality bulbillumination time.
260
Expedition (TB7) Canada/United States of America, enUSA, Edition date: 03/2016, First Printing
MaintenanceE205572 E205573 E205571
Page 270 of 500

•Never wash or rinse any ignition coil,spark plug wire or spark plug well, orthe area in and around these locations.
•Cover the battery, power distributionbox, and air filter assembly to preventwater damage when cleaning theengine.
CLEANING THE WINDOWS AND
WIPER BLADES
Car wash chemicals and environmentalfallout can result in windshield and wiperblade contamination. Dirty windshield andwipers will result in poor windshield wiperoperation. Keep the windshield and wiperblades clean to maintain windshield wiperperformance.
To clean the windshield and wiper blades:
•Clean the windshield with anon-abrasive glass cleaner. Whencleaning the interior of the windshield,avoid getting any glass cleaner on theinstrument panel or door panels. Wipeany glass cleaner off these surfacesimmediately.
•For windshields contaminated withtree sap, chemicals, wax or bugs, cleanthe entire windshield using steel wool(no greater than 0000 grade) in acircular motion and rinse with water.
•Clean the wiper blades with isopropylrubbing alcohol or windshield washerconcentrate.
Note: Do not use razor blades or othersharp objects to clean or remove decalsfrom the inside of the heated rear window.The vehicle warranty does not coverdamage caused to the heated rear windowgrid lines.
CLEANING THE INTERIOR
WARNINGS
Do not use cleaning solvents, bleachor dye on the vehicle’s safety belts,as these actions may weaken thebelt webbing.
On vehicles equipped withseat-mounted airbags, do not usechemical solvents or strongdetergents. Such products couldcontaminate the side airbag system andaffect performance of the side airbag in acollision.
For fabric, carpets, cloth seats, safety beltsand seats equipped with side airbags:
•Remove dust and loose dirt with avacuum cleaner.
•Remove light stains and soil withMotorcraft Professional StrengthCarpet & Upholstery Cleaner.
•If grease or tar is present on thematerial, spot-clean the area first withMotorcraft Spot and Stain Remover. InCanada, use Motorcraft Multi-PurposeCleaner.
•If a ring forms on the fabric after spotcleaning, clean the entire areaimmediately (but do not oversaturate)or the ring will set.
•Do not use household cleaningproducts or glass cleaners, which canstain and discolor the fabric and affectthe flame retardant abilities of the seatmaterials.
267
Expedition (TB7) Canada/United States of America, enUSA, Edition date: 03/2016, First Printing
Vehicle Care
Page 299 of 500

•To reduce the chances of interferencefrom another vehicle, perform thesystem reset procedure at least threefeet (one meter) away from anotherFord Motor Company vehicleundergoing the system reset procedureat the same time.
•Do not wait more than two minutesbetween resetting each tire sensor orthe system will time-out and the entireprocedure will have to be repeated onall four wheels.
•A double horn will sound indicating theneed to repeat the procedure.
Performing the System Reset Procedure
Read the entire procedure beforeattempting.
1. Drive the vehicle above 20 mph (32km/h) for at least two minutes, thenpark in a safe location where you caneasily get to all four tires and haveaccess to an air pump.
2.Place the ignition in the off position andkeep the key in the ignition.
3. Cycle the ignition to the on positionwith the engine off.
4. Turn the hazard flashers on then offthree times. You must accomplish thiswithin 10 seconds. If the reset modehas been entered successfully, the hornwill sound once, the system indicatorwill flash and a message is shown inthe information display. If this does notoccur, please try again starting at Step2. If after repeated attempts to enterthe reset mode, the horn does notsound, the system indicator does notflash and no message is shown in theinformation display, seek service fromyour authorized dealer.
5. Train the tire pressure monitoringsystem sensors in the tires using thefollowing system reset sequencestarting with the left front tire in thefollowing clockwise order: Left front(driver's side front tire), Right front(passenger's side front tire), Right rear(passenger's side rear tire), Left rear(driver's side rear tire).
6. Remove the valve cap from the valvestem on the left front tire. Decrease theair pressure until the horn sounds.
Note:The single horn chirp confirms thatthe sensor identification code has beenlearned by the module for this position. If adouble horn is heard, the reset procedurewas unsuccessful, and you must repeat it.
7. Remove the valve cap from the valvestem on the right front tire. Decreasethe air pressure until the horn sounds.
8. Remove the valve cap from the valvestem on the right rear tire. Decrease theair pressure until the horn sounds.
9. Remove the valve cap from the valvestem on the left rear tire. Decrease theair pressure until the horn sounds.Training is complete after the hornsounds for the last tire trained (driver'sside rear tire), the system indicatorstops flashing, and a message is shownin the information display.
10.Turn the ignition off. If two short hornbeeps are heard, the reset procedurewas unsuccessful and you mustrepeat it. If after repeating theprocedure and two short beeps areheard when the ignition is turned tooff, seek assistance from yourauthorized dealer.
296
Expedition (TB7) Canada/United States of America, enUSA, Edition date: 03/2016, First Printing
Wheels and Tires