Page 165 of 500

Manual (M)
Moving the gearshift lever to the manual(M) position will allow you to manuallyselect the gear you desire. Only the currentgear will display. Use the buttons on thegearshift lever to manually select gears.
Press the + button to upshift or the –button to downshift. Return thetransmission to a different gearshiftposition to deactivate manual control.
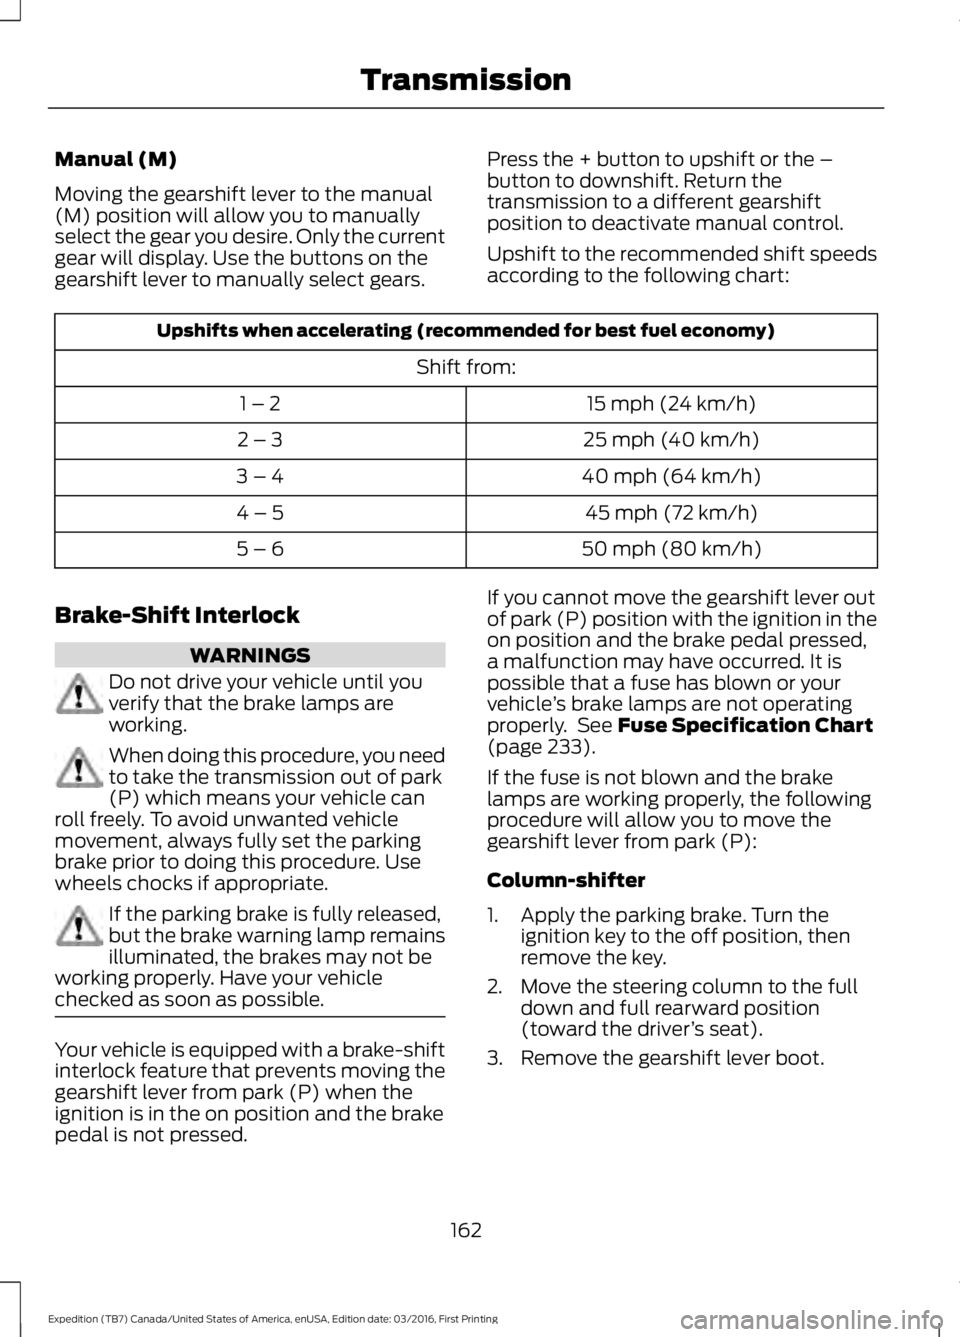
Upshift to the recommended shift speedsaccording to the following chart:
Upshifts when accelerating (recommended for best fuel economy)
Shift from:
15 mph (24 km/h)1 – 2
25 mph (40 km/h)2 – 3
40 mph (64 km/h)3 – 4
45 mph (72 km/h)4 – 5
50 mph (80 km/h)5 – 6
Brake-Shift Interlock
WARNINGS
Do not drive your vehicle until youverify that the brake lamps areworking.
When doing this procedure, you needto take the transmission out of park(P) which means your vehicle canroll freely. To avoid unwanted vehiclemovement, always fully set the parkingbrake prior to doing this procedure. Usewheels chocks if appropriate.
If the parking brake is fully released,but the brake warning lamp remainsilluminated, the brakes may not beworking properly. Have your vehiclechecked as soon as possible.
Your vehicle is equipped with a brake-shiftinterlock feature that prevents moving thegearshift lever from park (P) when theignition is in the on position and the brakepedal is not pressed.
If you cannot move the gearshift lever outof park (P) position with the ignition in theon position and the brake pedal pressed,a malfunction may have occurred. It ispossible that a fuse has blown or yourvehicle’s brake lamps are not operatingproperly. See Fuse Specification Chart(page 233).
If the fuse is not blown and the brakelamps are working properly, the followingprocedure will allow you to move thegearshift lever from park (P):
Column-shifter
1. Apply the parking brake. Turn theignition key to the off position, thenremove the key.
2. Move the steering column to the fulldown and full rearward position(toward the driver’s seat).
3. Remove the gearshift lever boot.
162
Expedition (TB7) Canada/United States of America, enUSA, Edition date: 03/2016, First Printing
Transmission
Page 166 of 500

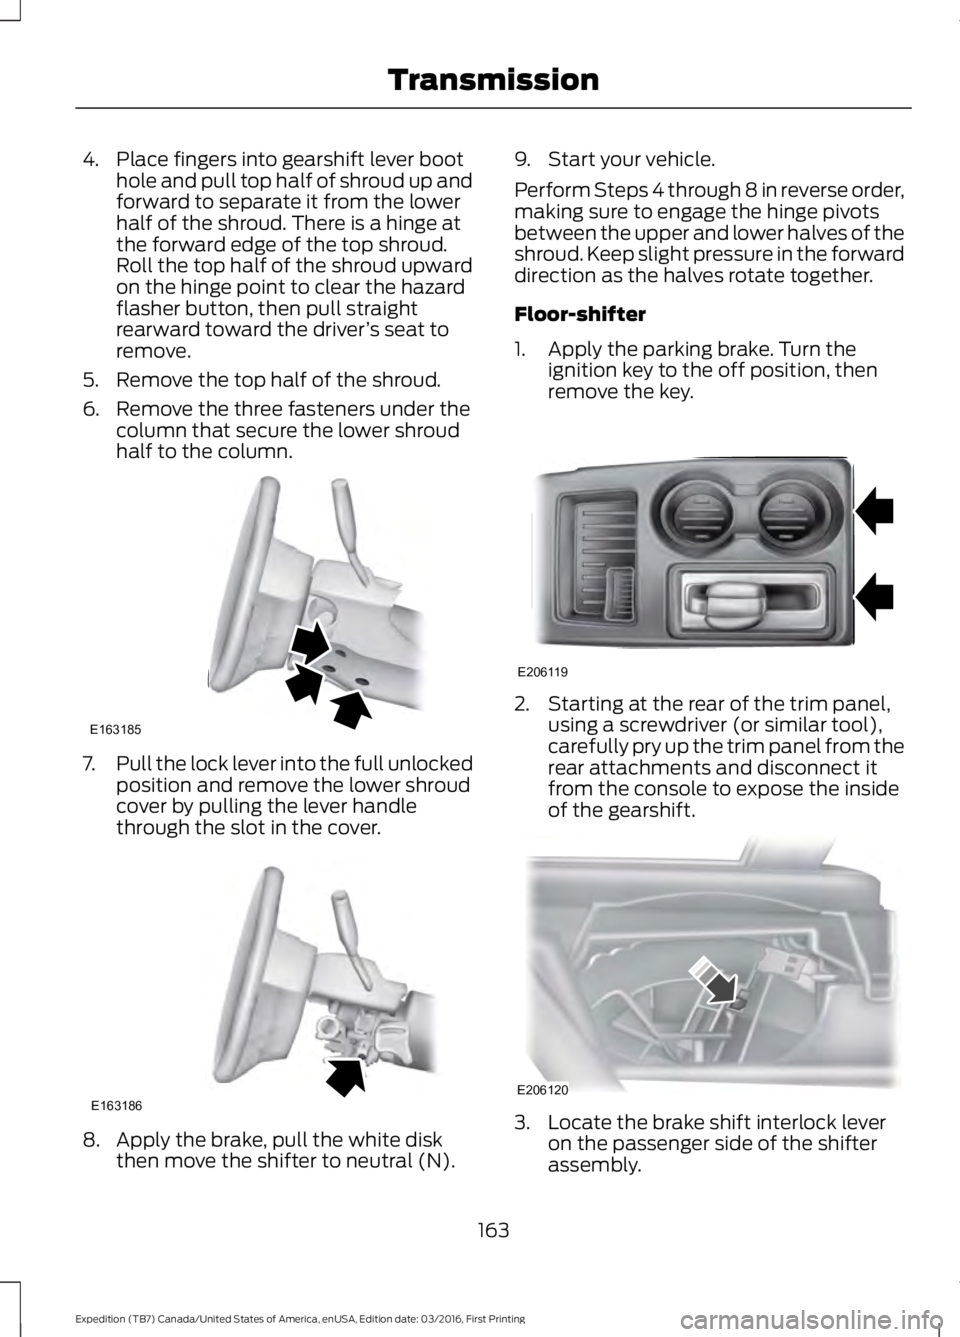
4. Place fingers into gearshift lever boothole and pull top half of shroud up andforward to separate it from the lowerhalf of the shroud. There is a hinge atthe forward edge of the top shroud.Roll the top half of the shroud upwardon the hinge point to clear the hazardflasher button, then pull straightrearward toward the driver’s seat toremove.
5. Remove the top half of the shroud.
6. Remove the three fasteners under thecolumn that secure the lower shroudhalf to the column.
7.Pull the lock lever into the full unlockedposition and remove the lower shroudcover by pulling the lever handlethrough the slot in the cover.
8. Apply the brake, pull the white diskthen move the shifter to neutral (N).
9. Start your vehicle.
Perform Steps 4 through 8 in reverse order,making sure to engage the hinge pivotsbetween the upper and lower halves of theshroud. Keep slight pressure in the forwarddirection as the halves rotate together.
Floor-shifter
1. Apply the parking brake. Turn theignition key to the off position, thenremove the key.
2. Starting at the rear of the trim panel,using a screwdriver (or similar tool),carefully pry up the trim panel from therear attachments and disconnect itfrom the console to expose the insideof the gearshift.
3. Locate the brake shift interlock leveron the passenger side of the shifterassembly.
163
Expedition (TB7) Canada/United States of America, enUSA, Edition date: 03/2016, First Printing
TransmissionE163185 E163186 E206119 E206120
Page 449 of 500

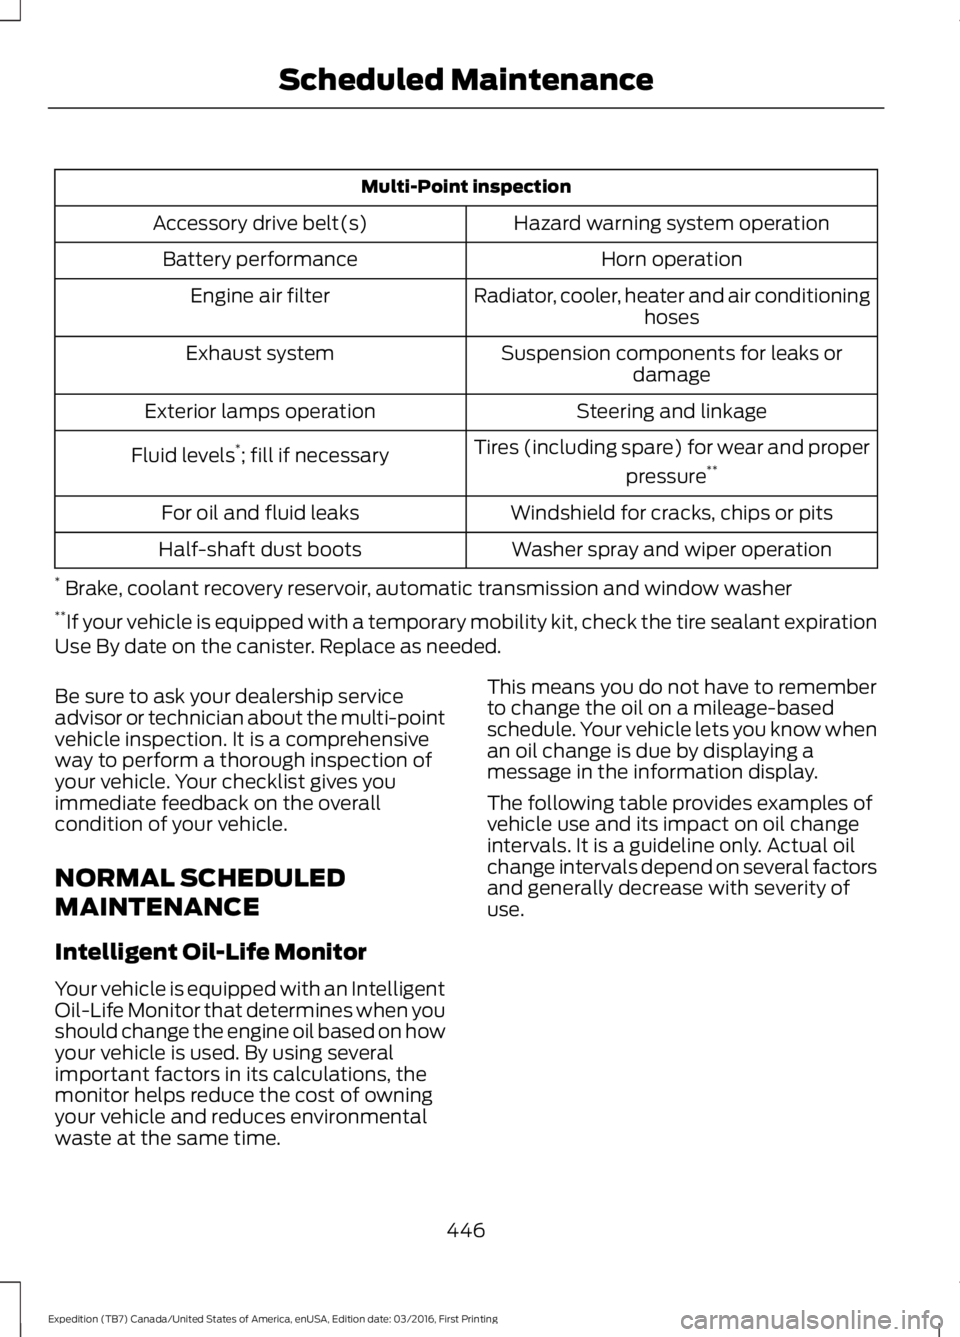
Multi-Point inspection
Hazard warning system operationAccessory drive belt(s)
Horn operationBattery performance
Radiator, cooler, heater and air conditioninghosesEngine air filter
Suspension components for leaks ordamageExhaust system
Steering and linkageExterior lamps operation
Tires (including spare) for wear and proper
pressure**Fluid levels*; fill if necessary
Windshield for cracks, chips or pitsFor oil and fluid leaks
Washer spray and wiper operationHalf-shaft dust boots
* Brake, coolant recovery reservoir, automatic transmission and window washer**If your vehicle is equipped with a temporary mobility kit, check the tire sealant expirationUse By date on the canister. Replace as needed.
Be sure to ask your dealership serviceadvisor or technician about the multi-pointvehicle inspection. It is a comprehensiveway to perform a thorough inspection ofyour vehicle. Your checklist gives youimmediate feedback on the overallcondition of your vehicle.
NORMAL SCHEDULED
MAINTENANCE
Intelligent Oil-Life Monitor
Your vehicle is equipped with an IntelligentOil-Life Monitor that determines when youshould change the engine oil based on howyour vehicle is used. By using severalimportant factors in its calculations, themonitor helps reduce the cost of owningyour vehicle and reduces environmentalwaste at the same time.
This means you do not have to rememberto change the oil on a mileage-basedschedule. Your vehicle lets you know whenan oil change is due by displaying amessage in the information display.
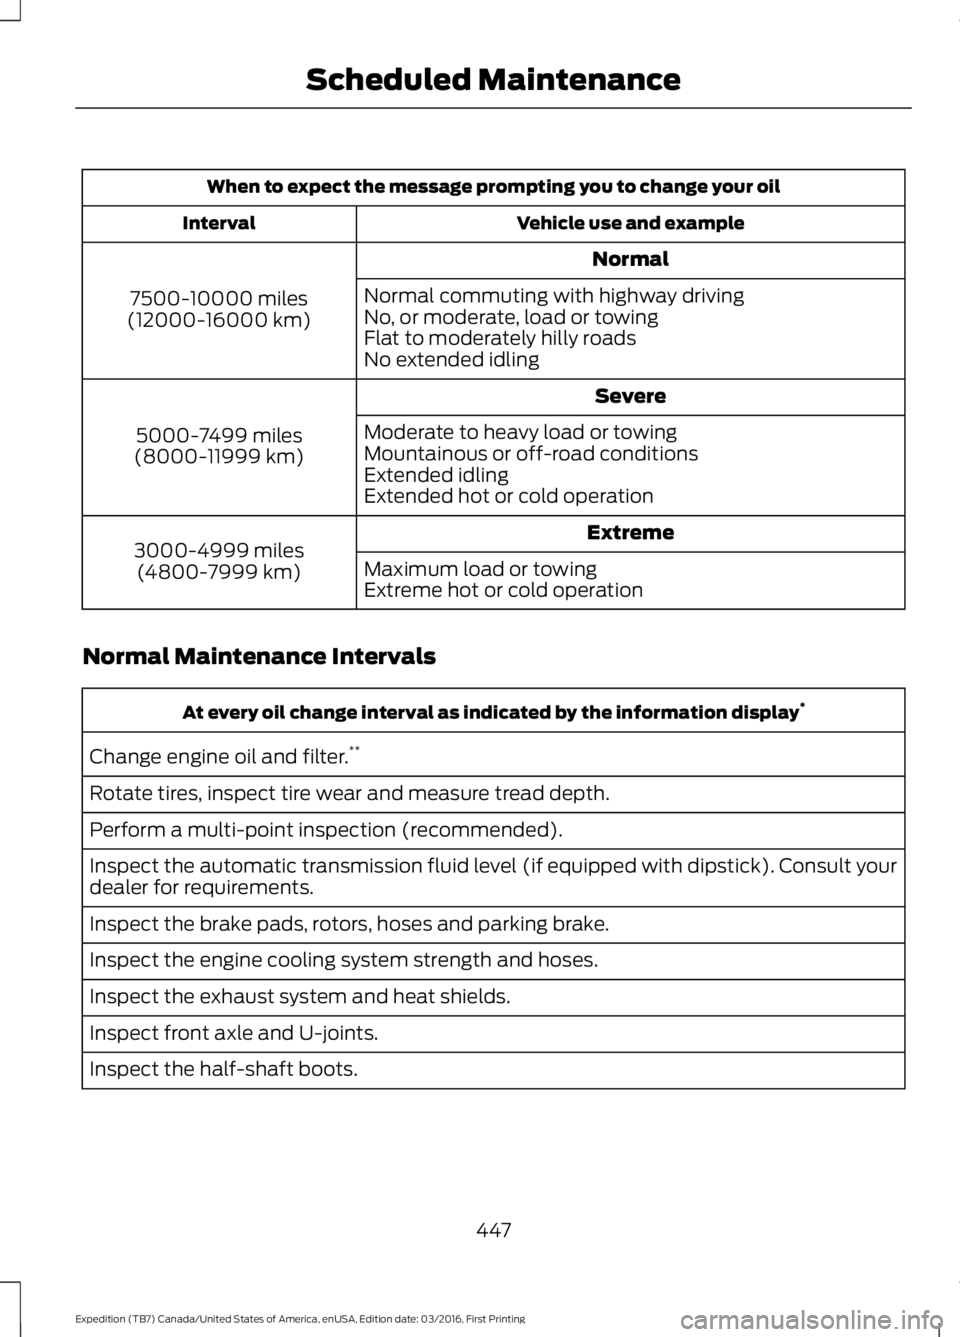
The following table provides examples ofvehicle use and its impact on oil changeintervals. It is a guideline only. Actual oilchange intervals depend on several factorsand generally decrease with severity ofuse.
446
Expedition (TB7) Canada/United States of America, enUSA, Edition date: 03/2016, First Printing
Scheduled Maintenance
Page 450 of 500

When to expect the message prompting you to change your oil
Vehicle use and exampleInterval
Normal
7500-10000 miles(12000-16000 km)
Normal commuting with highway drivingNo, or moderate, load or towingFlat to moderately hilly roadsNo extended idling
Severe
5000-7499 miles(8000-11999 km)
Moderate to heavy load or towingMountainous or off-road conditionsExtended idlingExtended hot or cold operation
Extreme3000-4999 miles(4800-7999 km)Maximum load or towingExtreme hot or cold operation
Normal Maintenance Intervals
At every oil change interval as indicated by the information display*
Change engine oil and filter.**
Rotate tires, inspect tire wear and measure tread depth.
Perform a multi-point inspection (recommended).
Inspect the automatic transmission fluid level (if equipped with dipstick). Consult yourdealer for requirements.
Inspect the brake pads, rotors, hoses and parking brake.
Inspect the engine cooling system strength and hoses.
Inspect the exhaust system and heat shields.
Inspect front axle and U-joints.
Inspect the half-shaft boots.
447
Expedition (TB7) Canada/United States of America, enUSA, Edition date: 03/2016, First Printing
Scheduled Maintenance