2017 FORD EXPEDITION EL jacking
[x] Cancel search: jackingPage 66 of 500

USING POWER RUNNING
BOARDS
WARNINGS
In extreme climates, excessive icebuildup may occur, causing therunning boards not to deploy. Makesure that the running boards havedeployed, and have finished moving beforeattempting to step on them. The runningboards will resume normal function oncethe blockage is cleared.
Turn off the running boards beforejacking or placing any object underyour vehicle. Never place your handbetween the extended running board andyour vehicle. A moving running board maycause injury.
Note:Do not use the running boards, frontand rear hinge assemblies, running boardmotors, or the running board underbodymounts to lift your vehicle when jacking.Always use proper jacking points.
Note:The running boards may operatemore slowly in cool temperatures.
Note:The running board mechanism maytrap debris such as mud, dirt, snow, ice andsalt. This may cause unwanted noise. If thishappens, manually set the running boardsto the deployed position. Then, wash thesystem, in particular the front and rear hingearms, with a high-pressure car wash wand.
Automatic Power Deploy
The running boards automatically extenddown and out when you open the door.This can help you enter and exit yourvehicle.
Automatic Power Stow
When you close the doors, the runningboards return to the stowed position aftera two-second delay.
Manual Power Deploy
You can manually operate the runningboards in the information display. SeeGeneral Information (page 91).
Set the running boards in the deployedposition to access the roof.
The running boards return to the stowedposition and enter automatic mode whenthe vehicle speed exceeds 5 mph (8 km/h).
Enabling and Disabling
You can enable and disable the powerrunning board feature in the informationdisplay. See General Information (page91).
63
Expedition (TB7) Canada/United States of America, enUSA, Edition date: 03/2016, First Printing
Power Running Boards (If Equipped)E166682
Page 302 of 500

Tire Change Procedure
WARNINGS
Only use replacement tires andwheels that are the same size, loadindex, speed rating and type (suchas P-metric versus LT-metric or all-seasonversus all-terrain) as those originallyprovided by Ford. The recommended tireand wheel size may be found on either theSafety Compliance Certification Label(affixed to either the door hinge pillar,door-latch post, or the door edge thatmeets the door-latch post, next to thedriver’s seating position) or the Tire Labelwhich is located on the B-Pillar or edge ofthe driver’s door. If this information is notfound on these labels then you shouldcontact your authorized dealer as soon aspossible. Use of any tire or wheel notrecommended by Ford can affect thesafety and performance of your vehicle,which could result in an increased risk ofloss of vehicle control, vehicle rollover,personal injury and death. Additionally theuse of non-recommended tires and wheelscould cause steering, suspension, axle,transfer case or power transfer unit failure.If you have questions regarding tirereplacement, contact your authorizeddealer as soon as possible.
When one of the front wheels is offthe ground, the transmission alonewill not prevent the vehicle frommoving or slipping off the jack.
To help prevent the vehicle frommoving when you change a tire, besure to place the transmission in park(P), set the parking brake and block (inboth directions) the wheel that isdiagonally opposite (other side and end ofthe vehicle) to the tire being changed.
Never get underneath a vehicle thatis supported only by a jack. If thevehicle slips off the jack, you orsomeone else could be seriously injured.
WARNINGS
Do not attempt to change a tire onthe side of the vehicle close tomoving traffic. Pull far enough off theroad to avoid the danger of being hit whenoperating the jack or changing the wheel.
Always use the jack provided asoriginal equipment with your vehicle.If using a jack other than the oneprovided as original equipment with yourvehicle, make sure the jack capacity isadequate for the vehicle weight, includingany vehicle cargo or modifications.
Disable the power running boardsbefore jacking, lifting, or placing anyobject under the vehicle. Never placeyour hand between the power runningboard and the vehicle as extended powerrunning boards will retract when the doorsare closed. Failure to follow theseinstructions may result in personal injury.
Failure to follow these instructionswhen using the spare tire carriercould cause loss of the wheel andtire and lead to personal injury: Only usethe spare tire carrier to stow the tire andwheel combination specified on the TireLabel or Safety Compliance CertificationLabel on the B-Pillar or the edge of thedriver door. Other tire and wheelcombinations could cause the carrier tofail if it does not fit securely or is too heavy.Do not use impact tools or power toolsoperating over 200 RPM, which may causewinch malfunction and prevent a securefit. Override the winch at least three times(there will be an audible click each time)to ensure a tight secure fit of the wheel andtire.
Note:Passengers should not remain in thevehicle when the vehicle is being jacked.
299
Expedition (TB7) Canada/United States of America, enUSA, Edition date: 03/2016, First Printing
Wheels and Tires
Page 303 of 500

Park on a level surface, activate the hazardflashers and set the parking brake. Then,place the transmission in park (P) and turnthe engine off.
Removing the Jack and Tools
Note:Pay close attention to the orientationof the bag, because it will have to bereinstalled after changing the tire.
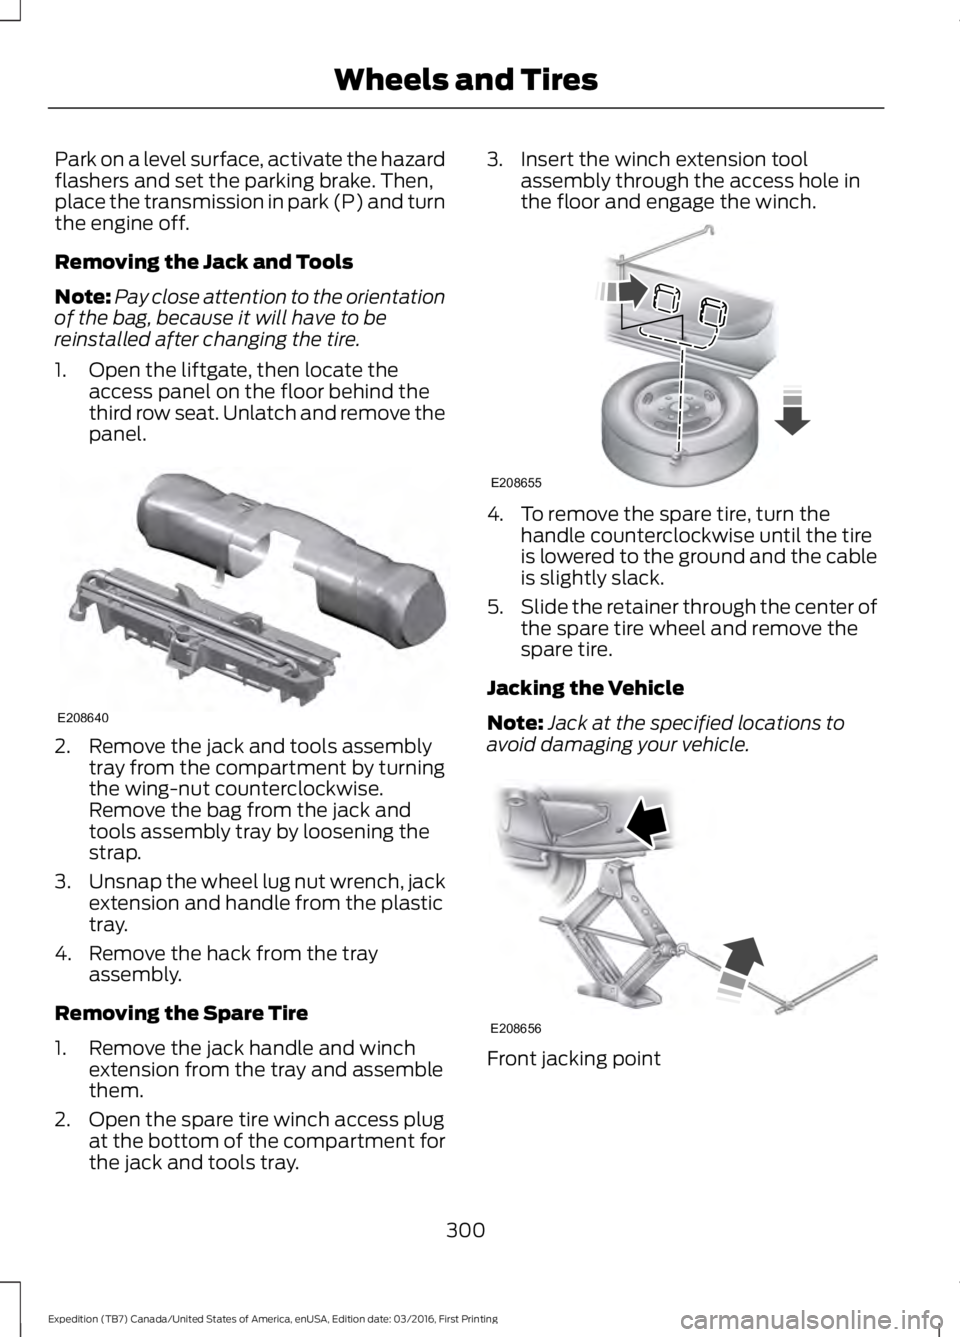
1. Open the liftgate, then locate theaccess panel on the floor behind thethird row seat. Unlatch and remove thepanel.
2. Remove the jack and tools assemblytray from the compartment by turningthe wing-nut counterclockwise.Remove the bag from the jack andtools assembly tray by loosening thestrap.
3.Unsnap the wheel lug nut wrench, jackextension and handle from the plastictray.
4. Remove the hack from the trayassembly.
Removing the Spare Tire
1. Remove the jack handle and winchextension from the tray and assemblethem.
2. Open the spare tire winch access plugat the bottom of the compartment forthe jack and tools tray.
3. Insert the winch extension toolassembly through the access hole inthe floor and engage the winch.
4. To remove the spare tire, turn thehandle counterclockwise until the tireis lowered to the ground and the cableis slightly slack.
5.Slide the retainer through the center ofthe spare tire wheel and remove thespare tire.
Jacking the Vehicle
Note:Jack at the specified locations toavoid damaging your vehicle.
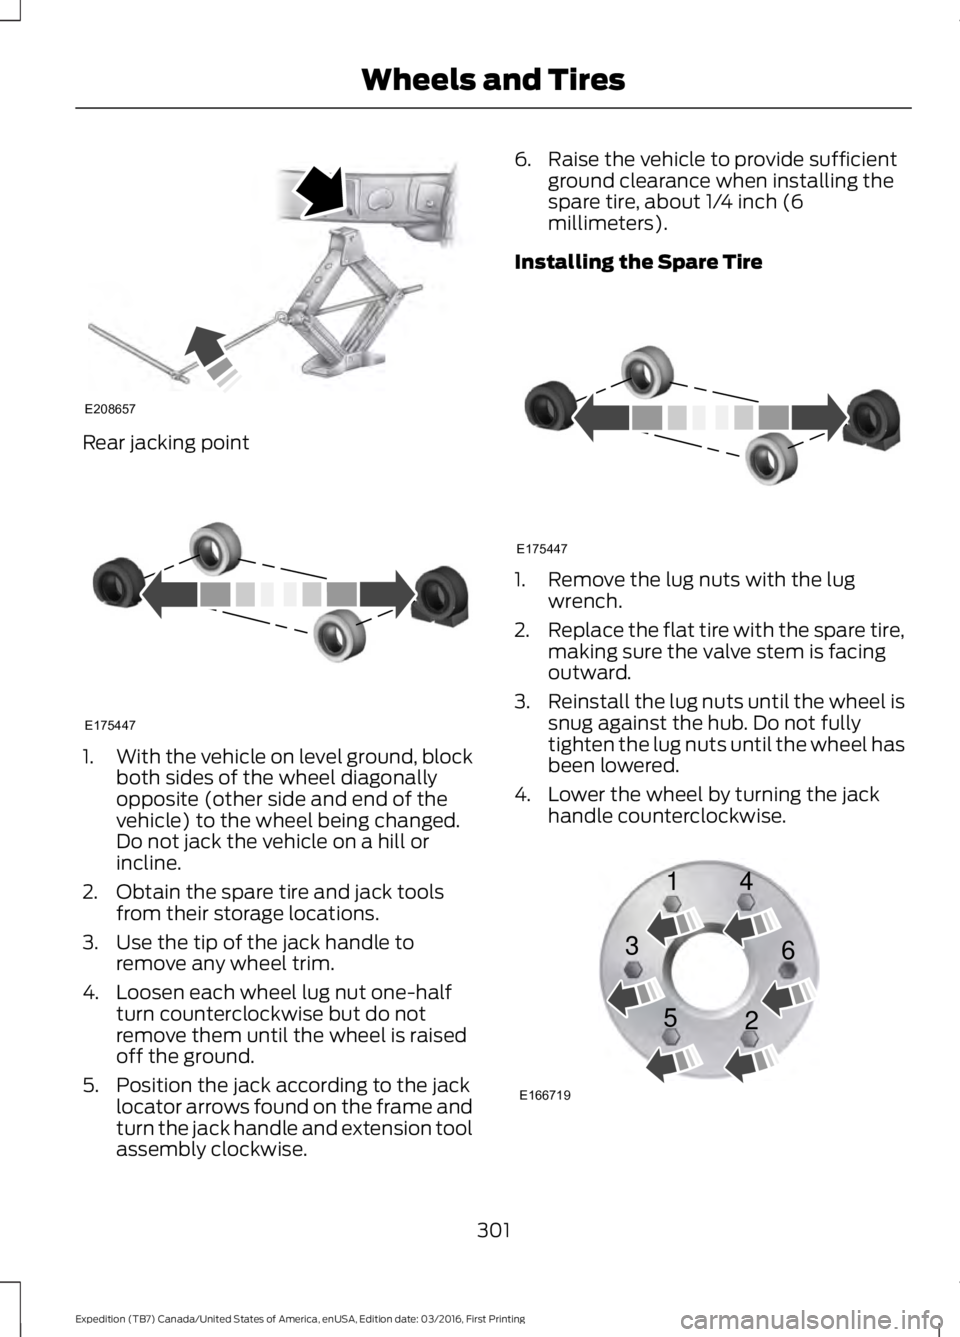
Front jacking point
300
Expedition (TB7) Canada/United States of America, enUSA, Edition date: 03/2016, First Printing
Wheels and TiresE208640 E208655 E208656
Page 304 of 500

Rear jacking point
1.With the vehicle on level ground, blockboth sides of the wheel diagonallyopposite (other side and end of thevehicle) to the wheel being changed.Do not jack the vehicle on a hill orincline.
2. Obtain the spare tire and jack toolsfrom their storage locations.
3. Use the tip of the jack handle toremove any wheel trim.
4. Loosen each wheel lug nut one-halfturn counterclockwise but do notremove them until the wheel is raisedoff the ground.
5. Position the jack according to the jacklocator arrows found on the frame andturn the jack handle and extension toolassembly clockwise.
6. Raise the vehicle to provide sufficientground clearance when installing thespare tire, about 1/4 inch (6millimeters).
Installing the Spare Tire
1. Remove the lug nuts with the lugwrench.
2.Replace the flat tire with the spare tire,making sure the valve stem is facingoutward.
3.Reinstall the lug nuts until the wheel issnug against the hub. Do not fullytighten the lug nuts until the wheel hasbeen lowered.
4. Lower the wheel by turning the jackhandle counterclockwise.
301
Expedition (TB7) Canada/United States of America, enUSA, Edition date: 03/2016, First Printing
Wheels and TiresE208657 E175447 E175447 E166719
1
3
5 4
6
2