2017 FORD EXPEDITION EL clock
[x] Cancel search: clockPage 21 of 500
Use a child safety seat (sometimes calledan infant carrier, convertible seat, ortoddler seat) for infants, toddlers, orchildren weighing 40 pounds (18kilograms) or less (generally age four oryounger).
Using Lap and Shoulder Belts
WARNINGS
Airbags can kill or injure a child in achild seat. Never place a rear-facingchild seat in front of an active airbag.If you must use a forward-facing child seatin the front seat, move the vehicle seatupon which the seat is installed all the wayback.
Airbags can kill or injure a child in achild seat. Children 12 and undershould be properly restrained in therear seat whenever possible.
Depending on where you secure achild restraint, and depending on thechild restraint design, you may blockaccess to certain seatbelt buckleassemblies and LATCH lower anchors,rendering those features potentiallyunusable. To avoid risk of injury, occupantsshould only use seating positions wherethey are able to be properly restrained.
When installing a child safety seat withcombination lap and shoulder belts:
•Use the correct seatbelt buckle for thatseating position.
•Insert the belt tongue into the properbuckle until you hear a snap and feel itlatch. Make sure the tongue is securelyfastened in the buckle.
•Keep the buckle release buttonpointing up and away from the safetyseat, with the tongue between the childseat and the release button, to preventaccidental unbuckling.
•Place the vehicle seat upon which thechild seat will be installed in the uprightposition.
•Put the seatbelt in the automaticlocking mode. This vehicle does notrequire the use of a locking clip.
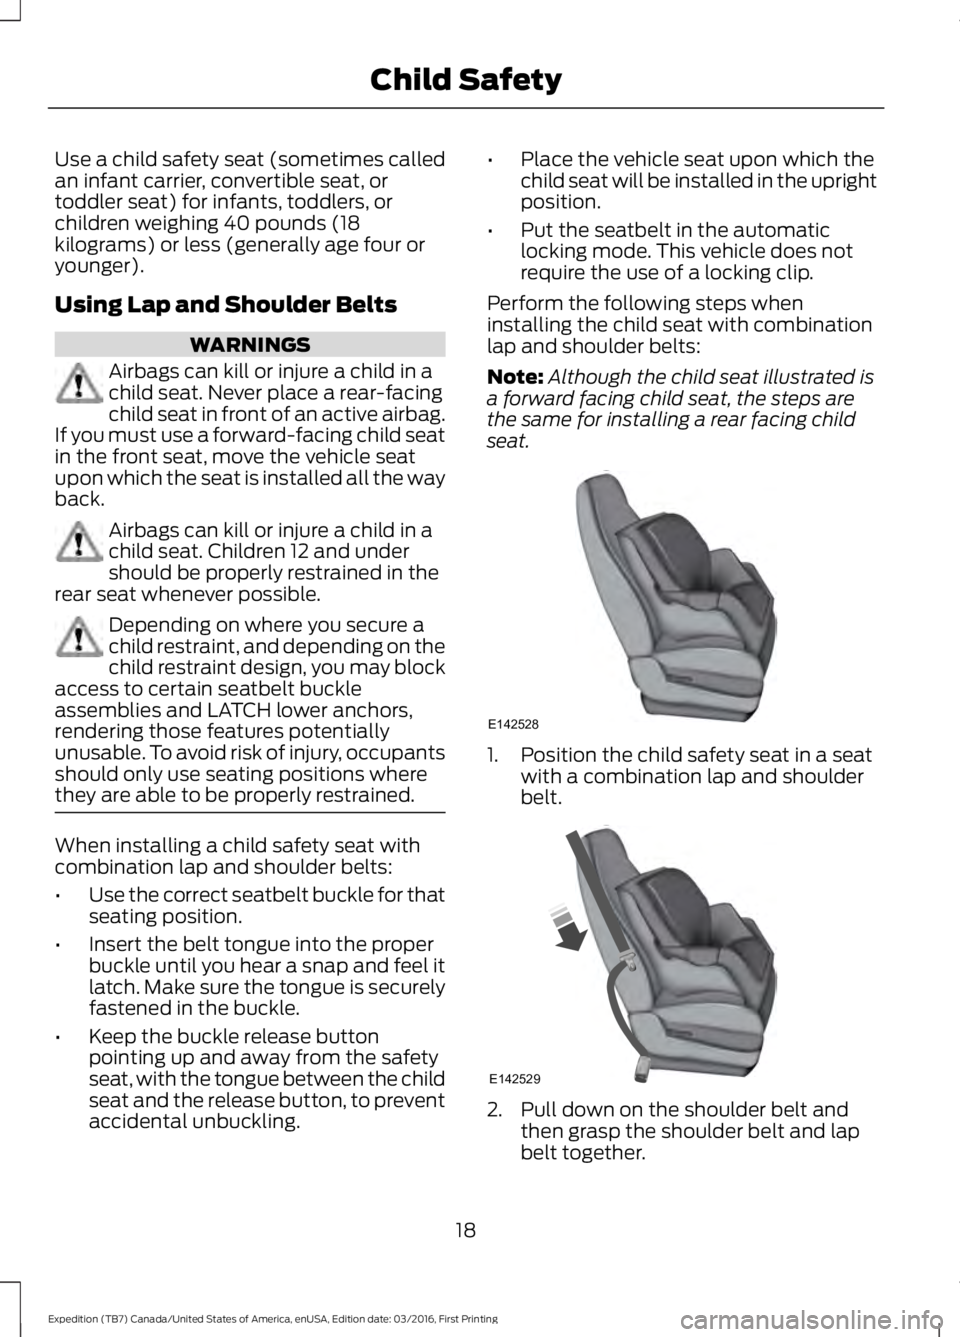
Perform the following steps wheninstalling the child seat with combinationlap and shoulder belts:
Note:Although the child seat illustrated isa forward facing child seat, the steps arethe same for installing a rear facing childseat.
1. Position the child safety seat in a seatwith a combination lap and shoulderbelt.
2. Pull down on the shoulder belt andthen grasp the shoulder belt and lapbelt together.
18
Expedition (TB7) Canada/United States of America, enUSA, Edition date: 03/2016, First Printing
Child SafetyE142528 E142529
Page 22 of 500
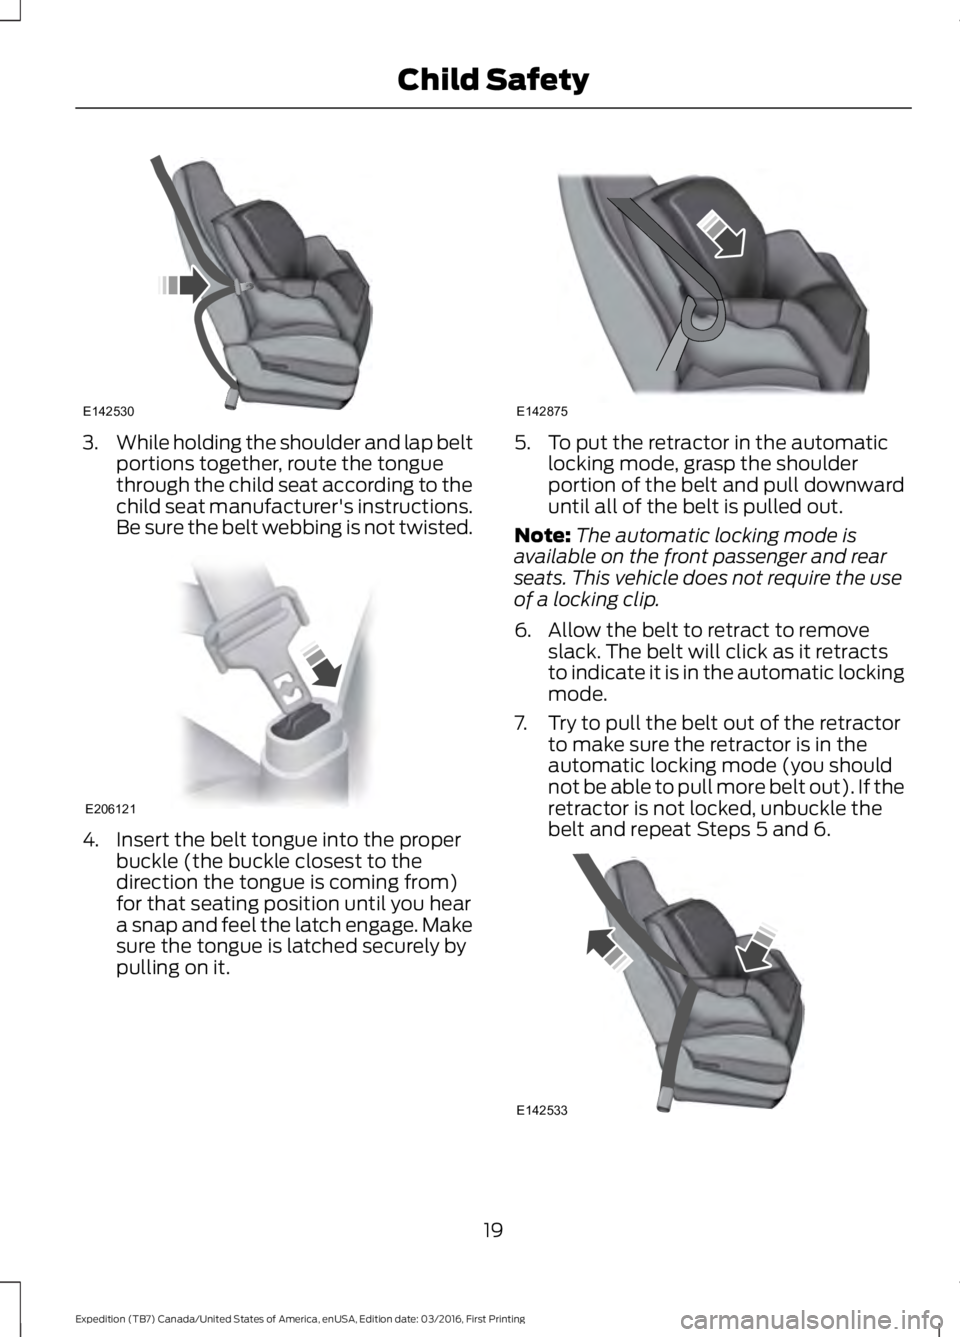
3.While holding the shoulder and lap beltportions together, route the tonguethrough the child seat according to thechild seat manufacturer's instructions.Be sure the belt webbing is not twisted.
4. Insert the belt tongue into the properbuckle (the buckle closest to thedirection the tongue is coming from)for that seating position until you heara snap and feel the latch engage. Makesure the tongue is latched securely bypulling on it.
5. To put the retractor in the automaticlocking mode, grasp the shoulderportion of the belt and pull downwarduntil all of the belt is pulled out.
Note:The automatic locking mode isavailable on the front passenger and rearseats. This vehicle does not require the useof a locking clip.
6. Allow the belt to retract to removeslack. The belt will click as it retractsto indicate it is in the automatic lockingmode.
7. Try to pull the belt out of the retractorto make sure the retractor is in theautomatic locking mode (you shouldnot be able to pull more belt out). If theretractor is not locked, unbuckle thebelt and repeat Steps 5 and 6.
19
Expedition (TB7) Canada/United States of America, enUSA, Edition date: 03/2016, First Printing
Child SafetyE142530 E206121 E142875 E142533
Page 32 of 500

PRINCIPLE OF OPERATION
WARNINGS
Always drive and ride with yourseatback upright and the lap beltsnug and low across the hips.
To reduce the risk of injury, makesure children sit where they can beproperly restrained.
Never let a passenger hold a child onhis or her lap while the vehicle ismoving. The passenger cannotprotect the child from injury in a crash,which may result in serious injury or death.
All occupants of the vehicle,including the driver, should alwaysproperly wear their safety belts, evenwhen an airbag supplemental restraintsystem is provided. Failure to properly wearyour safety belt could seriously increasethe risk of injury or death.
It is extremely dangerous to ride in acargo area, inside or outside of avehicle. In a crash, people riding inthese areas are more likely to be seriouslyinjured or killed. Do not allow people to ridein any area of your vehicle that is notequipped with seats and safety belts. Besure everyone in your vehicle is in a seatand using a safety belt properly.
In a rollover crash, an unbeltedperson is significantly more likely todie than a person wearing a safetybelt.
Each seating position in your vehiclehas a specific safety belt assemblywhich is made up of one buckle andone tongue that are designed to be usedas a pair. 1) Use the shoulder belt on theoutside shoulder only. Never wear theshoulder belt under the arm. 2) Neverswing the safety belt around your neck overthe inside shoulder. 3) Never use a singlebelt for more than one person.
WARNINGS
When possible, all children 12 yearsold and under should be properlyrestrained in a rear seating position.Failure to follow this could seriouslyincrease the risk of injury or death.
Safety belts and seats can becomehot in a vehicle that has been closedup in sunny weather; they could burna small child. Check seat covers andbuckles before you place a child anywherenear them.
Front and rear seat occupants,including pregnant women, shouldwear safety belts for optimumprotection in an accident.
All seating positions in this vehicle havelap and shoulder safety belts. Alloccupants of the vehicle should alwaysproperly wear their safety belts, even whenan airbag supplemental restraint systemis provided.
The safety belt system consists of:
•Lap and shoulder safety belts.
•Shoulder safety belt with automaticlocking mode, (except driver safetybelt).
•Height adjuster at the front outboardseating positions.
•Safety belt pretensioner at the frontoutboard seating positions.
•Safety belt warning light and chime.
•Crash sensors and monitoring systemwith readiness indicator.
29
Expedition (TB7) Canada/United States of America, enUSA, Edition date: 03/2016, First Printing
Seatbelts
Page 35 of 500
Allow the belt to retract. As the beltretracts, you will hear a clicking sound. Thisindicates the seatbelt is now in theautomatic locking mode.
How to Disengage the AutomaticLocking Mode
Unbuckle the combination lap andshoulder belt and allow it to retractcompletely to disengage the automaticlocking mode and activate the vehiclesensitive (emergency) locking mode.
SEATBELT HEIGHT
ADJUSTMENT
WARNING
Position the safety belt heightadjuster so that the belt rests acrossthe middle of your shoulder. Failureto adjust the safety belt properly couldreduce the effectiveness of the safety beltand increase the risk of injury in a crash.
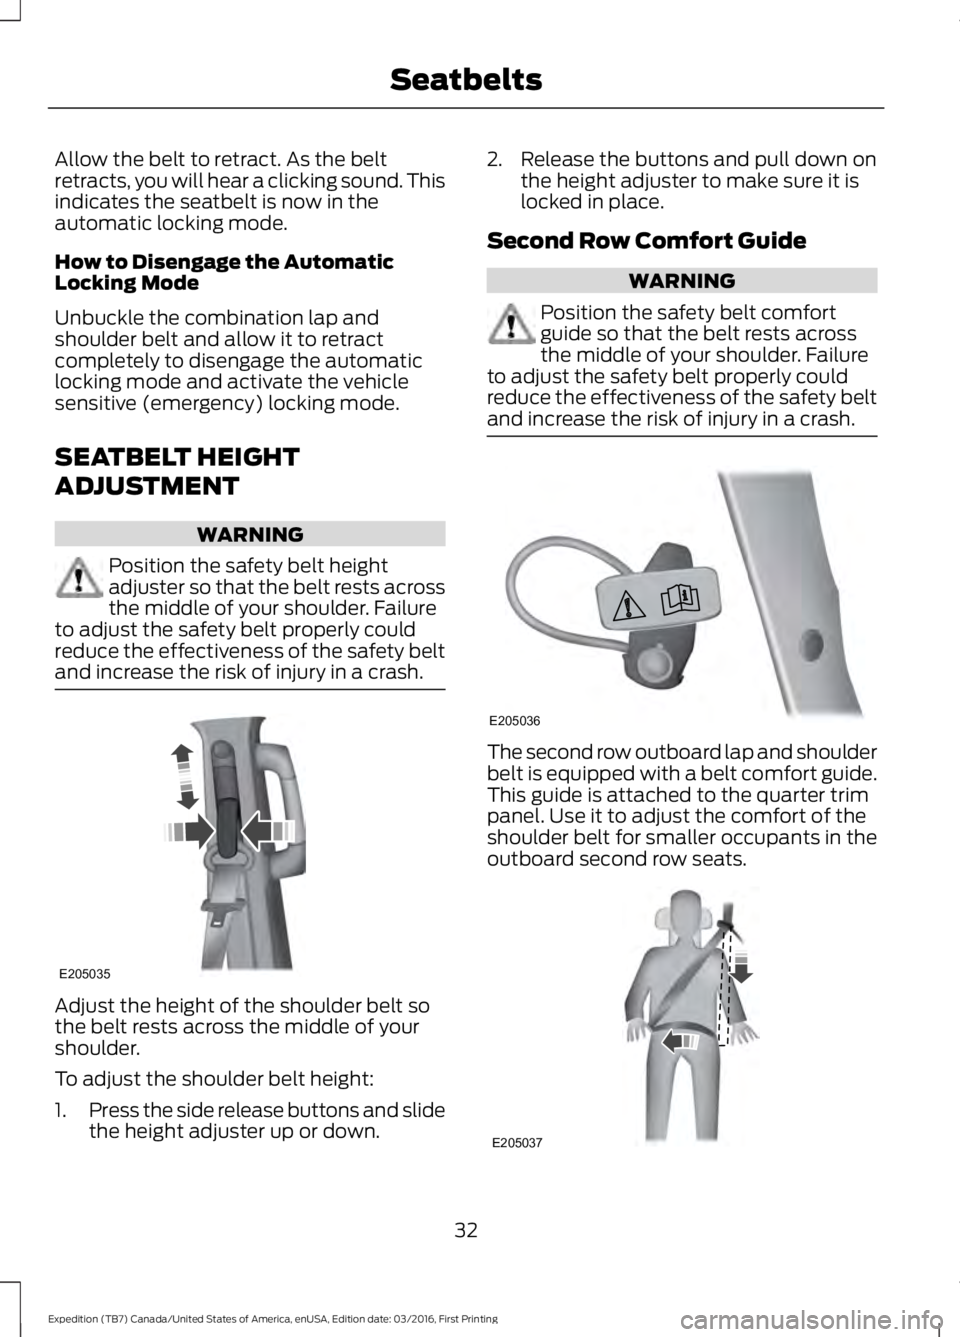
Adjust the height of the shoulder belt sothe belt rests across the middle of yourshoulder.
To adjust the shoulder belt height:
1.Press the side release buttons and slidethe height adjuster up or down.
2. Release the buttons and pull down onthe height adjuster to make sure it islocked in place.
Second Row Comfort Guide
WARNING
Position the safety belt comfortguide so that the belt rests acrossthe middle of your shoulder. Failureto adjust the safety belt properly couldreduce the effectiveness of the safety beltand increase the risk of injury in a crash.
The second row outboard lap and shoulderbelt is equipped with a belt comfort guide.This guide is attached to the quarter trimpanel. Use it to adjust the comfort of theshoulder belt for smaller occupants in theoutboard second row seats.
32
Expedition (TB7) Canada/United States of America, enUSA, Edition date: 03/2016, First Printing
SeatbeltsE205035 E205036 E205037
Page 138 of 500
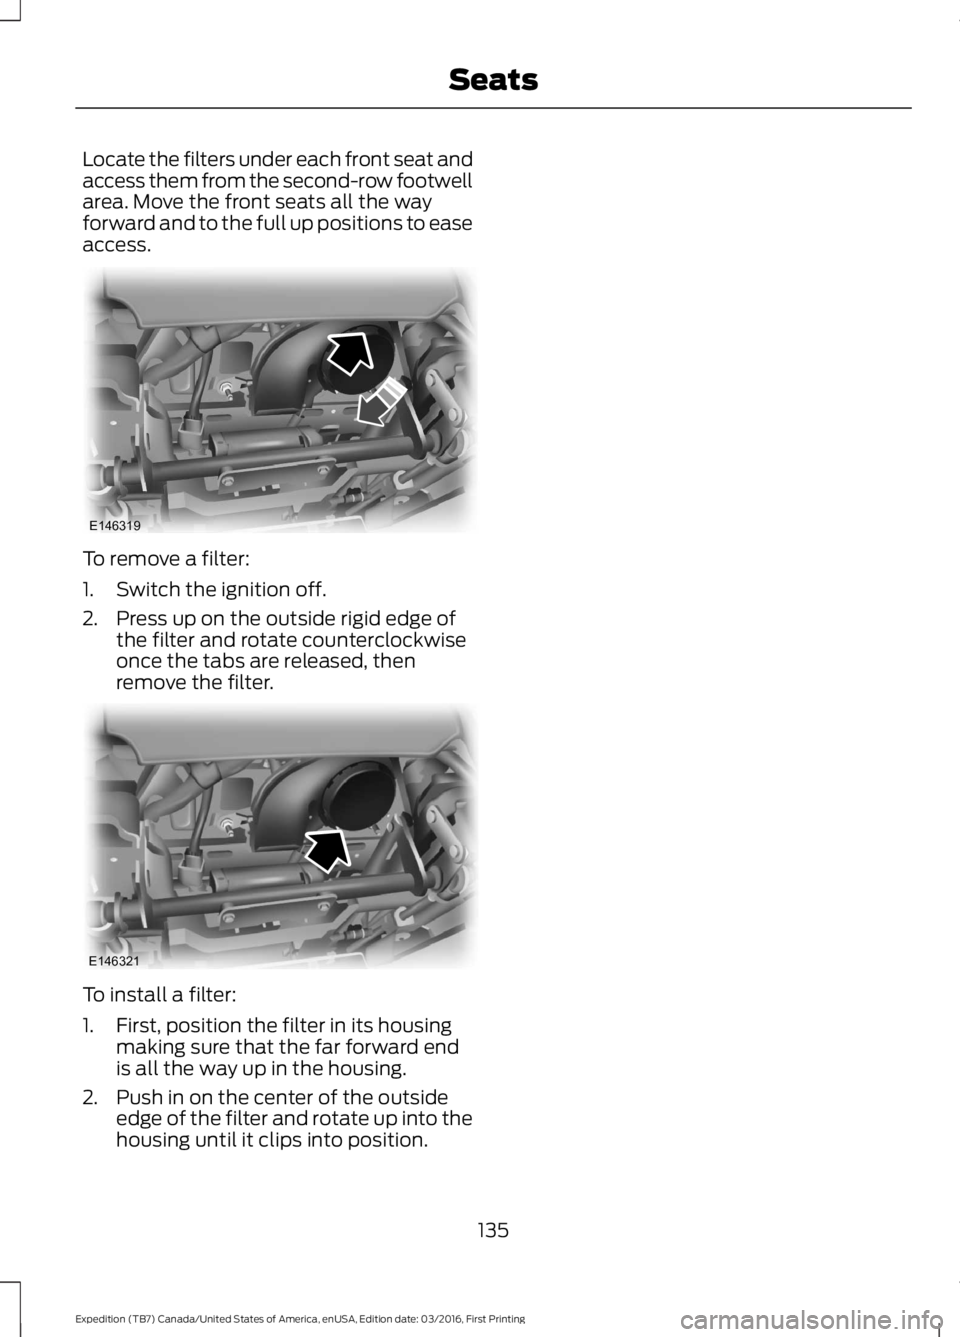
Locate the filters under each front seat andaccess them from the second-row footwellarea. Move the front seats all the wayforward and to the full up positions to easeaccess.
To remove a filter:
1. Switch the ignition off.
2. Press up on the outside rigid edge ofthe filter and rotate counterclockwiseonce the tabs are released, thenremove the filter.
To install a filter:
1. First, position the filter in its housingmaking sure that the far forward endis all the way up in the housing.
2. Push in on the center of the outsideedge of the filter and rotate up into thehousing until it clips into position.
135
Expedition (TB7) Canada/United States of America, enUSA, Edition date: 03/2016, First Printing
SeatsE146319 E146321
Page 200 of 500
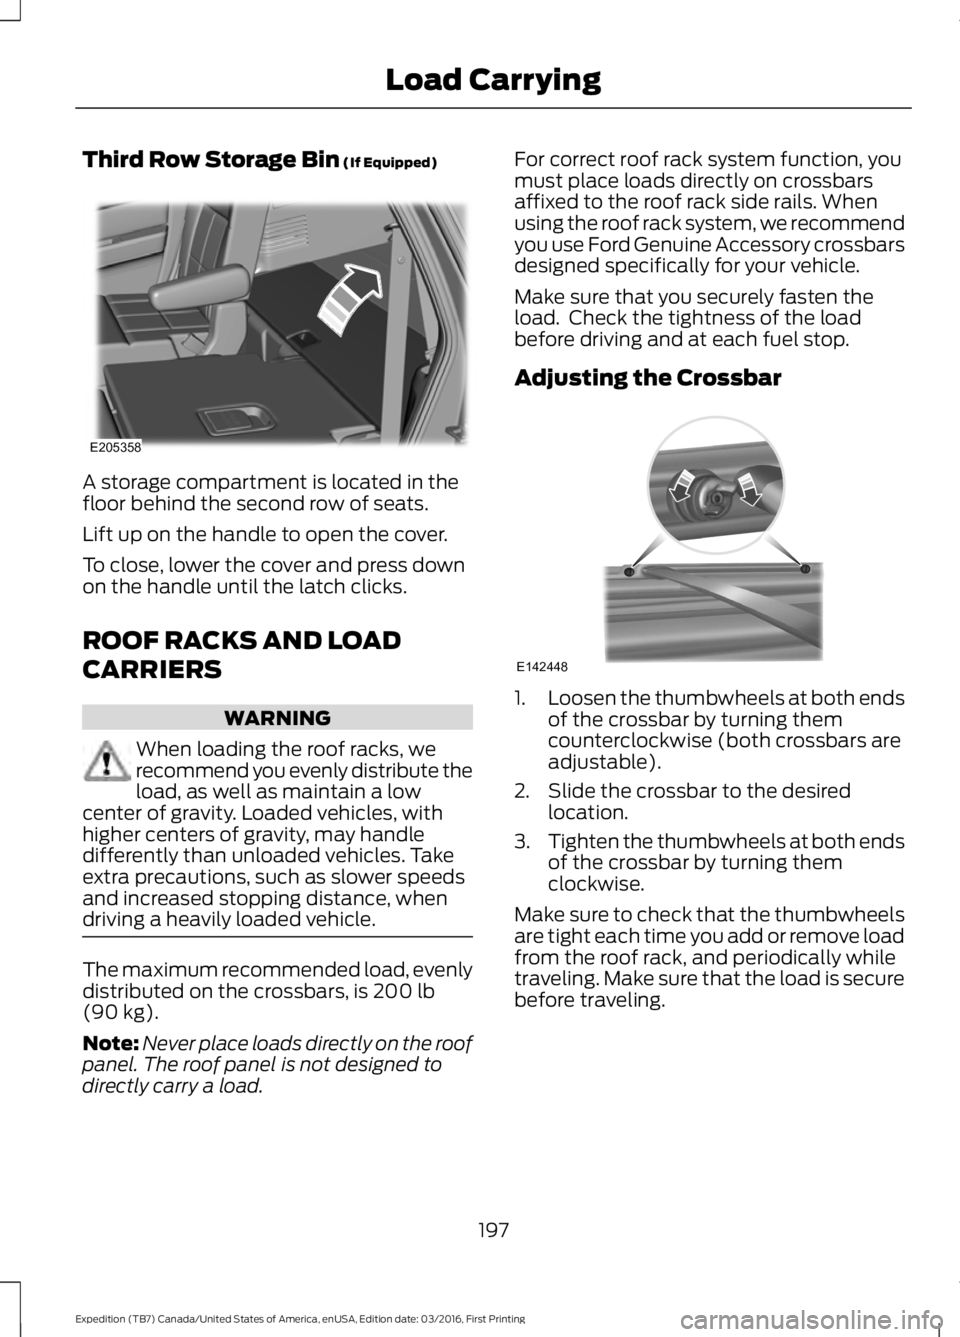
Third Row Storage Bin (If Equipped)
A storage compartment is located in thefloor behind the second row of seats.
Lift up on the handle to open the cover.
To close, lower the cover and press downon the handle until the latch clicks.
ROOF RACKS AND LOAD
CARRIERS
WARNING
When loading the roof racks, werecommend you evenly distribute theload, as well as maintain a lowcenter of gravity. Loaded vehicles, withhigher centers of gravity, may handledifferently than unloaded vehicles. Takeextra precautions, such as slower speedsand increased stopping distance, whendriving a heavily loaded vehicle.
The maximum recommended load, evenlydistributed on the crossbars, is 200 lb(90 kg).
Note:Never place loads directly on the roofpanel. The roof panel is not designed todirectly carry a load.
For correct roof rack system function, youmust place loads directly on crossbarsaffixed to the roof rack side rails. Whenusing the roof rack system, we recommendyou use Ford Genuine Accessory crossbarsdesigned specifically for your vehicle.
Make sure that you securely fasten theload. Check the tightness of the loadbefore driving and at each fuel stop.
Adjusting the Crossbar
1.Loosen the thumbwheels at both endsof the crossbar by turning themcounterclockwise (both crossbars areadjustable).
2. Slide the crossbar to the desiredlocation.
3.Tighten the thumbwheels at both endsof the crossbar by turning themclockwise.
Make sure to check that the thumbwheelsare tight each time you add or remove loadfrom the roof rack, and periodically whiletraveling. Make sure that the load is securebefore traveling.
197
Expedition (TB7) Canada/United States of America, enUSA, Edition date: 03/2016, First Printing
Load CarryingE205358 E142448
Page 249 of 500
Do not use supplemental engine oiladditives because they are unnecessaryand could lead to engine damage that maynot be covered by the vehicle Warranty.
Only use oils certified for gasoline enginesby the American Petroleum Institute (API).An oil with this trademark symbolconforms to the current engine andemission system protection standards andfuel economy requirements of theInternational Lubricants SpecificationAdvisory Committee (ILSAC).
To top up the engine oil level do thefollowing:
1. Clean the area surrounding the engineoil filler cap before you remove it.
2. Remove the engine oil filler cap. SeeUnder Hood Overview (page 244).Turn it counterclockwise and removeit.
3. Add engine oil that meets Fordspecifications. See Capacities andSpecifications (page 308). You mayhave to use a funnel to pour the engineoil into the opening.
4. Recheck the oil level.
5. If the oil level is correct, replace thedipstick and make sure it is fully seated.
6. Replace the engine oil filler cap. Turnit clockwise until you feel a strongresistance.
Note: Do not add oil further than themaximum mark. Oil levels above themaximum mark may cause engine damage.
Note:Make sure you install the oil filler capcorrectly.
Note:Soak up any spillage with anabsorbent cloth immediately.
OIL CHANGE INDICATOR
RESET
Use the information display controls onthe steering wheel to reset the oil changeindicator.
From the main menu scroll to:
Action and descriptionMessage
Press the right arrow button,then from this menu scrollto the following message.
Settings
Press the right arrow button,then from this menu scrollto the following message.
Vehicle
Press the right arrow button,then from this menu scrollto the following message.
Oil Life
Press and hold the OKbutton until the instrumentcluster displays thefollowing message.
Hold OK toReset
Reset Successful
When the oil change indic-ator resets the instrumentcluster displays 100%.
Remaining Life
{00}%
246
Expedition (TB7) Canada/United States of America, enUSA, Edition date: 03/2016, First Printing
MaintenanceE142732
Page 251 of 500
Note:Coolants marketed for all makes andmodels may not be approved to Fordspecifications and may cause damage tothe cooling system. Resulting componentdamage may not be covered by the vehicleWarranty.
If the coolant level is at or below theminimum mark, add prediluted coolantimmediately.
To top up the coolant level do thefollowing:
1. Unscrew the cap slowly. Any pressureescapes as you unscrew the cap.
2. Add prediluted coolant approved tothe correct specification. SeeCapacities and Specifications (page304).
3. Add enough prediluted coolant toreach the correct level.
4.Replace the coolant reservoir cap, turnit clockwise until you feel a strongresistance.
5. Check the coolant level in the coolantreservoir the next few times you driveyour vehicle. If necessary, add enoughprediluted engine coolant to bring thecoolant level to the correct level.
If you have to add more than 1.1 qt (1 L) ofengine coolant per month, have yourvehicle checked as soon as possible.Operating an engine with a low level ofcoolant can result in engine overheatingand possible engine damage.
Note:During normal vehicle operation, thecoolant may change color from orange topink or light red. As long as the coolant isclear and uncontaminated, this color changedoes not indicate the coolant has degradednor does it require the coolant to be drained,the system to be flushed, or the coolant tobe replaced.
Note:In case of emergency, you can add alarge amount of water without coolant inorder to reach a vehicle service location.Water alone, without coolant, can causeengine damage from corrosion, overheatingor freezing. When you reach a servicelocation, you must have the cooling systemdrained and refilled with prediluted coolantapproved to the correct specification. SeeCapacities and Specifications (page 304).
Do not use the following as a coolantsubstitute:
•Alcohol.
•Methanol.
•Brine.
•Any coolant mixed with alcohol ormethanol antifreeze.
Alcohol and other liquids can cause enginedamage from overheating or freezing.
Do not add extra inhibitors or additives tothe coolant. These can be harmful andcompromise the corrosion protection ofthe coolant.
Recycled Coolant
We do not recommend the use of recycledcoolant as an approved recycling processis not yet available.
Dispose of used engine coolant in anappropriate manner. Follow yourcommunity's regulations and standardsfor recycling and disposing of automotivefluids.
248
Expedition (TB7) Canada/United States of America, enUSA, Edition date: 03/2016, First Printing
Maintenance