2017 FORD EXPEDITION EL buttons
[x] Cancel search: buttonsPage 24 of 500
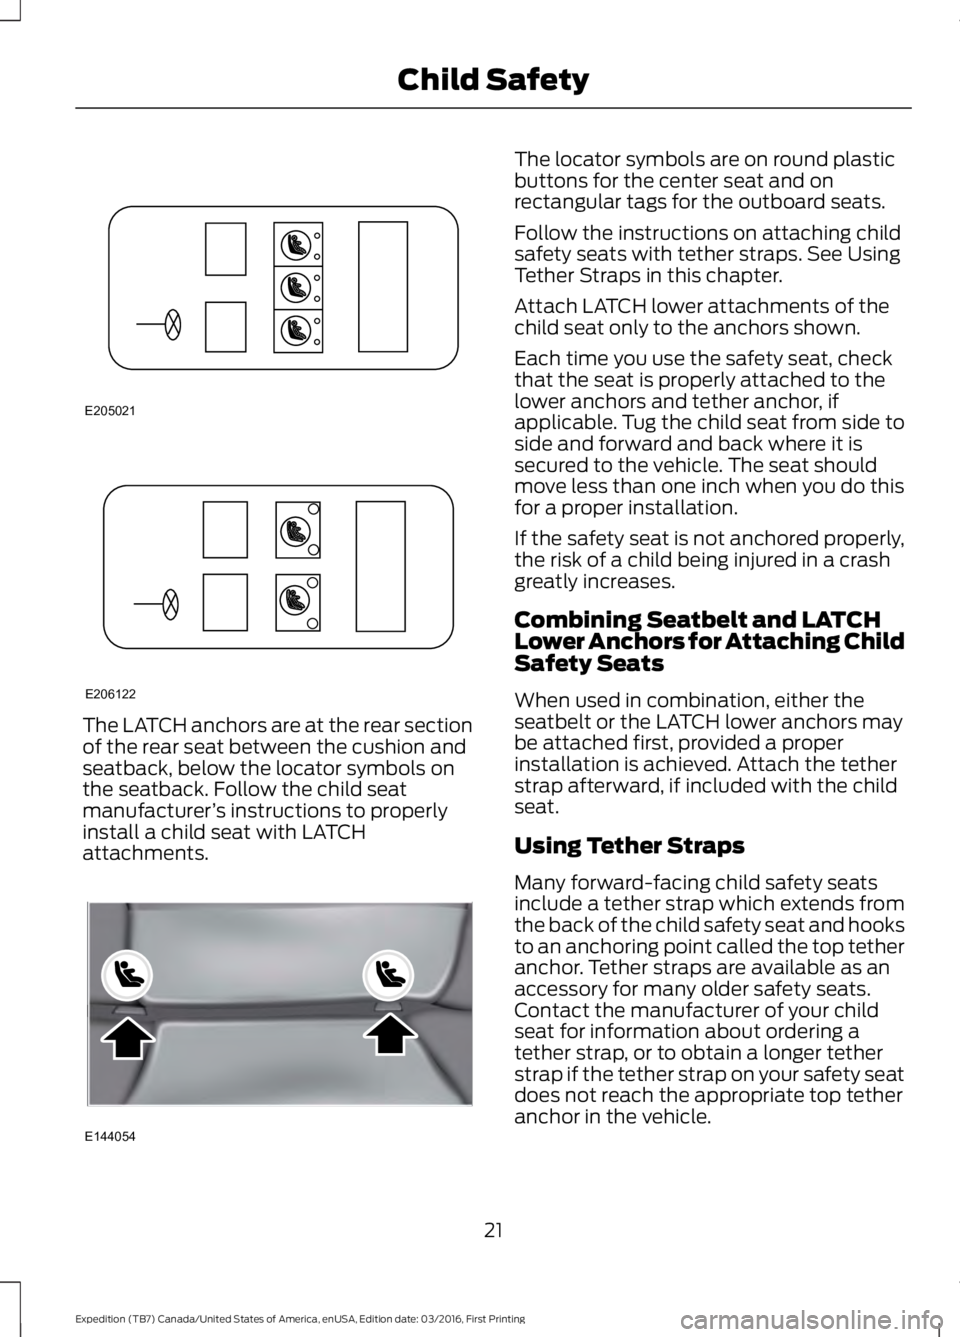
The LATCH anchors are at the rear sectionof the rear seat between the cushion andseatback, below the locator symbols onthe seatback. Follow the child seatmanufacturer’s instructions to properlyinstall a child seat with LATCHattachments.
The locator symbols are on round plasticbuttons for the center seat and onrectangular tags for the outboard seats.
Follow the instructions on attaching childsafety seats with tether straps. See UsingTether Straps in this chapter.
Attach LATCH lower attachments of thechild seat only to the anchors shown.
Each time you use the safety seat, checkthat the seat is properly attached to thelower anchors and tether anchor, ifapplicable. Tug the child seat from side toside and forward and back where it issecured to the vehicle. The seat shouldmove less than one inch when you do thisfor a proper installation.
If the safety seat is not anchored properly,the risk of a child being injured in a crashgreatly increases.
Combining Seatbelt and LATCHLower Anchors for Attaching ChildSafety Seats
When used in combination, either theseatbelt or the LATCH lower anchors maybe attached first, provided a properinstallation is achieved. Attach the tetherstrap afterward, if included with the childseat.
Using Tether Straps
Many forward-facing child safety seatsinclude a tether strap which extends fromthe back of the child safety seat and hooksto an anchoring point called the top tetheranchor. Tether straps are available as anaccessory for many older safety seats.Contact the manufacturer of your childseat for information about ordering atether strap, or to obtain a longer tetherstrap if the tether strap on your safety seatdoes not reach the appropriate top tetheranchor in the vehicle.
21
Expedition (TB7) Canada/United States of America, enUSA, Edition date: 03/2016, First Printing
Child SafetyE205021 E206122 E144054
Page 35 of 500
Allow the belt to retract. As the beltretracts, you will hear a clicking sound. Thisindicates the seatbelt is now in theautomatic locking mode.
How to Disengage the AutomaticLocking Mode
Unbuckle the combination lap andshoulder belt and allow it to retractcompletely to disengage the automaticlocking mode and activate the vehiclesensitive (emergency) locking mode.
SEATBELT HEIGHT
ADJUSTMENT
WARNING
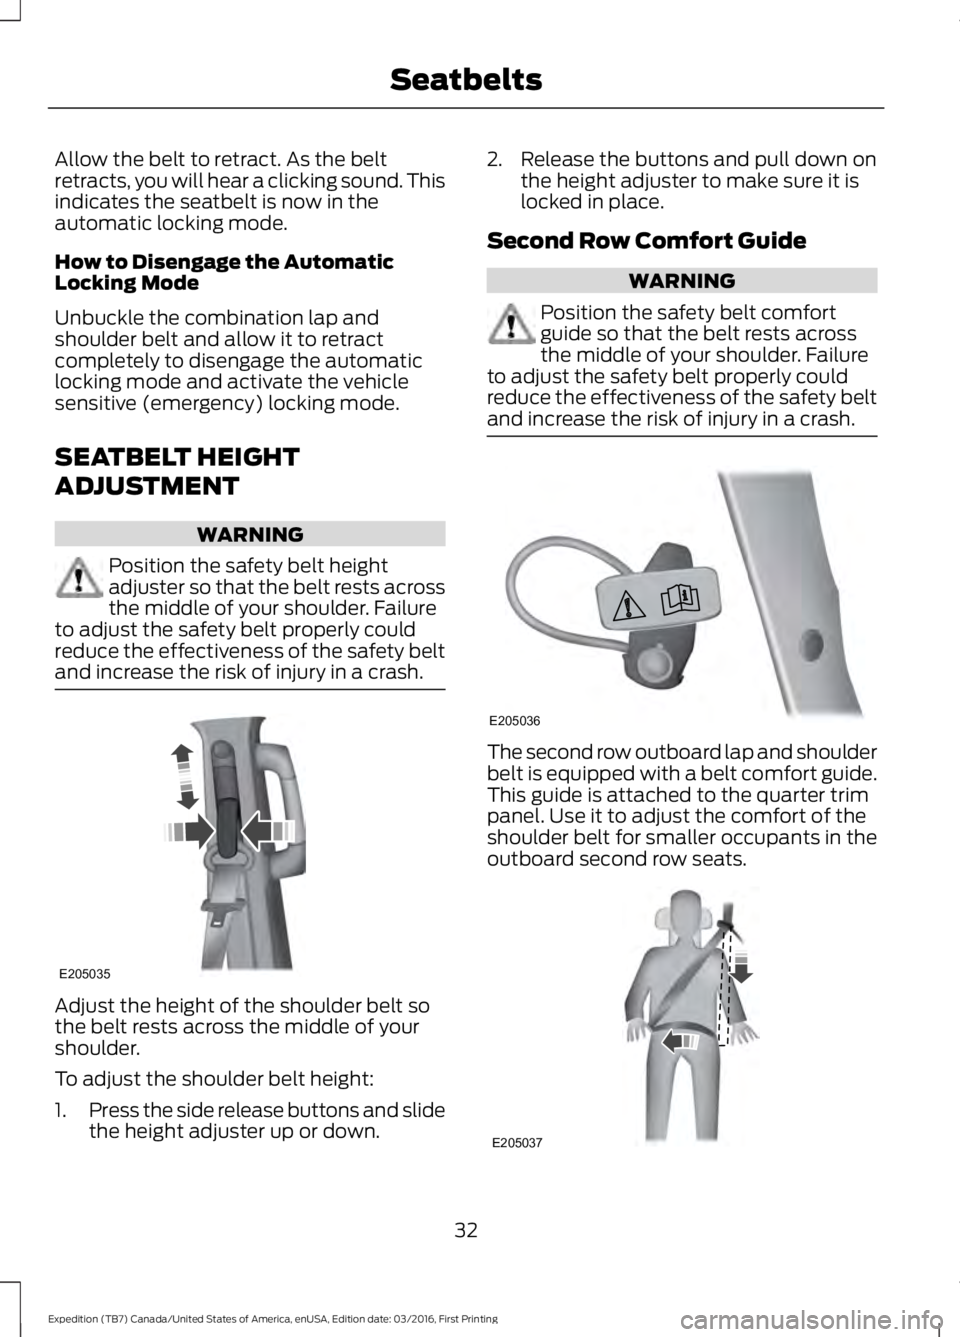
Position the safety belt heightadjuster so that the belt rests acrossthe middle of your shoulder. Failureto adjust the safety belt properly couldreduce the effectiveness of the safety beltand increase the risk of injury in a crash.
Adjust the height of the shoulder belt sothe belt rests across the middle of yourshoulder.
To adjust the shoulder belt height:
1.Press the side release buttons and slidethe height adjuster up or down.
2. Release the buttons and pull down onthe height adjuster to make sure it islocked in place.
Second Row Comfort Guide
WARNING
Position the safety belt comfortguide so that the belt rests acrossthe middle of your shoulder. Failureto adjust the safety belt properly couldreduce the effectiveness of the safety beltand increase the risk of injury in a crash.
The second row outboard lap and shoulderbelt is equipped with a belt comfort guide.This guide is attached to the quarter trimpanel. Use it to adjust the comfort of theshoulder belt for smaller occupants in theoutboard second row seats.
32
Expedition (TB7) Canada/United States of America, enUSA, Edition date: 03/2016, First Printing
SeatbeltsE205035 E205036 E205037
Page 55 of 500

LOCKING AND UNLOCKING
You can use the power door lock controlor the remote control to lock and unlockyour vehicle.
Power Door Locks
The power door lock control is on the driverand front passenger door panels.
Unlock.A
Lock.B
Remote Control (If Equipped)
Unlocking the Doors (Two-StageUnlock)
Press the button to unlock thedriver door.
Press the button again within threeseconds to unlock all doors. The directionindicators will flash.
Press and hold both the lock and unlockbuttons on the remote control for threeseconds to change between driver door orall doors unlock mode. The directionindicators flash twice to indicate a changeto the unlocking mode. Driver door unlockmode only unlocks the driver door whenyou press the unlock button once. All doorunlock mode unlocks all doors when youpress the unlock button once. The
unlocking mode applies to the remotecontrol, keyless entry keypad andintelligent access. You can also changebetween the unlocking modes using theinformation display. See InformationDisplays (page 91).
Locking the Doors
Press the button to lock alldoors. The direction indicatorswill flash.
Press the button again within threeseconds to confirm that all the doors areclosed. The doors will lock again, the hornwill sound and the direction indicators willflash if all the doors and the liftgate areclosed.
Note:If the system does not function, usethe key blade to lock and unlock yourvehicle.
Mislock
If any door or the liftgate is open, or if thehood is open on vehicles with an anti-theftalarm or remote start, the horn soundstwice and the direction indicators do notflash. You can switch this feature on or offin the information display. SeeInformation Displays (page 91).
Opening the Liftgate
Press twice within three secondsto open the liftgate.
Activating Intelligent Access (If
Equipped)
The intelligent access key must be within3 ft (1 m) of the driver door or liftgate.
At a Door
You can use the keyless entry keypad tolock and unlock the doors. See KeylessEntry (page 58).
52
Expedition (TB7) Canada/United States of America, enUSA, Edition date: 03/2016, First Printing
Doors and LocksABE163049 E138629 E138623 E138630
Page 94 of 500
GENERAL INFORMATION
WARNING
Driving while distracted can result inloss of vehicle control, crash andinjury. We strongly recommend thatyou use extreme caution when using anydevice that may take your focus off theroad. Your primary responsibility is the safeoperation of your vehicle. We recommendagainst the use of any handheld devicewhile driving and encourage the use ofvoice-operated systems when possible.Make sure you are aware of all applicablelocal laws that may affect the use ofelectronic devices while driving.
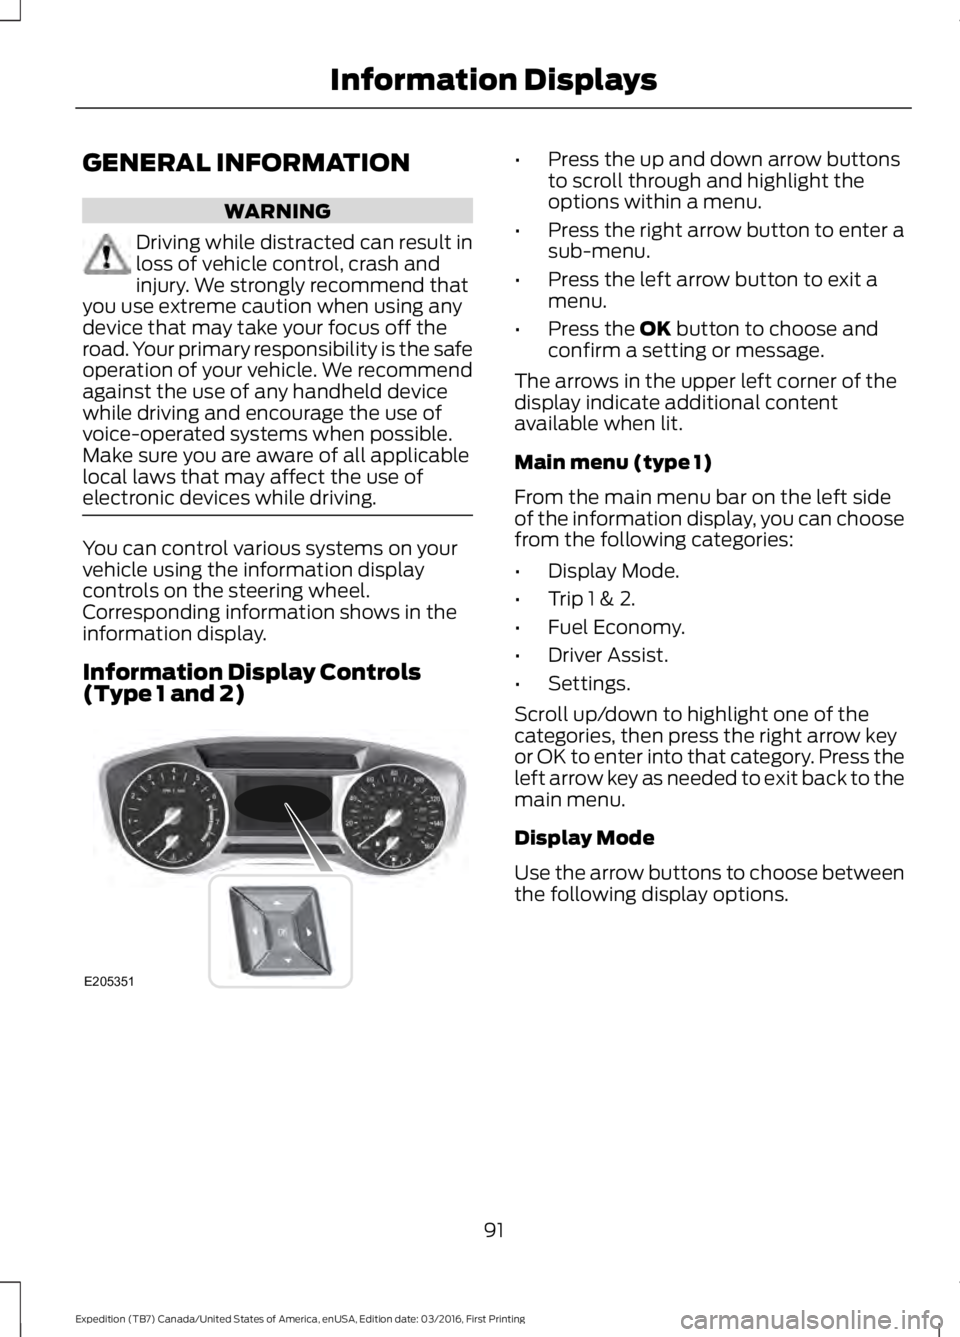
You can control various systems on yourvehicle using the information displaycontrols on the steering wheel.Corresponding information shows in theinformation display.
Information Display Controls(Type 1 and 2)
•Press the up and down arrow buttonsto scroll through and highlight theoptions within a menu.
•Press the right arrow button to enter asub-menu.
•Press the left arrow button to exit amenu.
•Press the OK button to choose andconfirm a setting or message.
The arrows in the upper left corner of thedisplay indicate additional contentavailable when lit.
Main menu (type 1)
From the main menu bar on the left sideof the information display, you can choosefrom the following categories:
•Display Mode.
•Trip 1 & 2.
•Fuel Economy.
•Driver Assist.
•Settings.
Scroll up/down to highlight one of thecategories, then press the right arrow keyor OK to enter into that category. Press theleft arrow key as needed to exit back to themain menu.
Display Mode
Use the arrow buttons to choose betweenthe following display options.
91
Expedition (TB7) Canada/United States of America, enUSA, Edition date: 03/2016, First Printing
Information DisplaysE205351
Page 95 of 500
Display Mode
Distance to E
Digital Speedo
Oil Press
Oil Temp
Trans Temp
Trip 1 & 2
Use the arrow buttons to choose betweenthe following.
Note:Pressing OK stops/starts the timer.Holding OK resets the odometer and timer.
Trip 1 & 2
Trip Odometer
Trip Timer
Average Fuel
•Trip Odometer — Registers thedistance traveled of individual journeys.
•Trip Timer — Registers the time ofindividual journeys.
•Average Fuel— Indicates the averagefuel consumption since the functionwas last reset.
Fuel Economy
Use the arrow buttons to choose thedesired energy display.
Fuel Economy
Distance to E
Inst Fuel Econ
Long Term Average Fuel
Average Speed
Driver Assist
In this mode, you can configure differentdriver setting choices.
Note:Some items are optional and maynot appear.
92
Expedition (TB7) Canada/United States of America, enUSA, Edition date: 03/2016, First Printing
Information Displays
Page 97 of 500
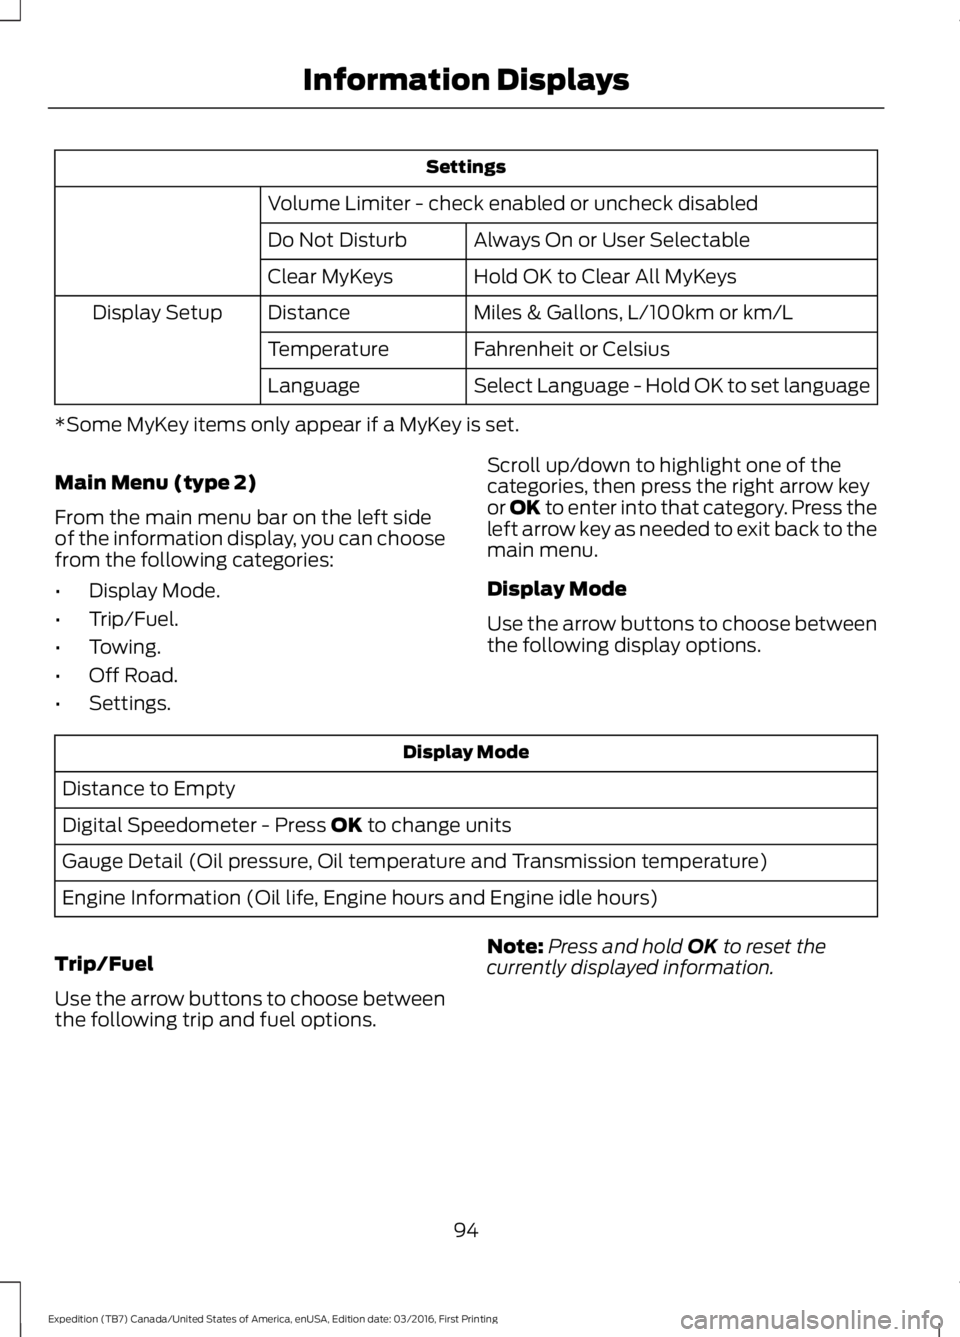
Settings
Volume Limiter - check enabled or uncheck disabled
Always On or User SelectableDo Not Disturb
Hold OK to Clear All MyKeysClear MyKeys
Miles & Gallons, L/100km or km/LDistanceDisplay Setup
Fahrenheit or CelsiusTemperature
Select Language - Hold OK to set languageLanguage
*Some MyKey items only appear if a MyKey is set.
Main Menu (type 2)
From the main menu bar on the left sideof the information display, you can choosefrom the following categories:
•Display Mode.
•Trip/Fuel.
•Towing.
•Off Road.
•Settings.
Scroll up/down to highlight one of thecategories, then press the right arrow keyor OK to enter into that category. Press theleft arrow key as needed to exit back to themain menu.
Display Mode
Use the arrow buttons to choose betweenthe following display options.
Display Mode
Distance to Empty
Digital Speedometer - Press OK to change units
Gauge Detail (Oil pressure, Oil temperature and Transmission temperature)
Engine Information (Oil life, Engine hours and Engine idle hours)
Trip/Fuel
Use the arrow buttons to choose betweenthe following trip and fuel options.
Note:Press and hold OK to reset thecurrently displayed information.
94
Expedition (TB7) Canada/United States of America, enUSA, Edition date: 03/2016, First Printing
Information Displays
Page 98 of 500
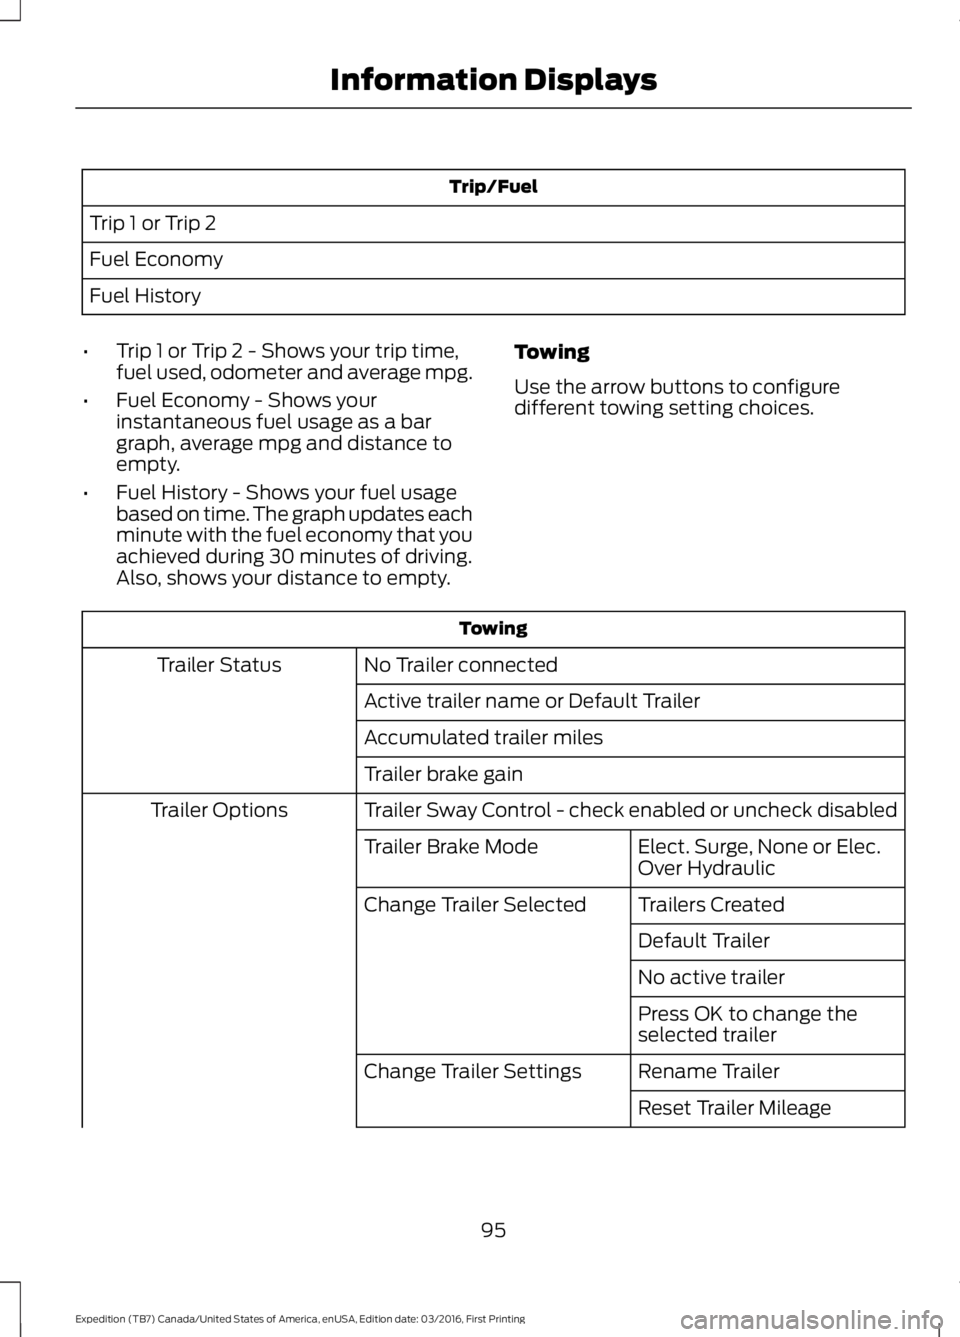
Trip/Fuel
Trip 1 or Trip 2
Fuel Economy
Fuel History
•Trip 1 or Trip 2 - Shows your trip time,fuel used, odometer and average mpg.
•Fuel Economy - Shows yourinstantaneous fuel usage as a bargraph, average mpg and distance toempty.
•Fuel History - Shows your fuel usagebased on time. The graph updates eachminute with the fuel economy that youachieved during 30 minutes of driving.Also, shows your distance to empty.
Towing
Use the arrow buttons to configuredifferent towing setting choices.
Towing
No Trailer connectedTrailer Status
Active trailer name or Default Trailer
Accumulated trailer miles
Trailer brake gain
Trailer Sway Control - check enabled or uncheck disabledTrailer Options
Elect. Surge, None or Elec.Over HydraulicTrailer Brake Mode
Trailers CreatedChange Trailer Selected
Default Trailer
No active trailer
Press OK to change theselected trailer
Rename TrailerChange Trailer Settings
Reset Trailer Mileage
95
Expedition (TB7) Canada/United States of America, enUSA, Edition date: 03/2016, First Printing
Information Displays
Page 101 of 500
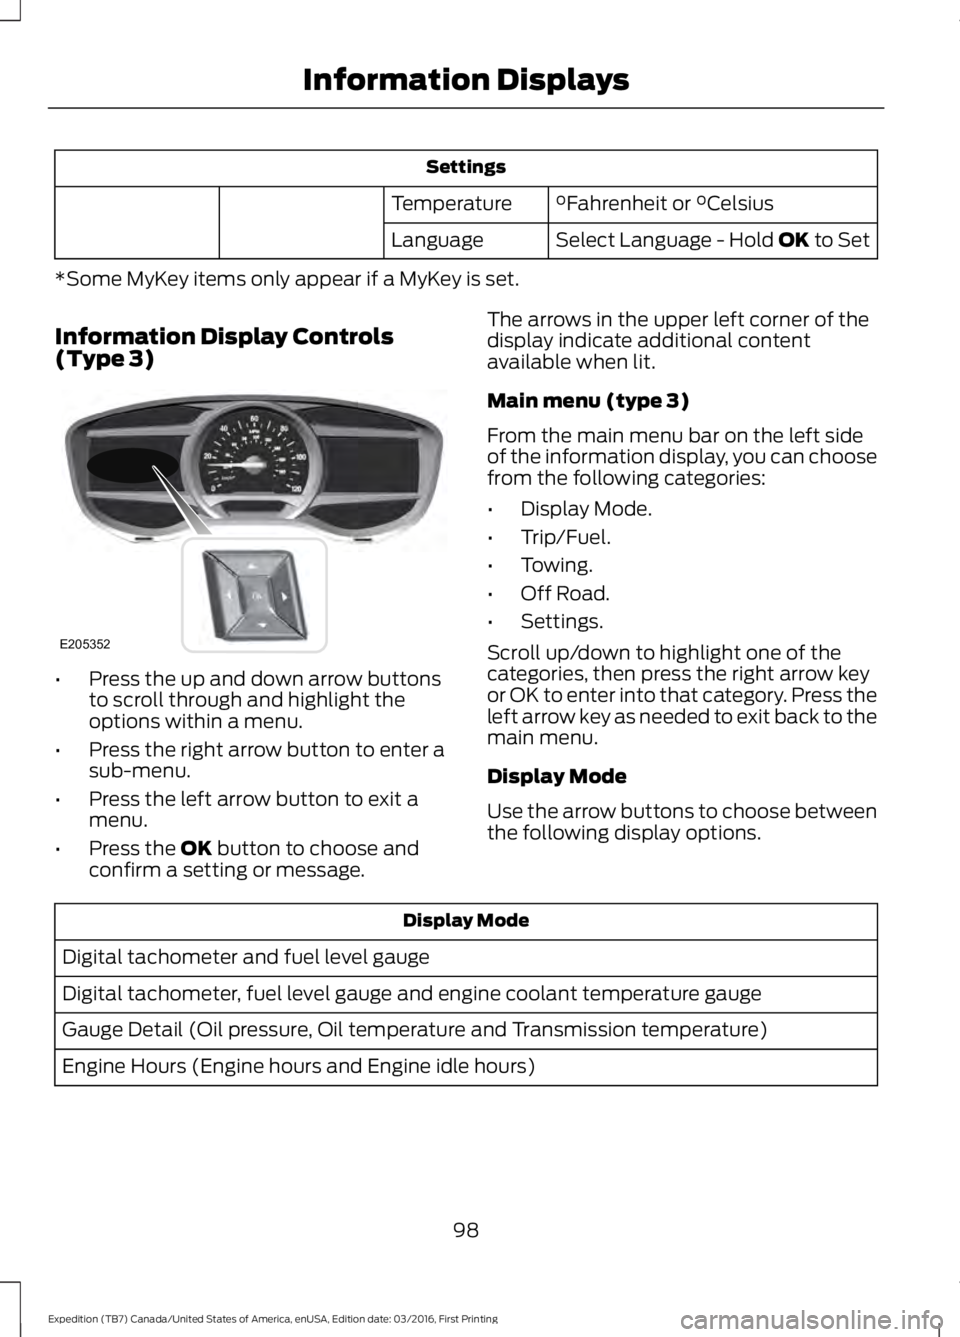
Settings
°Fahrenheit or °CelsiusTemperature
Select Language - Hold OK to SetLanguage
*Some MyKey items only appear if a MyKey is set.
Information Display Controls(Type 3)
•Press the up and down arrow buttonsto scroll through and highlight theoptions within a menu.
•Press the right arrow button to enter asub-menu.
•Press the left arrow button to exit amenu.
•Press the OK button to choose andconfirm a setting or message.
The arrows in the upper left corner of thedisplay indicate additional contentavailable when lit.
Main menu (type 3)
From the main menu bar on the left sideof the information display, you can choosefrom the following categories:
•Display Mode.
•Trip/Fuel.
•Towing.
•Off Road.
•Settings.
Scroll up/down to highlight one of thecategories, then press the right arrow keyor OK to enter into that category. Press theleft arrow key as needed to exit back to themain menu.
Display Mode
Use the arrow buttons to choose betweenthe following display options.
Display Mode
Digital tachometer and fuel level gauge
Digital tachometer, fuel level gauge and engine coolant temperature gauge
Gauge Detail (Oil pressure, Oil temperature and Transmission temperature)
Engine Hours (Engine hours and Engine idle hours)
98
Expedition (TB7) Canada/United States of America, enUSA, Edition date: 03/2016, First Printing
Information DisplaysE205352