2017 FORD EXPEDITION EL clock
[x] Cancel search: clockPage 305 of 500
5. Remove the jack and fully tighten thelug nuts in the order shown. SeeTechnical Specifications (page 302).
Stowing the Flat or Spare Tire
1.Lay the tire on the ground, near the rearof the vehicle, with the valve stem sidefacing up.
2. Slide the wheel partially under thevehicle and install the retainer throughthe wheel center. If equipped, you mayhave to remove the wheel center capprior to pushing the retainer throughthe center of the wheel. To remove thecenter cap, press it off with the jacktool from the inner side of the wheel.Pull on the cable to align thecomponents at the end of the cable.
3. Assemble the jack handle and winchextension, then insert the winchextension through the access holebehind the third row seat and engagethe winch.
4. Turn the jack handle clockwise untilthe tire is raised to its stowed positionunderneath the vehicle. The wrenchwill become harder to turn and thespare tire winch will rachet or slip whenthe tire is raised to maximum tightness.A clicking sound will be heard from thewinch indicating that the tire is properlystowed.
5. Disassembly the jack tool and winchextension and snap them back into thetool tray.
6. Reinstall the jack bag properly aroundthe jack and tool assembly tray, makingsure the strap is fastened.
7. Close the access hole with the rubberplug.
8. Reinstall the tray into the vehicle andsecure it with the wing nut.
TECHNICAL SPECIFICATIONS
Wheel Lug Nut Torque Specifications
WARNING
When you install a wheel, always remove any corrosion, dirt or foreign materialspresent on the mounting surfaces of the wheel or the surface of the wheel hub,brake drum or brake disc that contacts the wheel. Make sure to secure any fastenersthat attach the rotor to the hub so they do not interfere with the mounting surfaces ofthe wheel. Installing wheels without correct metal-to-metal contact at the wheel mountingsurfaces can cause the wheel nuts to loosen and the wheel to come off while your vehicleis in motion, resulting in loss of vehicle control, personal injury or death.
lb.ft (Nm)Bolt size
150 lb.ft (204 Nm)M14 x 1.5
*Torque specifications are for nut and bolt threads free of dirt and rust. Use only Fordrecommended replacement fasteners.
Retighten the lug nuts to the specified torque within 100 miles (160 kilometers) after anywheel disturbance (such as tire rotation, changing a flat tire, wheel removal).
302
Expedition (TB7) Canada/United States of America, enUSA, Edition date: 03/2016, First Printing
Wheels and Tires
Page 319 of 500
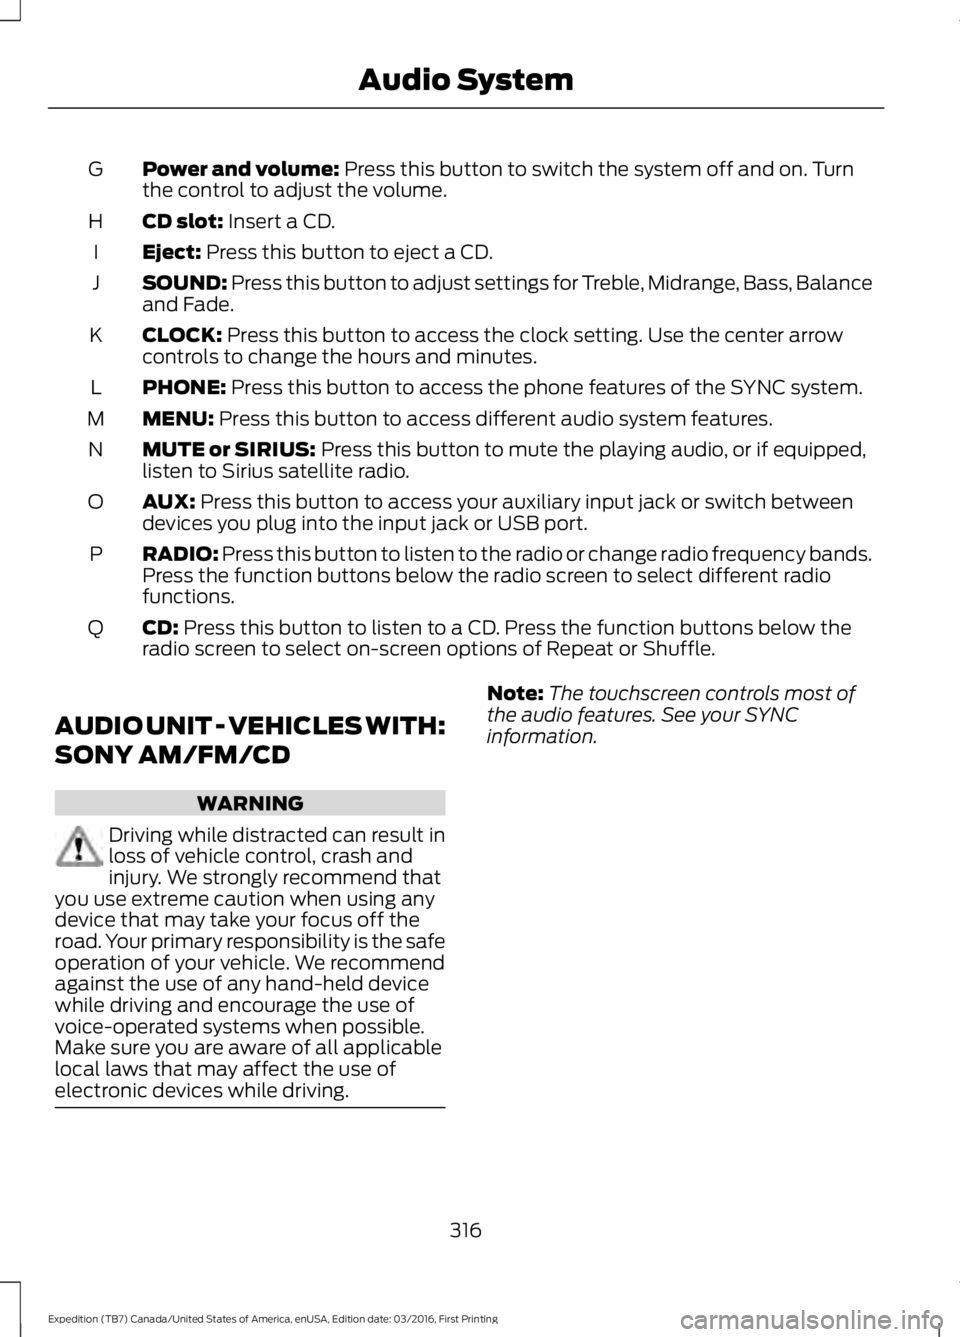
Power and volume: Press this button to switch the system off and on. Turnthe control to adjust the volume.G
CD slot: Insert a CD.H
Eject: Press this button to eject a CD.I
SOUND: Press this button to adjust settings for Treble, Midrange, Bass, Balanceand Fade.J
CLOCK: Press this button to access the clock setting. Use the center arrowcontrols to change the hours and minutes.K
PHONE: Press this button to access the phone features of the SYNC system.L
MENU: Press this button to access different audio system features.M
MUTE or SIRIUS: Press this button to mute the playing audio, or if equipped,listen to Sirius satellite radio.N
AUX: Press this button to access your auxiliary input jack or switch betweendevices you plug into the input jack or USB port.O
RADIO: Press this button to listen to the radio or change radio frequency bands.Press the function buttons below the radio screen to select different radiofunctions.
P
CD: Press this button to listen to a CD. Press the function buttons below theradio screen to select on-screen options of Repeat or Shuffle.Q
AUDIO UNIT - VEHICLES WITH:
SONY AM/FM/CD
WARNING
Driving while distracted can result inloss of vehicle control, crash andinjury. We strongly recommend thatyou use extreme caution when using anydevice that may take your focus off theroad. Your primary responsibility is the safeoperation of your vehicle. We recommendagainst the use of any hand-held devicewhile driving and encourage the use ofvoice-operated systems when possible.Make sure you are aware of all applicablelocal laws that may affect the use ofelectronic devices while driving.
Note:The touchscreen controls most ofthe audio features. See your SYNCinformation.
316
Expedition (TB7) Canada/United States of America, enUSA, Edition date: 03/2016, First Printing
Audio System
Page 321 of 500
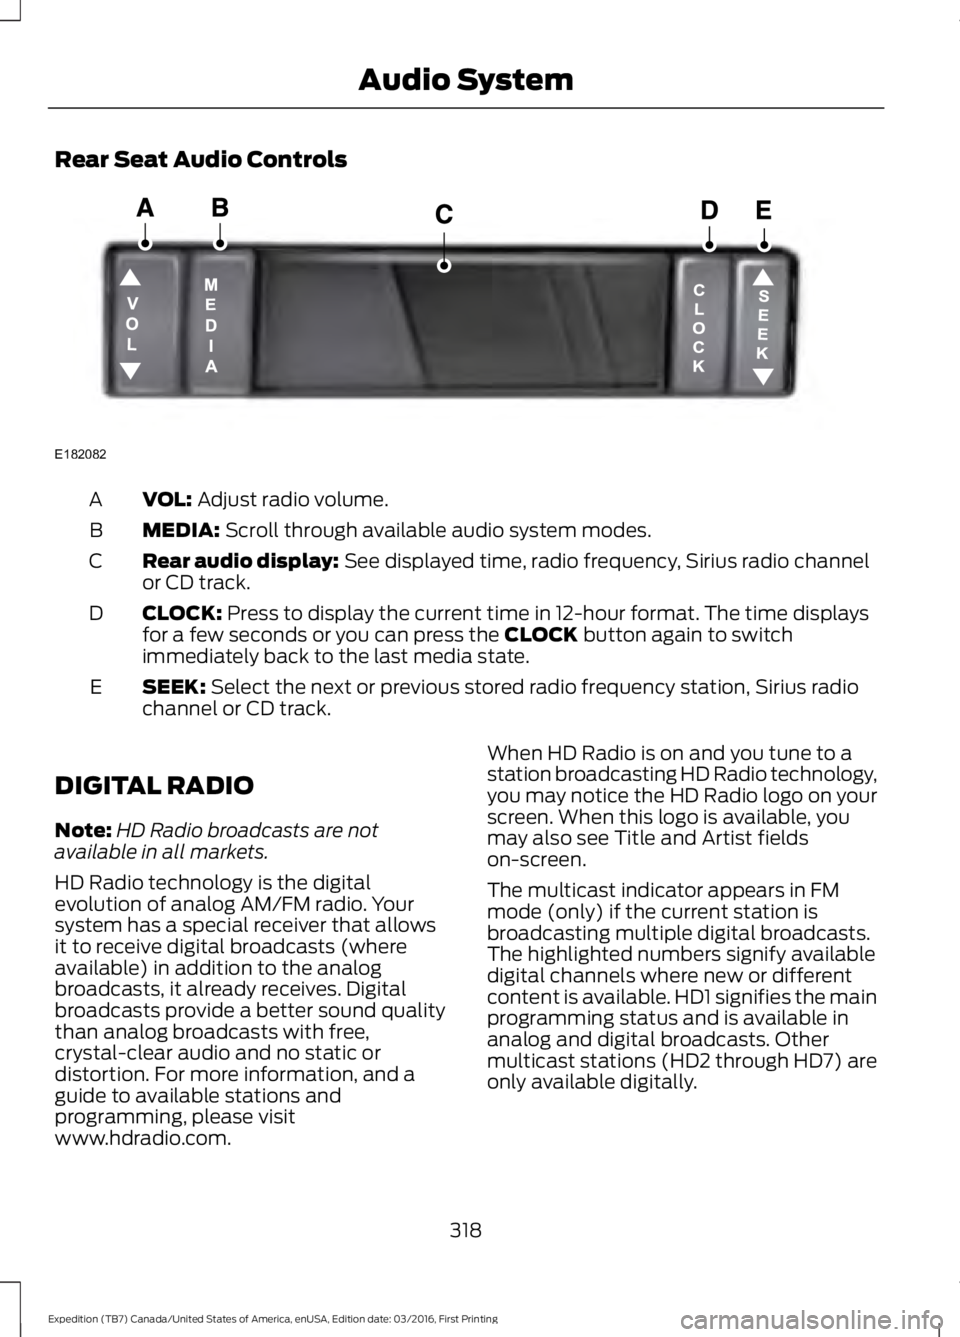
Rear Seat Audio Controls
VOL: Adjust radio volume.A
MEDIA: Scroll through available audio system modes.B
Rear audio display: See displayed time, radio frequency, Sirius radio channelor CD track.C
CLOCK: Press to display the current time in 12-hour format. The time displaysfor a few seconds or you can press the CLOCK button again to switchimmediately back to the last media state.
D
SEEK: Select the next or previous stored radio frequency station, Sirius radiochannel or CD track.E
DIGITAL RADIO
Note:HD Radio broadcasts are notavailable in all markets.
HD Radio technology is the digitalevolution of analog AM/FM radio. Yoursystem has a special receiver that allowsit to receive digital broadcasts (whereavailable) in addition to the analogbroadcasts, it already receives. Digitalbroadcasts provide a better sound qualitythan analog broadcasts with free,crystal-clear audio and no static ordistortion. For more information, and aguide to available stations andprogramming, please visitwww.hdradio.com.
When HD Radio is on and you tune to astation broadcasting HD Radio technology,you may notice the HD Radio logo on yourscreen. When this logo is available, youmay also see Title and Artist fieldson-screen.
The multicast indicator appears in FMmode (only) if the current station isbroadcasting multiple digital broadcasts.The highlighted numbers signify availabledigital channels where new or differentcontent is available. HD1 signifies the mainprogramming status and is available inanalog and digital broadcasts. Othermulticast stations (HD2 through HD7) areonly available digitally.
318
Expedition (TB7) Canada/United States of America, enUSA, Edition date: 03/2016, First Printing
Audio SystemE182082
Page 369 of 500
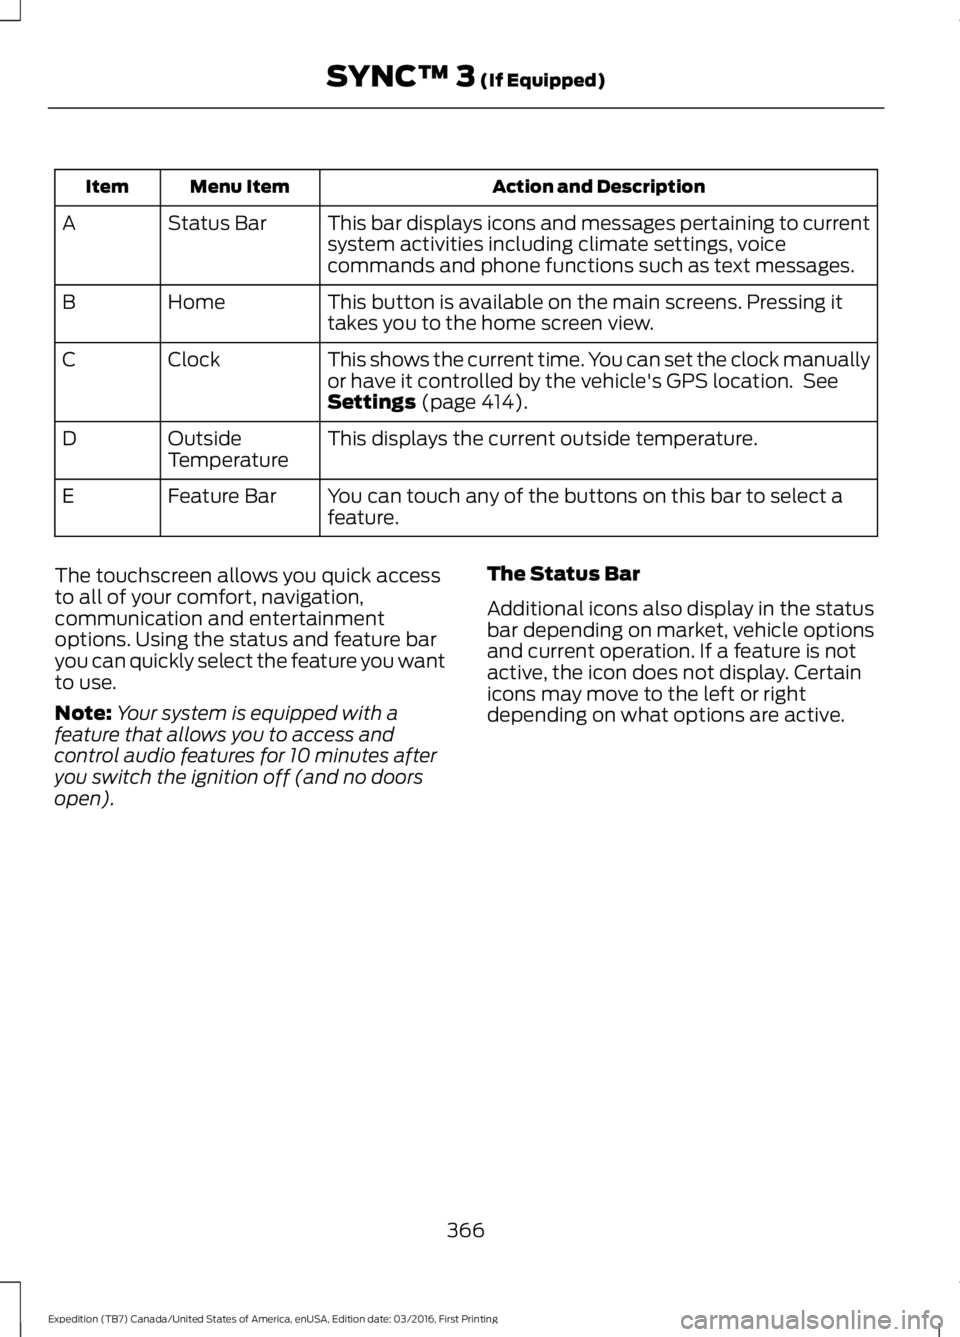
Action and DescriptionMenu ItemItem
This bar displays icons and messages pertaining to currentsystem activities including climate settings, voicecommands and phone functions such as text messages.
Status BarA
This button is available on the main screens. Pressing ittakes you to the home screen view.HomeB
This shows the current time. You can set the clock manuallyor have it controlled by the vehicle's GPS location. SeeSettings (page 414).
ClockC
This displays the current outside temperature.OutsideTemperatureD
You can touch any of the buttons on this bar to select afeature.Feature BarE
The touchscreen allows you quick accessto all of your comfort, navigation,communication and entertainmentoptions. Using the status and feature baryou can quickly select the feature you wantto use.
Note:Your system is equipped with afeature that allows you to access andcontrol audio features for 10 minutes afteryou switch the ignition off (and no doorsopen).
The Status Bar
Additional icons also display in the statusbar depending on market, vehicle optionsand current operation. If a feature is notactive, the icon does not display. Certainicons may move to the left or rightdepending on what options are active.
366
Expedition (TB7) Canada/United States of America, enUSA, Edition date: 03/2016, First Printing
SYNC™ 3 (If Equipped)
Page 400 of 500
Note: The heated steering wheel may remain on after remote starting thevehicle, based on your remote start settings. The heated steering wheel mayalso turn on when you start your vehicle, if it was on when you switched yourvehicle off.
Note: For steering wheels with wood trim, the heating feature will not heat thewheel between the 10 and 2 o'clock positions.
Defrost: A pop up appears on the screen to display the defrost options.C
MAX Defrost: Touch the button to maximize defrosting. Air flows through thewindshield vents, the fan automatically adjusts to the highest speed and thedriver and passenger temperatures are set to HI. You can use this setting todefog or clear a thin covering of ice from the windshield. The heated rear windowalso automatically turns on when you select MAX Defrost.
Defrost: Distributes air through the windshield defroster vents and demistervents.
Heated rear window: Turns the heated rear window on and off. See HeatedWindows and Mirrors (page 120).
AUTO: Touch the button to switch on automatic operation. Select the desiredtemperature using the temperature control. The system adjusts fan speed, airdistribution, air conditioning operation, and selects outside air or recirculatedair to heat or cool the vehicle in order to maintain the desired temperature.
D
Power: Touch the button to switch the system on and off. Switching off theclimate control system prevents outside air from entering the vehicle.E
DUAL: This button lights up when the passenger controls are active. To switchthe off and link the passenger temperature to the driver temperature, touch theDUAL button.
F
Note: the passenger side temperature and the DUAL indication automaticallyturn on when you or your passenger adjust the passenger temperature.
Passenger temperature: Touch up or down to adjust the temperature.G
Fan speed: Touch up or down to increase or decrease the volume of air thatcirculates in your vehicle.H
Note: You cannot adjust the fan speed when the system is set to AUTO or MAXA/C.
Rear: A pop up appears on the screen to display the rear control options.I
Touch the power icon to switch the rear climate control functions off and on.
Touch Rear Climate to allow the rear seat passengers to adjust the rear climatesettings. Touch it again to prevent the rear seat passengers from adjusting thesettings. Rear Control automatically turns off when you use the touchscreento adjust the rear climate settings.
Touch + or – to adjust the temperature.
397
Expedition (TB7) Canada/United States of America, enUSA, Edition date: 03/2016, First Printing
SYNC™ 3 (If Equipped)
Page 419 of 500
Action and DescriptionMenu Item
The Gracenote Database supplied cover art isused for your music files. This overrides anycover art from your device.
Gracenote®
Erase the stored media information in order to re-index.Reset Media
This allows you to view the version level of the Gracenote Database.Gracenote® Data-base Info
This allows you to view the manufacturer and model number of yourmedia device.Device Informa-tion
Clock
To adjust the time, select the up and downarrows on either side of the screen. Thearrows on the left adjust the hour andarrows on the right adjust the minute. Youcan then select AM or PM.
You can adjust the following features:
Action and DescriptionMenu Item
Select how time displays.Clock Format
When active, the clock adjusts to time zone changes.Auto Time ZoneUpdateThis feature is only available in vehicles with navigation.
When selected, the vehicle clock resets to GPS satellite time.Reset Clock toGPS Time
The system automatically saves anyupdates you make to the settings.Bluetooth
Pressing this button allows you to accessthe following:
ActionMenu Item
Turning Bluetooth off disconnects all devices and does not permitnew connections.Bluetooth
You must activate Bluetooth to pair aBluetooth-enabled device.
The processes of pairing a Bluetoothdevice is the same as pairing a phone.SeePairing a Device in Phone settings for howto pair a device and the available options.
416
Expedition (TB7) Canada/United States of America, enUSA, Edition date: 03/2016, First Printing
SYNC™ 3 (If Equipped)
Page 497 of 500

Roof Racks and Load Carriers..................197Adjusting the Crossbar.....................................197Running-InSee: Breaking-In..................................................218Running Out of Fuel......................................151Adding Fuel From a Portable FuelContainer..........................................................152Filling a Portable Fuel Container...................152
S
Safety Canopy™............................................39Safety Precautions......................................150Satellite Radio..............................................320Satellite Radio Electronic Serial Number(ESN)..................................................................321Satellite Radio Reception Factors................321SIRIUS® Satellite Radio Service...................321Troubleshooting.................................................322Scheduled Maintenance Record...........452Scheduled Maintenance..........................443Seatbelt Extension........................................35Seatbelt Height Adjustment......................32Second Row Comfort Guide............................32Seatbelt Reminder.........................................33Belt-Minder™........................................................33Seatbelts...........................................................29Principle of Operation........................................29Seatbelt Warning Lamp and IndicatorChime...............................................................33Conditions of operation.....................................33Seats...................................................................121Security...............................................................61Self-Leveling Suspension.........................194Settings............................................................414911 Assist................................................................419Ambient Lighting...............................................425Bluetooth...............................................................416Clock.......................................................................416Display...................................................................425General..................................................................423Media Player.........................................................415Mobile Apps.........................................................422Navigation............................................................420Phone......................................................................417Radio......................................................................420Sound......................................................................414Valet Mode...........................................................426
Vehicle...................................................................425Voice Control.......................................................426Wi-Fi.......................................................................424Side Airbags.....................................................38Sitting in the Correct Position...................121Snow ChainsSee: Using Snow Chains..................................291Special Notices................................................12New Vehicle Limited Warranty.........................12On Board Diagnostics Data LinkConnector............................................................13Special Instructions..............................................12Special Operating Conditions ScheduledMaintenance..............................................449Exceptions...........................................................450Speed ControlSee: Cruise Control.............................................187Stability Control.............................................177Principle of Operation........................................177Starter SwitchSee: Ignition Switch...........................................144Starting a Gasoline Engine.......................145Automatic Engine Shutdown.........................147Failure to Start......................................................147Guarding Against Exhaust Fumes...............148Important Ventilating Information..............148Stopping the Engine When Your Vehicle isMoving...............................................................148Stopping the Engine When Your Vehicle isStationary.........................................................147Vehicles with an Ignition Key.........................146Vehicles with Keyless Start............................146Starting and Stopping the Engine.........144General Information..........................................144Steering............................................................193Electric Power Steering....................................193Steering Wheel Lock...................................145Steering Wheel...............................................65Storage Compartments.............................143SunroofSee: Moonroof.......................................................82Sun Visors.........................................................82Illuminated Vanity Mirror...................................82Supplementary Restraints System.........36Principle of Operation........................................36Symbols Glossary.............................................7SYNC™ 3........................................................365General Information.........................................365
494
Expedition (TB7) Canada/United States of America, enUSA, Edition date: 03/2016, First Printing
Index