2017 FIAT TIPO 5DOORS STATION WAGON change time
[x] Cancel search: change timePage 3 of 264
Dear Customer,
We would like to congratulate and thank you for choosing a Fiat.
We have written this handbook to help you get to know all the features of your vehicle and use it in the best possible way.
Here you will find information, advice and important warnings regarding use of your vehicle and how to achieve the best
performance from its technical features.
You are advised to read it right through before taking to the road for the first time, to become familiar with the controls and
above all with those concerning brakes, steering and gearbox; at the same time, you can understand the vehicle behaviour on
different road surfaces.
This document also provides a description of special features and tips, as well as essential information for the safe driving, care
and maintenance of your vehicle over time.
After reading it, you are advised to keep the handbook inside the vehicle, for an easy reference and for making sure it remains
on board the vehicle should it be sold.
In the attached Warranty Booklet you will also find a description of the Services that Fiat offers to its customers, the Warranty
Certificate and the detail of the terms and conditions for maintaining its validity.
We are sure that these will help you to get in touch with and appreciate your new vehicle and the service provided by the
people at Fiat.
Enjoy reading. Happy motoring!
This Owner Handbook describes all vehicle versions. Options, equipment dedicated to specific markets or
versions are not explicitly indicated in the text: as a consequence, you should only consider the information which
is related to the trim level, engine and version that you have purchased. Any content introduced throughout the
production of the model, outside the specific request of options at the time of purchase, will be identified with the
wording(where provided).
All data contained in this publication are intended to help you use your vehicle in the best possible way. FCA Italy
S.p.A. aims at a constant improvement of the vehicles produced. For this reason it reserves the right to make
changes to the model described for technical and/or commercial reasons.
For further information, contact a Fiat Dealership.
Page 26 of 264
The higher the sensitivity, the lower the
amount of external light needed to
automatically switch the external lights
on.
Function activation
Turn the left stalk ring nut to position
.
IMPORTANT The function can only be
activated with the ignition device at
MAR.
Function deactivation
To deactivate the function, turn the left
stalk ring nut to a position other than
.
MAIN BEAM HEADLIGHTS
With ring nut in position, push the
stalk forward toward the dashboard
(stable position). The
warning light
switches on in the instrument panel.
They are switched off by pulling the
stalk towards the steering wheel.
MAIN BEAM HEADLIGHTS
Flashing the headlights
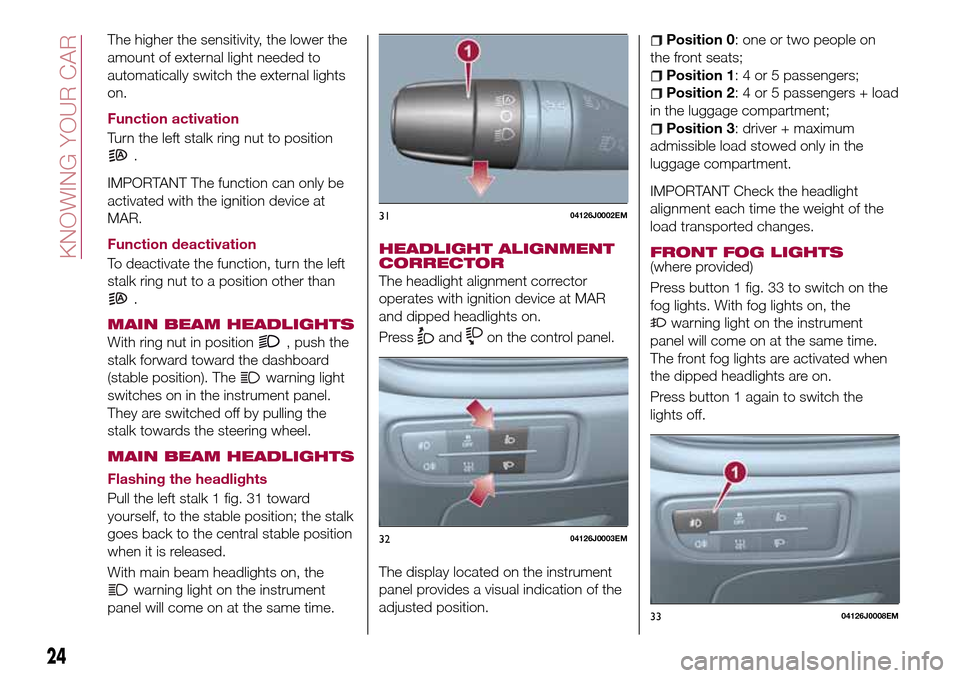
Pull the left stalk 1 fig. 31 toward
yourself, to the stable position; the stalk
goes back to the central stable position
when it is released.
With main beam headlights on, the
warning light on the instrument
panel will come on at the same time.
HEADLIGHT ALIGNMENT
CORRECTOR
The headlight alignment corrector
operates with ignition device at MAR
and dipped headlights on.
Press
andon the control panel.
The display located on the instrument
panel provides a visual indication of the
adjusted position.
Position 0: one or two people on
the front seats;
Position 1: 4 or 5 passengers;
Position 2: 4 or 5 passengers + load
in the luggage compartment;
Position 3: driver + maximum
admissible load stowed only in the
luggage compartment.
IMPORTANT Check the headlight
alignment each time the weight of the
load transported changes.
FRONT FOG LIGHTS
(where provided)
Press button 1 fig. 33 to switch on the
fog lights. With fog lights on, the
warning light on the instrument
panel will come on at the same time.
The front fog lights are activated when
the dipped headlights are on.
Press button 1 again to switch the
lights off.
3104126J0002EM
3204126J0003EM
3304126J0008EM
24
KNOWING YOUR CAR
Page 42 of 264
30)In the event of an accident or sharp
braking, any object placed on the curtain
may be projected into the passenger
compartment, and risk hurting the
occupants.
IMPORTANT
9)The dimensions of the platform permit a
maximum distributed weight capacity of
95 kg: do not load objects with a greater
weight.
HEADLIGHTS
LIGHT BEAM DIRECTION
The correct aiming of the headlights is
important for the comfort and safety of
not only the driver but all other road
users. This is also covered by a specific
rule of the highway code.
The headlights must be correctly
aligned to guarantee the best visibility
conditions for all drivers while travelling
with headlights on.
Contact a Fiat Dealership to have the
headlights checked and adjusted.
Check light beam alignment every time
the load or its distribution changes.
FOG LIGHTS ALIGNMENT(where provided)
Contact a Fiat Dealership to have the
headlights checked and adjusted.
ADJUSTING THE
HEADLIGHTS WHEN
ABROAD
Dipped beam headlights are adjusted
for driving in the country where the
vehicle was originally purchased.
When travelling in countries with
opposite driving direction, to avoid
dazzling the drivers on the other side of
the road, you need to cover areas of
the headlight according to the Highwaycode of the country you are travelling in:
(front right headlight), (front left
headlight).
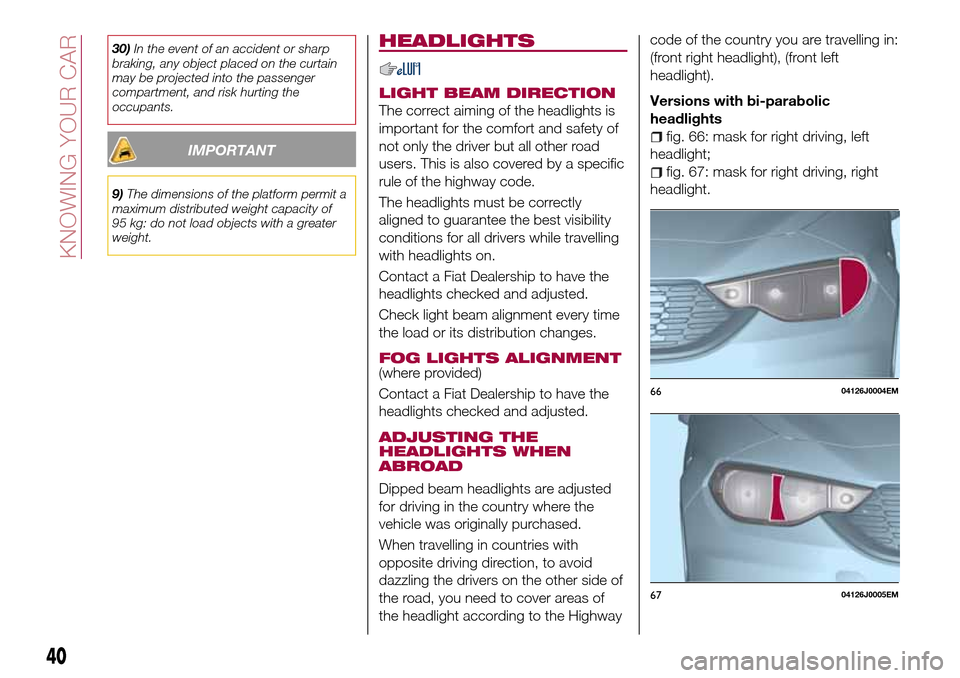
Versions with bi-parabolic
headlights
fig. 66: mask for right driving, left
headlight;
fig. 67: mask for right driving, right
headlight.
6604126J0004EM
6704126J0005EM
40
KNOWING YOUR CAR
Page 44 of 264
LPG MULTIPOINT
INJECTION SYSTEM
This product is produced by working
closely with qualified suppliers in the
LPG sector.
The injection system used on the car is
an efficient system in terms of engine
performance and is based on the
injection of LPG in a gaseous state.
In this system with four injectors, one
for each intake manifold, the fuel is
injected directly into the engine heat
transfer ducts, thereby metering the
LPG very precisely improving
combustion and, at the same time,
excluding any possibility of flame return.
By adapting the electronic control
technology of petrol engines to meet
LPG specifications, significant results in
terms of driveability and controlling
exhaust emissions have been obtained.
When running on LPG the engine has
almost the same torque and power
features as when running on petrol:
consequently, the car performance can
be compared.
SELECTION OF THE FUEL
SUPPLY TYPE
The car is configured for running
independently on either petrol or LPG.
The engine always starts up on petrol,
with automatic switching to LPG whenthe best conditions are achieved
(engine water temperature, minimum
engine rpm limit) for switching to LPG.
In addition, it is advisable to periodically
use up the petrol in the tank (until the
reserve warning light comes on) in order
to ensure that the petrol does not
become old and possibly deteriorate.
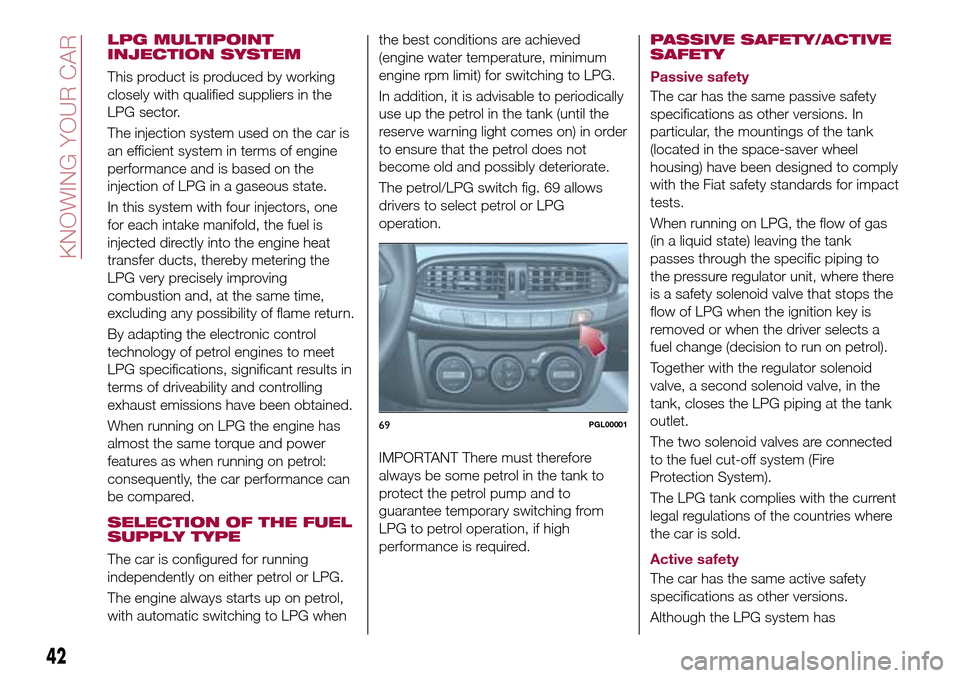
The petrol/LPG switch fig. 69 allows
drivers to select petrol or LPG
operation.
IMPORTANT There must therefore
always be some petrol in the tank to
protect the petrol pump and to
guarantee temporary switching from
LPG to petrol operation, if high
performance is required.PASSIVE SAFETY/ACTIVE
SAFETY
Passive safety
The car has the same passive safety
specifications as other versions. In
particular, the mountings of the tank
(located in the space-saver wheel
housing) have been designed to comply
with the Fiat safety standards for impact
tests.
When running on LPG, the flow of gas
(in a liquid state) leaving the tank
passes through the specific piping to
the pressure regulator unit, where there
is a safety solenoid valve that stops the
flow of LPG when the ignition key is
removed or when the driver selects a
fuel change (decision to run on petrol).
Together with the regulator solenoid
valve, a second solenoid valve, in the
tank, closes the LPG piping at the tank
outlet.
The two solenoid valves are connected
to the fuel cut-off system (Fire
Protection System).
The LPG tank complies with the current
legal regulations of the countries where
the car is sold.
Active safety
The car has the same active safety
specifications as other versions.
Although the LPG system has
69PGL00001
42
KNOWING YOUR CAR
Page 49 of 264
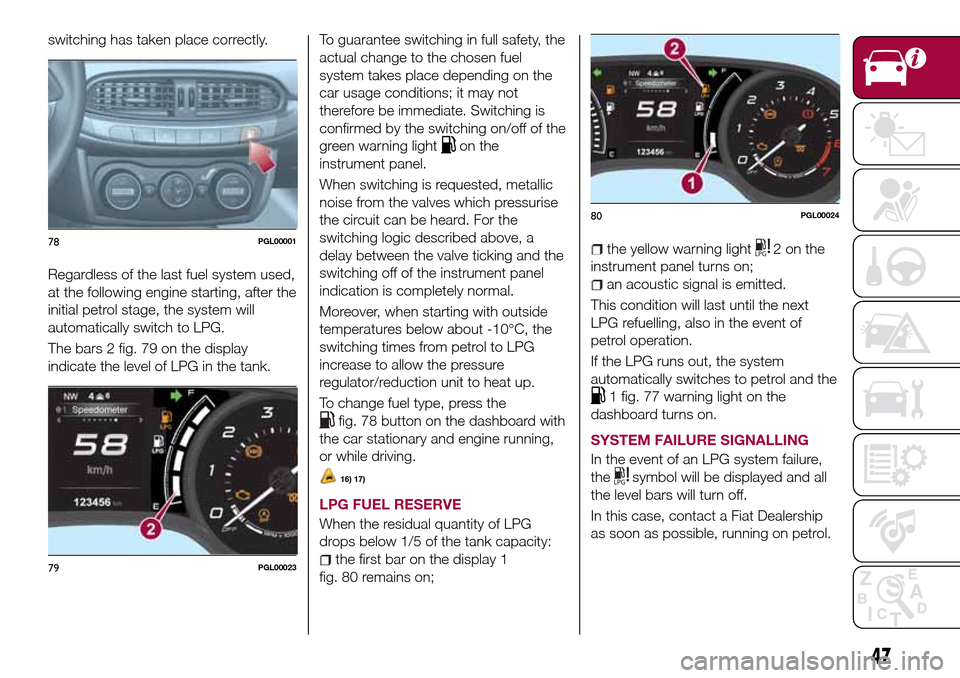
switching has taken place correctly.
Regardless of the last fuel system used,
at the following engine starting, after the
initial petrol stage, the system will
automatically switch to LPG.
The bars 2 fig. 79 on the display
indicate the level of LPG in the tank.To guarantee switching in full safety, the
actual change to the chosen fuel
system takes place depending on the
car usage conditions; it may not
therefore be immediate. Switching is
confirmed by the switching on/off of the
green warning light
on the
instrument panel.
When switching is requested, metallic
noise from the valves which pressurise
the circuit can be heard. For the
switching logic described above, a
delay between the valve ticking and the
switching off of the instrument panel
indication is completely normal.
Moreover, when starting with outside
temperatures below about -10°C, the
switching times from petrol to LPG
increase to allow the pressure
regulator/reduction unit to heat up.
To change fuel type, press the
fig. 78 button on the dashboard with
the car stationary and engine running,
or while driving.
16) 17)
LPG FUEL RESERVE
When the residual quantity of LPG
drops below 1/5 of the tank capacity:
the first bar on the display 1
fig. 80 remains on;
the yellow warning light2onthe
instrument panel turns on;
an acoustic signal is emitted.
This condition will last until the next
LPG refuelling, also in the event of
petrol operation.
If the LPG runs out, the system
automatically switches to petrol and the
1 fig. 77 warning light on the
dashboard turns on.
SYSTEM FAILURE SIGNALLING
In the event of an LPG system failure,
the
symbol will be displayed and all
the level bars will turn off.
In this case, contact a Fiat Dealership
as soon as possible, running on petrol.
78PGL00001
79PGL00023
80PGL00024
47
Page 56 of 264
DISPLAY
DESCRIPTION
The vehicle is equipped with a display
that can show useful information to the
driver while driving.
With the ignition device in STOP
position and ignition key removed, the
display lights up and shows the time
and total odometer reading (in km or
miles) for a few seconds when a door is
opened/closed.
GEAR SHIFT INDICATOR
The Gear Shift Indicator (GSI) system
advises the driver to change gear
through a special indication on the
display.
Through the GSI, the driver is informed
that the gear change will allow a
reduction in fuel consumption.
When the
symbol appears on the
display, the GSI suggests switching to a
higher gear, while when the
symbol
is displayed, the GSI suggests
changing to a lower gear.
The indication in the display remains
until a gear is shifted or the driving
conditions go back to a situation where
gearshifting is not required to improve
consumption.
RECONFIGURABLE
MULTIFUNCTION
DISPLAY
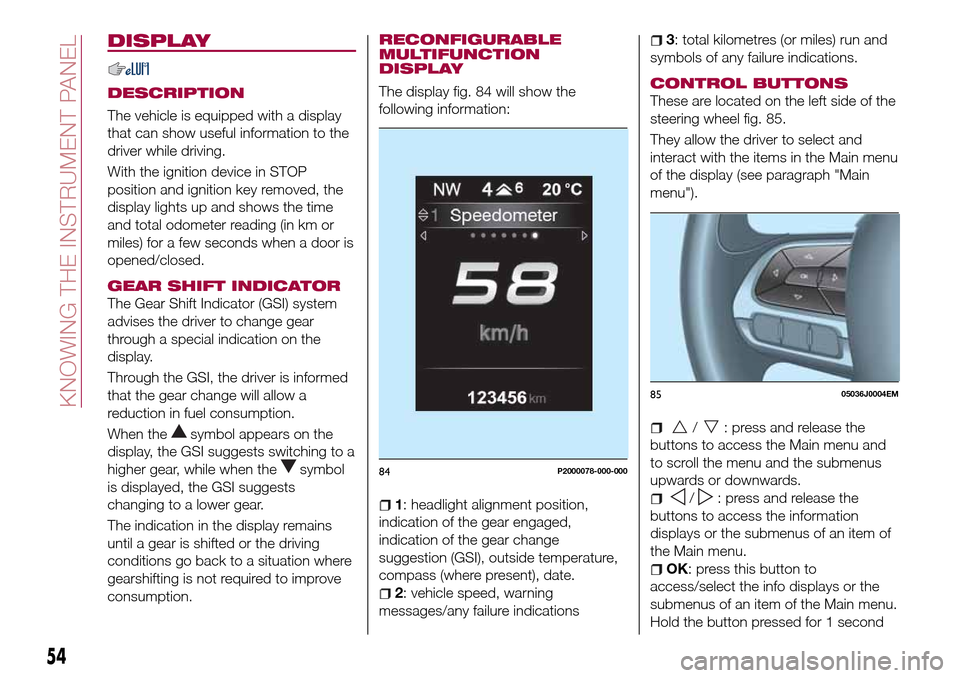
The display fig. 84 will show the
following information:
1: headlight alignment position,
indication of the gear engaged,
indication of the gear change
suggestion (GSI), outside temperature,
compass (where present), date.
2: vehicle speed, warning
messages/any failure indications
3: total kilometres (or miles) run and
symbols of any failure indications.
CONTROL BUTTONS
These are located on the left side of the
steering wheel fig. 85.
They allow the driver to select and
interact with the items in the Main menu
of the display (see paragraph "Main
menu").
/: press and release the
buttons to access the Main menu and
to scroll the menu and the submenus
upwards or downwards.
/: press and release the
buttons to access the information
displays or the submenus of an item of
the Main menu.
OK: press this button to
access/select the info displays or the
submenus of an item of the Main menu.
Hold the button pressed for 1 second
84P2000078-000-000
8505036J0004EM
54
KNOWING THE INSTRUMENT PANEL
Page 57 of 264
to reset the displayed/selected
functions.
MAIN MENU
The Main menu comprises a series of
items which can be selected using the
control buttons to access the different
selection and setting options given in
the following paragraphs.
REMARKS
Some options have a submenu.
With theUconnect™ 5"or7" HD
system, some Menu items are shown
and managed on the display of the
latter and not on the instrument panel
display (refer to the dedicated
Multimedia chapter or to the
supplement available online).
MENU OPTIONS
The Menu includes the following items:
TRIP
GSI
VEHICLE INFO
DRIVER ASSIST
AUDIO (function available in versions
and markets where present)
PHONE (function available in versions
and markets where present)
NAVIGATION (function available in
versions and markets where present)
ALERTS
VEHICLE SETTINGSTrip
This menu item displays the information
on the "Trip computer" (for further
information, see the description of the
"Trip computer" paragraph in this
chapter).
The information shown on the display is
as follows:
Instant info: distance (km or miles),
instantaneous consumption (mpg,
l/100 km or km/l);
Trip A: distance A (km or miles), trip
time A (hours/minutes/seconds),
average consumption A (mpg, or
l/100 km or km/l), average speed A
(km/h or mph);
Trip B: distance B (km or miles),
average consumption B (mpg, or
l/100 km or km/l), trip time B
(hours/minutes/seconds), average
speed B (km/h or mph).
Speedometer: km or miles displayed.
By pressing theOKbutton with
speedometer display active, you can
change the measurement unit (km/h
or mph). On leaving this screen, the
measurement unit set will take effect.
GSI
This menu item makes it possible to
see the gear shift indicator provided by
the GSI (gear shift indicator) system on
the display.Vehicle info
This menu item displays the information
on the vehicle conditions.
Press the
orbutton to select the
items listed below.
Tyre pressure: information displayed on
the iTPMS (where provided) (for further
information, see the description in
paragraph "Auxiliary driving systems" in
the "Safety" chapter).
Engine oil temperature: engine oil
temperature displayed.
Change engine oil: indication for engine
oil change.
Battery voltage: display of the battery
voltage value (charge level).
Service (Scheduled servicing):Number
of kilometres (or miles) and days until
the next Scheduled Servicing operation.
WARNING
The “Scheduled Servicing Plan”
includes vehicle maintenance at fixed
intervals (refer to the "Maintenance and
care" chapter).
This is displayed automatically, with
ignition device at MAR, 2000 km before
servicing or, where provided, 30 days
before servicing. It is also displayed
each time the ignition device is turned
to MAR or, for some versions, every
200 km. Below this threshold servicing
indications are more frequent. The
55
Page 58 of 264
display will be in km or miles according
to the unit of measurement set.
When the following scheduled servicing
is approaching ("coupon"), the word
"Service" will be displayed, followed by
the number of kilometres/miles or days
left, when the ignition device is turned
to MAR. Go to a Fiat Dealership, where
the "Scheduled Servicing Plan"
operations will be performed and the
message will be reset.
Driver Assist
This menu item allows you to view and
change the Adaptive Cruise Control
(ACC) settings on the instrument panel
display.
Audio
(function available in versions and
markets where present)
This Menu item allows some
information displayed on the
Uconnect™system to be repeated on
the instrument panel display (for further
information see the dedicated chapter).
Phone
(function available in versions and
markets where present)
This Menu item allows some
information displayed on the
Uconnect™system to be repeated on
the instrument panel display (for further
information see the dedicated chapter).The information displayed includes the
mobile pairing condition (mobile paired
or not paired), active/incoming/on hold
calls and the management of double
calls (first incoming, second on hold,
etc.).
In the phone menu, you can also select
3 sub-menus “SMS reader”, “recent
calls” and “favourite numbers” (available
with theUconnect™7'' HDsystem),
which can be selected with the arrows
or. This menu can also be used
to select and manage the last 10 calls
or the last 10 SMS using the directional
buttons on the steering wheel.
Navigation
(function available in versions and
markets where present)
This Menu item allows some
information displayed on the
Uconnect™ 5"o7" HDsystem to be
shown on the instrument panel display
(for further information see the
dedicated chapter).
Alerts
This menu item displays information/
failure messages stored by the system.
Vehicle Settings
This menu item allows you to change
the settings for:
Display;
Units;
Clock & Date;
Security;
Safety & Assistance;
Lights;
Doors & Locks.
Display
By selecting item "Display" you can
access the following settings:
Display Settings (changing
instrument panel display settings): this
menu item makes it possible to change
the displaying of the information, for
example the Compass (where present),
Outside temperature, Date (day/month),
Time (hours/minutes), Audio information
(where present). Selecting “Reset of the
default settings” makes it possible to
reset and restore the default settings;
Language: allows you to select the
language for showing the
information/warnings;
See phone: used to activate/
deactivate the display of pop-ups on
the instrument panel when there are
incoming calls, outgoing calls, on hold
calls, audio conference and incoming
SMS (available in versions and markets
where present);
See navigation: allows you to display
the information about the Navigation
mode on the instrument panel (available
in versions and markets where present);
56
KNOWING THE INSTRUMENT PANEL