2017 FIAT TIPO 5DOORS STATION WAGON turn signal
[x] Cancel search: turn signalPage 36 of 264
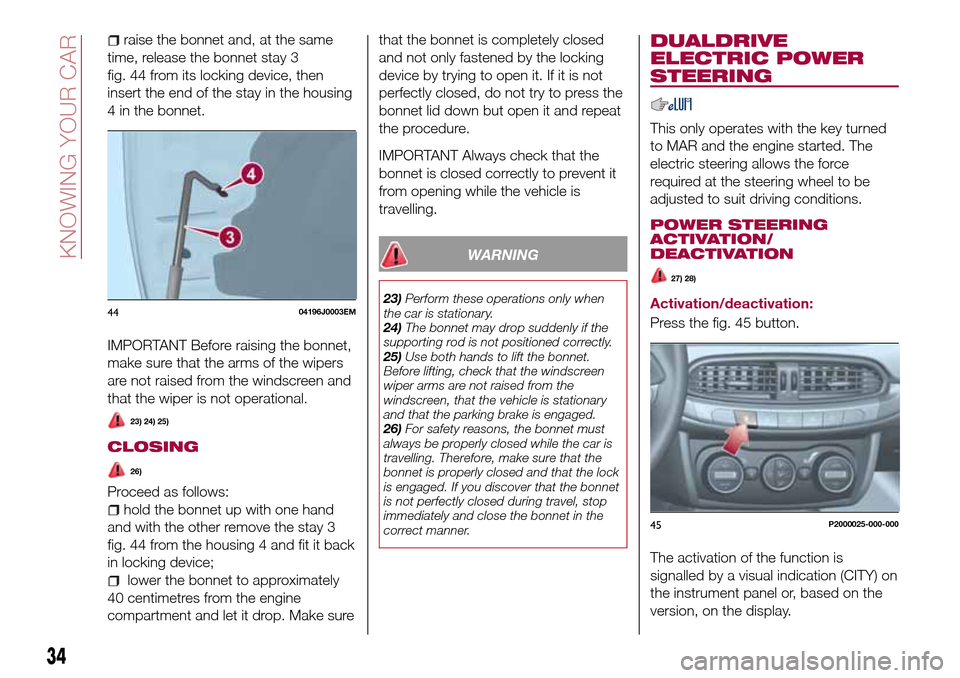
raise the bonnet and, at the same
time, release the bonnet stay 3
fig. 44 from its locking device, then
insert the end of the stay in the housing
4 in the bonnet.
IMPORTANT Before raising the bonnet,
make sure that the arms of the wipers
are not raised from the windscreen and
that the wiper is not operational.
23) 24) 25)
CLOSING
26)
Proceed as follows:
hold the bonnet up with one hand
and with the other remove the stay 3
fig. 44 from the housing 4 and fit it back
in locking device;
lower the bonnet to approximately
40 centimetres from the engine
compartment and let it drop. Make surethat the bonnet is completely closed
and not only fastened by the locking
device by trying to open it. If it is not
perfectly closed, do not try to press the
bonnet lid down but open it and repeat
the procedure.
IMPORTANT Always check that the
bonnet is closed correctly to prevent it
from opening while the vehicle is
travelling.
WARNING
23)Perform these operations only when
the car is stationary.
24)The bonnet may drop suddenly if the
supporting rod is not positioned correctly.
25)Use both hands to lift the bonnet.
Before lifting, check that the windscreen
wiper arms are not raised from the
windscreen, that the vehicle is stationary
and that the parking brake is engaged.
26)For safety reasons, the bonnet must
always be properly closed while the car is
travelling. Therefore, make sure that the
bonnet is properly closed and that the lock
is engaged. If you discover that the bonnet
is not perfectly closed during travel, stop
immediately and close the bonnet in the
correct manner.
DUALDRIVE
ELECTRIC POWER
STEERING
This only operates with the key turned
to MAR and the engine started. The
electric steering allows the force
required at the steering wheel to be
adjusted to suit driving conditions.
POWER STEERING
ACTIVATION/
DEACTIVATION
27) 28)
Activation/deactivation:
Press the fig. 45 button.
The activation of the function is
signalled by a visual indication (CITY) on
the instrument panel or, based on the
version, on the display.4404196J0003EM
45P2000025-000-000
34
KNOWING YOUR CAR
Page 48 of 264

the LPG flow if the fuel locking inertia
switch is activated.
the pressure regulatorallows the
LPG to pass from a liquid state to a
gaseous state through an expansion
chamber and maintains the pressure
required for the operation of the system
at a preset value.
LPG FILTER
The filter, located on the pressure
regulator outlet pipe fig. 74 filters the
gaseous LPG during the LPG injector
supply stage.
LPG INJECTORS
There are four injectors specifically for
LPG on a dedicated bracket on the
cylinder head and connected, via
specific pipes, to the individual intake
ducts fig. 75.
They are supplied with LPG in agaseous state at a constant pressure
and are controlled by a specific
electronic control unit.
A gas pressure and temperature sensor
that sends an appropriate electrical
signal in order to determine the LPG
injection time is fitted on the injectors.
ELECTRONIC CONTROL
UNIT
The car has a special electronic control
unit fig. 76, in the engine compartment,
controlling the LPG supply, using the
sensors located on the car.
The control unit for the injectors has the
same strategy as the petrol control unit
(timed sequential Multipoint).
LPG/PETROL SWITCH
This engine normally runs on LPG
except during starting when it runs on
petrol. Switching to LPG is automatic,
the warning light
1 fig. 77 on the
instrument panel, switches off.
If you specifically want to use petrol,
press the button on the dashboard
fig. 78. If the LED located above the
button turns on, it indicates that
74PGL00007
75PLG00008
76PLG00009
77PGL00022
46
KNOWING YOUR CAR
Page 49 of 264
switching has taken place correctly.
Regardless of the last fuel system used,
at the following engine starting, after the
initial petrol stage, the system will
automatically switch to LPG.
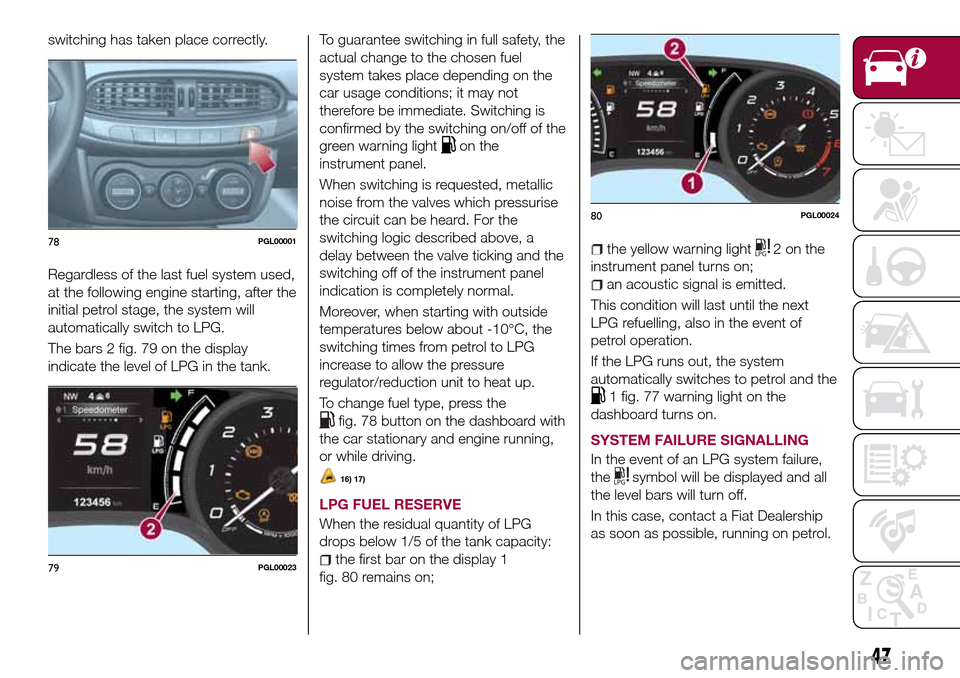
The bars 2 fig. 79 on the display
indicate the level of LPG in the tank.To guarantee switching in full safety, the
actual change to the chosen fuel
system takes place depending on the
car usage conditions; it may not
therefore be immediate. Switching is
confirmed by the switching on/off of the
green warning light
on the
instrument panel.
When switching is requested, metallic
noise from the valves which pressurise
the circuit can be heard. For the
switching logic described above, a
delay between the valve ticking and the
switching off of the instrument panel
indication is completely normal.
Moreover, when starting with outside
temperatures below about -10°C, the
switching times from petrol to LPG
increase to allow the pressure
regulator/reduction unit to heat up.
To change fuel type, press the
fig. 78 button on the dashboard with
the car stationary and engine running,
or while driving.
16) 17)
LPG FUEL RESERVE
When the residual quantity of LPG
drops below 1/5 of the tank capacity:
the first bar on the display 1
fig. 80 remains on;
the yellow warning light2onthe
instrument panel turns on;
an acoustic signal is emitted.
This condition will last until the next
LPG refuelling, also in the event of
petrol operation.
If the LPG runs out, the system
automatically switches to petrol and the
1 fig. 77 warning light on the
dashboard turns on.
SYSTEM FAILURE SIGNALLING
In the event of an LPG system failure,
the
symbol will be displayed and all
the level bars will turn off.
In this case, contact a Fiat Dealership
as soon as possible, running on petrol.
78PGL00001
79PGL00023
80PGL00024
47
Page 59 of 264

Automatic Trip B reset: allows you to
set the reset options for Trip B;
Display brightness: this function is
used to set the brightness level
(8 levels) for the display and all the other
backlit components. The display
brightness can be adjusted in all
environmental conditions, whereas all
the other components (e.g. climate
control, radio, dashboard, buttons, etc.)
can only be adjusted at night or when
the dipped headlights are on. To set the
brightness, briefly press theOKbutton,
the display will show the previously set
brightness “level”; then press the
or
button to adjust. To return to the
previous screen, briefly press the
button.
Units
Selecting the item "Units" you can
choose the unit of measurement to be
used for displaying the various values.
The possible options are:
Imperial
Metric
Customised
Clock & Date
Select item "Clock & Date" to adjust the
clock.
The possible options are:
Set time: hours/minutes adjustment;
Time format: adjustment of the time
format "12h" (12-hour) or "24h"
(24-hour);
Set date: adjustment of
day/month/year.
Security
Select item "Security" to make the
following adjustments:
Passenger AIR BAG: passenger side
airbag activation/deactivation “Off” (to
deactivate) or “On” (to activate).
Passenger's protection not active:
the
LED comes on constantly in the
instrument panel dashboard;
Speed beep: setting of the vehicle
speed limit (km/h or mph). When this is
exceeded, the driver is notified through
an acoustic and visual signal;
Seat belt buzzer: this function can be
only displayed after a Fiat Dealership
has deactivated the SBR system (see
the "SBR system" paragraph in the
"Security" chapter).
Safety & Assistance
Select item "Safety & Assistance" to
make the following adjustments:
Rain sensor: activation/deactivation
of the automatic switching on of the
wipers in the case of rain;
Buzzer volume: selection of the
volume of the buzzer that accompanies
the display of the failure/warning;
Brake Control: selection of the
intervention mode for the Full Brake
Control system;
“Brake C.Sensitivity": selection of the
"readiness" of the Full Brake Control
system to intervene, on the basis of the
distance from the obstacle;
Park Assist: selection of the type of
warning provided by the Park Assist
system;
Park Assist Vol.: selection of the
volume of the acoustic warnings
provided by the Park Assist system.
Lights
Select item "Lights" to make the
following adjustments:
Courtesy lights: interior light
brightness selection;
Daytime running lights:
activation/deactivation of the daytime
running lights;
Cornering lights: activation/
deactivation of cornering lights (where
provided);
Headlamp sensor: adjustment of
headlight activation sensitivity;
Follow me home: setting of the
headlight deactivation delay after
switching off the engine.
57
Page 63 of 264

Warning light What it means
ENGINE COOLANT TEMPERATURE TOO HIGH
The warning light on the display lights up when the engine has overheated.
In normal driving conditions: stop the car, switch off the engine and check that the coolant level in the
reservoir is not below the MIN mark. In this case, wait for the engine to cool down, then slowly and
carefully open the cap, top up with coolant and check that the level is between the MIN and MAX marks
on the reservoir itself. Also check visually for any fluid leaks. If, when restarting, the warning light on the
display switches on again, contact a Fiat Dealership;
If the vehicle is used under demanding conditions(e.g. in high-performance driving): slow down
and, if the warning light stays on, stop the vehicle. Stop for two or three minutes with the engine running
and slightly accelerated to facilitate better coolant circulation, then turn the engine off. Check that the
coolant level is correct as described above.
IMPORTANT Over demanding routes, it is advisable to keep the engine running and slightly accelerated
for a few minutes before turning it off.
AIRBAG FAILURE
If the warning light switches on constantly, this indicates a failure in the airbag system.
34) 35)
WARNING
34)If, when the ignition device is turned to MAR, thewarning light does not switch on or stays on whilst driving, a failure may have
occurred in the restraint systems. In this case the airbags or pretensioners may not be deployed in an impact or, in a lower number of cases,
they may be deployed accidentally. Before continuing, contact a Fiat Dealership immediately to have the system checked.
35)The failure of the
warning light is signalled by the lighting up of thesymbol on the instrument panel display (or, for versions where
provided, by the flashing of the generic failure warning light). In this case, the warning light may not indicate any faults with the restraint
systems. Before continuing, contact a Fiat Dealership immediately to have the system checked
61
Page 65 of 264

Warning light What it means
PARTIAL DEACTIVATION OF ACTIVE SAFETY SYSTEMS
The warning light switches on to indicate that some active safety systems have been partially deactivated.
When the systems are reactivated, the warning light switches off.
REAR FOG LIGHT
The warning light switches on when the rear fog light is activated.
INJECTION / EOBD SYSTEM FAILURE
In normal conditions, when the ignition device is brought to MAR, the warning light switches on, but it
should switch off as soon as the engine is started. The operation of the warning light may be checked by
the traffic police using specific devices. Comply with the laws and regulations of the country where you
are driving.
20)
Injection system failure
If the warning light remains on, or it switches on whilst driving, the injection system is not working
properly. The warning light on constantly signals a malfunction in the supply/ignition system which could
cause high exhaust emissions, a possible loss of performance, poor driveability and high consumption.
The warning light switches off if the malfunction disappears, but is still stored by the system. Under these
conditions, the vehicle can continue travelling at moderate speed but without demanding excessive effort
from the engine or high speed. Prolonged use of the car with the warning light on may cause damage.
Contact a Fiat Dealership as soon as possible.
Catalytic converter damaged
If the warning light flashes, it means that the catalytic converter may be damaged. Release the
accelerator pedal to lower the speed of the engine until the warning light stops flashing. Continue the
journey at moderate speed, trying to avoid driving conditions that may cause further flashing and contact
a Fiat Dealership as soon as possible.
IMPORTANT
20)If, turning the ignition device to MAR, thewarning light does not turn on or if it turns on steadily or flashing when travelling (on some
versions together with the message on the display), contact a Fiat Dealership as soon as possible.
63
Page 79 of 264

In the event of an imminent collision the
system may intervene by braking the
vehicle to prevent the crash or reduce
its effects.
When the system detects the risk of
collision, it gives the driver acoustic and
visual signals through specific
messages on the instrument panel
display. The signals are intended to
allow the driver to react promptly, in
order to prevent or reduce the effects of
a potential accident.
If the system does not detect any
action by the driver, it can intervene by
braking automatically to attenuate the
potential accident (automatic braking). If
the system detects that the driver is
pressing the brake pedal, but this is not
deemed sufficient, the system may
intervene in order to improve the
reaction of the braking system,therefore reducing vehicle speed further
(additional assistance during braking).
Versions equipped with Start&Stop
system: at the end of the automatic
braking, the Start&Stop system will
activate as described in paragraph
"Start&Stop system" of the "Starting
and driving" chapter.
Versions with manual gearbox:at
the end of the automatic braking the
engine may stall and turn off, unless the
driver presses the clutch pedal.
IMPORTANT After the car is stopped,
the brake callipers may be locked for
about 2 seconds for safety reasons.
Make sure you press the brake pedal if
the vehicle moves slightly forwards.
Engagement/disengagement
The Full Brake Control can be
deactivated (and subsequently
reactivated) through the instrument
panel Menu.
With theUconnect™ 5"or7" HD
system, some Menu items are shown
and managed on the display of the
latter and not on the instrument panel
display (refer to the dedicated
Multimedia chapter or to the
supplement available online).
The system can be deactivated even
with the ignition device at MAR.
IMPORTANT The system status can be
changed with vehicle at a standstill only.
The Full Brake Control can be set by
selecting one of the 3 Menu options:
System active: the system (if active),
in addition to the visual and acoustic
warnings, can provide automatic
braking and additional assistance
during braking, if the driver does not
brake hard enough in the event of a
potential impact with the vehicle in
front;
System partially active: the system (if
active), does not give the visual and
acoustic warnings, but can provide
automatic braking and additional
assistance during braking, if the driver
does not brake hard enough in the
event of a potential impact with the
vehicle in front;
System deactivated: the system
does not give visual and acoustic
warnings, limited braking, automatic
braking or additional assistance during
braking. The system will therefore
provide no indication of a possible
accident.
Activation/deactivation
If the Full Brake Control system has
been correctly activated from the Menu,
it will be active each time the engine is
started.
Following a deactivation, the system will
87P2000076-000-000
77
Page 82 of 264
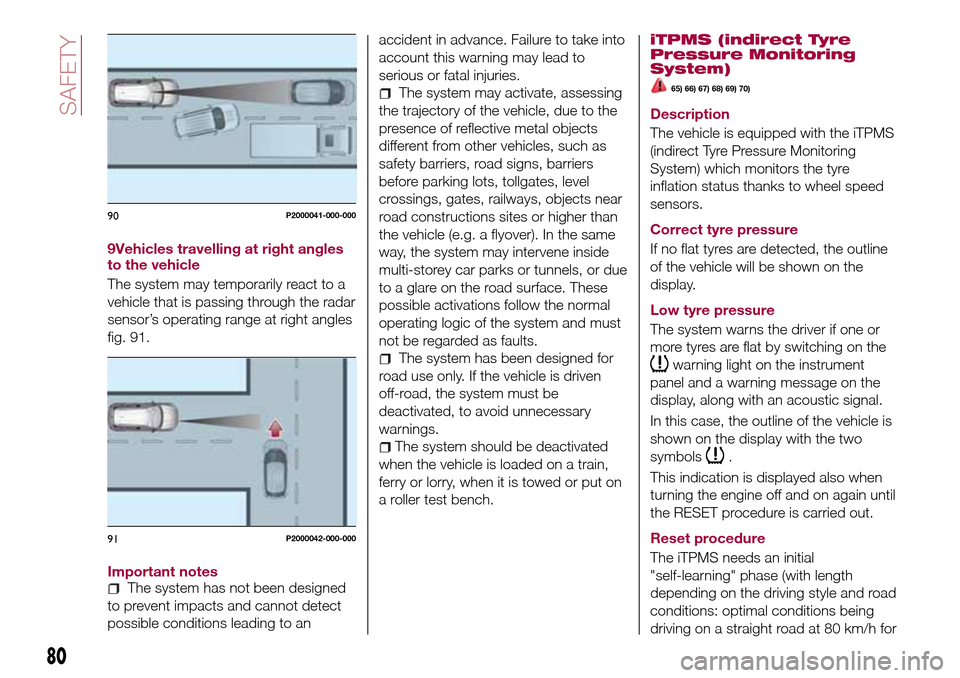
9Vehicles travelling at right angles
to the vehicle
The system may temporarily react to a
vehicle that is passing through the radar
sensor’s operating range at right angles
fig. 91.
Important notes
The system has not been designed
to prevent impacts and cannot detect
possible conditions leading to anaccident in advance. Failure to take into
account this warning may lead to
serious or fatal injuries.
The system may activate, assessing
the trajectory of the vehicle, due to the
presence of reflective metal objects
different from other vehicles, such as
safety barriers, road signs, barriers
before parking lots, tollgates, level
crossings, gates, railways, objects near
road constructions sites or higher than
the vehicle (e.g. a flyover). In the same
way, the system may intervene inside
multi-storey car parks or tunnels, or due
to a glare on the road surface. These
possible activations follow the normal
operating logic of the system and must
not be regarded as faults.
The system has been designed for
road use only. If the vehicle is driven
off-road, the system must be
deactivated, to avoid unnecessary
warnings.
The system should be deactivated
when the vehicle is loaded on a train,
ferry or lorry, when it is towed or put on
a roller test bench.
iTPMS (indirect Tyre
Pressure Monitoring
System)
65) 66) 67) 68) 69) 70)
Description
The vehicle is equipped with the iTPMS
(indirect Tyre Pressure Monitoring
System) which monitors the tyre
inflation status thanks to wheel speed
sensors.
Correct tyre pressure
If no flat tyres are detected, the outline
of the vehicle will be shown on the
display.
Low tyre pressure
The system warns the driver if one or
more tyres are flat by switching on the
warning light on the instrument
panel and a warning message on the
display, along with an acoustic signal.
In this case, the outline of the vehicle is
shown on the display with the two
symbols
.
This indication is displayed also when
turning the engine off and on again until
the RESET procedure is carried out.
Reset procedure
The iTPMS needs an initial
"self-learning" phase (with length
depending on the driving style and road
conditions: optimal conditions being
driving on a straight road at 80 km/h for
90P2000041-000-000
91P2000042-000-000
80
SAFETY