2017 FIAT TIPO 5DOORS STATION WAGON fog light bulb
[x] Cancel search: fog light bulbPage 70 of 264

Symbol What it means
FIAT CODE SYSTEM FAILURE
The symbol switches on to indicate a failure of the Fiat CODE system. Contact a Fiat
Dealership as soon as possible.
EXTERIOR LIGHTS FAILURE
The symbol switches on to indicate a failure on the following lights: daytime running lights
(DRLs); parking lights; side lights; direction indicators; rear fog light; reversing light; number
plate lights.
The failure may be caused by a blown bulb, a blown protection fuse or an interruption of the
electrical connection.
FUEL LEVEL SENSOR FAILURE
The symbol switches on in the event of fuel level sensor failure. Contact a Fiat Dealership.
LPG FUEL LEVEL SENSOR FAILURE
The symbol switches on in the event of LPG fuel level sensor failure. Contact a Fiat Dealership.
POSSIBLE ICE ON ROAD
The symbol turns on when the outside temperature falls to or below 3°C.
IMPORTANT In the event of outside temperature sensor failure, the digits that indicate the
value are replaced by dashes.
DUSK SENSOR FAILURE
The symbol switches on along with a message on the display in the event of dusk sensor
failure. Contact a Fiat Dealership as soon as possible.
AUDIO SYSTEM FAILURE
The symbol switches on to report a failure of the audio system. Contact a Fiat Dealership as
soon as possible.
68
KNOWING THE INSTRUMENT PANEL
Page 136 of 264
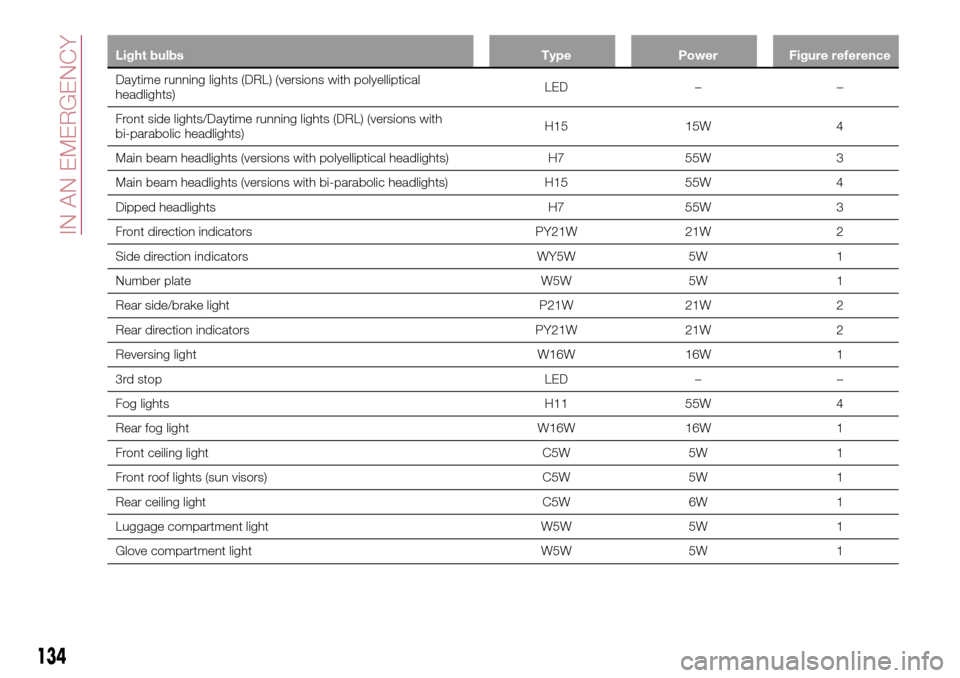
Light bulbs Type Power Figure reference
Daytime running lights (DRL) (versions with polyelliptical
headlights)LED – –
Front side lights/Daytime running lights (DRL) (versions with
bi-parabolic headlights)H15 15W 4
Main beam headlights (versions with polyelliptical headlights) H7 55W 3
Main beam headlights (versions with bi-parabolic headlights) H15 55W 4
Dipped headlights H7 55W 3
Front direction indicators PY21W 21W 2
Side direction indicators WY5W 5W 1
Number plate W5W 5W 1
Rear side/brake light P21W 21W 2
Rear direction indicators PY21W 21W 2
Reversing light W16W 16W 1
3rd stop LED – –
Fog lights H11 55W 4
Rear fog light W16W 16W 1
Front ceiling light C5W 5W 1
Front roof lights (sun visors) C5W 5W 1
Rear ceiling light C5W 6W 1
Luggage compartment light W5W 5W 1
Glove compartment light W5W 5W 1
134
IN AN EMERGENCY
Page 137 of 264
REPLACING AN
EXTERNAL BULB
Versions with polyelliptical
headlights
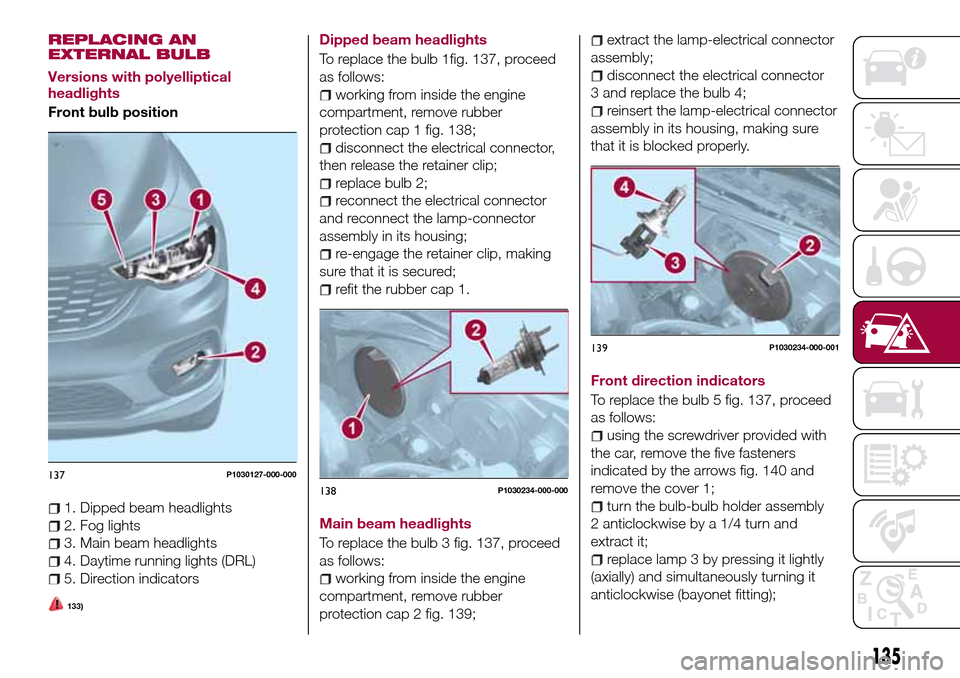
Front bulb position
1. Dipped beam headlights
2. Fog lights
3. Main beam headlights
4. Daytime running lights (DRL)
5. Direction indicators
133)
Dipped beam headlights
To replace the bulb 1fig. 137, proceed
as follows:
working from inside the engine
compartment, remove rubber
protection cap 1 fig. 138;
disconnect the electrical connector,
then release the retainer clip;
replace bulb 2;
reconnect the electrical connector
and reconnect the lamp-connector
assembly in its housing;
re-engage the retainer clip, making
sure that it is secured;
refit the rubber cap 1.
Main beam headlights
To replace the bulb 3 fig. 137, proceed
as follows:
working from inside the engine
compartment, remove rubber
protection cap 2 fig. 139;
extract the lamp-electrical connector
assembly;
disconnect the electrical connector
3 and replace the bulb 4;
reinsert the lamp-electrical connector
assembly in its housing, making sure
that it is blocked properly.
Front direction indicators
To replace the bulb 5 fig. 137, proceed
as follows:
using the screwdriver provided with
the car, remove the five fasteners
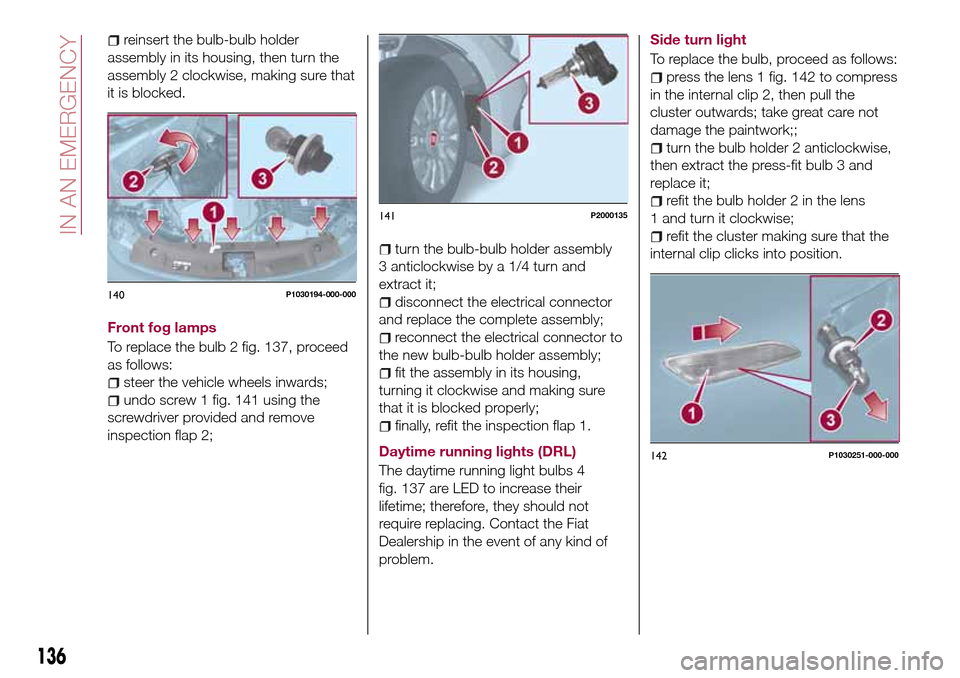
indicated by the arrows fig. 140 and
remove the cover 1;
turn the bulb-bulb holder assembly
2 anticlockwise by a 1/4 turn and
extract it;
replace lamp 3 by pressing it lightly
(axially) and simultaneously turning it
anticlockwise (bayonet fitting);
137P1030127-000-000
138P1030234-000-000
139P1030234-000-001
135
Page 138 of 264
reinsert the bulb-bulb holder
assembly in its housing, then turn the
assembly 2 clockwise, making sure that
it is blocked.
Front fog lamps
To replace the bulb 2 fig. 137, proceed
as follows:
steer the vehicle wheels inwards;
undo screw 1 fig. 141 using the
screwdriver provided and remove
inspection flap 2;
turn the bulb-bulb holder assembly
3 anticlockwise by a 1/4 turn and
extract it;
disconnect the electrical connector
and replace the complete assembly;
reconnect the electrical connector to
the new bulb-bulb holder assembly;
fit the assembly in its housing,
turning it clockwise and making sure
that it is blocked properly;
finally, refit the inspection flap 1.
Daytime running lights (DRL)
The daytime running light bulbs 4
fig. 137 are LED to increase their
lifetime; therefore, they should not
require replacing. Contact the Fiat
Dealership in the event of any kind of
problem.Side turn light
To replace the bulb, proceed as follows:
press the lens 1 fig. 142 to compress
in the internal clip 2, then pull the
cluster outwards; take great care not
damage the paintwork;;
turn the bulb holder 2 anticlockwise,
then extract the press-fit bulb 3 and
replace it;
refit the bulb holder 2 in the lens
1 and turn it clockwise;
refit the cluster making sure that the
internal clip clicks into position.
140P1030194-000-000
141P2000135
142P1030251-000-000
136
IN AN EMERGENCY
Page 139 of 264
Versions with bi-parabolic
headlights
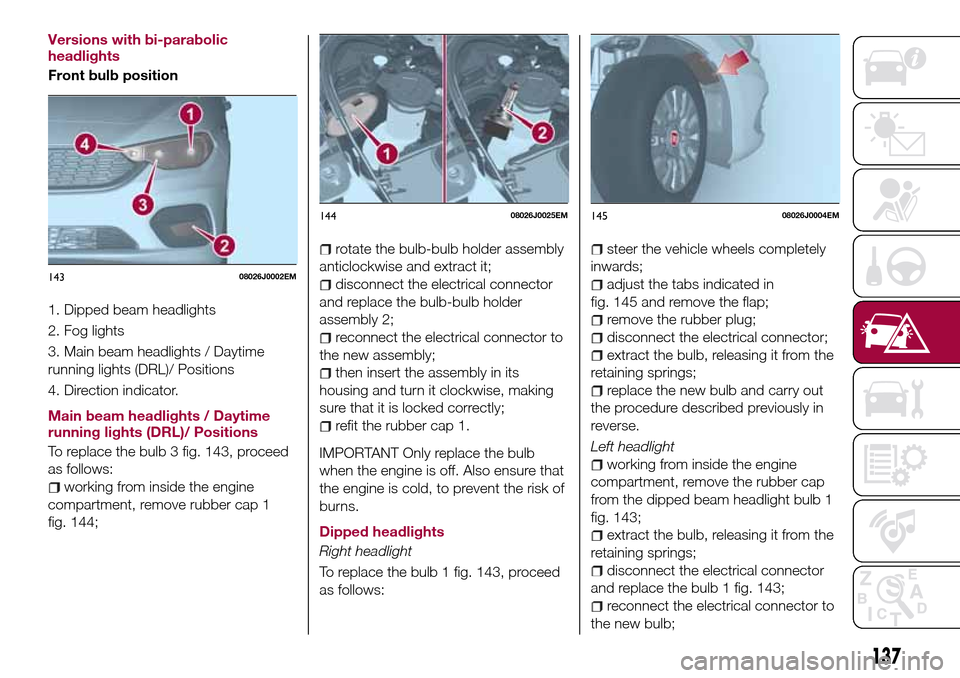
Front bulb position
1. Dipped beam headlights
2. Fog lights
3. Main beam headlights / Daytime
running lights (DRL)/ Positions
4. Direction indicator.
Main beam headlights / Daytime
running lights (DRL)/ Positions
To replace the bulb 3 fig. 143, proceed
as follows:
working from inside the engine
compartment, remove rubber cap 1
fig. 144;
rotate the bulb-bulb holder assembly
anticlockwise and extract it;
disconnect the electrical connector
and replace the bulb-bulb holder
assembly 2;
reconnect the electrical connector to
the new assembly;
then insert the assembly in its
housing and turn it clockwise, making
sure that it is locked correctly;
refit the rubber cap 1.
IMPORTANT Only replace the bulb
when the engine is off. Also ensure that
the engine is cold, to prevent the risk of
burns.
Dipped headlights
Right headlight
To replace the bulb 1 fig. 143, proceed
as follows:
steer the vehicle wheels completely
inwards;
adjust the tabs indicated in
fig. 145 and remove the flap;
remove the rubber plug;
disconnect the electrical connector;
extract the bulb, releasing it from the
retaining springs;
replace the new bulb and carry out
the procedure described previously in
reverse.
Left headlight
working from inside the engine
compartment, remove the rubber cap
from the dipped beam headlight bulb 1
fig. 143;
extract the bulb, releasing it from the
retaining springs;
disconnect the electrical connector
and replace the bulb 1 fig. 143;
reconnect the electrical connector to
the new bulb;
14308026J0002EM
14408026J0025EM14508026J0004EM
137
Page 140 of 264
reposition the assembly in the seat;
refit the rubber cap.
IMPORTANT Only replace the bulb
when the engine is off. Also ensure that
the engine is cold, to prevent the risk of
burns.
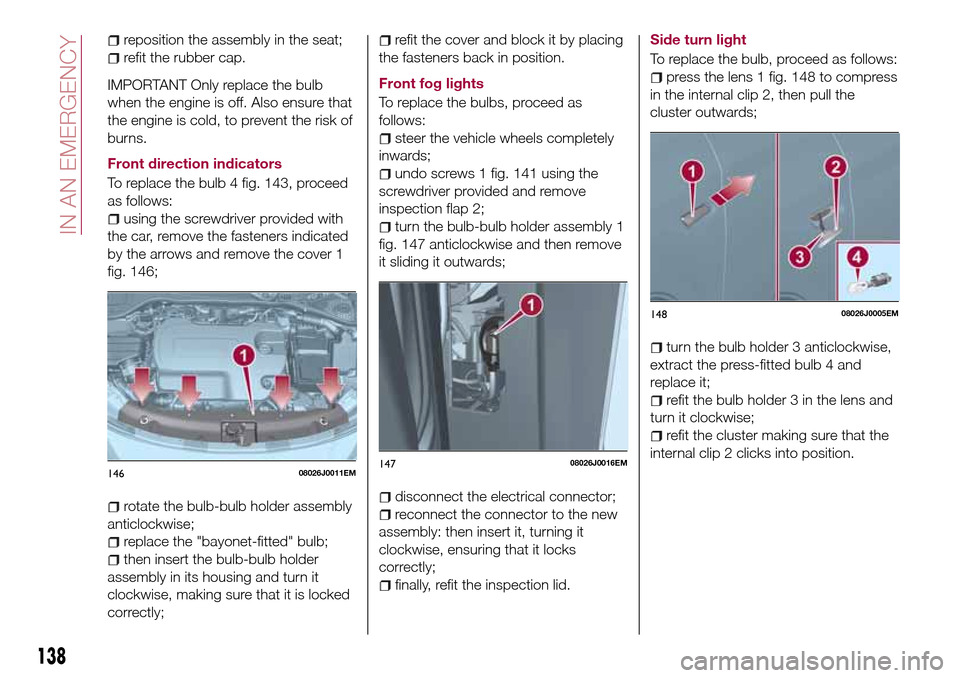
Front direction indicators
To replace the bulb 4 fig. 143, proceed
as follows:
using the screwdriver provided with
the car, remove the fasteners indicated
by the arrows and remove the cover 1
fig. 146;
rotate the bulb-bulb holder assembly
anticlockwise;
replace the "bayonet-fitted" bulb;
then insert the bulb-bulb holder
assembly in its housing and turn it
clockwise, making sure that it is locked
correctly;
refit the cover and block it by placing
the fasteners back in position.
Front fog lights
To replace the bulbs, proceed as
follows:
steer the vehicle wheels completely
inwards;
undo screws 1 fig. 141 using the
screwdriver provided and remove
inspection flap 2;
turn the bulb-bulb holder assembly 1
fig. 147 anticlockwise and then remove
it sliding it outwards;
disconnect the electrical connector;
reconnect the connector to the new
assembly: then insert it, turning it
clockwise, ensuring that it locks
correctly;
finally, refit the inspection lid.Side turn light
To replace the bulb, proceed as follows:
press the lens 1 fig. 148 to compress
in the internal clip 2, then pull the
cluster outwards;
turn the bulb holder 3 anticlockwise,
extract the press-fitted bulb 4 and
replace it;
refit the bulb holder 3 in the lens and
turn it clockwise;
refit the cluster making sure that the
internal clip 2 clicks into position.
14608026J0011EM14708026J0016EM
14808026J0005EM
138
IN AN EMERGENCY
Page 142 of 264
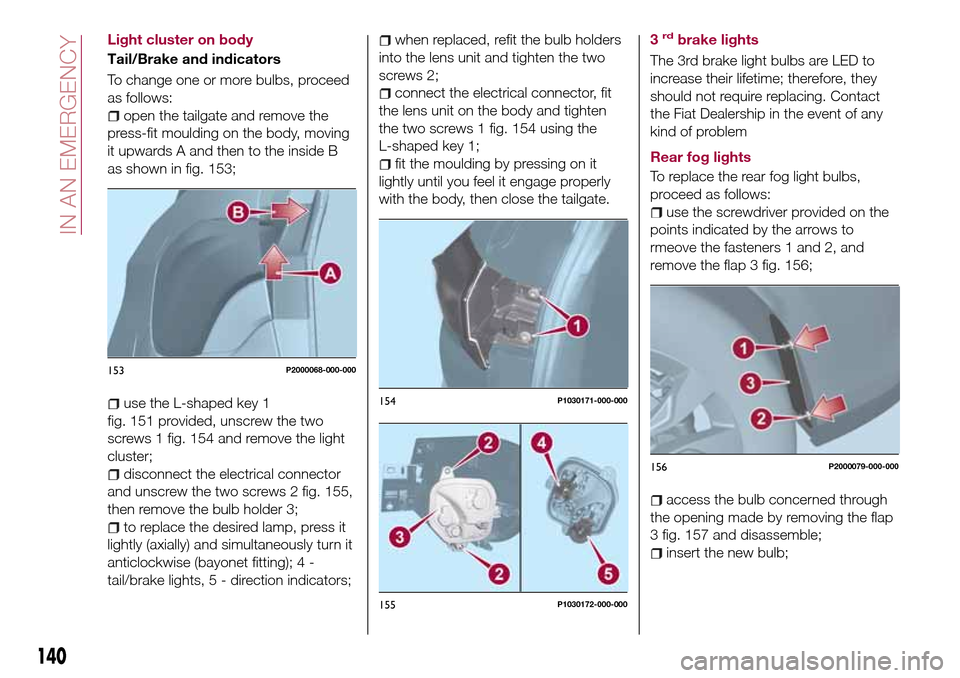
Light cluster on body
Tail/Brake and indicators
To change one or more bulbs, proceed
as follows:
open the tailgate and remove the
press-fit moulding on the body, moving
it upwards A and then to the inside B
as shown in fig. 153;
use the L-shaped key 1
fig. 151 provided, unscrew the two
screws 1 fig. 154 and remove the light
cluster;
disconnect the electrical connector
and unscrew the two screws 2 fig. 155,
then remove the bulb holder 3;
to replace the desired lamp, press it
lightly (axially) and simultaneously turn it
anticlockwise (bayonet fitting); 4 -
tail/brake lights, 5 - direction indicators;
when replaced, refit the bulb holders
into the lens unit and tighten the two
screws 2;
connect the electrical connector, fit
the lens unit on the body and tighten
the two screws 1 fig. 154 using the
L-shaped key 1;
fit the moulding by pressing on it
lightly until you feel it engage properly
with the body, then close the tailgate.3
rdbrake lights
The 3rd brake light bulbs are LED to
increase their lifetime; therefore, they
should not require replacing. Contact
the Fiat Dealership in the event of any
kind of problem
Rear fog lights
To replace the rear fog light bulbs,
proceed as follows:
use the screwdriver provided on the
points indicated by the arrows to
rmeove the fasteners 1 and 2, and
remove the flap 3 fig. 156;
access the bulb concerned through
the opening made by removing the flap
3 fig. 157 and disassemble;
insert the new bulb;
153P2000068-000-000
154P1030171-000-000
155P1030172-000-000
156P2000079-000-000
140
IN AN EMERGENCY
Page 259 of 264

INDEX
ABS (system)...............73
Active Grille Shutter............49
Active safety systems...........73
Adaptive cruise control.........116
Airbag
Front airbags.............101
Side bags...............105
Airbag (SRS supplementary
restraint system)...........101
Automatic climate control system.......................31
Automatic light control..........23
AUX source.............228 ,241
Battery..................175
Battery recharging............177
Bluetooth® source........227 ,241
Bodywork (cleaning and
maintenance).............183
Bonnet....................33
Carrying children safely.........88
Changing a wheel............148
Checking levels..............170
Child protection systems........88
Child safety device............14
Climate control...............29
CO2 emissions..............208
Control buttons..............54
Control panel and on-board
instruments...............51CONTROLS
Controls on the front panel. . . .222
Controls on front panel.........234
Daytime running lights (DRL)......23
Daytime running lights (DRL) (bulb
replacement)..............136
Dimensions................195
Dipped headlights.............23
Dipped headlights (bulb
replacement)..............135
Direction indicators............25
Display....................54
Doors.....................14
Double load compartment (TIPO
STATION WAGON version)......38
Driving assistance systems.......76
DTC (system)................73
Electric power steering.........34
Electric windows..............33
Electronic Cruise Control........114
Engine...................188
marking................187
Engine compartment..........170
Engine compartment (washing). . . .184
Engine oil (consumption)........175
Engine oil (level check).........175
ERM (system)................74
ESC (system)................73
External lights...............23
Fiat Code (system)............13
Fix&Go Automatic kit..........152
Flashing the headlights..........24
Fluids and lubricants..........202
Front ceiling light..............26
Front fog light (bulb replacement) . .136
Front fog lights...............24
Front panel control summary
table...................235
Front seat electric heating........16
Front seats (manual adjustments) . . .16
Fuel consumption............206
Fuel cut-off system...........157
Full Brake Control (system).......76
Fuse boxes................142
Fuses (replacement)...........142
GSI (Gear Shift Indicator)........54
Hazard warning lights.........132
Emergency braking.........132
Head restraints...............20
Headlight alignment corrector.....24
Headlights..................40
Headlights (cleaning)..........184
Heavy-duty use of the vehicle
(scheduled servicing)........169
HHC (system)................74
Identification data
chassis marking...........187
engine marking............187