2017 FIAT TIPO 5DOORS STATION WAGON remove seats
[x] Cancel search: remove seatsPage 20 of 264

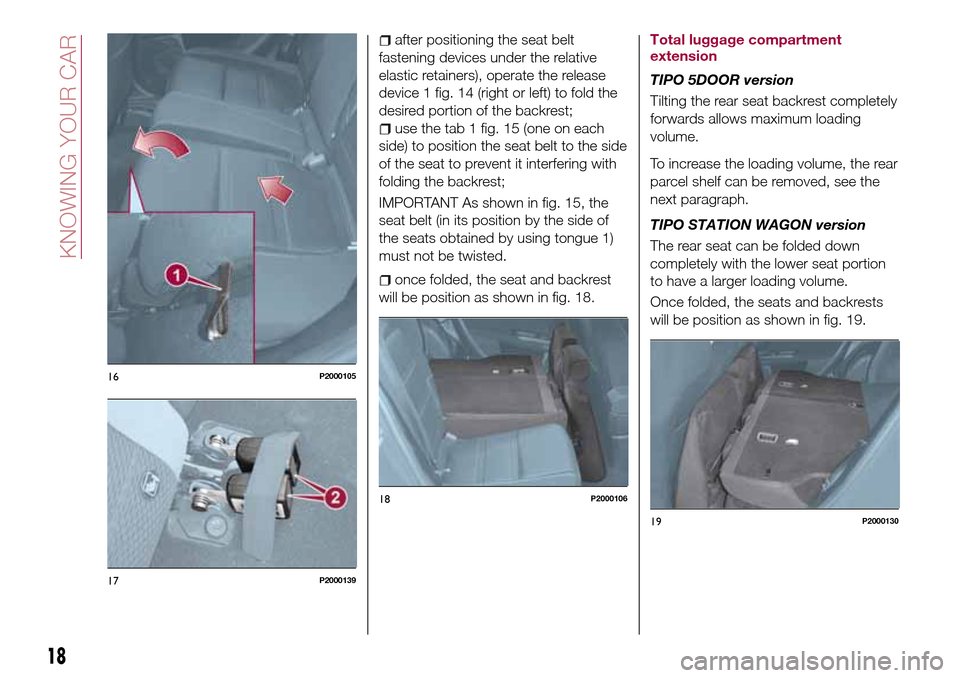
after positioning the seat belt
fastening devices under the relative
elastic retainers), operate the release
device 1 fig. 14 (right or left) to fold the
desired portion of the backrest;
use the tab 1 fig. 15 (one on each
side) to position the seat belt to the side
of the seat to prevent it interfering with
folding the backrest;
IMPORTANT As shown in fig. 15, the
seat belt (in its position by the side of
the seats obtained by using tongue 1)
must not be twisted.
once folded, the seat and backrest
will be position as shown in fig. 18.Total luggage compartment
extension
TIPO 5DOOR version
Tilting the rear seat backrest completely
forwards allows maximum loading
volume.
To increase the loading volume, the rear
parcel shelf can be removed, see the
next paragraph.
TIPO STATION WAGON version
The rear seat can be folded down
completely with the lower seat portion
to have a larger loading volume.
Once folded, the seats and backrests
will be position as shown in fig. 19.
16P2000105
17P2000139
18P2000106
19P2000130
18
KNOWING YOUR CAR
Page 21 of 264

Removing the rear parcel shelf
(TIPO 5DOOR version)
To remove the parcel shelf, proceed as
follows:
open the tailgate and unhook the two
side cords (one on each side) from their
supports;
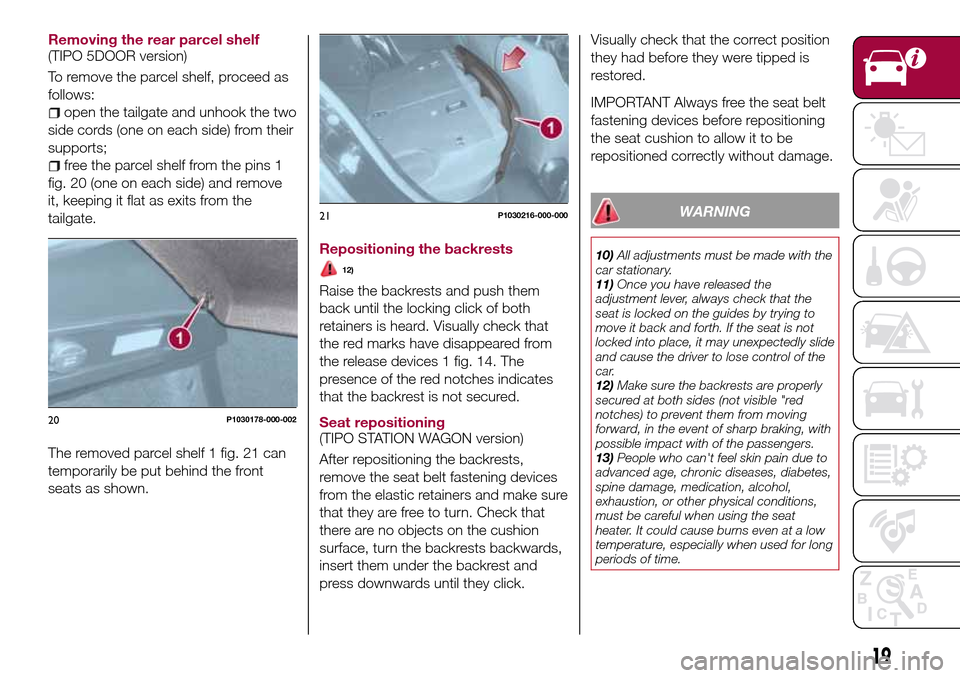
free the parcel shelf from the pins 1
fig. 20 (one on each side) and remove
it, keeping it flat as exits from the
tailgate.
The removed parcel shelf 1 fig. 21 can
temporarily be put behind the front
seats as shown.
Repositioning the backrests
12)
Raise the backrests and push them
back until the locking click of both
retainers is heard. Visually check that
the red marks have disappeared from
the release devices 1 fig. 14. The
presence of the red notches indicates
that the backrest is not secured.
Seat repositioning
(TIPO STATION WAGON version)
After repositioning the backrests,
remove the seat belt fastening devices
from the elastic retainers and make sure
that they are free to turn. Check that
there are no objects on the cushion
surface, turn the backrests backwards,
insert them under the backrest and
press downwards until they click.Visually check that the correct position
they had before they were tipped is
restored.
IMPORTANT Always free the seat belt
fastening devices before repositioning
the seat cushion to allow it to be
repositioned correctly without damage.
WARNING
10)All adjustments must be made with the
car stationary.
11)Once you have released the
adjustment lever, always check that the
seat is locked on the guides by trying to
move it back and forth. If the seat is not
locked into place, it may unexpectedly slide
and cause the driver to lose control of the
car.
12)Make sure the backrests are properly
secured at both sides (not visible "red
notches) to prevent them from moving
forward, in the event of sharp braking, with
possible impact with of the passengers.
13)People who can't feel skin pain due to
advanced age, chronic diseases, diabetes,
spine damage, medication, alcohol,
exhaustion, or other physical conditions,
must be careful when using the seat
heater. It could cause burns even at a low
temperature, especially when used for long
periods of time.
20P1030178-000-002
21P1030216-000-000
19
Page 22 of 264

14)Do not place objects on the seat or on
the backrest that may isolate the heat,
such as a cover or a pillow. It may cause
the seat heating device to overheat. Sitting
on an overheated seat may cause severe
burns due to the increase in temperature of
the seat surface.
IMPORTANT
4)The fabric upholstery of the seats has
been designed to withstand long-term wear
deriving from normal use of the car. Some
precautions are however required. Avoid
prolonged and/or excessive rubbing
against clothing accessories such as metal
buckles and Velcro strips which, by
applying a high pressure on the fabric in a
small area, could cause it to break, thereby
damaging the upholstery.
HEAD RESTRAINTS
15)
FRONT HEAD
RESTRAINTS
Adjustment
They can be adjusted to 4 height
positions (completely raised /
2 intermediate positions / completely
lowered).
Upward adjustment: raise the head
restraint until it clicks into place.
Downward adjustment: press button 1
fig. 22 and lower the head restraint.
Removal
Proceed as follows to remove the head
restraint:
tilt the backrest (to prevent it from
coming into contact with the roof);
press both buttons 1 and 2 fig. 22 at
the side of the two supports, thenremove the head restraint.
IMPORTANT Always reposition the
head restraints if they have been
removed before starting to drive
normally.
REAR HEAD RESTRAINTS
Adjustment
Two side and one central head
restraints (where present) can be
height-adjusted to 3 positions
(completely raised / intermediate /
completely lowered) are provided for
the rear seats
Upward adjustment: raise the head
restraint until it clicks into place.
Travelling with the head restraints in the
not-in-use position (all low) occupied
rear seats is not advised.
On some versions, the label shown in
fig. 23 reminds the passenger using the
2204076J0001EM
2304076J0002EM
20
KNOWING YOUR CAR
Page 143 of 264

refit the flap 3 properly, inserting the
fasteners 1 and 2 in their seats.
In the event the bulb cannot be
replaced, contact a Fiat Dealership.
Number plate lights
To replace the bulbs, proceed as
follows:
use the screwdriver provided to
remove the lens unit 1 fig. 158;
turn the bulb holder 2
fig. 159 anticlockwise, remove the bulb
3 and replace it;
refit the lens unit, pressing it lightly.
NOTE Before removing the lens unit,
put a protection (e.g. cloth) on the tip of
the screwdriver, in order not to damage
the lens itself.WARNING
130)Before replacing the bulb, wait for the
exhaust ducts to cool down: DANGER OF
SCALDING!
131)Modifications or repairs to the electric
system that are not carried out properly or
do not take the system technical
specifications into account can cause
malfunctions leading to the risk of fire.132)Halogen bulbs contain pressurised
gas, in the case of breakage they may
burst causing glass fragments to be
projected outwards.
133)Only replace bulbs when the engine is
off. Also ensure that the engine is cold, to
prevent the risk of burns.
IMPORTANT
55)Halogen bulbs must be handled
holding the metallic part only. Touching the
transparent part of the bulb with your
fingers may reduce the intensity of the
emitted light and even reduce the lifespan
of the bulb. In the event of accidental
contact, wipe the bulb with a cloth
moistened with alcohol and let the bulb dry.157P2000080-000-000158P1030157-000-000
15908026J0026EM
141
Page 187 of 264

INTERIOR
172) 173) 174)
Periodically check the cleanliness of the
interior, beneath the mats, which could
cause oxidation of the sheet metal.
SEATS AND FABRIC
PARTS
Remove dust with a soft brush or a
vacuum cleaner. It is advisable to use a
moist brush on when cleaning
non-fabric upholstery. Rub the seats
with a sponge moistened with a
solution of water and neutral detergent.
LEATHER SEATS(where provided)
Remove the dry dirt with a chamois or
slightly damp cloth, without exerting too
much pressure.
Remove any liquid or grease stains
using an absorbent dry cloth, without
rubbing. Then clean with a soft cloth or
buckskin cloth dampened with water
and mild soap. If the stain persists, use
specific products and observe the
instructions carefully.
IMPORTANT Never use alcohol. Make
sure that the cleaning products used
contain no alcohol or alcohol
derivatives, even in small quantities.PLASTIC AND COATED
PARTS
81)
Clean interior plastic parts with a damp
cloth (if possible made from microfibre),
and a solution of water and neutral,
non-abrasive detergent.
To clean oily or persistent stains, use
specific products free from solvents and
designed to maintain the original
appearance and colour of the
components.
Remove any dust using a microfibre
cloth, if necessary moistened with
water. The use of paper tissues is not
recommended as these may leave
residues.
GENUINE LEATHER
PARTS
(where provided)
Use only water and mild soap to clean
these parts. Never use alcohol or
alcohol-based products.
Before using a specific product for
cleaning interiors, make sure that it
does not contain alcohol and/or alcohol
based substances.
WARNING
172)Never use flammable products, such
as petrol ether or rectified petrol to clean
the inside of the car. The electrostatic
charges which are generated by rubbing
during the cleaning operation may cause a
fire.
173)Do not keep aerosol cans in the car:
they might explode. Aerosol cans must not
be exposed to a temperature exceeding
50°C. When the vehicle is exposed to
sunlight, the internal temperature can
greatly exceed this value.
174)There must be no obstacles on the
floor underneath the pedals; make sure
that mats are always flat and do not
interfere with the pedals.
IMPORTANT
81)Never use alcohol, petrols and
derivatives to clean the dashboard and
instrument panel lens.
185