2017 FIAT TIPO 5DOORS STATION WAGON phone
[x] Cancel search: phonePage 57 of 264
to reset the displayed/selected
functions.
MAIN MENU
The Main menu comprises a series of
items which can be selected using the
control buttons to access the different
selection and setting options given in
the following paragraphs.
REMARKS
Some options have a submenu.
With theUconnect™ 5"or7" HD
system, some Menu items are shown
and managed on the display of the
latter and not on the instrument panel
display (refer to the dedicated
Multimedia chapter or to the
supplement available online).
MENU OPTIONS
The Menu includes the following items:
TRIP
GSI
VEHICLE INFO
DRIVER ASSIST
AUDIO (function available in versions
and markets where present)
PHONE (function available in versions
and markets where present)
NAVIGATION (function available in
versions and markets where present)
ALERTS
VEHICLE SETTINGSTrip
This menu item displays the information
on the "Trip computer" (for further
information, see the description of the
"Trip computer" paragraph in this
chapter).
The information shown on the display is
as follows:
Instant info: distance (km or miles),
instantaneous consumption (mpg,
l/100 km or km/l);
Trip A: distance A (km or miles), trip
time A (hours/minutes/seconds),
average consumption A (mpg, or
l/100 km or km/l), average speed A
(km/h or mph);
Trip B: distance B (km or miles),
average consumption B (mpg, or
l/100 km or km/l), trip time B
(hours/minutes/seconds), average
speed B (km/h or mph).
Speedometer: km or miles displayed.
By pressing theOKbutton with
speedometer display active, you can
change the measurement unit (km/h
or mph). On leaving this screen, the
measurement unit set will take effect.
GSI
This menu item makes it possible to
see the gear shift indicator provided by
the GSI (gear shift indicator) system on
the display.Vehicle info
This menu item displays the information
on the vehicle conditions.
Press the
orbutton to select the
items listed below.
Tyre pressure: information displayed on
the iTPMS (where provided) (for further
information, see the description in
paragraph "Auxiliary driving systems" in
the "Safety" chapter).
Engine oil temperature: engine oil
temperature displayed.
Change engine oil: indication for engine
oil change.
Battery voltage: display of the battery
voltage value (charge level).
Service (Scheduled servicing):Number
of kilometres (or miles) and days until
the next Scheduled Servicing operation.
WARNING
The “Scheduled Servicing Plan”
includes vehicle maintenance at fixed
intervals (refer to the "Maintenance and
care" chapter).
This is displayed automatically, with
ignition device at MAR, 2000 km before
servicing or, where provided, 30 days
before servicing. It is also displayed
each time the ignition device is turned
to MAR or, for some versions, every
200 km. Below this threshold servicing
indications are more frequent. The
55
Page 58 of 264
display will be in km or miles according
to the unit of measurement set.
When the following scheduled servicing
is approaching ("coupon"), the word
"Service" will be displayed, followed by
the number of kilometres/miles or days
left, when the ignition device is turned
to MAR. Go to a Fiat Dealership, where
the "Scheduled Servicing Plan"
operations will be performed and the
message will be reset.
Driver Assist
This menu item allows you to view and
change the Adaptive Cruise Control
(ACC) settings on the instrument panel
display.
Audio
(function available in versions and
markets where present)
This Menu item allows some
information displayed on the
Uconnect™system to be repeated on
the instrument panel display (for further
information see the dedicated chapter).
Phone
(function available in versions and
markets where present)
This Menu item allows some
information displayed on the
Uconnect™system to be repeated on
the instrument panel display (for further
information see the dedicated chapter).The information displayed includes the
mobile pairing condition (mobile paired
or not paired), active/incoming/on hold
calls and the management of double
calls (first incoming, second on hold,
etc.).
In the phone menu, you can also select
3 sub-menus “SMS reader”, “recent
calls” and “favourite numbers” (available
with theUconnect™7'' HDsystem),
which can be selected with the arrows
or. This menu can also be used
to select and manage the last 10 calls
or the last 10 SMS using the directional
buttons on the steering wheel.
Navigation
(function available in versions and
markets where present)
This Menu item allows some
information displayed on the
Uconnect™ 5"o7" HDsystem to be
shown on the instrument panel display
(for further information see the
dedicated chapter).
Alerts
This menu item displays information/
failure messages stored by the system.
Vehicle Settings
This menu item allows you to change
the settings for:
Display;
Units;
Clock & Date;
Security;
Safety & Assistance;
Lights;
Doors & Locks.
Display
By selecting item "Display" you can
access the following settings:
Display Settings (changing
instrument panel display settings): this
menu item makes it possible to change
the displaying of the information, for
example the Compass (where present),
Outside temperature, Date (day/month),
Time (hours/minutes), Audio information
(where present). Selecting “Reset of the
default settings” makes it possible to
reset and restore the default settings;
Language: allows you to select the
language for showing the
information/warnings;
See phone: used to activate/
deactivate the display of pop-ups on
the instrument panel when there are
incoming calls, outgoing calls, on hold
calls, audio conference and incoming
SMS (available in versions and markets
where present);
See navigation: allows you to display
the information about the Navigation
mode on the instrument panel (available
in versions and markets where present);
56
KNOWING THE INSTRUMENT PANEL
Page 107 of 264
SIDE BAGS
To help increase occupants protection
in the event of side impact collisions,
the vehicle is equipped with front side
bags and window bags.
Side bag
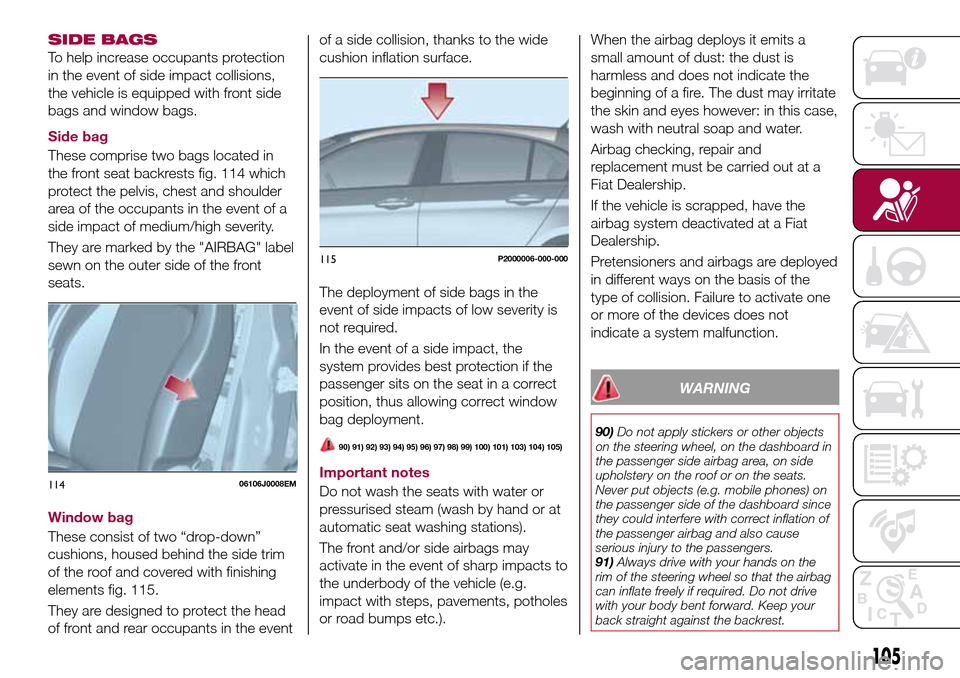
These comprise two bags located in
the front seat backrests fig. 114 which
protect the pelvis, chest and shoulder
area of the occupants in the event of a
side impact of medium/high severity.
They are marked by the "AIRBAG" label
sewn on the outer side of the front
seats.
Window bag
These consist of two “drop-down”
cushions, housed behind the side trim
of the roof and covered with finishing
elements fig. 115.
They are designed to protect the head
of front and rear occupants in the eventof a side collision, thanks to the wide
cushion inflation surface.
The deployment of side bags in the
event of side impacts of low severity is
not required.
In the event of a side impact, the
system provides best protection if the
passenger sits on the seat in a correct
position, thus allowing correct window
bag deployment.
90) 91) 92) 93) 94) 95) 96) 97) 98) 99) 100) 101) 103) 104) 105)
Important notes
Do not wash the seats with water or
pressurised steam (wash by hand or at
automatic seat washing stations).
The front and/or side airbags may
activate in the event of sharp impacts to
the underbody of the vehicle (e.g.
impact with steps, pavements, potholes
or road bumps etc.).When the airbag deploys it emits a
small amount of dust: the dust is
harmless and does not indicate the
beginning of a fire. The dust may irritate
the skin and eyes however: in this case,
wash with neutral soap and water.
Airbag checking, repair and
replacement must be carried out at a
Fiat Dealership.
If the vehicle is scrapped, have the
airbag system deactivated at a Fiat
Dealership.
Pretensioners and airbags are deployed
in different ways on the basis of the
type of collision. Failure to activate one
or more of the devices does not
indicate a system malfunction.
WARNING
90)Do not apply stickers or other objects
on the steering wheel, on the dashboard in
the passenger side airbag area, on side
upholstery on the roof or on the seats.
Never put objects (e.g. mobile phones) on
the passenger side of the dashboard since
they could interfere with correct inflation of
the passenger airbag and also cause
serious injury to the passengers.
91)Always drive with your hands on the
rim of the steering wheel so that the airbag
can inflate freely if required. Do not drive
with your body bent forward. Keep your
back straight against the backrest.
11406106J0008EM
115P2000006-000-000
105
Page 132 of 264
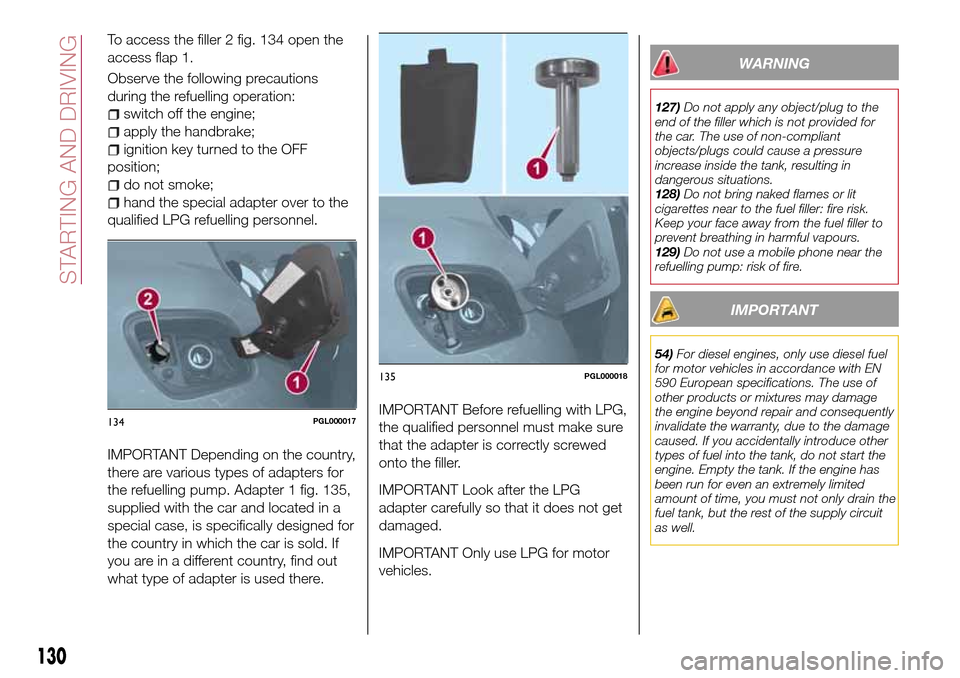
To access the filler 2 fig. 134 open the
access flap 1.
Observe the following precautions
during the refuelling operation:
switch off the engine;
apply the handbrake;
ignition key turned to the OFF
position;
do not smoke;
hand the special adapter over to the
qualified LPG refuelling personnel.
IMPORTANT Depending on the country,
there are various types of adapters for
the refuelling pump. Adapter 1 fig. 135,
supplied with the car and located in a
special case, is specifically designed for
the country in which the car is sold. If
you are in a different country, find out
what type of adapter is used there.IMPORTANT Before refuelling with LPG,
the qualified personnel must make sure
that the adapter is correctly screwed
onto the filler.
IMPORTANT Look after the LPG
adapter carefully so that it does not get
damaged.
IMPORTANT Only use LPG for motor
vehicles.
WARNING
127)Do not apply any object/plug to the
end of the filler which is not provided for
the car. The use of non-compliant
objects/plugs could cause a pressure
increase inside the tank, resulting in
dangerous situations.
128)Do not bring naked flames or lit
cigarettes near to the fuel filler: fire risk.
Keep your face away from the fuel filler to
prevent breathing in harmful vapours.
129)Do not use a mobile phone near the
refuelling pump: risk of fire.
IMPORTANT
54)For diesel engines, only use diesel fuel
for motor vehicles in accordance with EN
590 European specifications. The use of
other products or mixtures may damage
the engine beyond repair and consequently
invalidate the warranty, due to the damage
caused. If you accidentally introduce other
types of fuel into the tank, do not start the
engine. Empty the tank. If the engine has
been run for even an extremely limited
amount of time, you must not only drain the
fuel tank, but the rest of the supply circuit
as well.
134PGL000017
135PGL000018
130
STARTING AND DRIVING
Page 133 of 264
IN AN EMERGENCY
A punctured tyre or a burnt-out bulb?
At times, a problem may interfere with
our journey.
The pages on emergencies can help
you to deal with critical situations
independently and with calm.
In an emergency we recommend that
you call the freephone number found in
the Warranty Booklet.
It is also possible to call the national or
international universal freephone
number to search for the nearest Fiat
Dealership.HAZARD WARNING LIGHTS.....132
BULB REPLACEMENT........132
REPLACING FUSES..........142
CHANGING A WHEEL.........148
FIX&GO AUTOMATIC KIT.......152
JUMP STARTING............155
FUEL CUT-OFF SYSTEM.......157
TOWING THE VEHICLE........159
131
Page 179 of 264
162)When performing any operation on
the battery or near it, always protect your
eyes with special goggles.
IMPORTANT
64)Be careful not to confuse the various
types of fluids while topping up: they are
not compatible with each other! Topping up
with an unsuitable fluid could severely
damage your vehicle.
65)The oil level must never exceed the
MAX. mark.
66)Always top up using engine oil of the
same specifications as that already in the
engine.
67)PARAFLU
UPanti-freeze is used in the
engine cooling system. Use fluid of the
same type as that contained in the cooling
system for any top-ups. PARAFLU
UP
cannot be mixed with any other type of
fluid. If this happens, do not start the
engine under any circumstances and
contact a Fiat Dealership.
68)Prevent brake fluid, which is highly
corrosive, from coming into contact with
painted parts. Should it happen,
immediately wash with water.
69)If the vehicle must remain unused for a
long time at a very low temperature,
remove the battery and take it to a warm
place, to avoid freezing.70)Incorrect installation of electric and
electronic devices may cause severe
damage to your car. After purchasing your
vehicle, if you wish to install any
accessories (e.g. anti-theft, radio phone,
etc.), go to a Fiat Dealership, which will
suggest the most suitable devices and
advise you whether a higher capacity
battery needs to be installed.
IMPORTANT
3)The used engine oil and the filter that has
been replaced contain substances that are
harmful to the environment. To change the
oil and filters, we advise you to contact a
Fiat Dealership.
4)Batteries contain substances which are
very dangerous for the environment. For
battery replacement, contact a Fiat
Dealership.
BATTERY
RECHARGING
IMPORTANT NOTES
IMPORTANT The battery recharging
procedure is given as information only.
To carry out this operation contact a
Fiat Dealership.
IMPORTANT After setting the ignition
device to STOP and having closed the
driver side door, wait at least one
minute before disconnecting the
electrical supply from the battery. When
reconnecting the electrical supply to the
battery, make sure that the ignition
device is in the STOP position and the
driver side door is closed.
IMPORTANT Charging should be slow
at a low ampere rating for
approximately 24 hours. Charging for a
longer time may damage the battery.
IMPORTANT The cables of the
electrical system must be correctly
reconnected to the battery, i.e. the
positive cable (+) to the positive
terminal and the negative cable (–) to
the negative terminal. The battery
terminals are marked with the positive
(+) and negative (–) symbols, and are
shown on the battery cover. The battery
terminals must also be corrosion-free
and firmly secured to the terminals. If a
177
Page 214 of 264
IMPORTANT Keep the vehicle radio
passport in a safe place so that you
can give the information to the relevant
authorities if the system is stolen.
IMPORTANT NOTES
Look at the screen only and when it is
necessary and safe. If you need to look
at the screen for a long time, pull over
to a safe place so as not to be
distracted while driving.
Immediately stop using the system in
the event of a fault. Otherwise the
system might be damaged. Contact a
Fiat Dealership as soon as possible to
have the system repaired.
WARNING
178)Follow the safety rules here below:
otherwise serious injuries may occur to the
occupants or the system may be
damaged.
179)If the volume is too loud this can be
dangerous. Adjust the volume so that you
can still hear background noises (e.g.
horns, ambulances, police vehicles, etc.).
IMPORTANT
83)Only clean the front panel and the
display lens with a soft, clean, dry,
anti-static cloth. Cleaning and polishing
products may damage the surface. Never
use alcohol, petrols and derivatives.
84)Do not use the display as a base for
supports with suction pads or adhesives for
external navigators or smartphones or
similar devices.
212
MULTIMEDIA
Page 216 of 264

FRONT PANEL CONTROL SUMMARY TABLE
Button Functions Mode
Switching on Short button press
Switching off Short button press
Volume adjustment Knob clockwise/anticlockwise turning
Volume activation/deactivation (Mute/Pause) Short button press
Exit the selection/return to previous screen Short button press
BROWSE ENTERScrolling the list or tuning to a radio station or select
previous/next trackKnob clockwise/anticlockwise turning
Confirmation of the option displayed Short button press
INFODisplay mode selection (Radio, Media) Short button press
PHONE
(*)Access to Telephone mode (or versions/markets,
where provided)Short button press
AUDIO
(*)Access to the sound setting and adjustment functions Short button press
MENUAccess to the Infotelematic Settings/System menu Short button press
MEDIASource selection: USB/iPod or AUX Short button press
RADIOAccess to the Radio mode Short button press
1-2-3-4-5-6Store current radio station Long button press
Stored radio station recall Short button press
A-B-CSelection of the group of radio presets or selection of
the desired letter in each listShort button press
Search for previous radio station or selection of
USB/iPod previous trackShort button press
Scan of lower frequencies until released/fast return of
USB/iPod trackLong button press
(*) (for versions/markets, where provided)
214
MULTIMEDIA