2017 FIAT TIPO 5DOORS STATION WAGON change time
[x] Cancel search: change timePage 122 of 264
new distance will be stored also after
the system is deactivated and
reactivated.
To decrease the distance
Press and release the
button to
decrease the distance setting.
The distance setting decreases by one
bar (shorter) every time the button is
pressed.
The set speed is held if there are no
vehicles ahead. Once the shortest
distance has been reached, a further
press of the button will set the longest
distance.
If a slower vehicle is detected in the
same lane, it will be shown on the
display in the “Driver Assist” area. The
device will automatically adjust the car’s
speed to maintain the set distance,
independently of the set speed.
The vehicle holds the set distance until:
the vehicle ahead accelerates to a
speed higher than the set speed;
the vehicle ahead leaves the lane or
the detection field of the Adaptive
Cruise Control device sensor;
the distance setting is changed;
the Adaptive Cruise Control device is
deactivated/cancelled.
IMPORTANT The maximum breaking
applied by the device is limited. The
driver may apply the brakes in all cases
if needed.
IMPORTANT If the device predicts that
the braking level is not sufficient to hold
the set distance, the driver is warned by
a message indicating that the vehicle
ahead is too close. An acoustic signal is
also emitted. In this case, it is advisable
to brake immediately as necessary to
hold a safe distance from the vehicle
ahead.
IMPORTANT The driver is responsible
for ensuring that there are no
pedestrians, other vehicles or
objectives along the direction of the
vehicle. Failure to comply with these
precautions may cause serious
accidents and injuries.
IMPORTANT The driver is fully
responsible for holding a safe distance
from the vehicle ahead respecting the
highway code in force in the respective
country.
DEACTIVATION
The device is deactivated and the set
speed is cancelled if:
thebutton is pressed on the
Adaptive Cruise Control;
thebutton is pressed on the
electronic Cruise Control;
the Speed Limiter button is pressed;
the ignition device is in the STOP
position.
The device is cancelled (the set speed
and distance are stored):
when the CANC button is pressed;
when the conditions shown in the
“Setting the desired speed” paragraph
occur;
when the vehicle speed drops under
the minimum set speed (e.g. in
presence of slow vehicles).
If these conditions occur while the
system is decelerating with respect to a
vehicle ahead, the system could
continue the deceleration, if necessary,
also after it is cancelled or deactivated
within the minimum speed settable on
the system.
SYSTEM LIMITED
OPERATION SIGNAL
If the dedicated message is shown on
the display, a condition limiting the
system operation may have occurred.
The possible cause of this limitation is a
failure.
When the conditions limiting the system
functions end, this will go back to
normal and complete operation. Should
the fault persist, contact a Fiat
Dealership.
120
STARTING AND DRIVING
Page 123 of 264
PRECAUTIONS WHILE
DRIVING
The device may not work correctly in
some driving conditions (see below):
the driver must control the vehicle at all
times.
Towing a trailer
Use of the device is not recommended
while towing a trailer.
Vehicle not aligned
The device may not detect a vehicle
travelling on the same lane but which is
not aligned along the same direction of
travel or a vehicle which is cutting in
from a side lane. Sufficient distance
from the vehicles ahead may not be
guaranteed in these cases.
The non-aligned vehicle can weave in
and out of the driving direction causing
the vehicle to brake or accelerate
unexpectedly.
Steering and curves
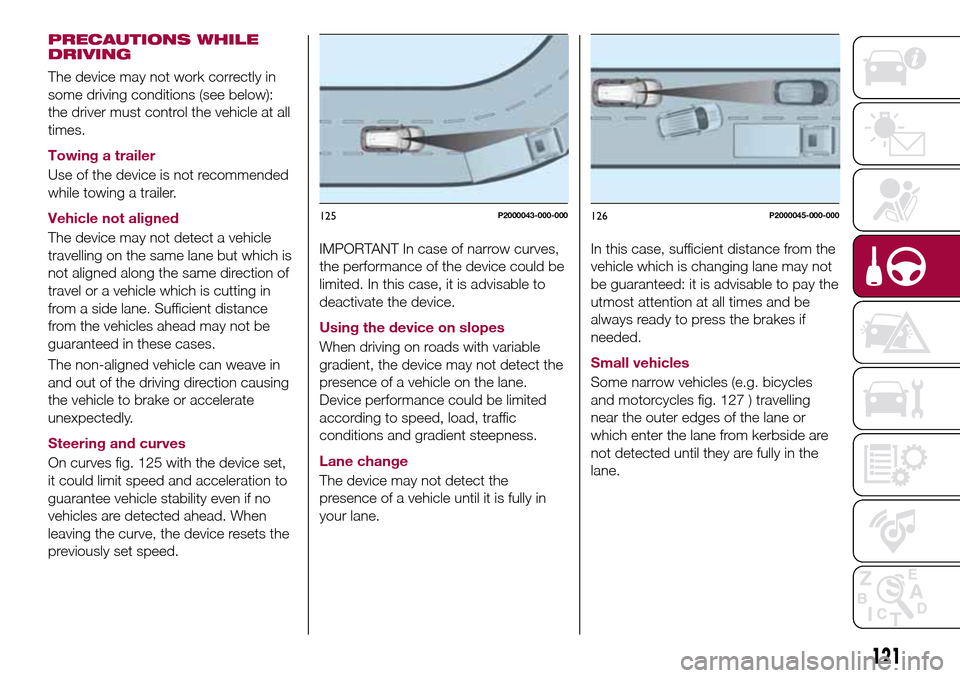
On curves fig. 125 with the device set,
it could limit speed and acceleration to
guarantee vehicle stability even if no
vehicles are detected ahead. When
leaving the curve, the device resets the
previously set speed.
IMPORTANT In case of narrow curves,
the performance of the device could be
limited. In this case, it is advisable to
deactivate the device.
Using the device on slopes
When driving on roads with variable
gradient, the device may not detect the
presence of a vehicle on the lane.
Device performance could be limited
according to speed, load, traffic
conditions and gradient steepness.
Lane change
The device may not detect the
presence of a vehicle until it is fully in
your lane.In this case, sufficient distance from the
vehicle which is changing lane may not
be guaranteed: it is advisable to pay the
utmost attention at all times and be
always ready to press the brakes if
needed.
Small vehicles
Some narrow vehicles (e.g. bicycles
and motorcycles fig. 127 ) travelling
near the outer edges of the lane or
which enter the lane from kerbside are
not detected until they are fully in the
lane.
125P2000043-000-000126P2000045-000-000
121
Page 142 of 264
Light cluster on body
Tail/Brake and indicators
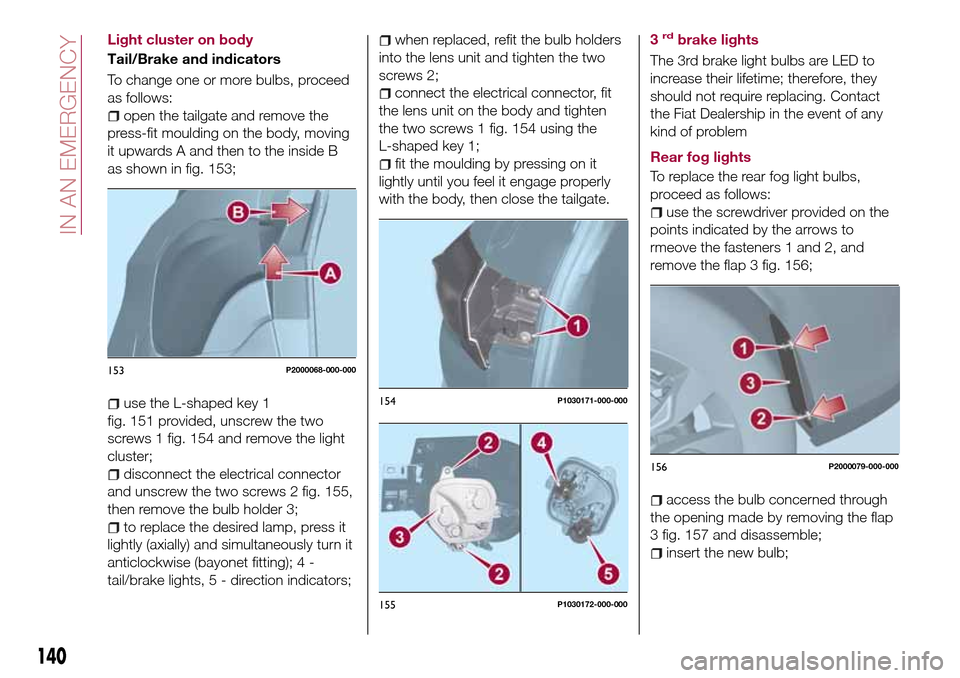
To change one or more bulbs, proceed
as follows:
open the tailgate and remove the
press-fit moulding on the body, moving
it upwards A and then to the inside B
as shown in fig. 153;
use the L-shaped key 1
fig. 151 provided, unscrew the two
screws 1 fig. 154 and remove the light
cluster;
disconnect the electrical connector
and unscrew the two screws 2 fig. 155,
then remove the bulb holder 3;
to replace the desired lamp, press it
lightly (axially) and simultaneously turn it
anticlockwise (bayonet fitting); 4 -
tail/brake lights, 5 - direction indicators;
when replaced, refit the bulb holders
into the lens unit and tighten the two
screws 2;
connect the electrical connector, fit
the lens unit on the body and tighten
the two screws 1 fig. 154 using the
L-shaped key 1;
fit the moulding by pressing on it
lightly until you feel it engage properly
with the body, then close the tailgate.3
rdbrake lights
The 3rd brake light bulbs are LED to
increase their lifetime; therefore, they
should not require replacing. Contact
the Fiat Dealership in the event of any
kind of problem
Rear fog lights
To replace the rear fog light bulbs,
proceed as follows:
use the screwdriver provided on the
points indicated by the arrows to
rmeove the fasteners 1 and 2, and
remove the flap 3 fig. 156;
access the bulb concerned through
the opening made by removing the flap
3 fig. 157 and disassemble;
insert the new bulb;
153P2000068-000-000
154P1030171-000-000
155P1030172-000-000
156P2000079-000-000
140
IN AN EMERGENCY
Page 179 of 264
162)When performing any operation on
the battery or near it, always protect your
eyes with special goggles.
IMPORTANT
64)Be careful not to confuse the various
types of fluids while topping up: they are
not compatible with each other! Topping up
with an unsuitable fluid could severely
damage your vehicle.
65)The oil level must never exceed the
MAX. mark.
66)Always top up using engine oil of the
same specifications as that already in the
engine.
67)PARAFLU
UPanti-freeze is used in the
engine cooling system. Use fluid of the
same type as that contained in the cooling
system for any top-ups. PARAFLU
UP
cannot be mixed with any other type of
fluid. If this happens, do not start the
engine under any circumstances and
contact a Fiat Dealership.
68)Prevent brake fluid, which is highly
corrosive, from coming into contact with
painted parts. Should it happen,
immediately wash with water.
69)If the vehicle must remain unused for a
long time at a very low temperature,
remove the battery and take it to a warm
place, to avoid freezing.70)Incorrect installation of electric and
electronic devices may cause severe
damage to your car. After purchasing your
vehicle, if you wish to install any
accessories (e.g. anti-theft, radio phone,
etc.), go to a Fiat Dealership, which will
suggest the most suitable devices and
advise you whether a higher capacity
battery needs to be installed.
IMPORTANT
3)The used engine oil and the filter that has
been replaced contain substances that are
harmful to the environment. To change the
oil and filters, we advise you to contact a
Fiat Dealership.
4)Batteries contain substances which are
very dangerous for the environment. For
battery replacement, contact a Fiat
Dealership.
BATTERY
RECHARGING
IMPORTANT NOTES
IMPORTANT The battery recharging
procedure is given as information only.
To carry out this operation contact a
Fiat Dealership.
IMPORTANT After setting the ignition
device to STOP and having closed the
driver side door, wait at least one
minute before disconnecting the
electrical supply from the battery. When
reconnecting the electrical supply to the
battery, make sure that the ignition
device is in the STOP position and the
driver side door is closed.
IMPORTANT Charging should be slow
at a low ampere rating for
approximately 24 hours. Charging for a
longer time may damage the battery.
IMPORTANT The cables of the
electrical system must be correctly
reconnected to the battery, i.e. the
positive cable (+) to the positive
terminal and the negative cable (–) to
the negative terminal. The battery
terminals are marked with the positive
(+) and negative (–) symbols, and are
shown on the battery cover. The battery
terminals must also be corrosion-free
and firmly secured to the terminals. If a
177
Page 180 of 264

"quick-type" battery charger is used
with the battery fitted on the vehicle,
before connecting it disconnect both
cables of the battery itself. Do not use a
"quick-type" battery charger to provide
the starting voltage.
VERSIONS WITHOUT
STOP/START SYSTEM
To recharge, proceed as follows:
disconnect the terminal from the
negative battery pole;
connect the charger cables to the
battery terminals, observing the polarity;
turn on the charger;
when it is recharged, turn the
charger off before disconnecting it from
the battery;
reconnect the terminal to the
negative battery pole.
VERSIONS WITH
STOP/START SYSTEM
(where provided)
To recharge, proceed as follows:
disconnect the connector 1
fig. 202 (pressing the button 2) from the
sensor 3 monitoring the battery
conditions, on the negative pole (–) 4 of
the battery;
connect the positive cable (+) of the
battery charger to the positive battery
terminal 5 and the negative cable (–) to
sensor terminal 4 as shown;
turn on the battery charger. At the
end of the charging process, switch the
battery charger off;
after having disconnected the
charging device, reconnect connector
1 to the sensor 3 as shown.
SERVICING
PROCEDURES
The following pages contain the rules
on therequiredmaintenance
envisaged by the technical personnel
who designed the vehicle.
In addition to these specific
maintenance instructions specified for
routine scheduled servicing, there are
other components which may require
intervention or replacements over the
vehicle’s life cycle.
ENGINE OIL
Engine oil level check
74)
To ensure correct engine lubrication, the
oil must always be kept at the
prescribed level (see "Engine
compartment" in this chapter).
ENGINE OIL FILTER
Replacing the engine oil filter
The engine oil filter must be replaced
each time the engine oil is changed.
It is advisable to replace it with a
genuine spare part, specifically
designed for this vehicle.
20209036J0001EM
178
SERVICING AND CARE
71) 72)
73)
Page 221 of 264
SWITCHING THE SYSTEM
ON/OFF
The system is switched on/off by
pressing the
button/knob.
Turn the button/knob clockwise to
increase the radio volume or
anticlockwise to decrease it. The
electronic volume adjustment control
rotates continuously (360°) in both
directions, without stop positions.
RADIO (TUNER) MODE
The system is equipped with the
following tuners: AM, FM and DAB (for
versions/markets, where provided).
Radio mode selection
Press the RADIO button on the front
panel to activate radio mode.
Selecting a frequency band
The different tuning modes can be
selected by pressing the RADIO button
on the front panel.
Indications on display
After the desired radio station is
selected on the display, the following
information is shown (INFO mode
activated):
In the upper part: the preset station, the
time and the other active radio settings
are highlighted.
In the central part: the name of the
current station, the frequency and theradio text information (if any) are
highlighted.
FM station list
Press the BROWSE ENTER
button/knob to display the complete list
of the FM stations that can be received.
AM/FM radio station storage
The preset stations are available in all
system modes and are selected by
touching one of the presetting buttons
1-2-3-4-5-6on the front panel. If you
are tuned to a radio station that you
wish to store, hold down the button on
the display which corresponds to the
desired preset until an acoustic
confirmation signal is emitted.
AM/FM radio station selection
To search for the desired radio station
press the
orbutton or use the
wheel of the steering wheel controls, or
turn the "BROWSE ENTER" knob.
Previous/next radio station search
Briefly press the
orbutton:
when the button is released the
previous or the next radio station is
displayed.Previous/next radio station fast
search
Hold down the
orbutton to
start the fast search: when the button is
released, the first tunable radio is
played.
MEDIA MODE
Interaction modes for AUX, USB/iPod
operation.
Audio source selection
To select the desired audio source
among those available: AUX o
USB/iPod, press theMEDIAbutton.
WARNING Some multimedia player
devices may not be compatible with the
Uconnect™system.
Track change (next/previous)
Briefly press the
button to play the
next track or briefly press the
button to return to the beginning
of the selected track or to the beginning
of the previous track if this has been
played for less than 3 seconds.
Fast forward/rewind through tracks
Press and hold down the
button to
fast forward the selected track or keep
the
button pressed to fast rewind
the track.
Track selection (browse)
Use this function to scroll through and
select the tracks on the active device.
219
Page 222 of 264
The choices available depend on the
device connected. For example, on a
USB/iPod device you can also scroll
through the list of artists, genres and
albums available on the device
depending on the information present
on the tracks using the BROWSE
ENTER button/knob.
Within each alphabetical list, theA-B-C
button on the front panel allows the
user to skip to the desired letter in the
list.
NOTE This button might be disabled for
some Apple® devices.
Press the BROWSE ENTER button to
activate this function on the source
being played. Turn the BROWSE
ENTER button/knob to select the
desired category and then press the
button/knob to confirm the selection.
Press the
button to cancel the
function.
NOTE The BROWSE ENTER button
does not allow any operation on an
AUX device.
Track information display
Press theINFObutton to select the
information displayed while playing
(Artist, Album, Genre, Name, Folder, File
name). Press the
button to exit the
screen.Shuffle
Press the
button to play the tracks
on USB/iPod in a random order. Press
again to deactivate the function.
Repeat
To listen to the track again, press the
button. Press again to deactivate
the function.
USB/iPod SOURCE
To activate the USB/iPod mode insert
the corresponding device (USB or iPod)
in the USB port present on the vehicle.
If a USB/iPod device is inserted with the
system on, this starts playing the tracks
present on the device.
IMPORTANT When connecting a device
(USB or iPod) to the USB port, make
sure that it does not obstruct the
operation of the handbrake lever.
AUX SOURCE
To activate AUX mode, insert an
appropriate device in the AUX socket
on the car (see the image in the
"USB/iPod Support" paragraph).
When a device WITH AUX output is
inserted the system starts reproducing
the AUX source connected, if it is
already being played.
Adjust the volume using the
button/knob on the front panel or
using the volume adjustment control onthe connected device.
For the "Audio source selection"
function, see the "Media mode"
chapter.
IMPORTANT NOTES
The functions of the device connected
with the AUX socket are directly
managed by the device itself: it is not
possible to change track/folder/playlist
or control playing start/end/pause with
the controls on the front panel or on the
steering wheel.
Do not leave the cable of your portable
player connected to the AUX socket
after disconnection, to avoid possible
hiss from the speakers.
IMPORTANT When connecting a device
to the AUX socket, make sure that it
does not obstruct the operation of the
handbrake lever.
PHONE MODE
(where provided)
Activate phone mode
Press the PHONE button on the front
panel to activate the Phone mode.
The available commands can be used
to:
dial the wished phone number;
display and call the contacts in the
mobile phone phonebook;
220
MULTIMEDIA
Page 225 of 264
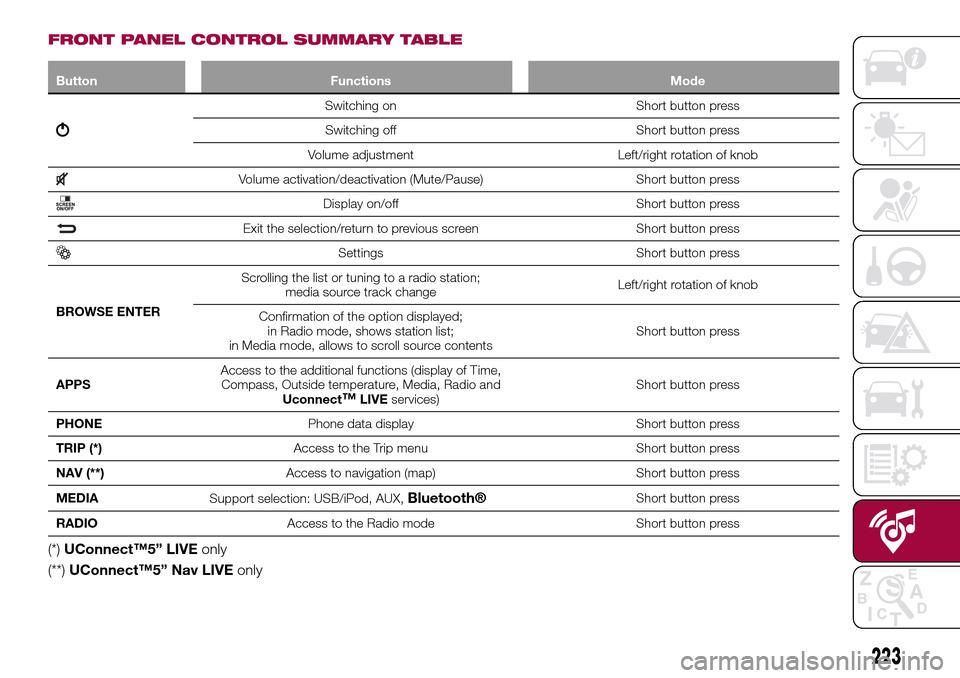
FRONT PANEL CONTROL SUMMARY TABLE
Button Functions Mode
Switching on Short button press
Switching off Short button press
Volume adjustment Left/right rotation of knob
Volume activation/deactivation (Mute/Pause) Short button press
Display on/off Short button press
Exit the selection/return to previous screen Short button press
Settings Short button press
BROWSE ENTERScrolling the list or tuning to a radio station;
media source track changeLeft/right rotation of knob
Confirmation of the option displayed;
in Radio mode, shows station list;
in Media mode, allows to scroll source contentsShort button press
APPSAccess to the additional functions (display of Time,
Compass, Outside temperature, Media, Radio and
Uconnect
™LIVEservices)Short button press
PHONEPhone data display Short button press
TRIP (*)Access to the Trip menu Short button press
NAV (**)Access to navigation (map) Short button press
MEDIA
Support selection: USB/iPod, AUX,
Bluetooth®Short button press
RADIOAccess to the Radio mode Short button press
(*)UConnect™5” LIVEonly
(**)UConnect™5” Nav LIVEonly
223