2017 FIAT TIPO 5DOORS STATION WAGON instrument panel
[x] Cancel search: instrument panelPage 27 of 264
Cornering lights
The function activates with the main
beam headlights switched on with a
speed lower than 40 km/h - For wide
wheel rotation angles or at the
switching on the direction indicator, a
light will turn on (built in the front fog
light) referring to the turning side which
will extend the night visibility angle.
REAR FOG LIGHT(where provided)
When the dipped beam headlights are
on, these can be activated by pressing
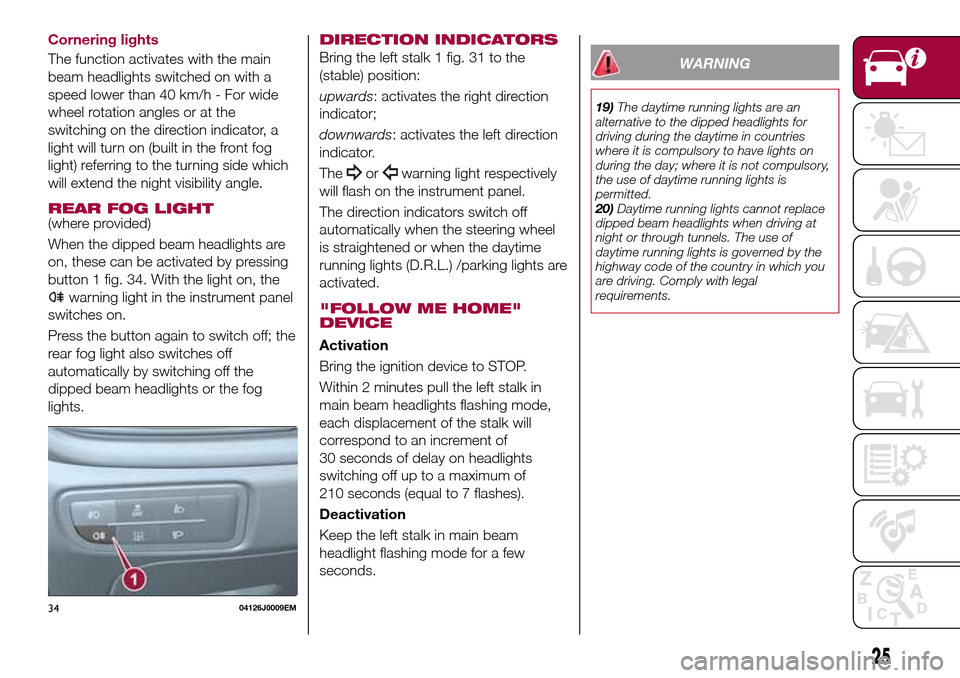
button 1 fig. 34. With the light on, the
warning light in the instrument panel
switches on.
Press the button again to switch off; the
rear fog light also switches off
automatically by switching off the
dipped beam headlights or the fog
lights.
DIRECTION INDICATORS
Bring the left stalk 1 fig. 31 to the
(stable) position:
upwards: activates the right direction
indicator;
downwards: activates the left direction
indicator.
The
orwarning light respectively
will flash on the instrument panel.
The direction indicators switch off
automatically when the steering wheel
is straightened or when the daytime
running lights (D.R.L.) /parking lights are
activated.
"FOLLOW ME HOME"
DEVICE
Activation
Bring the ignition device to STOP.
Within 2 minutes pull the left stalk in
main beam headlights flashing mode,
each displacement of the stalk will
correspond to an increment of
30 seconds of delay on headlights
switching off up to a maximum of
210 seconds (equal to 7 flashes).
Deactivation
Keep the left stalk in main beam
headlight flashing mode for a few
seconds.
WARNING
19)The daytime running lights are an
alternative to the dipped headlights for
driving during the daytime in countries
where it is compulsory to have lights on
during the day; where it is not compulsory,
the use of daytime running lights is
permitted.
20)Daytime running lights cannot replace
dipped beam headlights when driving at
night or through tunnels. The use of
daytime running lights is governed by the
highway code of the country in which you
are driving. Comply with legal
requirements.
3404126J0009EM
25
Page 36 of 264
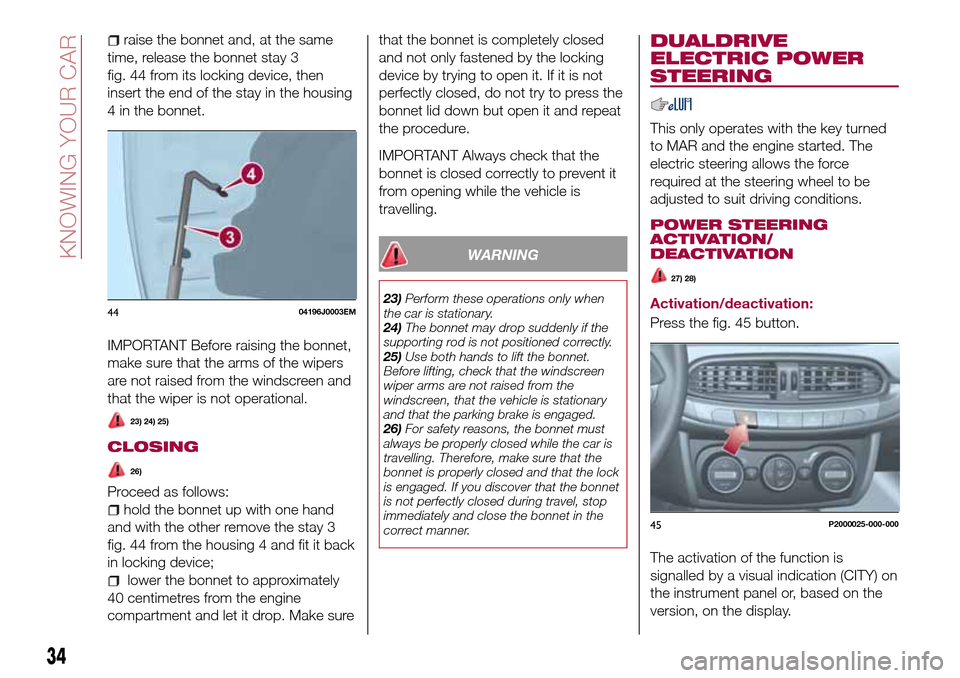
raise the bonnet and, at the same
time, release the bonnet stay 3
fig. 44 from its locking device, then
insert the end of the stay in the housing
4 in the bonnet.
IMPORTANT Before raising the bonnet,
make sure that the arms of the wipers
are not raised from the windscreen and
that the wiper is not operational.
23) 24) 25)
CLOSING
26)
Proceed as follows:
hold the bonnet up with one hand
and with the other remove the stay 3
fig. 44 from the housing 4 and fit it back
in locking device;
lower the bonnet to approximately
40 centimetres from the engine
compartment and let it drop. Make surethat the bonnet is completely closed
and not only fastened by the locking
device by trying to open it. If it is not
perfectly closed, do not try to press the
bonnet lid down but open it and repeat
the procedure.
IMPORTANT Always check that the
bonnet is closed correctly to prevent it
from opening while the vehicle is
travelling.
WARNING
23)Perform these operations only when
the car is stationary.
24)The bonnet may drop suddenly if the
supporting rod is not positioned correctly.
25)Use both hands to lift the bonnet.
Before lifting, check that the windscreen
wiper arms are not raised from the
windscreen, that the vehicle is stationary
and that the parking brake is engaged.
26)For safety reasons, the bonnet must
always be properly closed while the car is
travelling. Therefore, make sure that the
bonnet is properly closed and that the lock
is engaged. If you discover that the bonnet
is not perfectly closed during travel, stop
immediately and close the bonnet in the
correct manner.
DUALDRIVE
ELECTRIC POWER
STEERING
This only operates with the key turned
to MAR and the engine started. The
electric steering allows the force
required at the steering wheel to be
adjusted to suit driving conditions.
POWER STEERING
ACTIVATION/
DEACTIVATION
27) 28)
Activation/deactivation:
Press the fig. 45 button.
The activation of the function is
signalled by a visual indication (CITY) on
the instrument panel or, based on the
version, on the display.4404196J0003EM
45P2000025-000-000
34
KNOWING YOUR CAR
Page 48 of 264

the LPG flow if the fuel locking inertia
switch is activated.
the pressure regulatorallows the
LPG to pass from a liquid state to a
gaseous state through an expansion
chamber and maintains the pressure
required for the operation of the system
at a preset value.
LPG FILTER
The filter, located on the pressure
regulator outlet pipe fig. 74 filters the
gaseous LPG during the LPG injector
supply stage.
LPG INJECTORS
There are four injectors specifically for
LPG on a dedicated bracket on the
cylinder head and connected, via
specific pipes, to the individual intake
ducts fig. 75.
They are supplied with LPG in agaseous state at a constant pressure
and are controlled by a specific
electronic control unit.
A gas pressure and temperature sensor
that sends an appropriate electrical
signal in order to determine the LPG
injection time is fitted on the injectors.
ELECTRONIC CONTROL
UNIT
The car has a special electronic control
unit fig. 76, in the engine compartment,
controlling the LPG supply, using the
sensors located on the car.
The control unit for the injectors has the
same strategy as the petrol control unit
(timed sequential Multipoint).
LPG/PETROL SWITCH
This engine normally runs on LPG
except during starting when it runs on
petrol. Switching to LPG is automatic,
the warning light
1 fig. 77 on the
instrument panel, switches off.
If you specifically want to use petrol,
press the button on the dashboard
fig. 78. If the LED located above the
button turns on, it indicates that
74PGL00007
75PLG00008
76PLG00009
77PGL00022
46
KNOWING YOUR CAR
Page 49 of 264
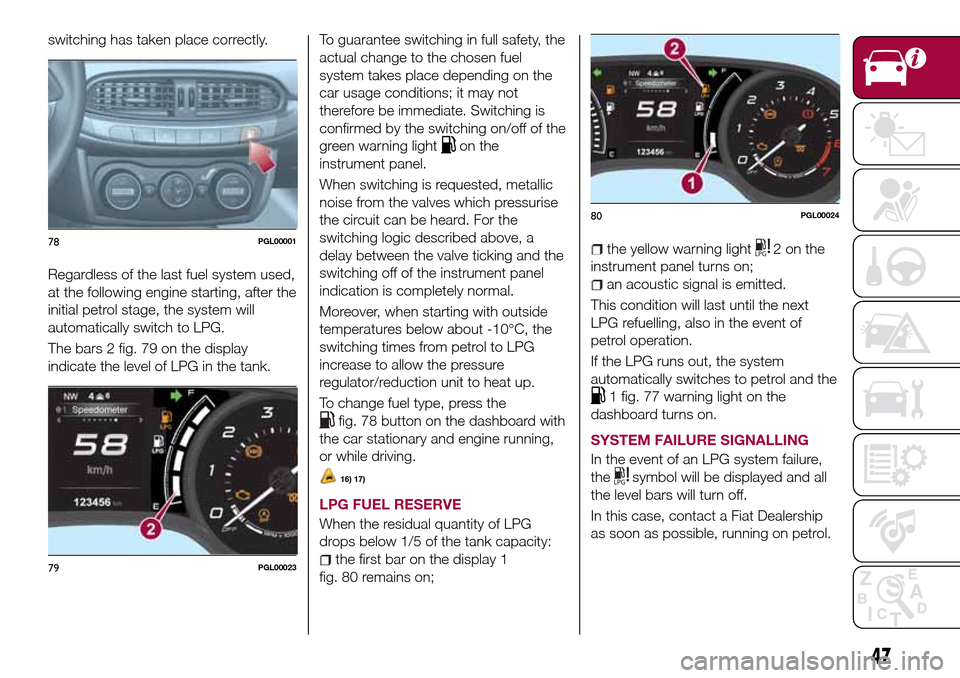
switching has taken place correctly.
Regardless of the last fuel system used,
at the following engine starting, after the
initial petrol stage, the system will
automatically switch to LPG.
The bars 2 fig. 79 on the display
indicate the level of LPG in the tank.To guarantee switching in full safety, the
actual change to the chosen fuel
system takes place depending on the
car usage conditions; it may not
therefore be immediate. Switching is
confirmed by the switching on/off of the
green warning light
on the
instrument panel.
When switching is requested, metallic
noise from the valves which pressurise
the circuit can be heard. For the
switching logic described above, a
delay between the valve ticking and the
switching off of the instrument panel
indication is completely normal.
Moreover, when starting with outside
temperatures below about -10°C, the
switching times from petrol to LPG
increase to allow the pressure
regulator/reduction unit to heat up.
To change fuel type, press the
fig. 78 button on the dashboard with
the car stationary and engine running,
or while driving.
16) 17)
LPG FUEL RESERVE
When the residual quantity of LPG
drops below 1/5 of the tank capacity:
the first bar on the display 1
fig. 80 remains on;
the yellow warning light2onthe
instrument panel turns on;
an acoustic signal is emitted.
This condition will last until the next
LPG refuelling, also in the event of
petrol operation.
If the LPG runs out, the system
automatically switches to petrol and the
1 fig. 77 warning light on the
dashboard turns on.
SYSTEM FAILURE SIGNALLING
In the event of an LPG system failure,
the
symbol will be displayed and all
the level bars will turn off.
In this case, contact a Fiat Dealership
as soon as possible, running on petrol.
78PGL00001
79PGL00023
80PGL00024
47
Page 50 of 264
REFUELLING
18) 19)
LPG
Maximum refuelling capacity (including
reserve): 42 litres. The figure already
takes into account the 80% tank filling
limit and the residual fluid required for
priming; this figure represents the
maximum permitted capacity. In
addition, after different refuelling
processes, this figure may vary due to
differences between the network pump
supply pressures, pumps having
different supply/locking features, tank
not completely run out of fuel.
IMPORTANT In order to avoid
inconsistent information by the LPG
gauge on the instrument panel, it is
recommended to refill with at least
10 litres each time.
WARNING
32)Note that in some countries (including
Italy) there are legal restrictions in force for
parking/garaging motor vehicles fuelled by
gas that is denser than air; LPG comes
under this category.
33)If gas is smelt, switch from LPG
operation to petrol operation and
immediately go to a Fiat Dealership to have
the vehicle checked and possible system
faults excluded.
IMPORTANT
12)The car is equipped with a gaseous
LPG injection system designed specifically
for it: it is therefore absolutely forbidden to
alter the configuration of the system or its
components. The use of other components
or materials could cause malfunctions and
lead to a reduction in safety; therefore, in
the case of problems, contact a Fiat
Dealership. To prevent damage to the gas
system parts when towing or raising the
vehicle, follow the instructions in the
"Towing the vehicle" paragraph of the
Owner Handbook.
13)The system operates at temperatures
ranging between −20°C and 100°C.
14)When painting in an oven, the LPG tank
must be removed from the car and later
refitted by a Fiat Dealership. Although the
LPG system has numerous safety features,
it is advisable to proceed as follows every
time the vehicle is not in use for a long
period or moved in an emergency as a
result of a breakdown or accident: unscrew
the devices fastening the cover of the LPG
tank, then remove it. Close the LPG cock
rotating the ring nut clockwise (see
"Passive safety / active safety"). Refit the
cover and retighten the fastening devices.
15)When switching is requested, metallic
noise from the valves which pressurise the
circuit can be heard. For the switching logic
described above, a delay between the
valve ticking and the switching off of the
instrument panel indication is completely
normal.16)Do not switch between the two
operating modes whilst starting the engine.
17)In particular usage conditions, such as
starting and operation at low ambient
temperature or LPG supply with low
propane content, the system may switch
temporarily to petrol operation, without a
visual indication of switching on the
instrument panel. In the event of low LPG
levels in the tank or request for high
performance (e.g. overtaking, car fully
laden, steep hills) the system may
automatically switch to petrol operation to
guarantee the engine power requested; the
green warning light
on the instrument
panel switches on to indicate this. When
the above conditions are no longer present,
the system automatically restores LPG
operation; the green warning light
switches off. To achieve the automatic
switching described above, make sure that
there is always enough fuel in the petrol
tank.
18)It is strictly forbidden to use any
additive in the LPG. Periodically (at least
once every six months) it is advisable to let
the LPG in the tank run out and, at the first
refuelling, to check that it does not exceed
the maximum capacity of 42 litres (reserve
included) (with a tolerance of 1 litres
excess). If the level is above 42 litres
(reserve included) contact a Fiat Dealership
immediately.
19)Only use LPG for motor vehicles.
48
KNOWING YOUR CAR
Page 51 of 264
ACTIVE GRILLE
SHUTTER
(where provided)
Your vehicle may be equipped with
Active Grille Shutter, an automatic
system with mobile flaps applied in front
of the cooling module, whose
automatic opening/closing movement
aims at improving the vehicle
aerodynamic efficiency and thus
reducing consumption while ensuring
optimal engine operating temperature
conditions.
When a greater air flow is required for
cooling (e.g. when driving in urban
traffic), the flaps open, whereas when
temperature is low or the air flow is
enough (for example when driving in
motorways), the grille closes.
In case of failure, the instrument panel
will show the warning light
.
49
Page 52 of 264
KNOWING THE INSTRUMENT PANEL
This section of the handbook gives you
all the information you need to
understand, interpret and use the
instrument panel correctly.CONTROL PANEL AND ON-BOARD
INSTRUMENTS..............51
DISPLAY..................54
TRIP COMPUTER.............58
WARNING LIGHTS AND
MESSAGES................59
50
KNOWING THE INSTRUMENT PANEL
Page 53 of 264
CONTROL PANEL AND ON-BOARD INSTRUMENTS
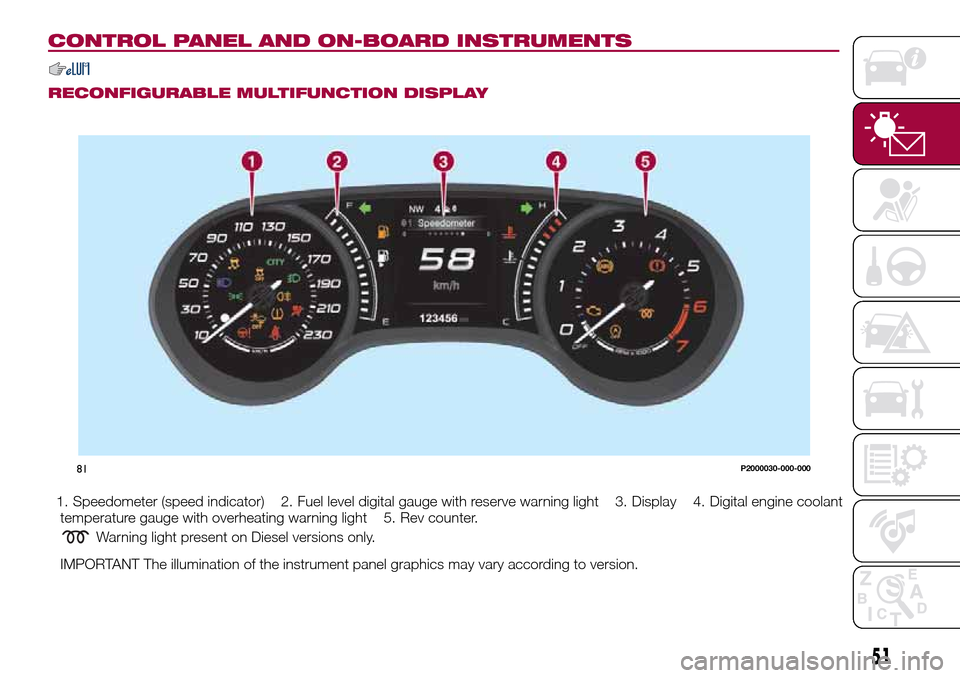
RECONFIGURABLE MULTIFUNCTION DISPLAY
1. Speedometer (speed indicator) 2. Fuel level digital gauge with reserve warning light 3. Display 4. Digital engine coolant
temperature gauge with overheating warning light 5. Rev counter.
Warning light present on Diesel versions only.
IMPORTANT The illumination of the instrument panel graphics may vary according to version.
81P2000030-000-000
51