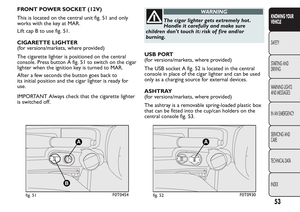
Page 49 of 260

REAR WINDOW WIPER/WASHER
(for versions/markets, where provided)
This only operates with the ignition turned to MAR.
Activation
Turn the ring to
to operate the rear window
wiper as follows:
intermittent operation if the windscreen wiper is
off;
in synchronous mode (at half the speed of the
windscreen wiper) when the windscreen wiper
is on;
in continuous mode with reverse gear engaged
and the control active.
With the windscreen wiper on and reverse gear
engaged, rear window wiping will be continuous.
Pushing the stalk towards the dashboard (temporary
position) the rear window washer jet will activate.
Keeping the stalk pushed for more than half a second
also the rear window wiper will activate. Releasing
the stalk will activate the smart washing function, as
described for the windscreen wiper.Deactivation
The function stops when the stalk is released.
Do not use the rear window wiper to
removelayersofsnoworice.In
such conditions, the wiper may be
subjected to excessive stress and the motor
protection, which prevents operation for a few
seconds, may intervene. Contact the Fiat
Dealership if operation is not restored.
45
KNOWING YOUR
VEHICLE
SAFETY
STARTING AND
DRIVING
WARNING LIGHTS
AND MESSAGES
IN AN EMERGENCY
SERVICING AND
CARE
TECHNICAL DATA
INDEX
Page 50 of 260

CRUISE CONTROL
(for versions/markets, where provided)
This is an electronic driving aid that allows you to
drive at a speed of above 30 km/h on long and
straight dry roads with few driving changes (e.g.
motorways) at a preset speed without having to
press the accelerator pedal. Therefore it is not
recommended to use this device on extra-urban
roads with traffic. Do not use it in town.
Switching the device on
When the device is activated, light
comes on
together with the relevant message on the
instrument panel (for versions/markets, where
provided).
The function cannot be turned on in first gear or
reverse. It is advisable to use the function in fourth
gear or higher.
When travelling downhill with the device engaged,
the vehicle speed may exceed the stored setting.
Memorizing vehicle speed
Proceed as follows:
turn ring nut A fig. 40 to the ON position and
press the accelerator pedal so that the vehicle
reaches the desired speed;
move the stalk upwards (+) for at least one
second, then release it. The vehicle speed is now
stored and you can therefore release the
accelerator pedal.If necessary (when overtaking for instance)
acceleration is possible by simply pressing the
accelerator pedal: releasing the accelerator pedal, the
car will return to the speed memorised previously.
Restoring the stored speed
If the device has been switched off, for example by
pressing the brake or clutch pedal, the memorised
speed can be restored as follows:
accelerate gently until a speed close to that stored
one is reached;
engage the gear selected when storing the speed;
press button B fig. 40.
Increasing the stored speed
This can be done in two ways:
by pressing the accelerator and memorizing the
new speed reached;
fig. 40F0T0405
46
KNOWING YOUR
VEHICLE
SAFETY
STARTING AND
DRIVING
WARNING LIGHTS
AND MESSAGES
IN AN EMERGENCY
SERVICING AND
CARE
TECHNICAL DATA
INDEX
Page 51 of 260

or
by moving the lever upwards (+).
Each operation of the lever will correspond to a
slight increase in speed of about 1 km/h, while
keeping the lever upwards will correspond to a
continuous speed increase.
Reducing the memorised speed
This can be done in two ways:
by switching off the device and then storing the
new speed;
or
by moving the lever downwards (-) until the new
speed, which will be automatically stored, is
reached.
Each movement of the stalk will correspond to a
reduction in speed of about 1 km/h, while keeping
the stalk held downwards will continuously reduce
the speed.
Switching the device off
The device can be switched off by the driver in the
following ways:
by turning the ring A to the OFF position;
by stopping the engine.
Deactivating the function
The device can be switched off by the driver in the
following ways:
by pressing the brake pedal when the device is
adjusting the speed:
by pressing the clutch pedal when the device is
adjusting the speed;
by pressing button B fig. 40 when the device is
adjusting the speed (for versions/markets, where
provided);
by pressing the accelerator pedal (in this case the
system is not actually turned off but the
acceleration request takes priority; the cruise
control remains activated, without the need to the
press button B fig. 40 to restore the previous
conditions once the acceleration is over).
The device is automatically switched off in the
following cases:
if the ABS or VDC systems intervene;
with the vehicle speed below the set limit;
in the case of system failure.
WARNING
When travelling with the device on,
never set the gearshift lever to neutral.
WARNING
In the event of device faults or failures,
turn knob A to OFF and contact a Fiat
Dealership.
47
KNOWING YOUR
VEHICLE
SAFETY
STARTING AND
DRIVING
WARNING LIGHTS
AND MESSAGES
IN AN EMERGENCY
SERVICING AND
CARE
TECHNICAL DATA
INDEX
Page 52 of 260

CEILING LIGHTS
FRONT CEILING LIGHT WITH MOVABLE
LENS
The light comes on automatically when a front door
or sliding side door is opened and goes out when
it is closed.
Press the left-hand side of the lens A fig. 41, as
shown in the diagram, to switch the light on/off
when the doors are closed.
FRONT CEILING LIGHT WITH SPOT
LIGHTS
(for versions/markets, where provided)
Switch A fig. 42 is used to switch the ceiling lights
on/off.
With switch A in the middle position, lights C and D
go on/off fig. 42when the doors are opened/closed.With switch A pressed to the left, the lights C and D
arealwaysoff.
With switch A pressed to the right, the lights C and
D are always on.
The lights are faded out.
Switch B fig. 42 is a spot light; when the ceiling light
is off, it switches on individually:
light C if pressed on the left side;
light D if pressed on the right side.
IMPORTANT Before getting out of the vehicle, make
sure both switches are in the middle position; when
the doors are closed, the lights switch off to prevent
the battery from being run down. In any case, if
the switch is left in the permanently on position, the
courtesy light goes off automatically 15 minutes
after the engine switching off.
fig. 41F0T0113fig. 42F0T0121
48
KNOWING YOUR
VEHICLE
SAFETY
STARTING AND
DRIVING
WARNING LIGHTS
AND MESSAGES
IN AN EMERGENCY
SERVICING AND
CARE
TECHNICAL DATA
INDEX
Page 53 of 260

REAR CEILING LIGHT WITH MOVABLE
LENS
(for versions/markets, where provided)
The light comes on automatically when a front door
or sliding side door is opened and goes out when
it is closed.
Press the left-hand side of the lens A fig. 43, as
shown in the diagram, to switch the light on/off
when the doors are closed.
REAR CEILING LIGHTS WITH REMOVABLE
TO RC H
(for versions/markets, where provided)
The light comes on automatically when you open the
sliding side doors (for versions/markets where
provided) and the rear swing doors, and goes out
when you close them.
Press switch A fig. 44 to turn the light on/off with
the doors closed.Switch A can be set to three different positions:
switch in central position (position 0), light comes
on when a door is opened;
switch pushed up (position 1), light is always on;
switch pushed down (position2-AUTOOFF),
light is always off.
TORCH FUNCTION
(for versions/markets, where provided)
This is located on the right side of the load
compartment. It is used as both a fixed light and a
portable electric torch.
To use the removable torch A fig. 45, push button B
and remove the torch in the direction shown by
the arrow. Then press switch C to switch the light
on/off.
fig. 43F0T0114
AUTO
AUTO
OFF
fig. 44F0T0116
49
KNOWING YOUR
VEHICLE
SAFETY
STARTING AND
DRIVING
WARNING LIGHTS
AND MESSAGES
IN AN EMERGENCY
SERVICING AND
CARE
TECHNICAL DATA
INDEX
Page 54 of 260

When the removable light is secured to its fixed
support, the electric torch battery is automatically
recharged.
With the vehicle stationary and the ignition key
either turned to STOP or removed, the courtesy
light is recharged for a maximum of 15 minutes.
SWITCHING CEILING LIGHTS ON/OFF
Cargo versions
The ceiling lights switch on/off in the following ways:
Ceiling lights on without locking the doors
Front ceiling light: comes on when the front doors
are opened.
Rear ceiling light: on manually.
Removable ceiling light (alternative to rear ceiling
light): on manually (fixed part).
Ceiling lights off when locking the doorsFront and rear ceiling light (also with optional
removable ceiling light): off (faded out) when the
sliding side doors, rear swing doors or front doors
are closed.
With independent load compartment
Front ceiling light: fades out when the front doors
are closed.
Rear ceiling light (also with optional removable
ceiling light): off (faded out) closing the rear doors.
Combi versions
The ceiling lights switch on/off in the following ways:
Ceiling lights on without locking the doors
Front ceiling light: comes on when the front doors
are opened.
Rear ceiling light: on manually.
Ceiling lights off when locking the doors
Front and rear ceiling light (also with optional
removable ceiling light): off (faded out) when the
sliding side doors, rear swing doors or front doors
are closed.
A
UT
O
fig. 45F0T0115
50
KNOWING YOUR
VEHICLE
SAFETY
STARTING AND
DRIVING
WARNING LIGHTS
AND MESSAGES
IN AN EMERGENCY
SERVICING AND
CARE
TECHNICAL DATA
INDEX
Page 55 of 260

COMMANDS
HAZARD LIGHTS
They are turned on by pressing switch A fig. 46,
regardless of the position of the ignition key.
Instrument panel warning lights
andlit up when
this device is on. Press switch A again to turn the
lights off.
IMPORTANT The use of hazard warning lights is
governed by the highway code of the country you are
in. Keep to the rules.
Emergency braking
(for versions/markets, where provided)
In the event of emergency braking the hazard lights
come on automatically along with the instrument
panel warning lights
and. The function switches
off automatically when the nature of the brakingchanges. This function complies with the relevant
legislations currently in force.
FOG LIGHTS
(for versions/markets, where provided)
Press button
fig. 47 with the side/taillights on to
turn the fog lights on. Instrument panel warning light
comes on.
Press the button again to turn the lights off.
REAR FOG LIGHTS
Press button
fig. 47 with the dipped beams or
front fog lights on to turn the rear fog lights on.
Instrument panel warning light
comes on.
Press the button again to turn the lights off or turn
off the dipped beam headlights and/or the front
fog lights (for versions/markets, where provided).
fig. 46F0T0049fig. 47F0T0501
51
KNOWING YOUR
VEHICLE
SAFETY
STARTING AND
DRIVING
WARNING LIGHTS
AND MESSAGES
IN AN EMERGENCY
SERVICING AND
CARE
TECHNICAL DATA
INDEX
Page 56 of 260
INTERIOR FITTINGS
DRIVER SIDE ARMREST
(for versions/markets, where provided)
On some versions, the driver side front seat has an
armrest.
Raise or lower the armrest as shown by the arrows
fig. 48.
STORAGE COMPARTMENT
This is located in front of the passenger seat fig. 49.
GLOVE COMPARTMENT
(for versions/markets, where provided)
To open it, operate handle A fig. 50
WARNING
Never travel with the glove
compartment open: it could injure the
passenger in the event of a crash.
fig. 48F0T0056
fig. 49F0T0187
fig. 50F0T0069
52
KNOWING YOUR
VEHICLE
SAFETY
STARTING AND
DRIVING
WARNING LIGHTS
AND MESSAGES
IN AN EMERGENCY
SERVICING AND
CARE
TECHNICAL DATA
INDEX