2017 CHEVROLET EXPRESS CARGO VAN lock
[x] Cancel search: lockPage 247 of 346
Chevrolet Express Owner Manual (GMNA-Localizing-U.S./Canada/Mexico-9967827) - 2017 - crc - 5/2/16
246 Vehicle Care
Headlamp Wiring
An electrical overload may causethe lamps to go on and off, or insome cases to remain off. Have theheadlamp wiring checked right awayif the lamps go on and off orremain off.
Windshield Wipers
If the wiper motor overheats due toheavy snow or ice, the windshieldwipers will stop until the motor coolsand will then restart.
Although the circuit is protectedfrom electrical overload, overloaddue to heavy snow or ice maycause wiper linkage damage.Always clear ice and heavy snowfrom the windshield before using thewindshield wipers.
If the overload is caused by anelectrical problem and not snow orice, be sure to get it fixed.
Fuses and Circuit
Breakers
The wiring circuits in the vehicle areprotected from short circuits by acombination of fuses and circuitbreakers. This greatly reduces thechance of fires caused by electricalproblems.
Look at the silver-colored bandinside the fuse. If the band is brokenor melted, replace the fuse. Be sureyou replace a bad fuse with a newone of the identical size and rating.
Engine Compartment
Fuse Block
For vans with a diesel engine, seethe Duramax diesel supplement.
The fuse block is located in theengine compartment on the driverside of the vehicle.
Vehicles with upfitter content
See www.gmupfitter.com for upfitterprovisions and best practices.
Caution
Spilling liquid on any electrical
component on the vehicle may
damage it. Always keep the
covers on any electrical
component.
Page 250 of 346
Chevrolet Express Owner Manual (GMNA-Localizing-U.S./Canada/Mexico-9967827) - 2017 - crc - 5/2/16
Vehicle Care 249
FusesUsage
67 Daytime runninglamps 1 (UPLVL+V22) (if equipped)
68 Auxiliary stoplamps
69 Trailer stoplamps
70–
71 Fuel heater/Flexfuel sensor
72 Body controlmodule 6
73 Lighter/Data linkconnector
74 Front blower
75 Fuel injectors
76–
77 O2 sensor 2
78 Engine controlmodule/Powertrain
79 Ignition/Injectors–even
RelaysUsage
15 Run/Crank
37–
38 Fuel pump
39 Crank
40 A/C
48 EV fan clutch
49 Powertrain
50–
57 Cooling fan–low
60 Fan control
Floor Console Fuse Block
The floor console fuse block isunder the driver seat.
Page 252 of 346
Chevrolet Express Owner Manual (GMNA-Localizing-U.S./Canada/Mexico-9967827) - 2017 - crc - 5/2/16
Vehicle Care 251
Mini-Fuse Usage
F15–
F16 Upfitter 1 (ifequipped)
F17 Exterior rearviewheated mirrors
F18 Rear windowdefogger
F19 Compass
F20 Radio/Chime/SiriusXM satelliteradio (if equipped)
F21 Remote functionactuator/Tirepressure monitor
F22 Ignition switch/Discrete logicignitionsensor (PK3)
F23 Instrument cluster
F24–
F25 HVAC
F26 Auxiliary/Trailerreverse lamps
Mini-Fuse Usage
F27 Reverse lamps
F28 Upfitter 2/Readinglamps (if equipped)
F29 Rear blower
F30 Upfitter/Courtesylamps
F31 Front door lock
F32 Rear door lock
F33 Cargo door unlock
F34 Passenger doorunlock
F35 Rear passengerdoor unlock
F36 Driver door lock
F37–
F38–
Relays Usage
K1 Run
K2–
K3 Parking lamps
K4 Upfitter 2
Relays Usage
K5 Rear defogger
K6 Retainedaccessory power
CB1 Power seats
CB2 Power windows
Page 266 of 346
Chevrolet Express Owner Manual (GMNA-Localizing-U.S./Canada/Mexico-9967827) - 2017 - crc - 5/2/16
Vehicle Care 265
5. Place the relearn tool againstthe tire sidewall, near the valvestem. Then press the button toactivate the TPMS sensor.Ahornchirpconfirmsthatthesensor identification code hasbeen matched to this tire andwheel position.
6. Proceed to the passenger sidefront tire, and repeat theprocedure in Step 5.
7. Proceed to the passenger siderear tire, and repeat theprocedure in Step 5.
8. Proceed to the driver side reartire, and repeat the procedurein Step 5. The horn sounds twotimes to indicate the sensoridentification code has beenmatched to the driver side reartire, and the TPMS sensormatching process is no longeractive. The TIRE LEARNINGACTIVE message on the DICdisplay screen goes off.
9. Turn the ignition switch toLOCK/OFF.
10. Set all four tires to therecommended air pressurelevel as indicated on the Tireand Loading Information label.
Tire Inspection
We recommend that the tires,
including the spare tire, if the
vehicle has one, be inspected
for signs of wear or damage at
least once a month.
Replace the tire if:
.The indicators at three or
more places around the tire
can be seen.
.There is cord or fabric
showing through the tire's
rubber.
.The tread or sidewall is
cracked, cut, or snagged
deep enough to show cord or
fabric.
.The tire has a bump, bulge,
or split.
.The tire has a puncture, cut,
or other damage that cannot
be repaired well because of
the size or location of the
damage.
Tire Rotation
Tires should be rotated every
12 000 km (7,500 mi). See
Maintenance Schedule0297.
Tires are rotated to achieve a
uniform wear for all tires. The
first rotation is the most
important.
Any time unusual wear is
noticed, rotate the tires as soon
as possible and check the wheel
alignment. Also check for
damaged tires or wheels. See
When It Is Time for New Tires
0267andWheel
Replacement0271.
Page 270 of 346
Chevrolet Express Owner Manual (GMNA-Localizing-U.S./Canada/Mexico-9967827) - 2017 - crc - 5/2/16
Vehicle Care 269
Warning (Continued)
vehicle damage. Use the
correct size, brand, and type
of tires on all wheels.
This vehicle may have a
different size spare than the
road tires originally installed
on the vehicle. When new, the
vehicle included a spare tire
and wheel assembly with a
similar overall diameter as the
road tires and wheels, so it is
all right to drive on it. The
spare tire was developed for
use on this vehicle and will not
affect vehicle handling.
{Warning
Using bias-ply tires on the
vehicle may cause the wheel
rim flanges to develop cracks
after many miles of driving.
(Continued)
Warning (Continued)
Atireand/orwheelcouldfail
suddenly and cause a crash.
Use only radial-ply tires with
the wheels on the vehicle.
Winter tires with the same speed
rating as the original equipment
tires may not be available for H,
V, W, Y a n d Z R s p e e d r a t e d
tires. Never exceed the winter
tires’maximum speed capability
when using winter tires with a
lower speed rating.
If the vehicle tires must be
replaced with a tire that does not
have a TPC Spec number, make
sure they are the same size,
load range, speed rating, and
construction (radial) as the
original tires.
Vehicles that have a tire
pressure monitoring system
could give an inaccurate
low-pressure warning if non-TPC
Spec rated tires are installed.
SeeTire Pressure Monitor
System0261.
The Tire and Loading
Information label indicates the
original equipment tires on the
vehicle. SeeVehicle Load Limits
0171for the label location and
more information about the Tire
and Loading Information label.
Different Size Tires and
Wheels
If wheels or tires are installed thatare a different size than the originalequipment wheels and tires, vehicleperformance, including its braking,ride and handling characteristics,stability, and resistance to rollovermay be affected. If the vehicle haselectronic systems such as antilockbrakes, rollover airbags, roll bars,traction control, electronic stabilitycontrol, or All-Wheel Drive, theperformance of these systems canalso be affected.
Page 275 of 346
Chevrolet Express Owner Manual (GMNA-Localizing-U.S./Canada/Mexico-9967827) - 2017 - crc - 5/2/16
274 Vehicle Care
Warning (Continued)
training. If a jack is provided with
the vehicle, it is designed only for
changing a flat tire. If it is used for
anything else, you or others could
be badly injured or killed if the
vehicle slips off the jack. If a jack
is provided with the vehicle, only
use it for changing a flat tire.
If a tire goes flat, avoid further tireand wheel damage by driving slowlyto a level place, well off the road,if possible. Turn on the hazardwarning flashers. SeeHazardWarning Flashers0128.
{Warning
Changing a tire can be
dangerous. The vehicle can slip
off the jack and roll over or fall
causing injury or death. Find a
level place to change the tire. To
help prevent the vehicle from
moving:
(Continued)
Warning (Continued)
1. Set the parking brake firmly.
2. Put an automatictransmission in P (Park) or amanual transmission in1(First) or R(Reverse).
3. Turn off the engine and donot restart while the vehicleis raised.
4. Do not allow passengers toremain in the vehicle.
5. Place wheel blocks,if equipped, on both sides ofthe tire at the oppositecorner of the tire beingchanged.
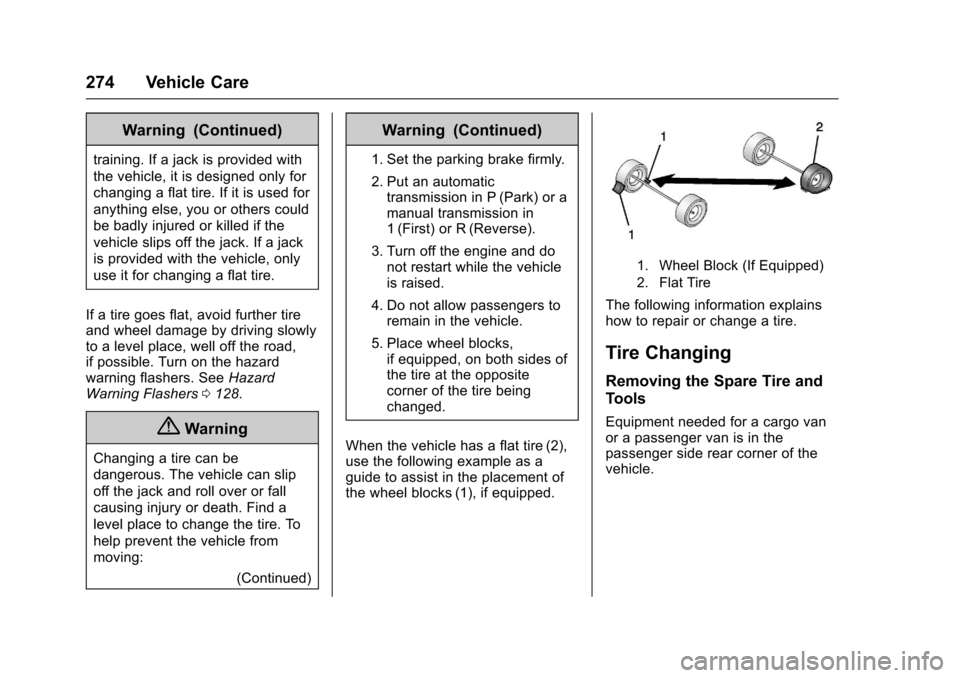
When the vehicle has a flat tire (2),use the following example as aguide to assist in the placement ofthe wheel blocks (1), if equipped.
1. Wheel Block (If Equipped)
2. Flat Tire
The following information explainshow to repair or change a tire.
Tire Changing
Removing the Spare Tire and
Tools
Equipment needed for a cargo vanor a passenger van is in thepassenger side rear corner of thevehicle.
Page 277 of 346
Chevrolet Express Owner Manual (GMNA-Localizing-U.S./Canada/Mexico-9967827) - 2017 - crc - 5/2/16
276 Vehicle Care
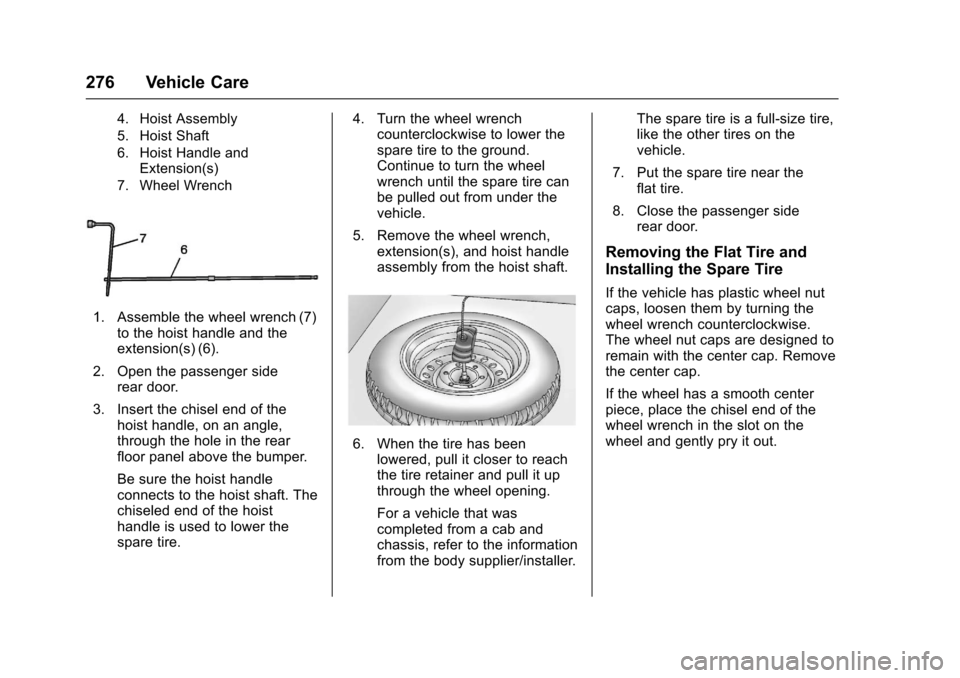
4. Hoist Assembly
5. Hoist Shaft
6. Hoist Handle andExtension(s)
7. Wheel Wrench
1. Assemble the wheel wrench (7)to the hoist handle and theextension(s) (6).
2. Open the passenger siderear door.
3. Insert the chisel end of thehoist handle, on an angle,through the hole in the rearfloor panel above the bumper.
Be sure the hoist handleconnects to the hoist shaft. Thechiseled end of the hoisthandle is used to lower thespare tire.
4. Turn the wheel wrenchcounterclockwise to lower thespare tire to the ground.Continue to turn the wheelwrench until the spare tire canbe pulled out from under thevehicle.
5. Remove the wheel wrench,extension(s), and hoist handleassembly from the hoist shaft.
6. When the tire has beenlowered, pull it closer to reachthe tire retainer and pull it upthrough the wheel opening.
For a vehicle that wascompleted from a cab andchassis, refer to the informationfrom the body supplier/installer.
The spare tire is a full-size tire,like the other tires on thevehicle.
7. Put the spare tire near theflat tire.
8. Close the passenger siderear door.
Removing the Flat Tire and
Installing the Spare Tire
If the vehicle has plastic wheel nutcaps, loosen them by turning thewheel wrench counterclockwise.The wheel nut caps are designed toremain with the center cap. Removethe center cap.
If the wheel has a smooth centerpiece, place the chisel end of thewheel wrench in the slot on thewheel and gently pry it out.
Page 279 of 346
Chevrolet Express Owner Manual (GMNA-Localizing-U.S./Canada/Mexico-9967827) - 2017 - crc - 5/2/16
278 Vehicle Care
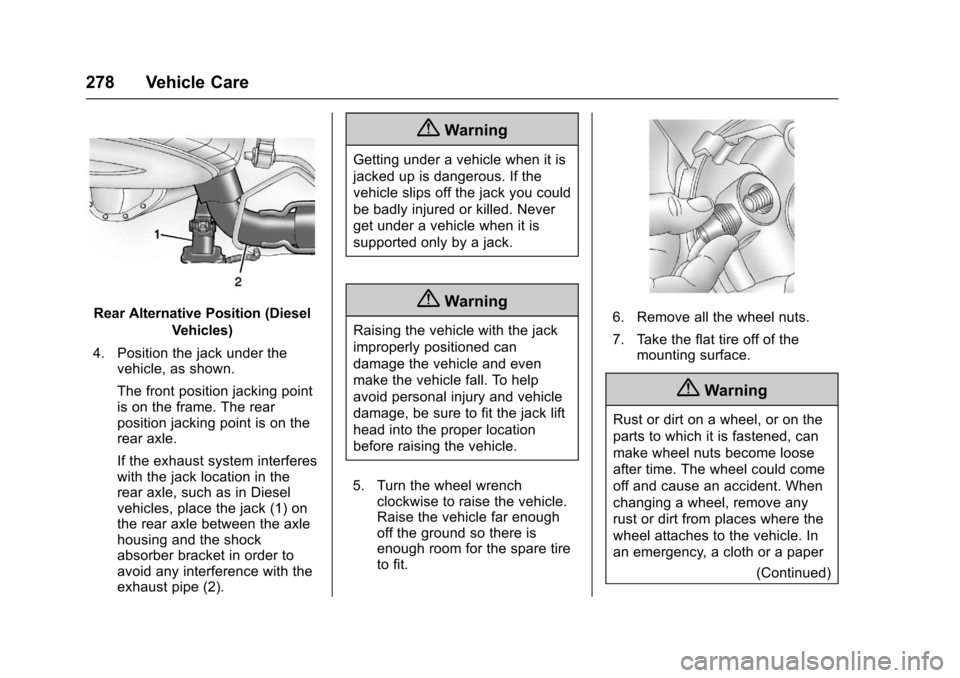
Rear Alternative Position (Diesel
Vehicles)
4. Position the jack under thevehicle, as shown.
The front position jacking pointis on the frame. The rearposition jacking point is on therear axle.
If the exhaust system interfereswith the jack location in therear axle, such as in Dieselvehicles, place the jack (1) onthe rear axle between the axlehousing and the shockabsorber bracket in order toavoid any interference with theexhaust pipe (2).
{Warning
Getting under a vehicle when it is
jacked up is dangerous. If the
vehicle slips off the jack you could
be badly injured or killed. Never
get under a vehicle when it is
supported only by a jack.
{Warning
Raising the vehicle with the jack
improperly positioned can
damage the vehicle and even
make the vehicle fall. To help
avoid personal injury and vehicle
damage, be sure to fit the jack lift
head into the proper location
before raising the vehicle.
5. Turn the wheel wrenchclockwise to raise the vehicle.Raise the vehicle far enoughoff the ground so there isenough room for the spare tireto fit.
6. Remove all the wheel nuts.
7. Take the flat tire off of themounting surface.
{Warning
Rust or dirt on a wheel, or on the
parts to which it is fastened, can
make wheel nuts become loose
after time. The wheel could come
off and cause an accident. When
changing a wheel, remove any
rust or dirt from places where the
wheel attaches to the vehicle. In
an emergency, a cloth or a paper
(Continued)