Page 226 of 346
Chevrolet Express Owner Manual (GMNA-Localizing-U.S./Canada/Mexico-9967827) - 2017 - crc - 5/2/16
Vehicle Care 225
Caution
Use of the incorrect automatic
transmission fluid may damage
the vehicle, and the damage may
not be covered by the vehicle
warranty. Always use the
automatic transmission fluid listed
inRecommended Fluids and
Lubricants0305.
.After adding fluid, recheck thefluid level as described under“How to Check AutomaticTransmission Fluid,”earlier inthis section.
.When the correct fluid level isobtained, push the dipstick backin all the way; then flip thehandle down to lock the dipstickin place.
Engine Air Cleaner/Filter
The air cleaner/filter assembly is onthe front of the engine compartmenton the driver side of the vehicle.SeeEngine CompartmentOverview0218.
When to Inspect the Engine AirCleaner/Filter
For intervals on changing andinspecting the engine air filter, seeMaintenance Schedule0297.
How to Inspect the Engine AirCleaner/Filter
Do not start the engine or have theengine running with the engine airfilter housing open. Before removingthe engine air filter, make sure thatthe engine air filter housing andnearby components are free of dirtand debris. Remove the engine airfilter. Lightly tap and shake theengine air filter (away from thevehicle) to release dust and dirt.Inspect the engine air filter fordamage, and replace if damaged.Do not clean the engine air filter orcomponents with water orcompressed air.
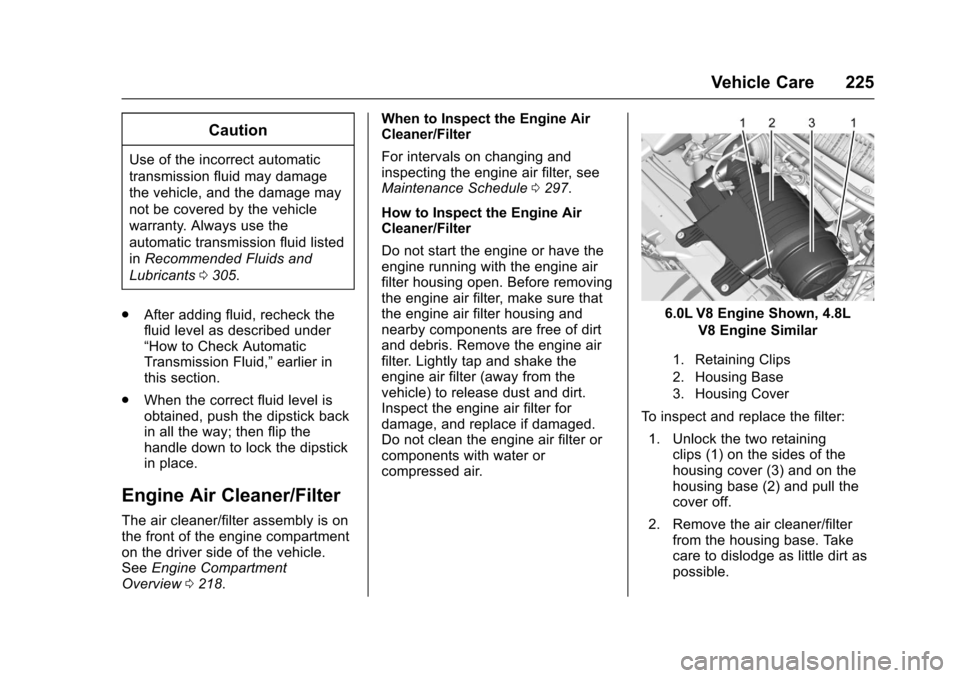
6.0L V8 Engine Shown, 4.8L
V8 Engine Similar
1. Retaining Clips
2. Housing Base
3. Housing Cover
To i n s p e c t a n d r e p l a c e t h e f i l t e r :
1. Unlock the two retainingclips (1) on the sides of thehousing cover (3) and on thehousing base (2) and pull thecover off.
2. Remove the air cleaner/filterfrom the housing base. Takecare to dislodge as little dirt aspossible.
Page 230 of 346
Chevrolet Express Owner Manual (GMNA-Localizing-U.S./Canada/Mexico-9967827) - 2017 - crc - 5/2/16
Vehicle Care 229
If coolant is needed, add the propermixture directly to the radiator, butbe sure the cooling system is coolbefore this is done.
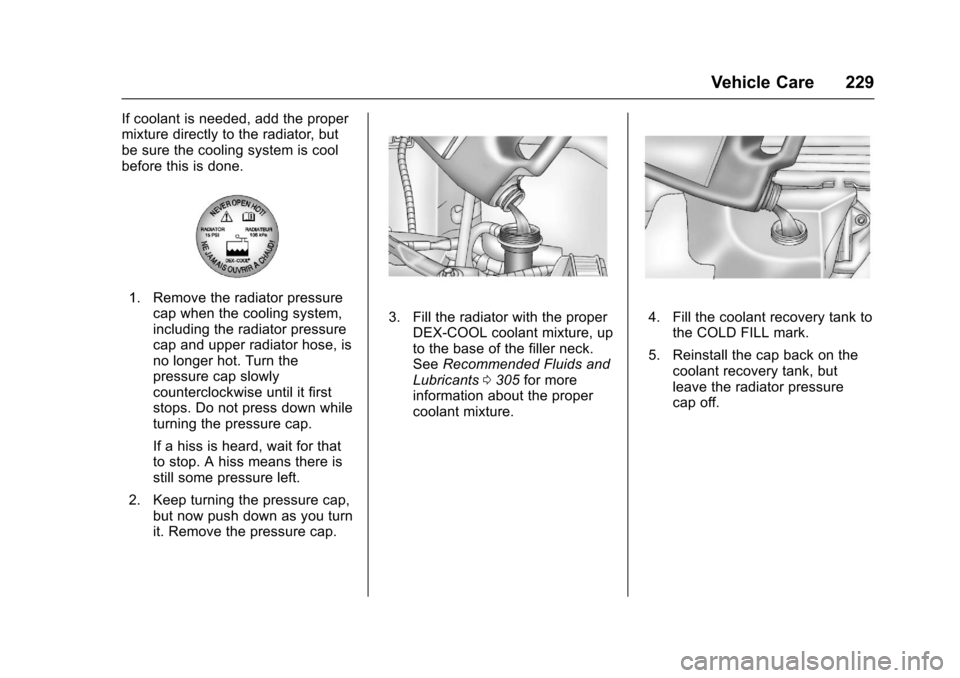
1. Remove the radiator pressurecap when the cooling system,including the radiator pressurecap and upper radiator hose, isno longer hot. Turn thepressure cap slowlycounterclockwise until it firststops. Do not press down whileturning the pressure cap.
If a hiss is heard, wait for thatto stop. A hiss means there isstill some pressure left.
2. Keep turning the pressure cap,but now push down as you turnit. Remove the pressure cap.
3. Fill the radiator with the properDEX-COOL coolant mixture, upto the base of the filler neck.SeeRecommended Fluids andLubricants0305for moreinformation about the propercoolant mixture.
4. Fill the coolant recovery tank tothe COLD FILL mark.
5. Reinstall the cap back on thecoolant recovery tank, butleave the radiator pressurecap off.
Page 239 of 346

Chevrolet Express Owner Manual (GMNA-Localizing-U.S./Canada/Mexico-9967827) - 2017 - crc - 5/2/16
238 Vehicle Care
Among those acts presumed toconstitute tampering are the actslisted below.
Insulation:
.Removal of the noise shields orany underhood insulation.
Engine:
.Removal or rendering enginespeed governor, if the vehiclehas one, inoperative so as toallow engine speed to exceedmanufacturer specifications.
Fan and Drive:
.Removal of fan clutch, if thevehicle has one, or renderingclutch inoperative.
.Removal of the fan shroud, if thevehicle has one.
Air Intake:
.Removal of the air cleanersilencer.
.Modification of the air cleaner.
Exhaust:
.Removal of the muffler and/orresonator.
.Removal of the exhaust pipesand exhaust pipe clamps.
Fuel Operated Heater (FOH)—Diesel Engine:
.Removal of the muffler.
Starter Switch Check
{Warning
When you are doing this
inspection, the vehicle could
move suddenly. If the vehicle
moves, you or others could be
injured.
1. Before starting this check, besure there is enough roomaround the vehicle.
2. Apply both the parking brakeand the regular brake.
Do not use the acceleratorpedal, and be ready to turn offthe engine immediately if itstarts.
3. Try to start the engine in eachgear. The vehicle should startonly in P (Park) or N (Neutral).If the vehicle starts in any otherposition, contact your dealer forservice.
Automatic Transmission
Shift Lock Control
Function Check
{Warning
When you are doing this
inspection, the vehicle could
move suddenly. If the vehicle
moves, you or others could be
injured.
1. Before starting this check, besure there is enough roomaround the vehicle. It should beparked on a level surface.
2. Apply the parking brake. Beready to apply the regularbrake immediately if the vehiclebegins to move.
Page 240 of 346
Chevrolet Express Owner Manual (GMNA-Localizing-U.S./Canada/Mexico-9967827) - 2017 - crc - 5/2/16
Vehicle Care 239
3. With the engine off, turn theignition on, but do not start theengine. Without applying theregular brake, try to move theshift lever out of P (Park) withnormal effort. If the shift levermoves out of P (Park), contactyour dealer for service.
Ignition Transmission
Lock Check
While parked and with the parkingbrake set, try to turn the ignition toLOCK/OFF in each shift leverposition.
.The ignition should turn toLOCK/OFF only when the shiftlever is in P (Park).
.The ignition key should comeout only in LOCK/OFF.
Contact your dealer if service isrequired.
Park Brake and P (Park)
Mechanism Check
{Warning
When you are doing this check,
the vehicle could begin to move.
Yo u o r o t h e r s c o u l d b e i n j u r e d
and property could be damaged.
Make sure there is room in front
of the vehicle in case it begins to
roll. Be ready to apply the regular
brake at once should the vehicle
begin to move.
Park on a fairly steep hill, with thevehicle facing downhill. Keepingyour foot on the regular brake, setthe parking brake.
.To c h e c k t h e p a r k i n g b r a k e ' sholding ability: With the enginerunning and the transmission inN(Neutral), slowly remove footpressure from the regular brakepedal. Do this until the vehicle isheld by the parking brake only.
.To c h e c k t h e P ( P a r k )mechanism's holding ability:With the engine running, shift toP(Park). Then release theparking brake followed by theregular brake.
Contact your dealer if service isrequired.
Wiper Blade Replacement
Windshield wiper blades should beinspected for wear and cracking.SeeMaintenance Schedule0297.
Replacement blades come indifferent types and are removed indifferent ways. For proper type andlength, seeMaintenanceReplacement Parts0306.
Caution
Allowing the wiper arm to touch
the windshield when no wiper
blade is installed could damage
the windshield. Any damage that
occurs would not be covered by
(Continued)
Page 242 of 346
Chevrolet Express Owner Manual (GMNA-Localizing-U.S./Canada/Mexico-9967827) - 2017 - crc - 5/2/16
Vehicle Care 241
Headlamps
Composite Headlamp
1. High-Beam Headlamp
2. Low-Beam Headlamp
To r e m o v e t h e h e a d l a m p a s s e m b l yfrom the vehicle and access thebulbs:
1. Open the hood. SeeHood0217.
2. Remove the two bolts from theheadlamp assembly.
3. Lift the headlamp assembly torelease the lower tabs from theradiator support.
4. Turn the headlamp forward andupward to remove it from thegrille.
5. Disconnect the electricalconnector.
6. Turn the bulb counterclockwiseone-quarter turn to remove itfrom the headlamp assembly.
7. Install the new bulb into theheadlamp assembly andconnect the electricalconnector.
8. Reverse the steps to reinstallthe headlamp assembly.
To p r e v e n t h e a d l a m p v i b r a t i o nand shortened bulb life, besure to insert the headlamp
Page 244 of 346
Chevrolet Express Owner Manual (GMNA-Localizing-U.S./Canada/Mexico-9967827) - 2017 - crc - 5/2/16
Vehicle Care 243
1. Use a small tool to unlatch theoutboard clip on the lamp bypushing inboard and prying thelamp assembly forward.
2. Remove the lamp from thegrille.
3. Turn the bulb socketcounterclockwise one-quarterturn and remove it from thelamp assembly.
4. Remove the bulb from thesocket by pulling it straight out.
5. Replace the bulb.
6. Turn the bulb socket clockwiseto reinstall it in the lampassembly.
7. Reinstall the lamp assemblyinto the grille until the outboardclip snaps into place.
Taillamps
To r e p l a c e a t a i l l a m p / t u r n s i g n a llamp or back-up lamp bulb:
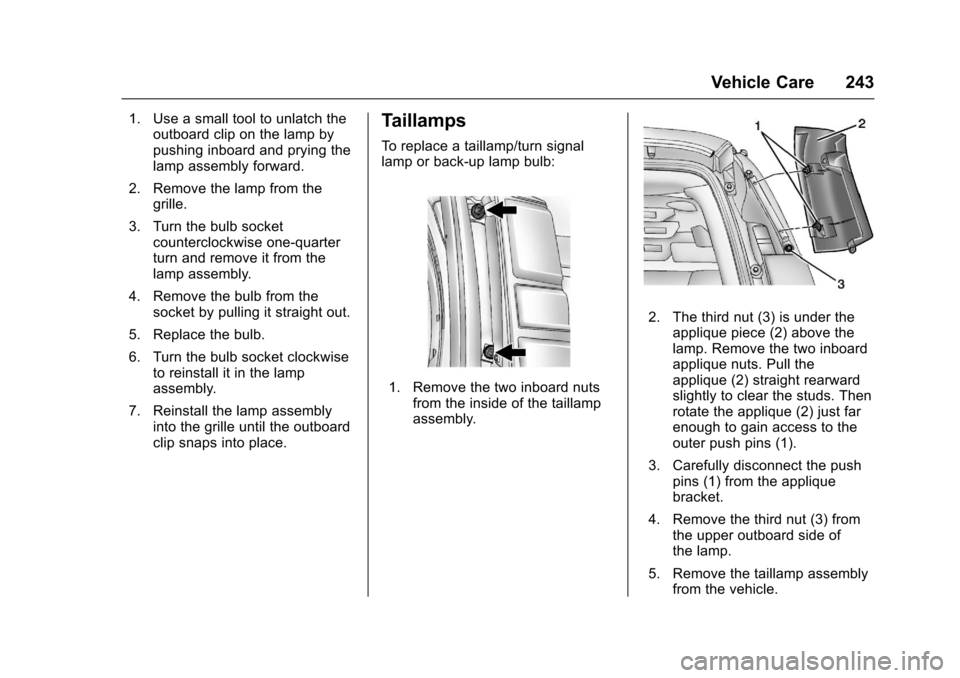
1. Remove the two inboard nutsfrom the inside of the taillampassembly.
2. The third nut (3) is under theapplique piece (2) above thelamp. Remove the two inboardapplique nuts. Pull theapplique (2) straight rearwardslightly to clear the studs. Thenrotate the applique (2) just farenough to gain access to theouter push pins (1).
3. Carefully disconnect the pushpins (1) from the appliquebracket.
4. Remove the third nut (3) fromthe upper outboard side ofthe lamp.
5. Remove the taillamp assemblyfrom the vehicle.
Page 245 of 346
Chevrolet Express Owner Manual (GMNA-Localizing-U.S./Canada/Mexico-9967827) - 2017 - crc - 5/2/16
244 Vehicle Care
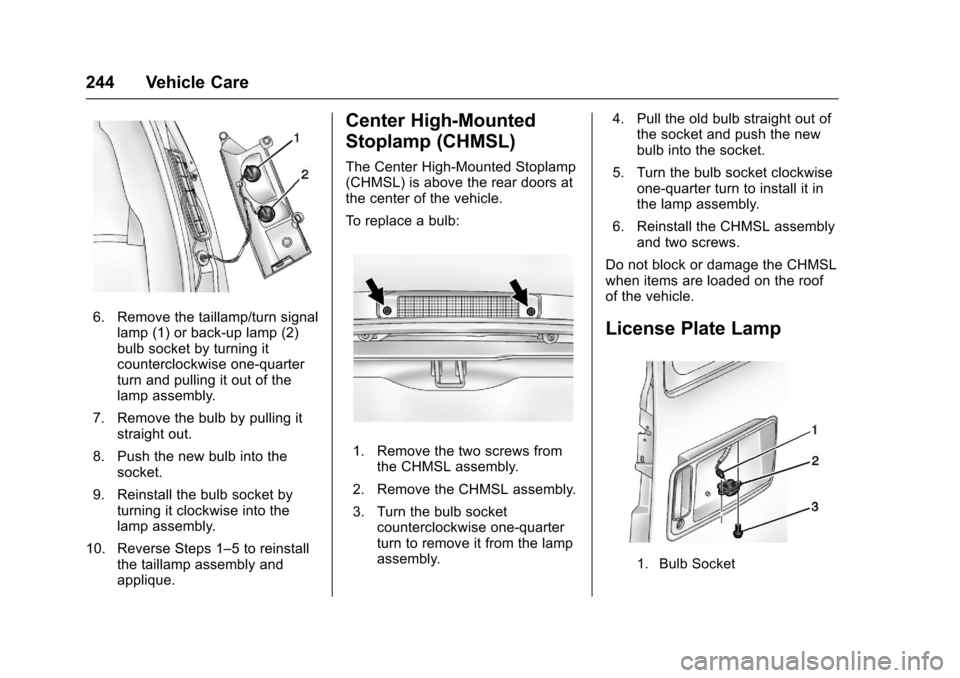
6. Remove the taillamp/turn signallamp (1) or back-up lamp (2)bulb socket by turning itcounterclockwise one-quarterturn and pulling it out of thelamp assembly.
7. Remove the bulb by pulling itstraight out.
8. Push the new bulb into thesocket.
9. Reinstall the bulb socket byturning it clockwise into thelamp assembly.
10. Reverse Steps 1–5toreinstallthe taillamp assembly andapplique.
Center High-Mounted
Stoplamp (CHMSL)
The Center High-Mounted Stoplamp(CHMSL) is above the rear doors atthe center of the vehicle.
To r e p l a c e a b u l b :
1. Remove the two screws fromthe CHMSL assembly.
2. Remove the CHMSL assembly.
3. Turn the bulb socketcounterclockwise one-quarterturn to remove it from the lampassembly.
4. Pull the old bulb straight out ofthe socket and push the newbulb into the socket.
5. Turn the bulb socket clockwiseone-quarter turn to install it inthe lamp assembly.
6. Reinstall the CHMSL assemblyand two screws.
Do not block or damage the CHMSLwhen items are loaded on the roofof the vehicle.
License Plate Lamp
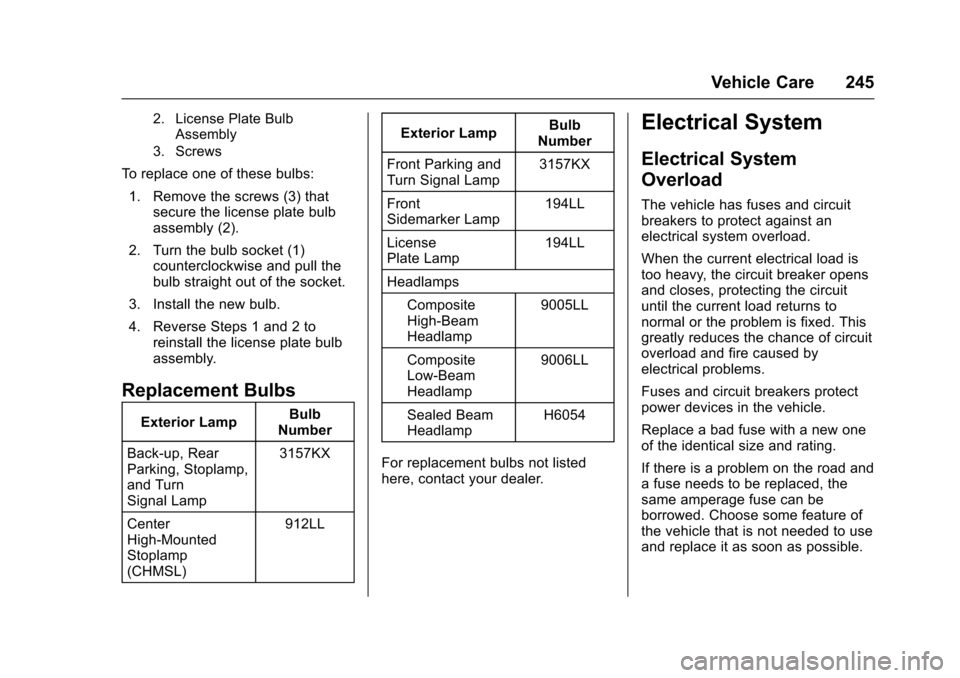
1. Bulb Socket
Page 246 of 346
Chevrolet Express Owner Manual (GMNA-Localizing-U.S./Canada/Mexico-9967827) - 2017 - crc - 5/2/16
Vehicle Care 245
2. License Plate BulbAssembly
3. Screws
To r e p l a c e o n e o f t h e s e b u l b s :
1. Remove the screws (3) thatsecure the license plate bulbassembly (2).
2. Turn the bulb socket (1)counterclockwise and pull thebulb straight out of the socket.
3. Install the new bulb.
4. Reverse Steps 1 and 2 toreinstall the license plate bulbassembly.
Replacement Bulbs
Exterior LampBulbNumber
Back-up, RearParking, Stoplamp,and TurnSignal Lamp
3157KX
CenterHigh-MountedStoplamp(CHMSL)
912LL
Exterior LampBulbNumber
Front Parking andTurn Signal Lamp3157KX
FrontSidemarker Lamp194LL
LicensePlate Lamp194LL
Headlamps
CompositeHigh-BeamHeadlamp
9005LL
CompositeLow-BeamHeadlamp
9006LL
Sealed BeamHeadlampH6054
For replacement bulbs not listedhere, contact your dealer.
Electrical System
Electrical System
Overload
The vehicle has fuses and circuitbreakers to protect against anelectrical system overload.
When the current electrical load istoo heavy, the circuit breaker opensand closes, protecting the circuituntil the current load returns tonormal or the problem is fixed. Thisgreatly reduces the chance of circuitoverload and fire caused byelectrical problems.
Fuses and circuit breakers protectpower devices in the vehicle.
Replace a bad fuse with a new oneof the identical size and rating.
If there is a problem on the road andafuseneedstobereplaced,thesame amperage fuse can beborrowed. Choose some feature ofthe vehicle that is not needed to useand replace it as soon as possible.