2017 CHEVROLET EXPRESS CARGO VAN four wheel drive
[x] Cancel search: four wheel drivePage 15 of 346
Chevrolet Express Owner Manual (GMNA-Localizing-U.S./Canada/Mexico-9967827) - 2017 - crc - 5/2/16
14 In Brief
Exterior Lighting
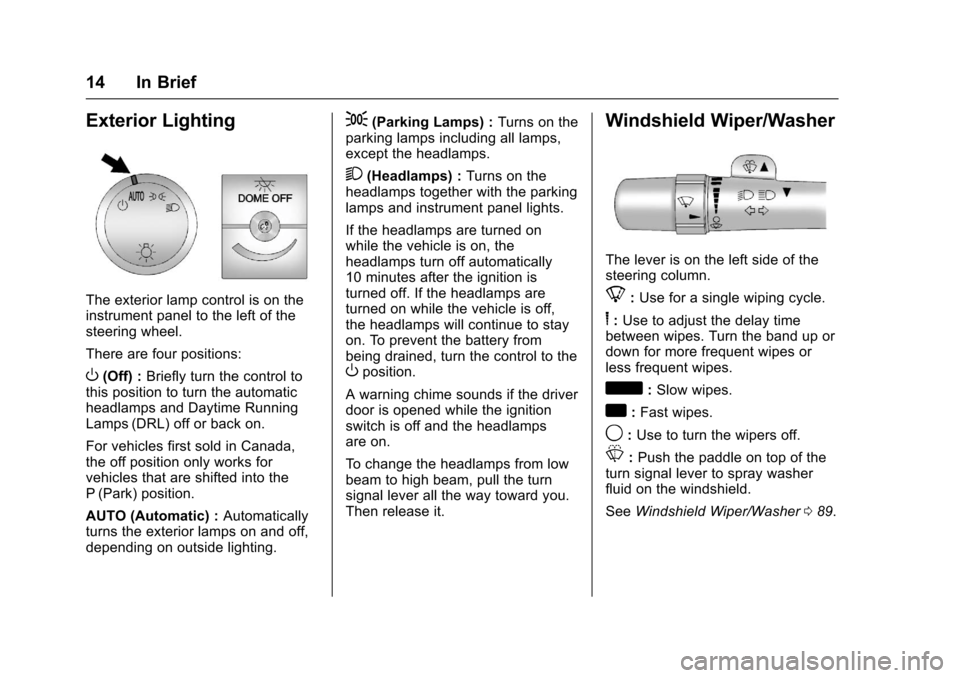
The exterior lamp control is on theinstrument panel to the left of thesteering wheel.
There are four positions:
O(Off) :Briefly turn the control tothis position to turn the automaticheadlamps and Daytime RunningLamps (DRL) off or back on.
For vehicles first sold in Canada,the off position only works forvehicles that are shifted into theP(Park) position.
AUTO (Automatic) :Automaticallyturns the exterior lamps on and off,depending on outside lighting.
;(Parking Lamps) :Turns on theparking lamps including all lamps,except the headlamps.
2(Headlamps) :Turns on theheadlamps together with the parkinglamps and instrument panel lights.
If the headlamps are turned onwhile the vehicle is on, theheadlamps turn off automatically10 minutes after the ignition isturned off. If the headlamps areturned on while the vehicle is off,the headlamps will continue to stayon. To prevent the battery frombeing drained, turn the control to theOposition.
Awarningchimesoundsifthedriverdoor is opened while the ignitionswitch is off and the headlampsare on.
To c h a n g e t h e h e a d l a m p s f r o m l o wbeam to high beam, pull the turnsignal lever all the way toward you.Then release it.
Windshield Wiper/Washer
The lever is on the left side of thesteering column.
8:Use for a single wiping cycle.
6:Use to adjust the delay timebetween wipes. Turn the band up ordown for more frequent wipes orless frequent wipes.
d:Slow wipes.
a:Fast wipes.
9:Use to turn the wipers off.
L:Push the paddle on top of theturn signal lever to spray washerfluid on the windshield.
SeeWindshield Wiper/Washer089.
Page 126 of 346
Chevrolet Express Owner Manual (GMNA-Localizing-U.S./Canada/Mexico-9967827) - 2017 - crc - 5/2/16
Lighting 125
Lighting
Exterior Lighting
Exterior Lamp Controls . . . . . . . 125Exterior Lamps OffReminder . . . . . . . . . . . . . . . . . . . 126Headlamp High/Low-BeamChanger . . . . . . . . . . . . . . . . . . . . 126Flash-to-Pass . . . . . . . . . . . . . . . . 126Daytime RunningLamps (DRL) . . . . . . . . . . . . . . . 126Automatic HeadlampSystem . . . . . . . . . . . . . . . . . . . . . . 127Hazard Warning Flashers . . . . . 128Turn and Lane-ChangeSignals . . . . . . . . . . . . . . . . . . . . . . 128
Interior Lighting
Instrument Panel IlluminationControl . . . . . . . . . . . . . . . . . . . . . . 129Dome Lamps . . . . . . . . . . . . . . . . . 129Reading Lamps . . . . . . . . . . . . . . 130
Lighting Features
Entry/Exit Lighting . . . . . . . . . . . . 130Battery Load Management . . . 130Battery Power Protection . . . . . 131
Exterior Lighting
Exterior Lamp Controls
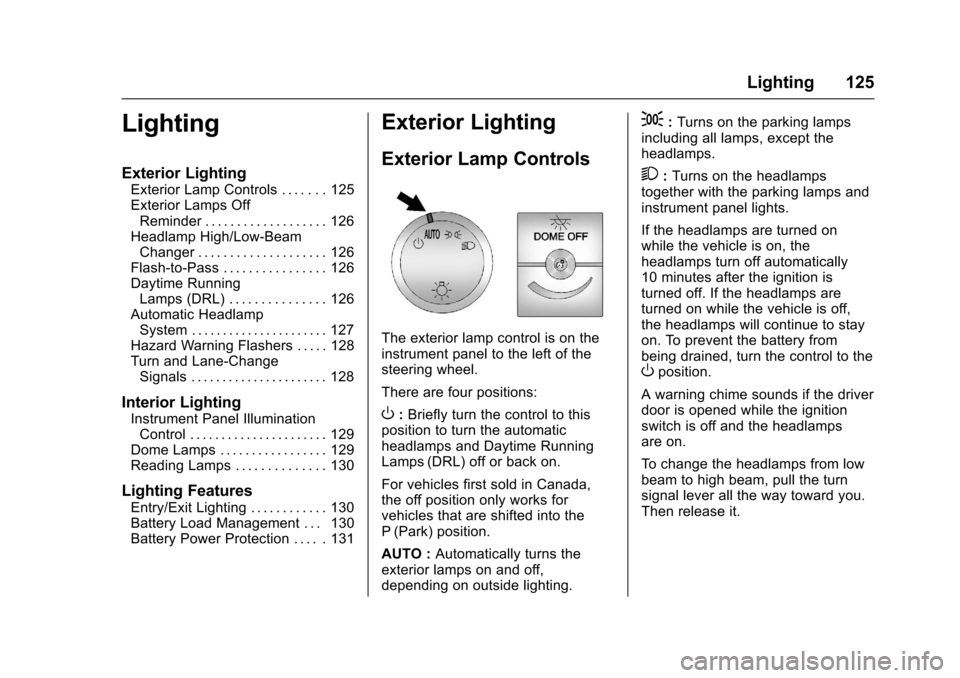
The exterior lamp control is on theinstrument panel to the left of thesteering wheel.
There are four positions:
O:Briefly turn the control to thisposition to turn the automaticheadlamps and Daytime RunningLamps (DRL) off or back on.
For vehicles first sold in Canada,the off position only works forvehicles that are shifted into theP(Park) position.
AUTO :Automatically turns theexterior lamps on and off,depending on outside lighting.
;:Turns on the parking lampsincluding all lamps, except theheadlamps.
2:Turns on the headlampstogether with the parking lamps andinstrument panel lights.
If the headlamps are turned onwhile the vehicle is on, theheadlamps turn off automatically10 minutes after the ignition isturned off. If the headlamps areturned on while the vehicle is off,the headlamps will continue to stayon. To prevent the battery frombeing drained, turn the control to theOposition.
Awarningchimesoundsifthedriverdoor is opened while the ignitionswitch is off and the headlampsare on.
To c h a n g e t h e h e a d l a m p s f r o m l o wbeam to high beam, pull the turnsignal lever all the way toward you.Then release it.
Page 212 of 346
Chevrolet Express Owner Manual (GMNA-Localizing-U.S./Canada/Mexico-9967827) - 2017 - crc - 5/6/16
Driving and Operating 211
State and local regulations may alsorequire the trailer to have its ownbraking system if loaded above acertain threshold.
Be sure to read and follow theinstructions for the trailer brakes sothey are installed, adjusted, andmaintained properly.
Do not tap into the vehicle'shydraulic brake system.
Trailer Wiring Harness
The optional heavy-duty trailerwiring package includes a wiringharness, with a seven-pin connectorat the rear of the vehicle and afour-wire harness assembly underthe driver side of the instrumentpanel. The four-wire harnessassembly comes without aconnector.
If the vehicle does not have a trailerhitch, the seven-wire harnessassembly with connector is tapedtogether and located in a framepocket at the driver side rear leftcorner of the frame.
If the vehicle has a trailer hitch, theseven-wire harness assembly withconnector is attached to a bracketon the hitch platform. In both cases,the seven-wire harness has aconnector and includes a 30-ampfeed wire.
Use only a round, seven-wireconnector with flat blade terminalsmeeting SAE J2863 specificationsfor proper electrical connectivity.
The seven-wire harness connectorcontains the following trailer circuits:
.Light Green: Back-up Lamps(10A fuse)**
.White: Ground
.Dark Blue: Trailer Brake Signal
.Dark Green: Right Rear Stopand Turn Signal*
.Red/Black Stripe: Battery Feed(30A Fuse)
.Brown: Trailer Park LampSupply Voltage (15A fuse)**
.Ye l l o w : L e f t R e a r S t o p a n d Tu r nSignal *
The four-wire harness (withoutconnector) contains the followingcircuits:
.Black: Ground
.Red/White: Battery Feed
.Dark Blue: Trailer Brake Signal
.Light Blue: CHMSL/StoplampSupply Voltage
*Ifthevehicleisacutawaywithtrailer provisions, a 15 amp fuse willbe shared for both left/stop trailerturn and right/stop trailer turnsignals. However, the cutawaylighting connector will have a10 amp fuse for each signal.
** If the vehicle is a cutaway withtrailer provisions, a 15 amp fuse willbe shared for trailer park lamps andcutaway rear lighting connector parklamps. Also, a 10 amp fuse will beshared for trailer back-up lamps andcutaway rear lighting connectorback-up lamps.
Tow/Haul Mode
This button is on the instrumentpanel, to the right of the steeringwheel.
Page 265 of 346
Chevrolet Express Owner Manual (GMNA-Localizing-U.S./Canada/Mexico-9967827) - 2017 - crc - 5/2/16
264 Vehicle Care
the sensor matching process isperformed successfully. Seeyour dealer for service.
.Replacement tires or wheels donot match the original equipmenttires or wheels. Tires and wheelsother than those recommendedcould prevent the TPMS fromfunctioning properly. SeeBuyingNew Tires0268.
.Operating electronic devices orbeing near facilities using radiowave frequencies similar to theTPMS could cause the TPMSsensors to malfunction.
If the TPMS is not functioningproperly, it cannot detect or signal alow tire condition. See your dealerfor service if the TPMS malfunctionlight and DIC message come onand stay on.
TPMS Sensor Matching
Process
Each TPMS sensor has a uniqueidentification code. The identificationcode needs to be matched to a newtire/wheel position after rotating thevehicle’stiresorreplacingoneor
more of the TPMS sensors. Also,the TPMS sensor matching processshould be performed after replacingasparetirewitharoadtirecontaining the TPMS sensor. Themalfunction light and the DICmessage should go off at the nextignition cycle. The sensors arematched to the tire/wheel positions,using a TPMS relearn tool, in thefollowing order: driver side front tire,passenger side front tire, passengerside rear tire, and driver side rear.See your dealer for service or topurchase a relearn tool. A TPMSrelearn tool can also be purchased.See Tire Pressure Monitor SensorActivation Tool atwww.gmtoolsandequipment.com orcall 1-800-GM TOOLS(1-800-468-6657).
There are two minutes to match thefirst tire/wheel position, andfive minutes overall to match all fourtire/wheel positions. If it takeslonger, the matching process stopsand must be restarted.
The TPMS sensor matchingprocess is:
1. Set the parking brake.
2. Turn the ignition to ON/RUNwith the engine off.
3. Press the Remote Keyless
Entry (RKE) transmitter'sQ
andKbuttons at the same
time for approximatelyfive seconds. The horn soundstwice to signal the receiver is inrelearn mode and TIRELEARNING ACTIVE messagedisplays on the DIC screen.
If the vehicle does not haveRKE, press the DriverInformation Center (DIC)vehicle information button untilthe PRESSVTO RELEARNTIRE POSITIONS messagedisplays. The horn soundstwice to signal the receiver is inrelearn mode and TIRELEARNING ACTIVE messagedisplays on the DIC screen.
4. Start with the driver sidefront tire.
Page 266 of 346
Chevrolet Express Owner Manual (GMNA-Localizing-U.S./Canada/Mexico-9967827) - 2017 - crc - 5/2/16
Vehicle Care 265
5. Place the relearn tool againstthe tire sidewall, near the valvestem. Then press the button toactivate the TPMS sensor.Ahornchirpconfirmsthatthesensor identification code hasbeen matched to this tire andwheel position.
6. Proceed to the passenger sidefront tire, and repeat theprocedure in Step 5.
7. Proceed to the passenger siderear tire, and repeat theprocedure in Step 5.
8. Proceed to the driver side reartire, and repeat the procedurein Step 5. The horn sounds twotimes to indicate the sensoridentification code has beenmatched to the driver side reartire, and the TPMS sensormatching process is no longeractive. The TIRE LEARNINGACTIVE message on the DICdisplay screen goes off.
9. Turn the ignition switch toLOCK/OFF.
10. Set all four tires to therecommended air pressurelevel as indicated on the Tireand Loading Information label.
Tire Inspection
We recommend that the tires,
including the spare tire, if the
vehicle has one, be inspected
for signs of wear or damage at
least once a month.
Replace the tire if:
.The indicators at three or
more places around the tire
can be seen.
.There is cord or fabric
showing through the tire's
rubber.
.The tread or sidewall is
cracked, cut, or snagged
deep enough to show cord or
fabric.
.The tire has a bump, bulge,
or split.
.The tire has a puncture, cut,
or other damage that cannot
be repaired well because of
the size or location of the
damage.
Tire Rotation
Tires should be rotated every
12 000 km (7,500 mi). See
Maintenance Schedule0297.
Tires are rotated to achieve a
uniform wear for all tires. The
first rotation is the most
important.
Any time unusual wear is
noticed, rotate the tires as soon
as possible and check the wheel
alignment. Also check for
damaged tires or wheels. See
When It Is Time for New Tires
0267andWheel
Replacement0271.
Page 287 of 346
Chevrolet Express Owner Manual (GMNA-Localizing-U.S./Canada/Mexico-9967827) - 2017 - crc - 5/2/16
286 Vehicle Care
Towing the Vehicle
Caution
Incorrectly towing a disabled
vehicle may cause damage. The
damage would not be covered by
the vehicle warranty.
Do not lash or hook to
suspension components. Use the
proper straps around the tires to
secure the vehicle.
Use only a flatbed tow truck fortowing a disabled vehicle. Neveruse a sling type lift or damage willoccur. Use ramps to help reduceapproach angles if necessary.Atowedvehicleshouldhaveitsdrive wheels off the ground.
Consult a professional towingservice if the disabled vehicle mustbe towed.
Recreational Vehicle
Towing
Recreational vehicle towing meanstowing the vehicle behind anothervehicle, such as behind a motorhome. The two most common typesof recreational vehicle towing areknown as dinghy towing and dollytowing. Dinghy towing is towing thevehicle with all four wheels on theground. Dolly towing is towing thevehicle with two wheels on theground and two wheels up on adevice known as a dolly.
Here are some important things toconsider before recreational vehicletowing:
.What is the towing capacity ofthe towing vehicle? Be sure toread the tow vehiclemanufacturer'srecommendations.
.What is the distance that will betraveled? Some vehicles haverestrictions on how far and howlong they can tow.
.Is the proper towing equipmentgoing to be used? See yourdealer or trailering professionalfor additional advice andequipment recommendations.
.Is the vehicle ready to betowed? Just as preparing thevehicle for a long trip, make surethe vehicle is prepared to betowed.
Caution
Use of a shield mounted in front
of the vehicle grille could restrict
airflow and cause damage to the
transmission. The repairs would
not be covered by the vehicle
warranty. If using a shield, only
use one that attaches to the
towing vehicle.
Page 288 of 346
Chevrolet Express Owner Manual (GMNA-Localizing-U.S./Canada/Mexico-9967827) - 2017 - crc - 5/2/16
Vehicle Care 287
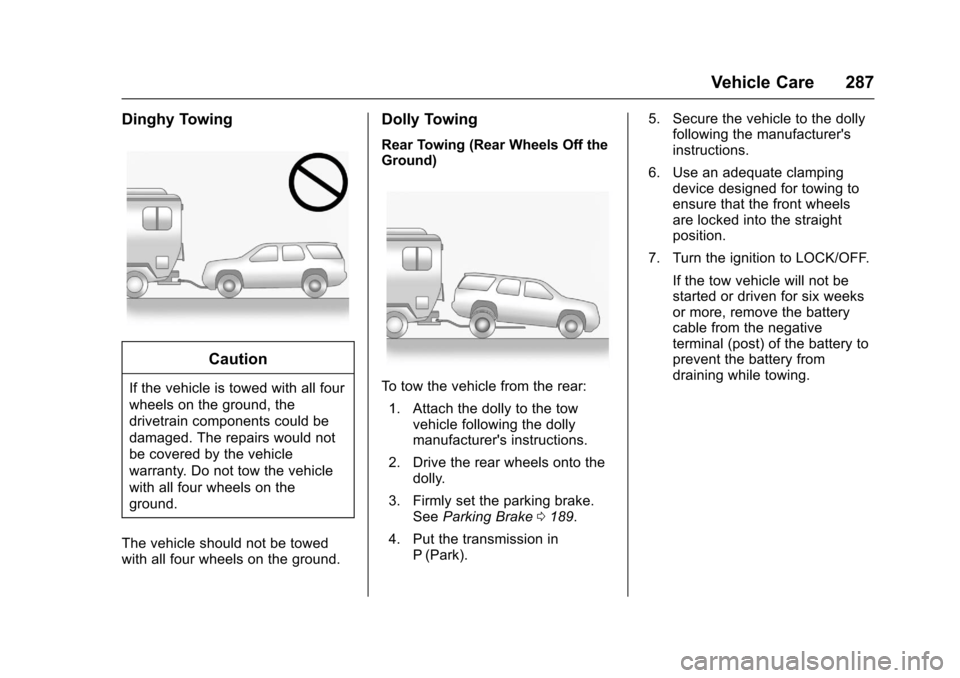
Dinghy Towing
Caution
If the vehicle is towed with all four
wheels on the ground, the
drivetrain components could be
damaged. The repairs would not
be covered by the vehicle
warranty. Do not tow the vehicle
with all four wheels on the
ground.
The vehicle should not be towedwith all four wheels on the ground.
Dolly Towing
Rear Towing (Rear Wheels Off theGround)
To t o w t h e v e h i c l e f r o m t h e r e a r :
1. Attach the dolly to the towvehicle following the dollymanufacturer's instructions.
2. Drive the rear wheels onto thedolly.
3. Firmly set the parking brake.SeeParking Brake0189.
4. Put the transmission inP(Park).
5. Secure the vehicle to the dollyfollowing the manufacturer'sinstructions.
6. Use an adequate clampingdevice designed for towing toensure that the front wheelsare locked into the straightposition.
7. Turn the ignition to LOCK/OFF.
If the tow vehicle will not bestarted or driven for six weeksor more, remove the batterycable from the negativeterminal (post) of the battery toprevent the battery fromdraining while towing.