2017 AUDI TT ROADSTER warning
[x] Cancel search: warningPage 84 of 314
Parking systems
Parking systems
General information
A ppl ies to: ve hicles w ith rear pa rk in g sys te m /p ark in g system
p lus
Depending on your vehicle's equipment , various
parking aids will help you when parking and ma
neuvering.
The
rear park ing system is an audible parking aid
that warns you of obstacles
behind the vehicle
c:> poge 83.
The parking system plus assists you when park
ing by audibly and visually indicating objects de
tected
in front of and behind the veh icle
c:> poge83.
The rearview camera shows the area behind the
vehicle in the Infotainment system display . The
lines in the rearview camera image help you to
park or maneuver
c:> page 84. The parking sys
tem plus functions are also available
c:> page83.
& WARNING
-Always look for traffic and check the area
around your vehicle by looking at it directly
as well. The parking system cannot replace
the driver's attention. The driver is always
responsible when entering or leaving a park
ing space and during similar maneuvers .
- Please note that some surfaces , such as
clothing, are not detected by the system .
- Sensors and cameras have blind spots in
which people and objects cannot be detect
ed . Be especially cautious of small children
and animals .
- The sensors can be displaced by impacts or
damage to the radiator gr ille, bumper,
wheel housing and the underbody . The park
ing system may be impaired as a result.
Have an authorized Audi dealer or author
ized Audi Service Facility check their func
tion .
- Make sure the sensors are not obstructed by
stickers, deposits or other materials. If they
are, the sensor function could be impaired.
For additional information on cleaning, see
c:> page266.
82
(D Note
-Some objects are not detected or displayed
by the system under certain circumstances:
- Objects such as barrier chains, trailer draw
bars, vertical poles or fences
- Objects above the sensors such as wall ex
tensions
- Objects with certain surfaces or structures
such as chain link fences or powder snow
- If you continue driving closer to a low ob
ject, it may disappear from the sensor range. Note that you will no longer be
warned about th is obstacle.
- Keep enough distance from the curb to re
duce the risk of damage to the rims .
@ Tips
-The system may provide a warning even
though there are no obstacles in the cover
age area in some situations, such as :
- certain road surfaces or when there is tall
grass.
- external ultrasonic sources such as from
cleaning vehicles .
- in heavy rain, snow, or thick vehicle ex
haust.
- We recommend that you practice parking in
a traffic -free location or parking lot to be
come familiar with the system . When doing
this, there should be good light and weath
er conditions.
- You can change the volume of the signals.
- What appears in the display is slightly de-
layed.
- The sensors must be kept clean and free of
snow and ice for park aid to operate .
Page 85 of 314
CD
CD
.... N
" N .... 0
" V, co
Rear parking system
Description
Applies to: vehicles with rear parking system
The rear parking system is an audible parking
aid .
Descrip tion
There is a sensor in the rear bumper cover. If
these detect an obstacle, audible signals warn
you .
Make sure the sensors are not covered by stick
ers, deposits or any other obstructions as it may
impair the sensor function. For information on
cleaning, see
¢page 266.
The range at which the sensors begin to measure
is approximately:
side 3 ft (0 .90 m)
rear
center 5.2
ft (1.60 m)
The closer you get to the obstacle, the shorter
the interval between the audible signals . A con
tinuous tone sounds when the obstacle is less
than approximately 1 foot (0.30 meters) away. Do not continue backing up
c:::;, &. in General infor
mation on page 82,
c:::;,(D in General information
on page 82!
If the distance to an obstacle remains constant,
the volume of the distance warning gradually drops after about four seconds (this does not ap
ply in the continuous tone range).
Act ivat in g
The rear parking assist activates automatically
when the reverse gear is engaged. A brief confir
mation tone will sound.
Parking systems
Park ing system plus
Description
Applies to: veh icles w ith park ing system plus
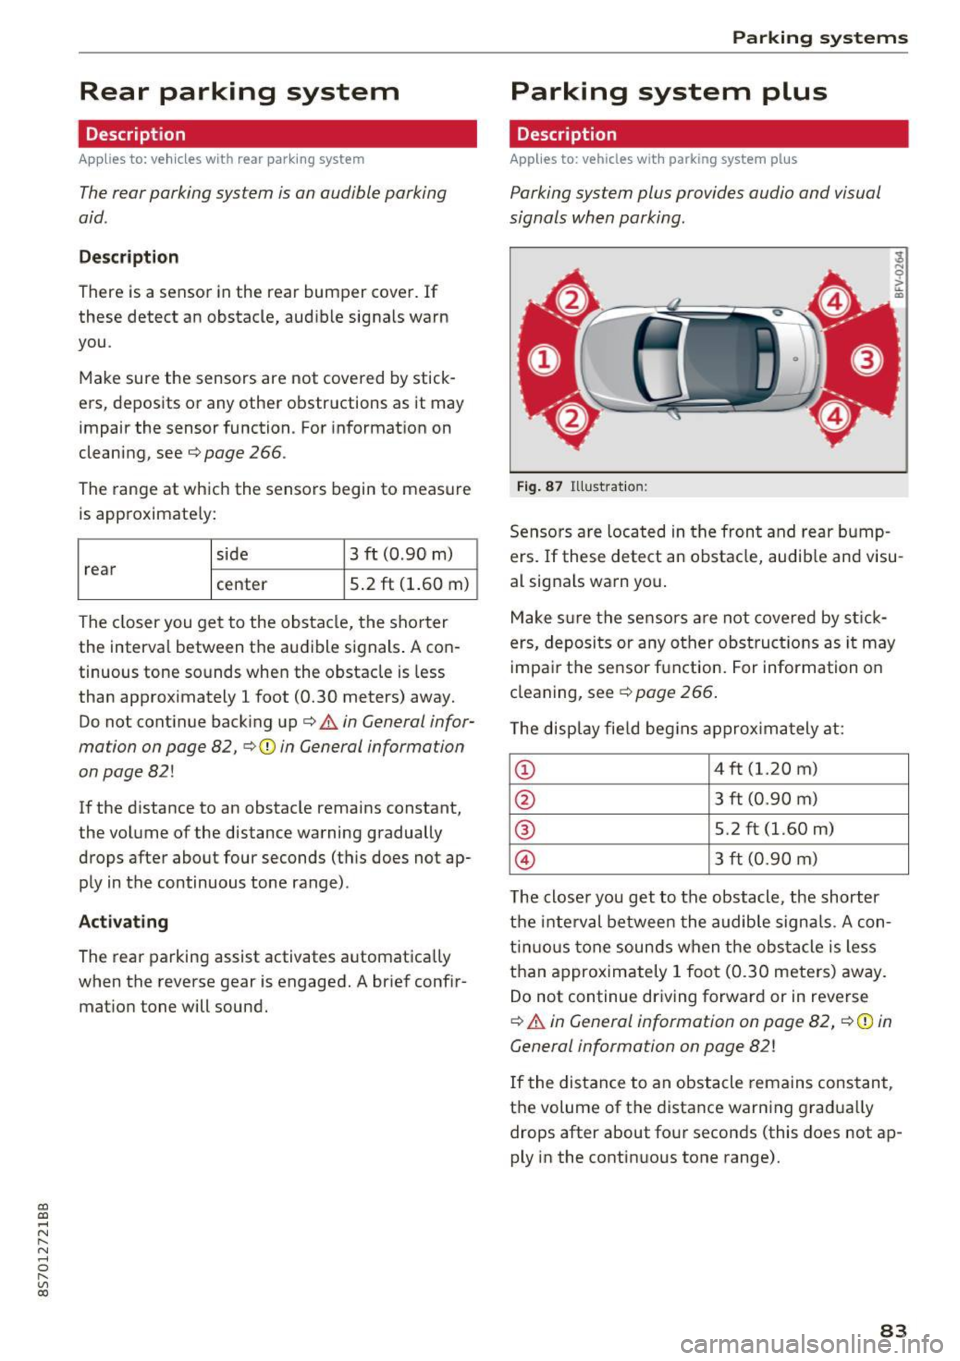
Parking system plus provides audio and visual
signals when parking.
Fig. 87 Illustration :
Sensors are located in the front and rear bump
ers. If these detect an obstacle, audible and visu
al signals warn you.
Make sure the sensors are not covered by st ick
ers, deposits or any other obstructions as it may
impair the sensor function. For information on
cleaning, see
c:::;, page 266.
The display field beg ins approximately at:
CD 4 ft (1.20 m)
0 3 ft (0.90 m)
® 5.2 ft (1.60 m)
© 3 ft (0.90 m)
T he closer you get to the obstacle, the shorter
the interval between the audible signa ls . A con
t inuous tone sounds when the obstacle is less
than approximately 1 foot (0.30 meters) away.
Do not continue driving forward or in reverse
c:::;, &. in General information on page 82, c:::;,(D in
General information on page 82!
If the distance to an obstacle remains constant,
the volume of the distance warning gradually
drops after about four seconds (this does not ap
ply in the continuous tone range).
83
Page 87 of 314
CD
CD
.... N
" N .... 0 r--. V, co
General information
Applies to: vehicles with rearview camera
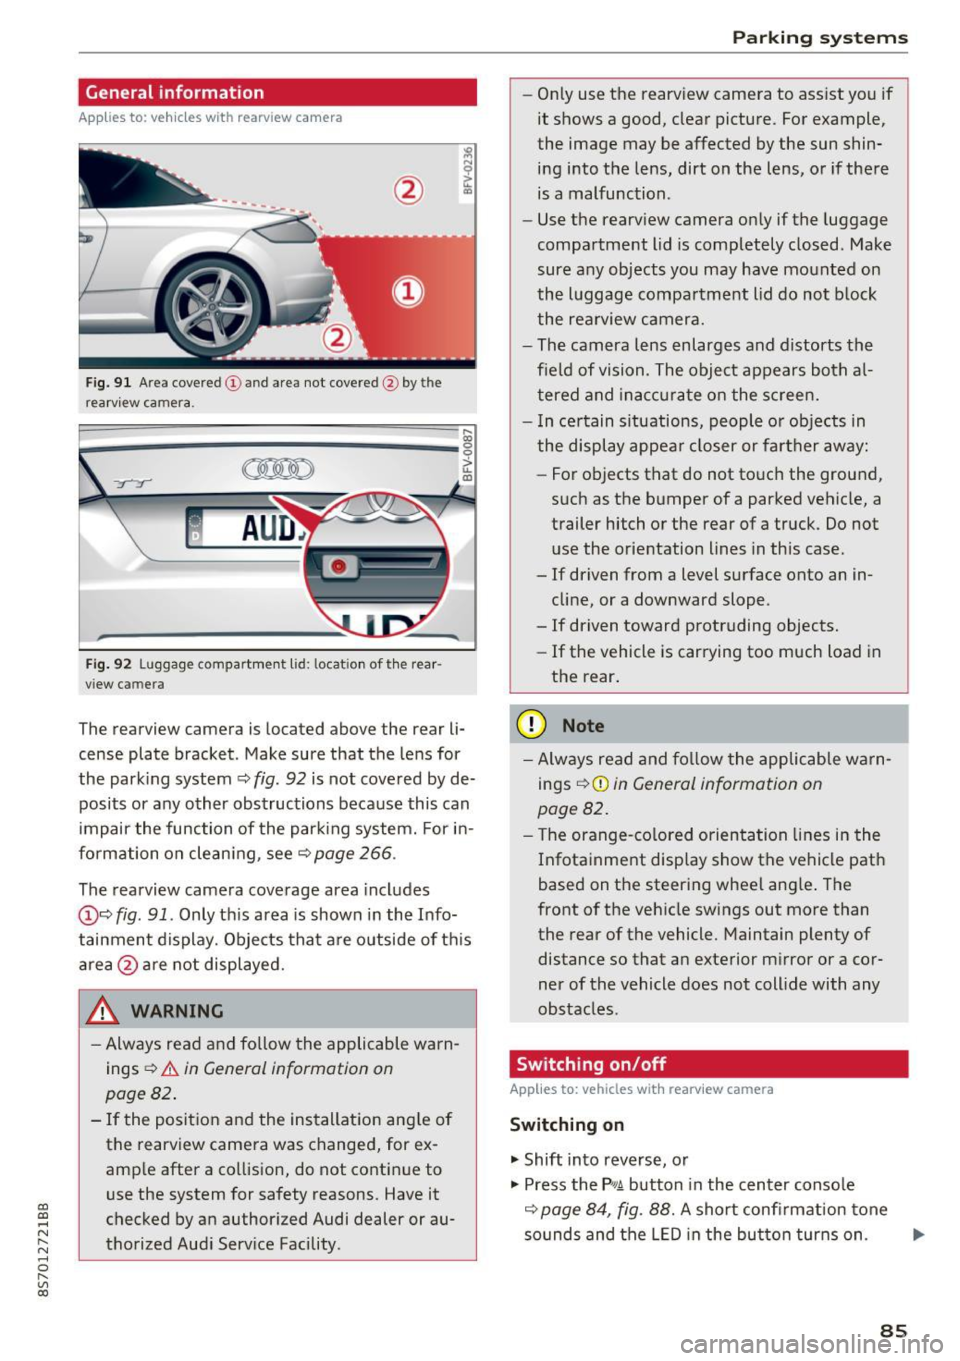
Fig. 9 1 Are a co vered (!) and a rea not cove red @ bythe
r earv iew ca mera.
~
~ ;..------ ::.·~- ,.,.~ _.,- ,,,_-------- g
(Jo00oD ~
Fig. 92 Luggage compartme nt lid: locat io n of t he rear
view c amera
The rearview camera is located above the rear li
cense plate bracket. Make sure that the lens for
the park ing system ~
fig. 92 is not covered by de
posits or any other obstructions because this can
i mpair the function of the par king system. For in
formation on clean ing, see ~
page 266 .
The rearview camera coverage area includes
@ ~ fig . 91 . Only th is area is shown in the Info
tainment display. Objects tha t are outside of th is
area @are no t displayed.
A WARNING
- Always read and fo llow the applicable warn
ings
~ A in General information on
page 82 .
- If the position and the installation ang le of
the rearview camera was changed, for ex
amp le after a collision , do not continue to
use the system for safety reasons. Have it
checked by an authorized Audi dealer or au
thorized Aud i Serv ice Facility .
Parking systems
-On ly use the rearv iew camera to ass ist you if
it shows a good, clear pictu re. For example,
the image may be affected by the sun shin
ing i nto the lens, dirt on the lens, or if there
is a malfunction .
- Use the rearv iew camera on ly if the luggage
compa rtment lid is completely closed . Make
sure any objects you may have mounted on
the l uggage compa rtment lid do not b lock
the rea rview camera.
- The camera lens enlarges and d istorts the
field of vision. The object appears both a l
t ered and ina ccur ate on the s creen.
- I n ce rtain s itu ations, people or objects in
the display appea r closer or fa rther away:
- For objects t hat do not touc h the grou nd,
such as the bumper of a parked vehicle, a
trailer hitch or the rear of a truck . Do not
u se the orie ntation lines in this case .
- If driven from a level s urface onto an in
cline, or a downward slope .
- If driven toward protruding objects.
- If the vehicle is carrying too much load in
the rear.
(D Note
-Alw ays read and fo llow the applicable w arn
ings
¢ (D in General information on
page 82 .
- The orange-co lored orientation lines in the
Infotainment display show the vehicle path
based on the steering wheel ang le . The
front o f the vehicle swings out more than
the rear of the vehicle. Maintain plenty of distance so that a n exterior m irror or a cor
ner of the vehicle does not coll ide with any
obstacles.
Switching on/off
Applies to: vehicles with rearview camera
Switching on
.. Shift into reverse, or
.. Press the
P,qA button in the center console
~ page 84, fig. 88. A short confi rmation tone
so unds and the LED in the bu tton tur ns on . ...
85
Page 88 of 314
Parking systems
Switching off
.. Drive faster than 6 mph (10 km/h), or
.. Press the
P"1A button, or
.. Switch the ignition
off.
(D) Tips
- The visual display in the left part of the dis
play should help you detect the critical vehi
cle areas .
- You can change the volume of the sig nals
and the display
¢page 86.
Perpendicular parking
Appl ies to: ve hicles with rea rview ca mera
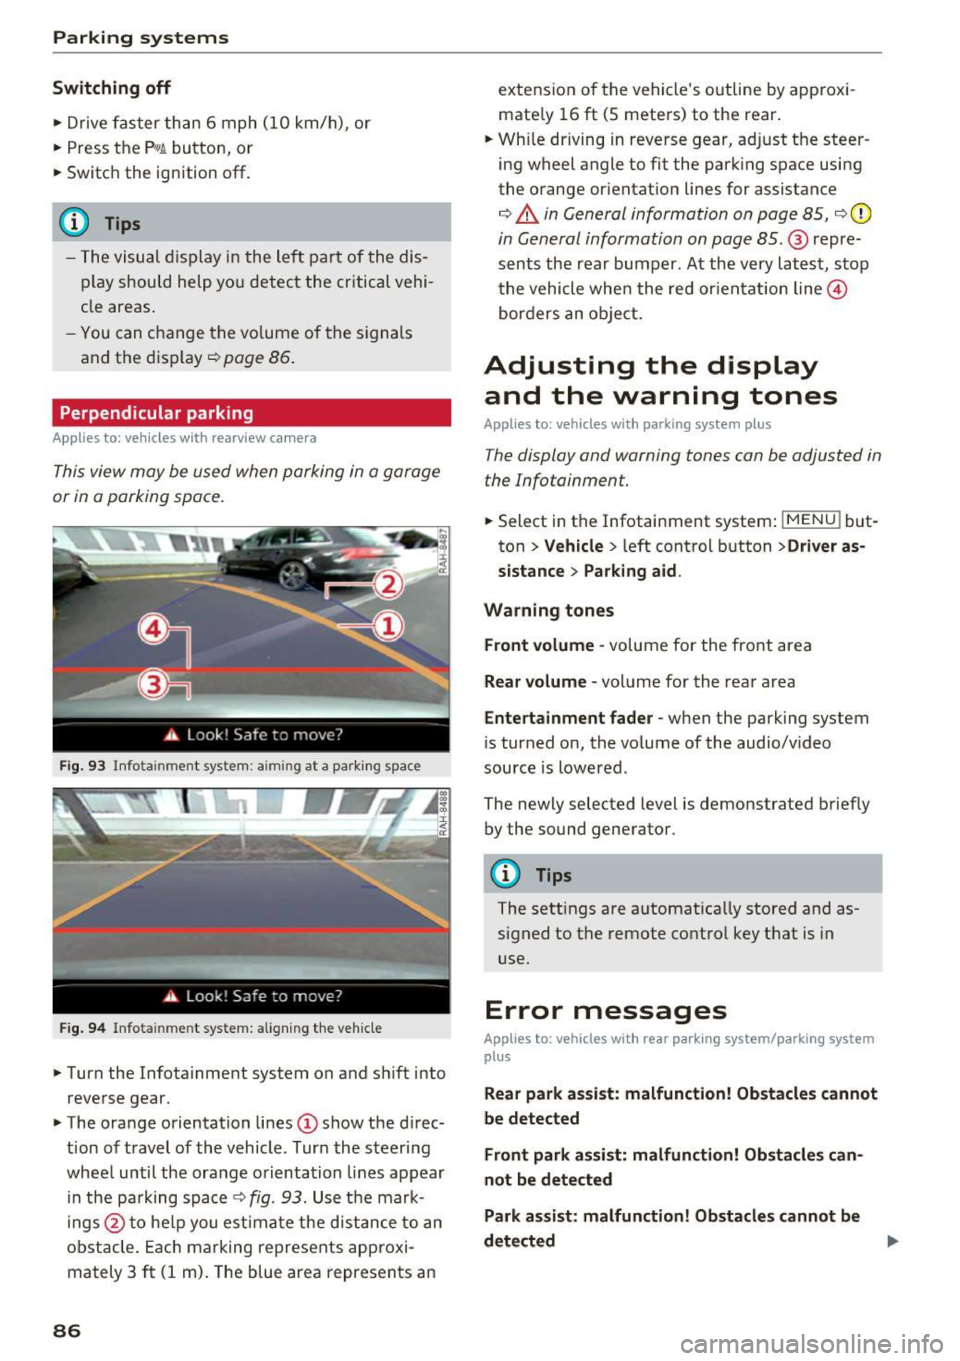
This view may be used when parking in a garage
or in a parking space.
Fig. 93 Info ta inment syste m: aim ing at a pa rking space
Fig. 94 Infota inme nt sys tem: aligning the vehicle
.. Turn the Infotainment system on and shift into
reverse gear.
.. The orange orientation lines
(I) show the direc
tion of travel of the vehicle . Turn the steering
wheel until the orange orientation lines appear
in the pa rking space
c:!;> fig. 93. Use the mark
ings @to help you estimate the d istance to an
obstacle. Each marking represents approxi
mately 3
ft (1 m). The blue area represents an
86
extension of the vehicle 's outline by approxi
mate ly 16
ft (5 meters) to the rear .
.. Wh ile driving in reverse gear, adjust the steer
ing wheel angle to fit the parking space using
the orange orientation lines for assistance
¢ &. in General information on page 85, ¢(D
in General information on page 85. @ repre
sents the rear bumper. At the very latest, stop
the vehicle when the red or ientation line@
borders an object.
Adjusting the display
and the warning tones
Applies to: vehicles with parkin g sys tem plus
The display and warning tones can be adjusted in
the Infotainment.
.. Select in the Infotainment system : IMENUj but
ton
> Vehicle > left control button >Driver as
sistance> Parking aid .
Warning tones Front volume -
volume for the front area
Rear volume -volume for the rear area
Entertainment fader -when the parking system
is turned on, the volume of the audio/video
source is lowered .
The newly selected level is demonstrated briefly by the sound generator.
{!) Tips
The settings are automat ically stored and as
signed to the remote control key that is in
use.
Error messages
App lies to : vehicles wit h rear parking system/parking system
plus
Rear park assist: malfunction! Obstacles cannot
be detected
Front park assist: malfunction! Obstacles can
not be detected
Park assist: malfunction! Obstacles cannot be
detected ..,._
Page 90 of 314
Intelligent Technology
Intelligent Technology
Electronic stabilization
control (ESC)
Description
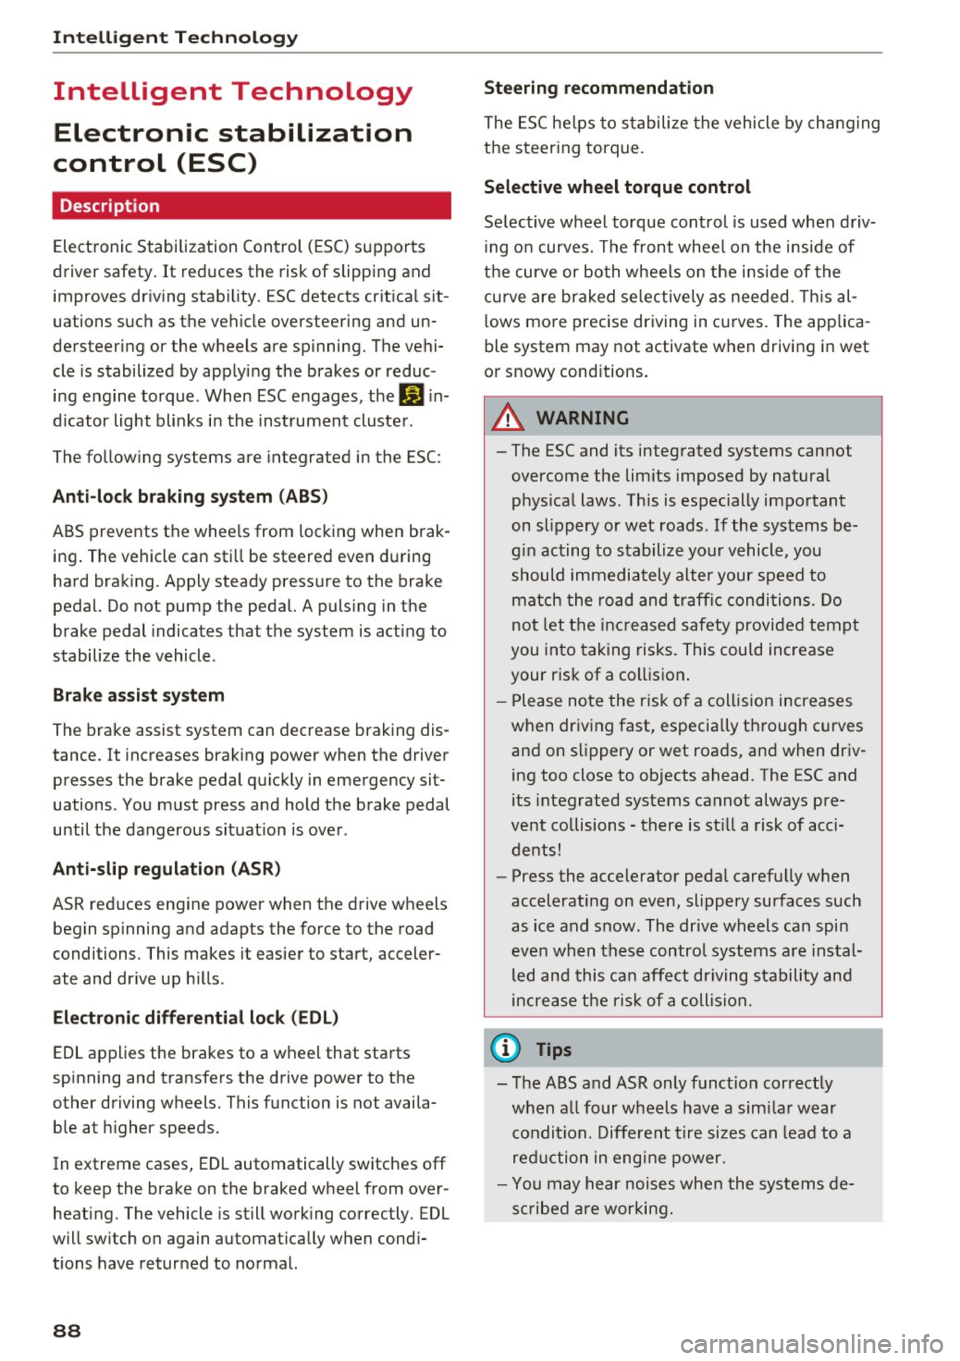
Electronic Stabilization Control (ESC) supports
driver safety.
It reduces the risk of slipping and
improves driving stability. ESC detects critical sit
uations such as the vehicle oversteering and un
dersteering or the wheels are spinning. The vehi
cle is stabilized by applying the brakes or reduc
ing engine torque. When ESC engages, the
G1 in
dicator light blinks in the instrument cluster.
The following systems are integrated in the ESC:
Anti-lock braking system (ABS)
ABS prevents the wheels from locking when brak
ing. The vehicle can still be steered even during
hard braking. Apply steady pressure to the brake
pedal. Do not pump the pedal. A pulsing in the
brake pedal indicates that the system is acting to
stabilize the vehicle .
Brake assist system
The brake assist system can decrease braking dis
tance. It increases braking power when the driver
presses the brake pedal quickly in emergency sit
uations . You must press and hold the brake pedal
until the dangerous situation is over .
Anti-slip regulation (ASR)
ASR reduces engine power when the drive wheels
begin spinning and adapts the force to the road
conditions. This makes it easier to start, acceler
ate and drive up hills .
Electronic differential lock (EDL)
EDL applies the brakes to a wheel that starts
spinning and transfers the drive power to the
other driving wheels. This function is not availa
ble at higher speeds.
In extreme cases, EDL automatically switches
off
to keep the brake on the braked wheel from over heating. The vehicle is still working correctly. EDL
will switch on again automatically when condi
tions have returned to normal.
88 Steering
recommendation
The ESC helps to stabilize the vehicle by changing
the steering torque.
Selective wheel torque control
Selective wheel torque control is used when driv
ing on curves. The front whee l on the inside of
the curve or both wheels on the inside of the
cu rve are braked selectively as needed. This al
lows more precise driving in curves. The applica
ble system may not activate when driving in wet
or snowy conditions.
A WARNING
- The ESC and its integrated systems cannot
overcome the limits imposed by natural physical laws. This is especially important
on slippery or wet roads. If the systems be
gin acting to stabilize your vehicle, you
should immediately alter your speed to
match the road and traffic conditions. Do
not let the increased safety provided tempt
you into taking risks. This could increase
your risk of a collision .
- Please note the risk of a collision increases
when driving fast, especially through curves
and on slippery or wet roads, and when driv ing too close to objects ahead. The ESC and
its integrated systems cannot always pre
vent collisions -there is still a risk of acci
dents!
- Press the accelerator pedal carefully when
accelerating on even, slippery surfaces such
as ice and snow. The drive wheels can spin
even when these control systems are instal
led and this can affect driving stability and
increase the risk of a collision.
(j) Tips
-The ABS and ASR only function correctly
when all four wheels have a similar wear
condition. Different tire sizes can lead to a
reduction in engine power.
- You may hear noises when the systems de
scribed are working.
Page 91 of 314
CD
CD
.... N
" N ...... 0 r--. V, co
Intelligent Technology
Switching on and off
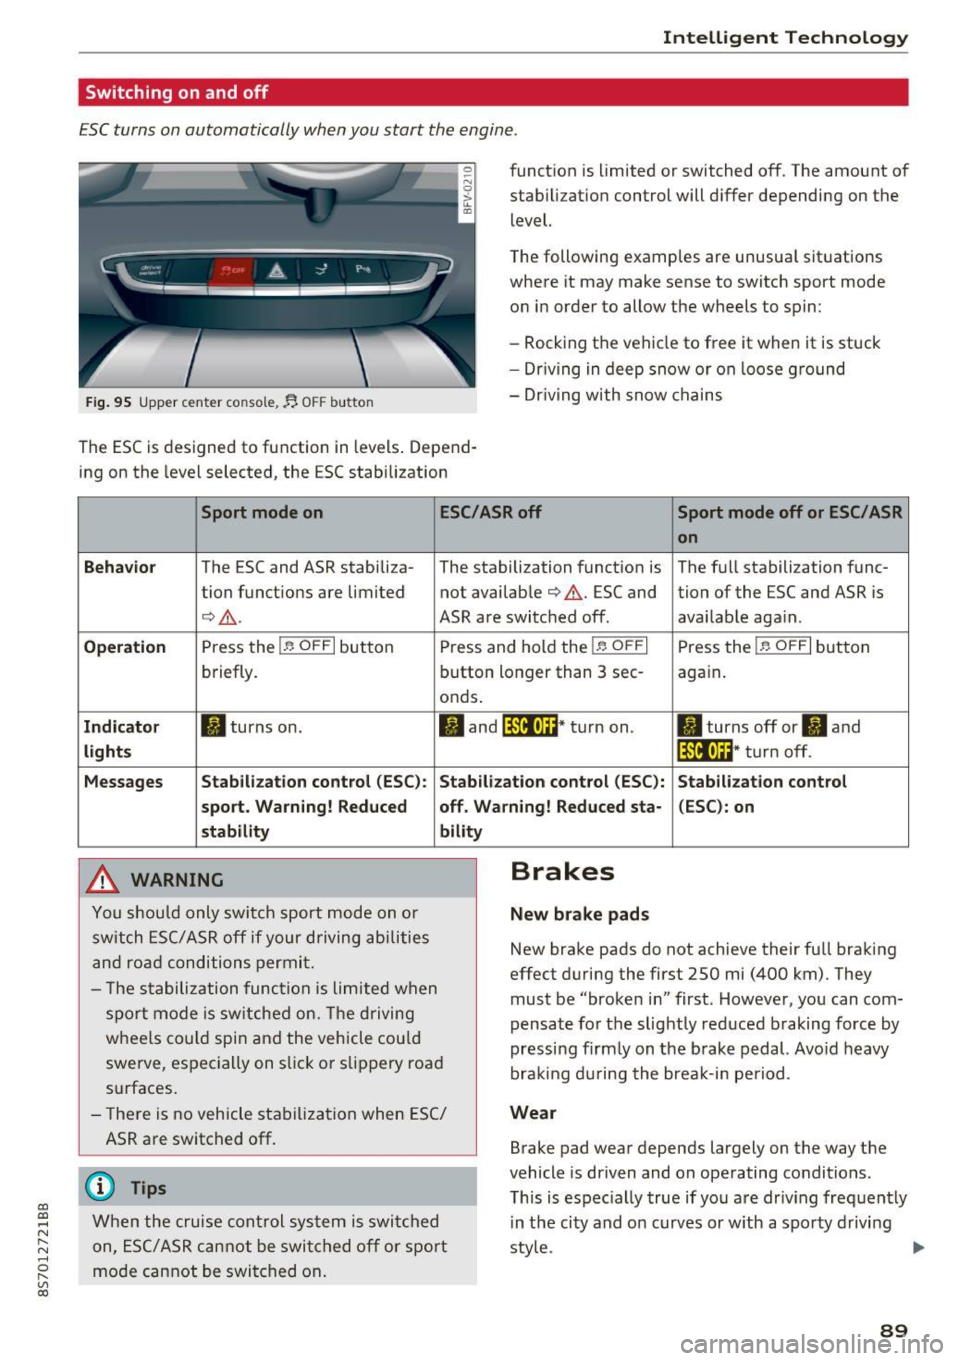
ESC turns on automatically when you start the engine.
Fig. 95 Upper center console, fj. OFF b utton
The ESC is designed to function in levels . Depend
ing on the level selected, the ESC stabilization funct
ion is limited or switched off. The amount of
stab ilizat ion control will d iffer depending on the
level.
T he following examples are unusua l situat ions
where it may make sense to switch sport mode
o n in order to allow the wheels to spin:
- Rocking the vehicle to free it when it is stuck
- Dr iving in deep snow or on loose g round
- Dr iving with snow chains
Sport mode on ESC/ASR off Sport mode off or ESC/ ASR
on
Behavio r
The ESC and ASR stabiliza- The stabilization funct ion is The f ull stabilization func-
tion funct ions are limited not availab le
¢ .&. . ESC and tion of the ESC and ASR is
¢ .&.. ASR are switched off. availab le aga in.
Operation Press the l.e OFFI but ton Press and hold the l.e OFFI Press the l .e OFFI but ton
briefly. button longer than 3 sec- aga in .
onds .
Indicator II turns on. II and l*JJ•U~* tu rn on. II turns off or II and
liil•IH * tu rn off. light s
Messages Stab
ilization control (ESC ): Stab ilization con trol (ESC ): Stab ilization cont rol
sport . Warning! Reduced off. Wa rning! Reduced sta -(ESC): on
stability
A WARNING
Y ou shou ld only swit ch spo rt m ode on or
switch ESC/ ASR off if your driving ab ilities
a n d roa d conditions permi t.
bility
- T he s tabiliz ation func tion is li mite d when
s por t mode is sw itched on. The driving
whee ls co uld spi n and the vehicle cou ld
swerve, espec ially on s lick or s lippery roa d
surfaces.
- There is no vehicle stabi lization when ESC/
ASR are switched off.
(D Tips
Wh en the cruise cont rol sys tem is swi tched
on, ESC/ ASR can not be swi tched o ff or sport
mo de can not be swit ched on .
Brakes
New brake pads
New brake pads do not achieve their fu ll braking
effect duri ng the first 250 mi (400 km) . They
must be "broke n in" first. Howeve r, you can com
pensate fo r th e slightly reduced braking force by
pressing f irm ly on the b rake pedal. Avo id heavy
bra king d urin g the brea k-in pe riod .
Wear
Brake pad wear depends largely on the way the
vehicle is driven and on operating conditions.
T his is espec ially true if yo u are dr iv ing freq uently
in t he ci ty and o n curves or w ith a spo rty d rivi ng
sty le.
IJI,,
89
Page 92 of 314
Intelligent Technology
Operating nois e
Noises may occur when br aking depend ing on the
speed, b raking force and outside cond itions such
as tempe rature and humidity.
Effect of water and road salt
I n ce rtain s ituations, for example after driving
through wa ter, in heavy ra in, afte r ove rnig ht con
densat ion or after washing your car, the braking
effect can be reduced by moisture or ice on the
brake rotors and brake pads. The brakes must be
"dried" first w ith a few careful brake applica
tions.
At highe r speeds and with the windshie ld wipers
turned on, the brake pads press against the brake rotors for a short amount of time . Th is action,
which is not felt by the driver, happens at regular
intervals and ensures a better reaction time for
the brakes in wet weather .
The braking eff ect can also be reduced if you are
driving on salted roads and you do not apply the
brakes for long periods of time. The layer of salt
on the brake rotors and pads must be worn off
first when the brakes are applied .
Corrosion
Leaving the vehicle parked for long periods of
time, low mi leage and avoiding heavy braking
can contribute to corrosion on the brake rotors
and to dirty brake pads .
If you usually avoid heavy braking or if there is
corros ion present, occasional heavy braking at
h igh speeds is recommended to clean the brake
rotors and pads
¢ ,& .
Brake system malfunct ion
if you notice that the brake pedal travel has sud
denly increased, then a brake c ircuit in the dual
circu it brake system may have malfunct ioned.
Drive to an authorized Aud i dea ler or aut horized
Aud i Serv ice Facility immediately to have t he
p roblem co rrected . On the way there, drive with
reduced speed and keep in mi nd that you w ill
need a longer d istance to s top and you w ill need
to p ress the brake pedal har der.
90
Low brake fluid level
When the brake fluid level is low, m alfunc tions in
the b rake system may occur . The brake fluid leve l
i s e lectronically monitored .
Brake booster
The brake booster ampl ifies the press ure you ap
ply to the brake pedal.
_&. WARNING
- New brake pads do no t achieve the ir full
braking effect during the first 2 50 m i
-
(400 km). They m ust be "b roken in" first .
However, you can compensate fo r the
slightly reduced braking force by pressing
firm ly on the brake pedal. Avoid heavy brak
ing during the break-in period .
- On ly app ly the bra kes for the purpose of
cleaning the brake system when road and
traffic conditions permit. You must not en danger other road users . This increases the
ris k of an accident.
- On steep slopes, reduce the speed and se
lect a lower gear o r lower selector leve r po·
si tion. D rive as little as possible while press
ing the bra ke pedal and avoi d pu tting your
left foot on the brake pedal while dr iv ing.
This could cause the bra kes to overhea t and
impair the efficiency of the b rakes.
- Do not let the bra kes "grind" by always
keep ing your foot on the bra ke pe dal. This
can cause the brakes to overheat, inc rease
wear and increase braking distance unneces
sarily .
- Ce rtain weather and operating conditions
such as d riving through water, dr iv ing in
heavy rain or driv ing after wash ing your ve
hicle can impai r the effective ness of the
brakes . In t he win ter, ice may build up o n
the bra ke pa ds, rotors and dr ums. Check
t hese components by b raking carefully. Ap
plyi ng the brakes carefully seve ral times
dries the brakes and removes ice build-up .
- The efficiency o f th e brakes can also be im
p air ed by dr iv ing for long s tretches on roads
covered with sa lt wi thout using the bra kes .
You can remove salt deposits from the ..,.
Page 94 of 314
Intelligent Technology
snow and ice. Always read and follow safety pre
cautions
¢ & .
Winter tires
By using all wheel drive, your vehicle has good
forward motion with standard tires in winter con
ditions. However, in winter we recommend using
winter or all season tires on
all four wheels, be
cause this will improve the
broking effect.
Snow chains
If there are snow chain laws, snow chains must
also be used on vehicles with all wheel drive
¢ page 261, Snow chains.
Replacing tires
For vehicles with all wheel drive, only whee ls with
the same rolling circumference should be used .
Avoid using tires with different tread depths
¢ page 2 53, New tires or wheels.
Offroad vehicle?
Your Aud i is not an offroad vehicle - there is not
enough ground clearance. For this reason, avoid
difficult terrain.
_&. WARNING
-Also, in vehicles with all wheel drive, adapt
your driv ing style to the current road and
t ra ffic conditions. Do not let the increased
safety provided tempt you into taking risks,
because this increases the r isk of an acci
dent.
- The braking ability of your vehicle is limited
to the traction of the wheels. In this way, it
is not different from a two wheel drive vehi
cle. Do not be tempted to accelerate to a
high speed when the road is slippery, be
cause this increases the risk of an accident.
- Note that on wet streets, the front wheels
can "hydroplane" if driving at speeds that
are too high. Unlike front whee l drive
vehicles, the eng ine does not rev highe r sud
denly when the vehicle begins hydroplaning.
For this reason, pay attention to the road
conditions regardless o f your speed.
92
Rear spoiler
Appl ies to: vehicles with retractable rear spoile r
The extendoble rear spoiler increases driving sta
bility.
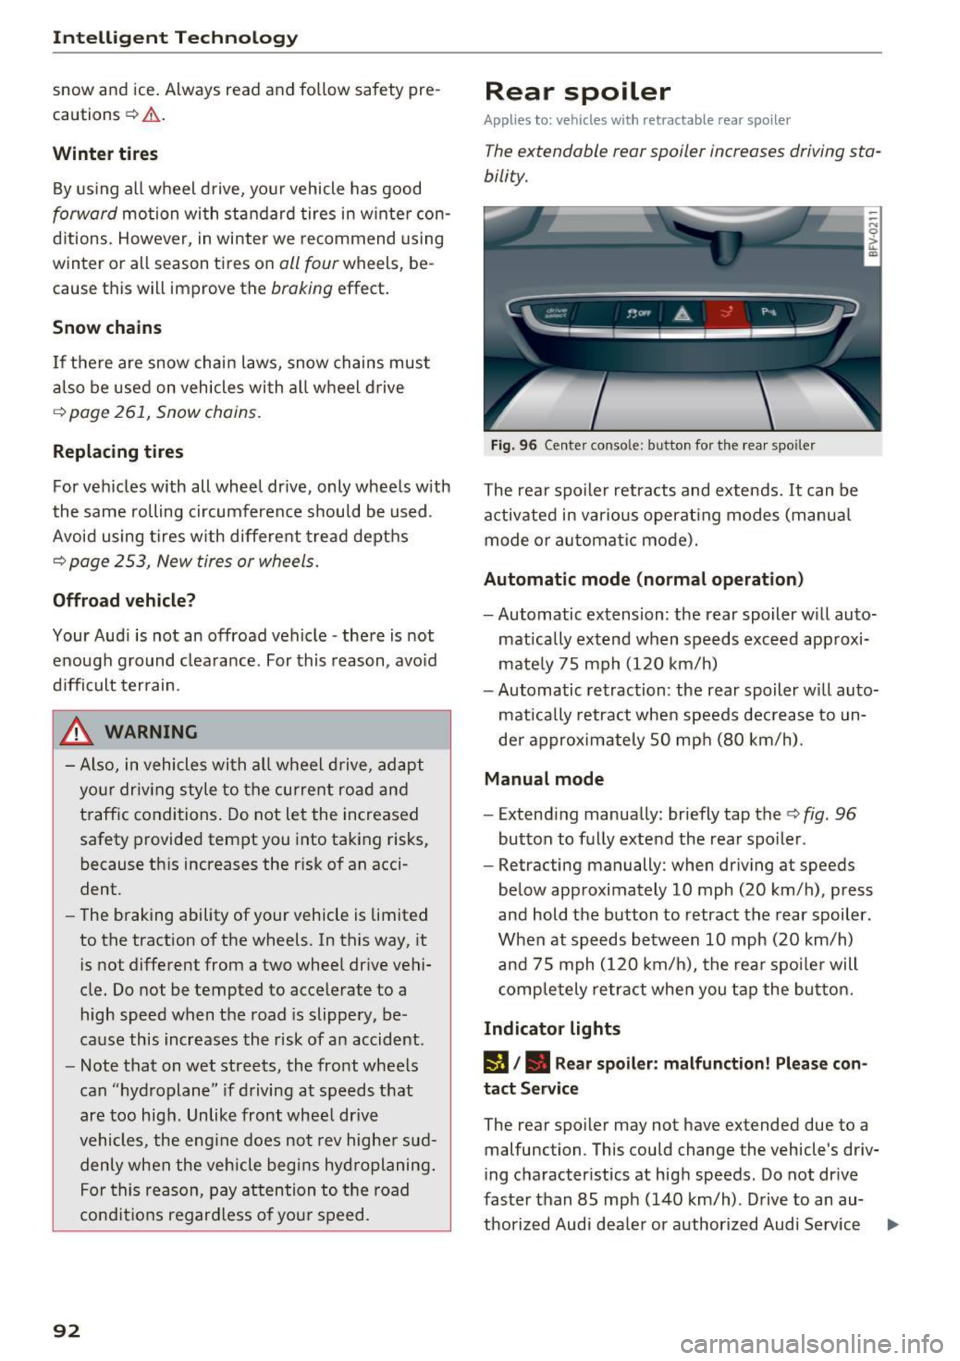
Fig. 96 Center conso le: button for the rear spoiler
The rear spoiler retracts and extends. It can be
activated in various operat ing modes (manua l
mode or automatic mode).
Automatic mode (normal operation)
- Automatic extension: the rear spoiler w ill auto-
mat ically extend when speeds exceed approxi
mately 75 mph (120 km/h)
- Automatic retraction: the rear spoiler w ill auto
matically retract when speeds decrease to un
der approximately 50 mph (80 km/h).
Manual mode
-Extend ing manually : briefly tap the¢ fig. 96
button to fully extend the rear spoiler .
- Retracting manually: when driving at speeds
below approximately 10 mph (20 km/h), press
and hold the b utton to retract the rear spoiler .
When at speeds be tween 10 mph (20 km/h)
and 75 mph (120 km/h), the rea r spoi ler will
completely retract when you tap the button.
Indicator lights
IJ,. Rear spoiler: malfunction! Please con
tact Service
The rear spoiler may not have extended due to a
malfunction. This could change the vehicle's driv
ing characteristics at high speeds. Do not drive
faster than 85 mph (140 km/h) . Drive to an au-
thorized Audi dea ler or authorized Audi Service ..,.