2017 AUDI TT ROADSTER buttons
[x] Cancel search: buttonsPage 9 of 314
co
co
.... N
" N .... 0
" "' c:o
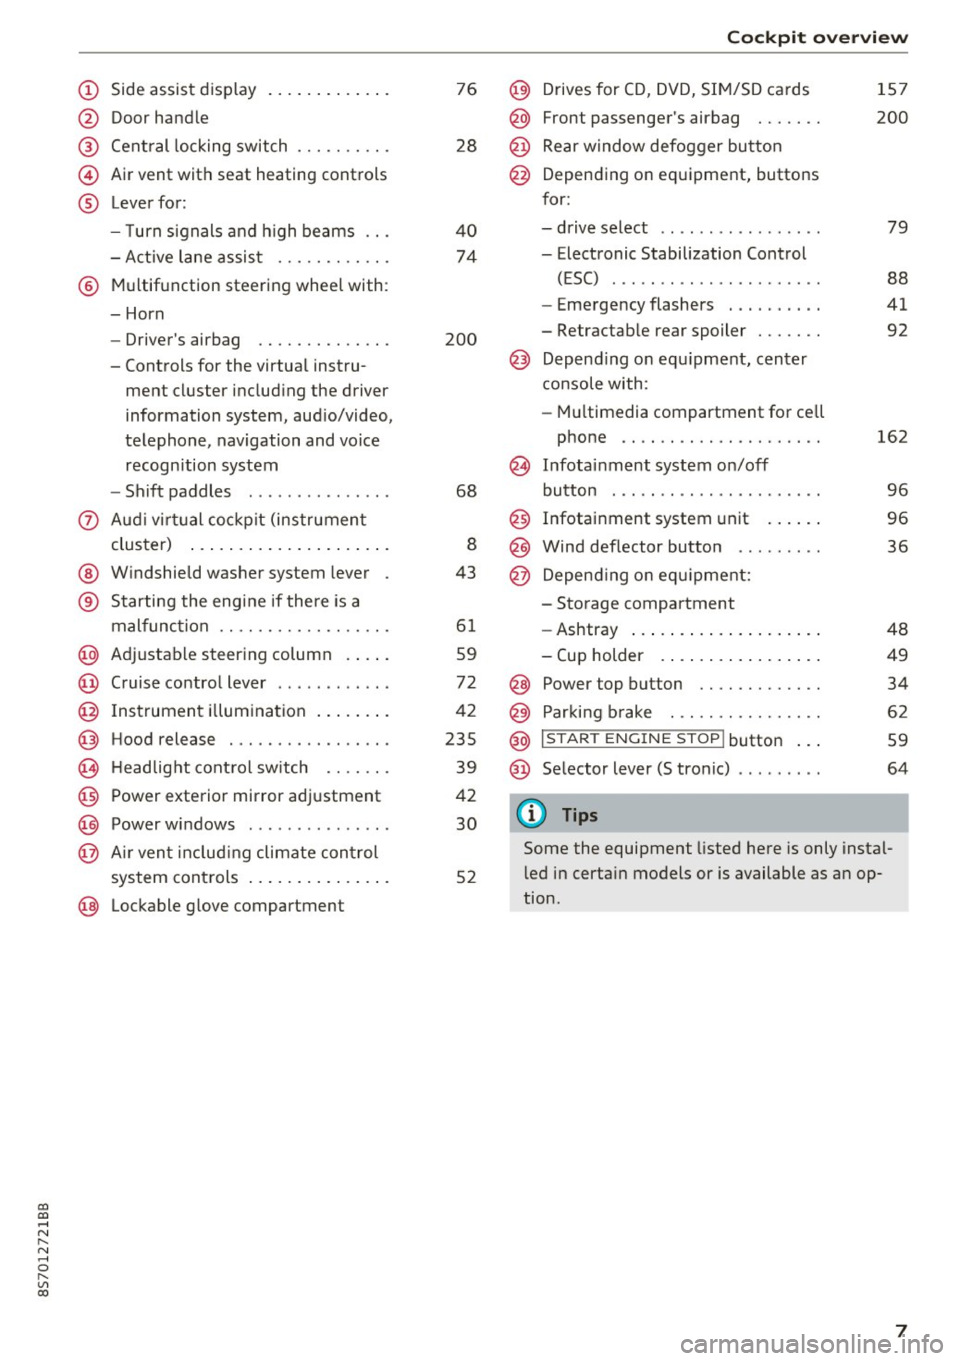
(!) Side assist display ..... ... .. .. .
@ Door handle
®
©
®
Cent ral locking switch
Air vent with seat heating controls
Lever for:
- T urn s ignals and h igh beams .. .
- Active lane assis t ......... .. .
® Multifunction steering wheel with :
- Horn
- Driver's ai rbag .. ......... .. .
- Controls for the virtual instru-
ment cluster includ ing the driver
information system, aud io/video,
telephone, navigation and voice
recogn ition system
- Shift paddles . .... ..... ... . .
0 Aud i v ir tu al co ckpit (instrument
cluster) ... .... .. .... ... .. .. .
@ W indshield washer system lever
® S tarting the engi ne if the re is a
mal func tion .. ........... .. .. .
@ Adjustab le st eering column . ... .
@ Cruise co ntrol lever .. ..... ... . .
@ Ins trument i llum ination ... .. .. .
@ Hood release . .... ......... .. .
0 H eadlight cont rol sw itch .... .. .
@ Power exterior mirror adjustment
@ Power windows . .... ..... ... . .
@ A ir ven t incl uding climate con trol
system controls ... .... ... .. .. .
@ Lockable g love compartment
76
28
40
74
200
68
8
43
6 1
59
72
42
235
39
42
30
52
Coc kpit o ve rv iew
@) Drives for CD, DVD, SI M/SD cards
@ Front passenger's ai rbag ...... .
@ Rear window defogger bu tton
@ Depending on equipment, buttons
for:
- drive select .. .. ............ .
- Electronic Stabilization Control
(ESC) ..... .. .. ............ .
- Emergency flashers . ...... .. .
- Retractab le rear spoiler ...... .
@ Depend ing on equ ipment , center
co nsole with:
- Mu ltimedia compartment for cell
phone .... .. .............. .
~ Infotai nment system on/off
button . .. .. .. .. ............ .
@ Infotainment system unit ... .. .
@ Wind deflector button ........ .
@ Depending o n eq uipment:
- Storage compartment
- Ashtray ... .. ... .. .. ..... .. .
- Cup holder .. ... .. .. ..... .. .
@ Power top button ............ .
@ Parking b rake . .. ............ .
@ I S TAR T ENGINE ST OP I butto n ...
@ Selector lever (S tronic)
@ Tips
1S7
200
79
88
41
92
162
9 6
96
36
48
49
34
62
59
64
Some the equipment listed here is only instal
l ed in certa in models or is available as an op
tion.
7
Page 22 of 314
Driver information system
Multifunction steering
wheel plus
Operating
Apples to: vehicles with multifunctio n steering wheel plus
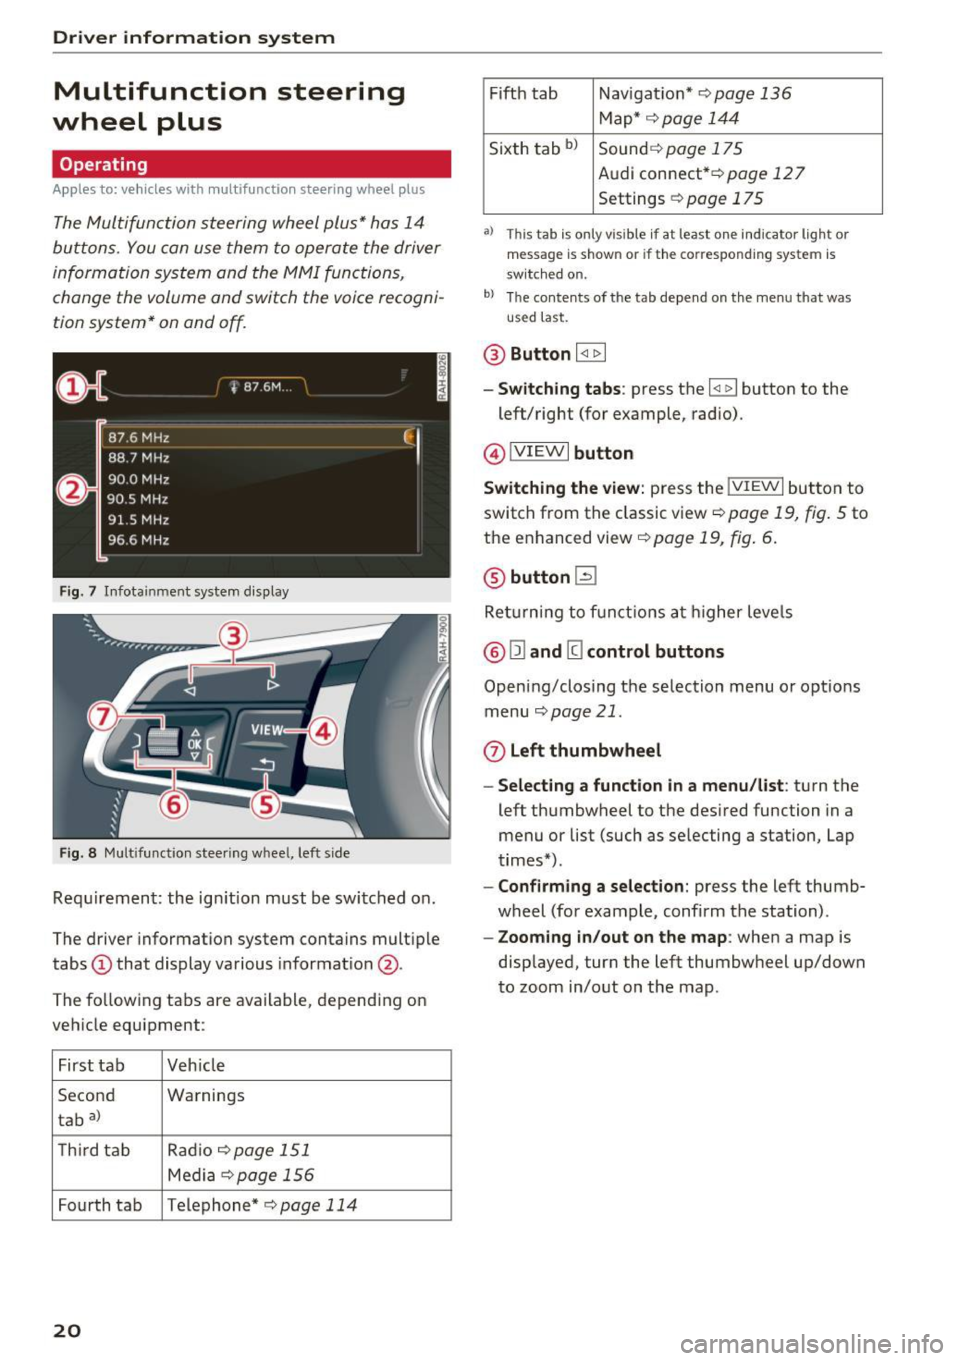
The Multifunction steering wheel plus* hos 14
buttons. You con use them to operate the driver
information system and the MMI functions,
change the volume and switch the voice recogni
tion system* on and off.
F ig. 7 Infotainment system display
Fig. 8 Mult ifunction steering wheel, left side
Requirement: the ign ition must be switched on .
The driver information system contains multiple
tabs
(D that display various informat ion @.
The fo llowing tabs are available, depending on
vehicle equipment :
First tab Veh icle
Second Warnings
tab
a)
T h ird tab Rad
io c:>page 151
Media c:> page 156
Fourth tab Telephone* c:> page 114
20
Fifth tab Navigat ion* c:> page 136
Map * c:> page 144
Sixth tab bl Sound c:> page 175
Audi connect* c:>page 127
Settings c:> page 175
a) This tab is only visible if at least o ne indicator lig ht or
message is shown or if the correspond ing system is
sw itc hed on.
bl Th e contents of the tab depend on the menu that was
u se d last.
® Button I <1 1> I
- Switching tabs: press the I
left/right (for example, radio).
@!VIEWI button
Switching the view: press the !VIEWI button to
switch from the classic view
c:> page 19, fig. 5 to
the enhanced view c:>
page 19, fig. 6.
@ button l2J
Returning to f unctions at higher levels
® l1l and III control buttons
Opening/closing the selection menu o r options
menu
c:>poge 21.
0 Left thumbwheel
-Selecting a function in a menu/list: turn the
left thumbwheel to the desired function in a
menu or list (such as selecting a station, Lap
times*) .
-Confirming a selection: press the left thumb
wheel (for example, confirm the station) .
-Zooming in/out on the map : when a map is
displayed, turn the left thumbwheel up/down
to zoom in/out on the map.
Page 23 of 314
CD
CD
.... N
" N ...... 0 r--. V, co
Control buttons
Applies to: vehicles with multifunction steering wheel plus
Fig . 9 Open ing th e selec tio n and opt ions menu
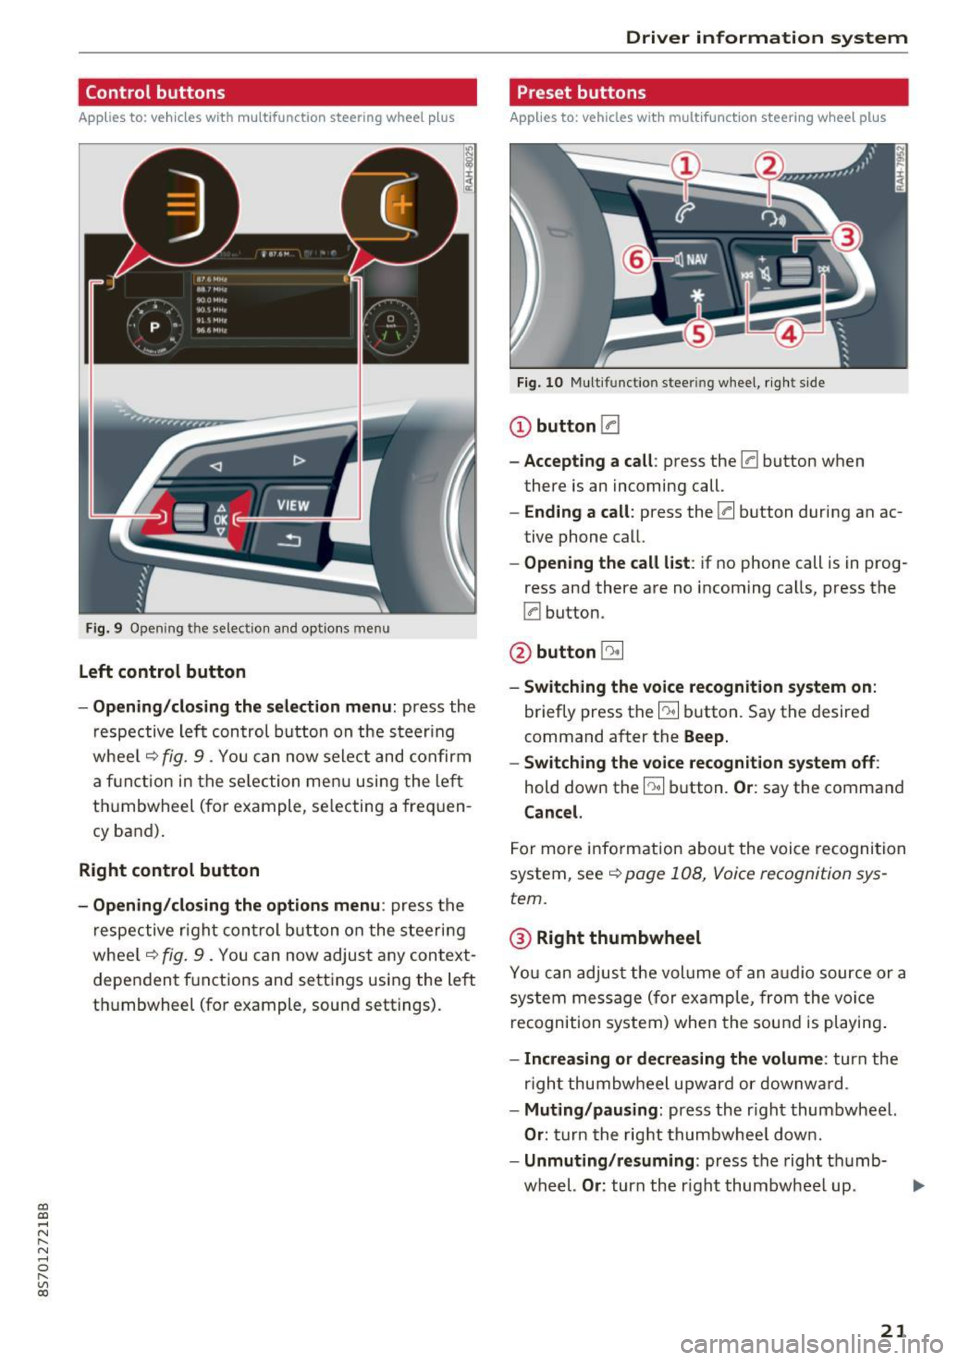
Left control button
- Opening /closing the select ion menu : press the
respective lef t control button on the s teer ing
whee l
c::> fig. 9 . You can now sele ct and confirm
a f unction in the se lection men u using the le ft
t hu mbwheel (for example, se lec ting a frequen
cy band) .
Right control button
-Opening /closing the options menu : press the
r espective r ight con trol b utton o n the stee rin g
whee l
c::> fig. 9 . You can now adjus t any context
dependent f unctions and setti ngs using the left
t hu mbwheel (fo r example , sound sett ings).
Driver in forma tion system
Preset buttons
Applies to: vehicles with multifunctio n steering wheel plus
Fig . 10 M ulti fun ctio n stee ring whee l, ri ght s ide
CD button [a
-Accepting a call : press the [a button when
there is an incoming call.
- Ending a call : press the [a button during an ac
tive phone call.
- Opening the call list : if no phone call is in prog
ress and there are no incoming ca lls, press the
[a button.
@ button 5l
-Switching the voice re cognition system on :
briefly press the~ button. Say the desired
command a fter the
Beep.
- Switching the voice recognition system off :
hold down the~ button. Or : say the command
Cancel.
For more info rm ation abou t the voice recognition
system, see
c::> page 108, Voice recognition sys
tem.
@ Right thumbwheel
You can adjus t the vol ume of an a udio source or a
system message (for ex ample, from the voice
recognition system) when the sou nd is pl ayin g.
-Increasing or decrea sing the volume: turn the
r ight thumbw heel upward or downw ard.
- Muting /pausing : press the r ight thumbwheel.
Or : turn the rig ht thumbwhee l dow n.
- Unmuting /resuming : press the right t humb-
wheel.
Or : turn th e right thumbw heel up. .,,.
21
Page 28 of 314
Opening and clo sin g
LED and batteries in the remote control key
fr=-~=;;;;- --~
I
Fig . 15 Re mote contro l key : rem ov ing the ba ttery h olde r
F ig. 16 Re mote cont ro l key (re ar side ): re m ovi ng the bat
tery ho lder
LED in the remote control k ey
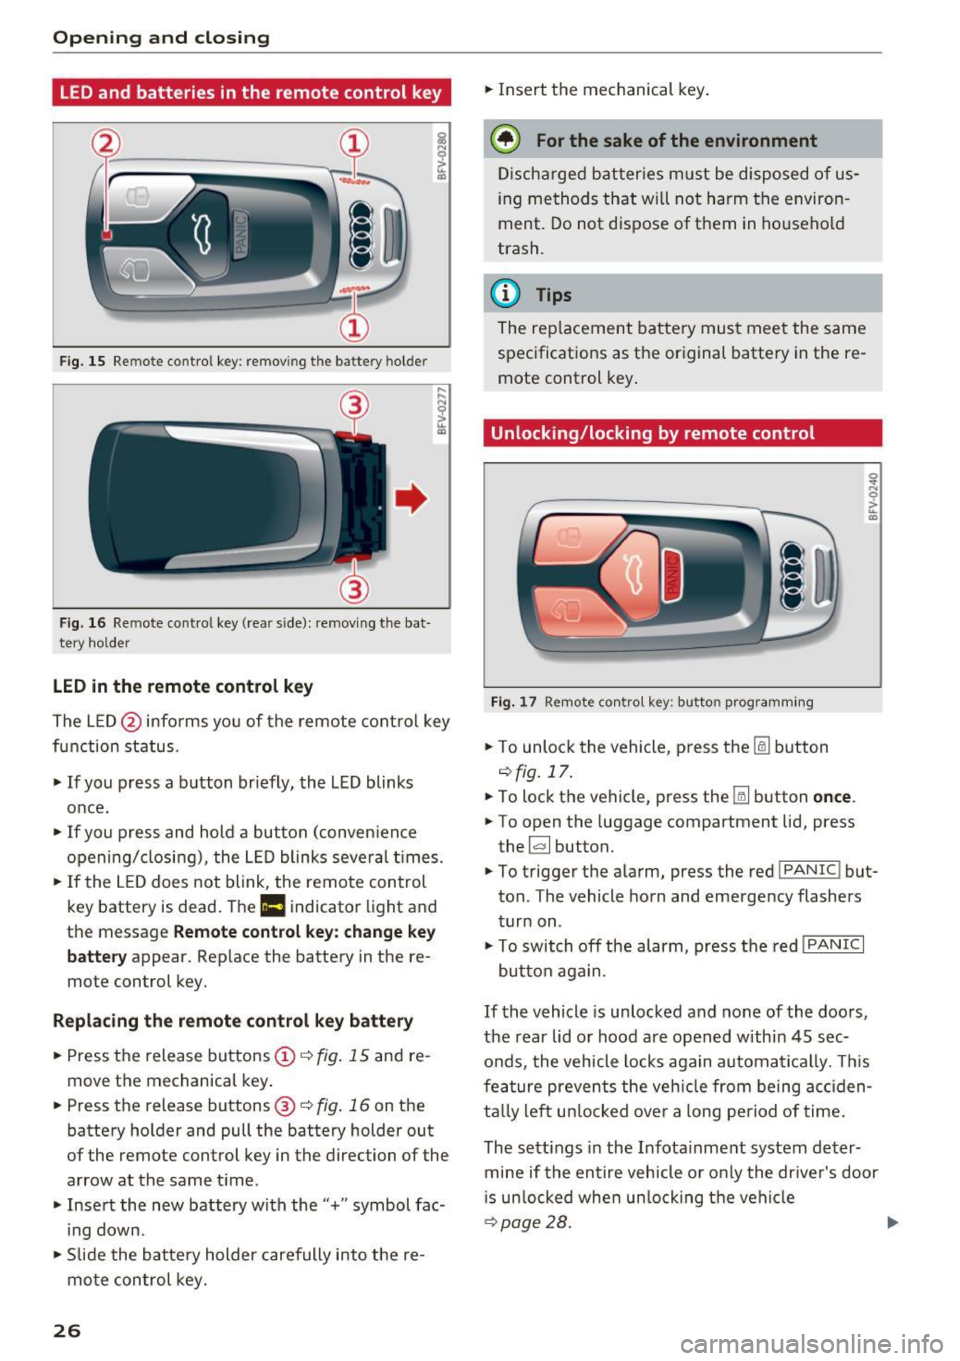
The LE D @ info rms you of the remote control key
function status .
.,. If you press a b utton briefly, the LED blinks
once.
.,. If you press and hold a button (conven ience
opening/closing), the LED blinks several t imes .
.,. If the L ED does not blink , the remote control
key battery is dead . The
Ill indicator light and
th e m essag e
Rem ote control key : cha nge ke y
b att ery
appea r. Rep lace the battery in the re
mote con trol key.
R eplacing th e remot e co ntrol k ey batt ery
.,. Press the release buttons@¢ fig. 15 and re
move the mechanical key .
.,. Pre ss the r ele as e buttons @¢
fig. 16 on th e
battery holder and pull the battery holde r out
of the remo te control key in the dire ction o f the
arrow at the same t ime .
.,. Insert the new battery with the"+" symbol fac·
ing down .
.,. Slide the batte ry holder carefully into the re
mote control key.
26 .,.
Insert the mechanical key .
@ For the sake of the environment
Discharged batter ies m ust be disposed of us
ing methods that wi ll not harm the environ
ment. Do not dispose of them in ho usehold
trash.
(D Tips
The rep lacement battery must meet the same
spec ificat ions as the or iginal battery in the re
mote control key .
Unlocking/locking by remote control
Fig. 17 Remot e con tro l key: butt on programming
.,. To unlock the vehicle , pr ess the lil button
¢fig.17 .
.,. To lock the vehicle, press th e Iii button once .
.,. To open the luggage compartment lid, press
the ~ button.
.,. To trigger the alarm, press the red
!PAN IC! but·
ton . The vehicle horn and emergency flashers
turn on .
.,. To switch off the alarm, press the red
! PANIC I
button aga in .
If the vehicle is unlocked and none of the doors,
the rear lid or hood are opened within 45 sec
onds, the vehicle locks again automatically . T his
fea ture prevents the veh icle from being acc iden
ta lly left un locked over a long period of time .
The sett ings in the Infota inment system deter·
mine if the entire vehicle o r only the dr iver's door
i s un locked whe n un locking the veh icle
¢ page 28. .,.
Page 33 of 314
CD
CD
.... N
" N ,-I 0 r--. V, co
@ Tips
-You can still open and close the windows for
approximately 10 minutes after turn ing the
ignition off. The power windows do not
switch off until the driver's door or front passenger's door has been opened.
- When opening the doors and when open
i ng/closing the power top, the windows au
tomatically lower approximately 10 mm.
Convenience opening/closing
All windows can be opened and closed at the
same time.
Convenience opening feature
• Press the Im button on the remote control key
until all windows reach the desired position.
Convenience closing feature
• Press the {D button on the remote control key
u nti l all windows are closed¢
A or
Convenience closing with the convenience
key*
• Touch the sensor* on the door handle long
enough until all windows and the power top*
are closed . Do not place your hand in the door
hand le when doing this.
Setting convenience opening in the
Infotainment system
• Select in the Infotainment system: !MENUI but
ton
> Vehicle> left control button >Vehicle set
tings .
To enable the convenience window opening func
tion, the
Long press to open windows function
must be switched
on.
.&_ WARNING
- Never close the windows or power top* care lessly or in an uncontrolled manner, be
cause this increases the risk of injury.
- For security reasons, the windows and the
power top* can only be opened and closed
with the remote control key at a maximum
distance of approximately 6 ft (2 m) away
Open ing and closing
from the vehicle . Always pay attention when
pressing the
Im button to close the w indows
and the power top* so that no one is
pinched. The closing process w ill stop im
mediately when the
Im button is released .
Correcting power window malfunctions
You can reactivate the one-touch up/down func
tion if it malfunctions.
• Pull the power window switch up until the win
dow is completely raised.
• Release the switch and pull it up aga in for at
least one second .
Garage door opener
(Homelink)
Description
Applies to : veh icles w ith garage door o pen er (Home link)
Fig. 25 Garage door opener: examples of usage for differ
ent systems
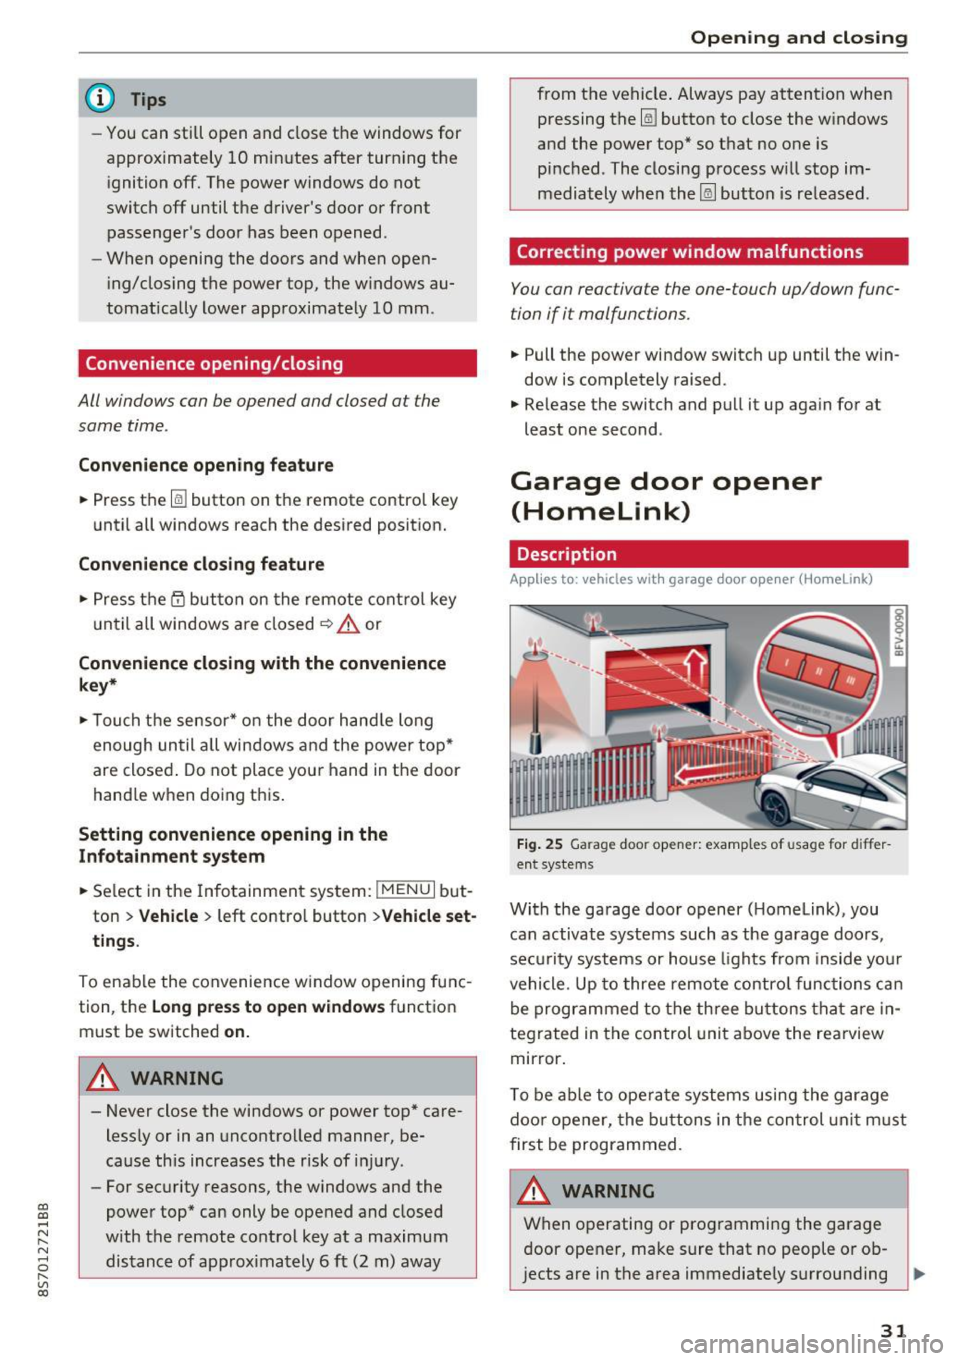
With the garage door opener ( Homelink), you
can activate systems such as the garage doors,
security systems or house lights from inside your
vehicle. Up to three remote control functions can
be programmed to the three buttons that are in
tegrated in the control unit above the rearview
mirror.
T o be able to operate systems using the garage
door opener, the buttons in the control unit must
first be programmed.
A WARNING ~
When operating or programming the garage
door opener, make sure that no people or ob
jects are in the area immediately surrounding ..,.
31
Page 34 of 314
Opening and closing
the equipment. Peop le can be injured or prop
erty can be damaged if struck when closing.
(D Tips
- For secu rity reasons, we recommend that
you clear the programmed buttons before
selling the vehicle.
- For additional information about Homelink,
v is it
www .homelink .com.
- For the Declaration of Conformity with the
provisions from the FCC in the United States
and Industry Canada, see¢
page 296 .
Operation
Applies to: ve hicles w ith garage doo r opener (Homeli nk)
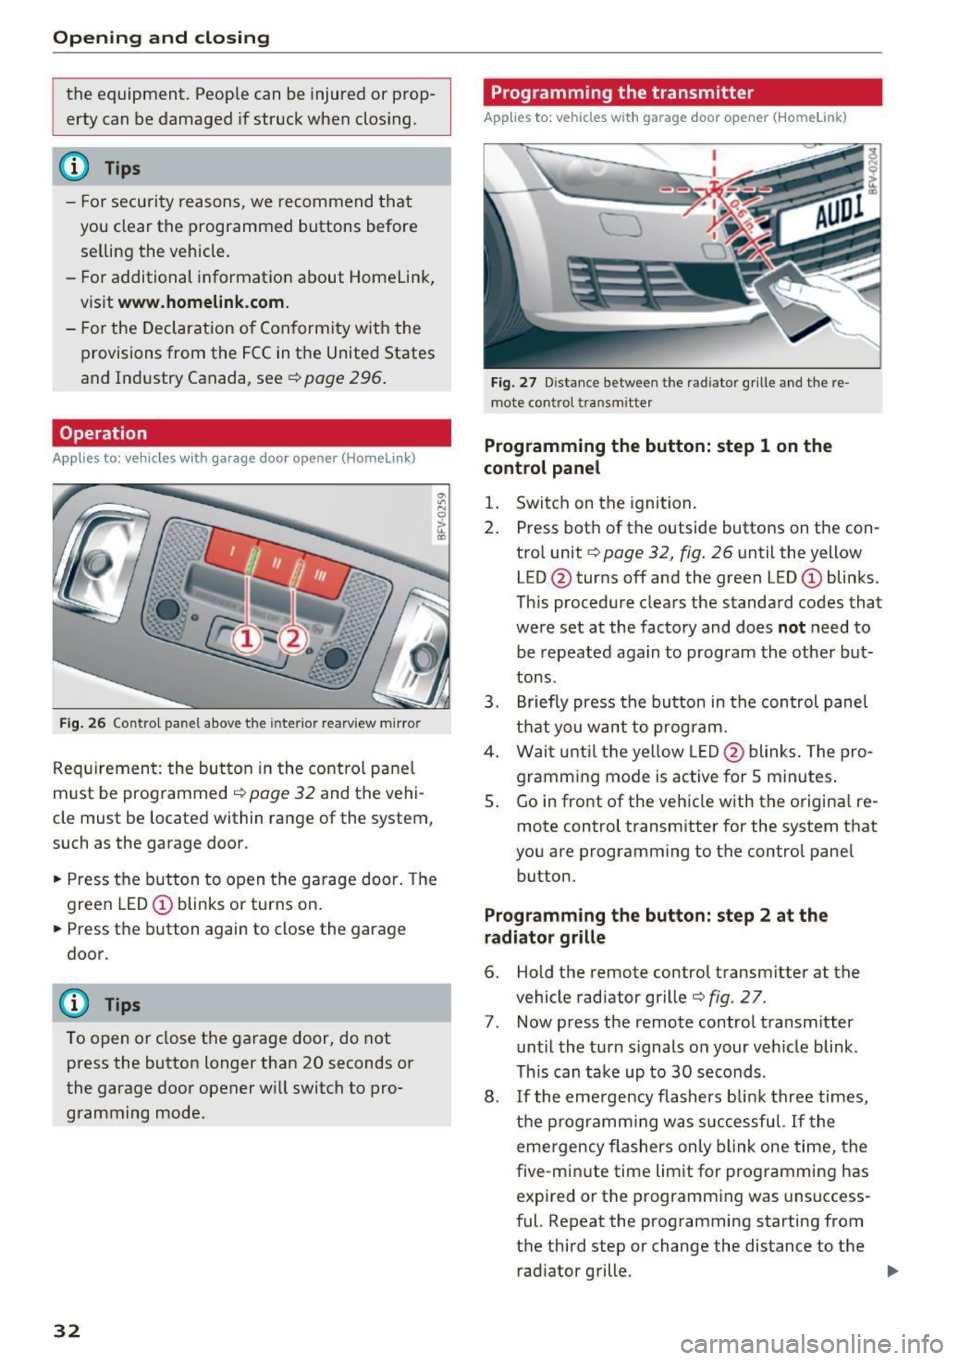
Fig. 26 Contro l pa nel above the inter io r rearview mirror
Requirement: the but ton in the control panel
m ust be programmed
i:!> page 32 and the vehi
cle must be located within range of the system,
such as the garage door .
.. Press the button to open the garage door. The
green LED
CD blinks or turns on.
.. Press the button again to close the garage
door.
(D} Tips
To open or close the garage door, do not
press the button longer than 20 seconds or
the garage door opener w ill switch to pro
gramming mode.
32
Programming the transmitter
App lies to : vehicles wit h garage door o pener (Horne link)
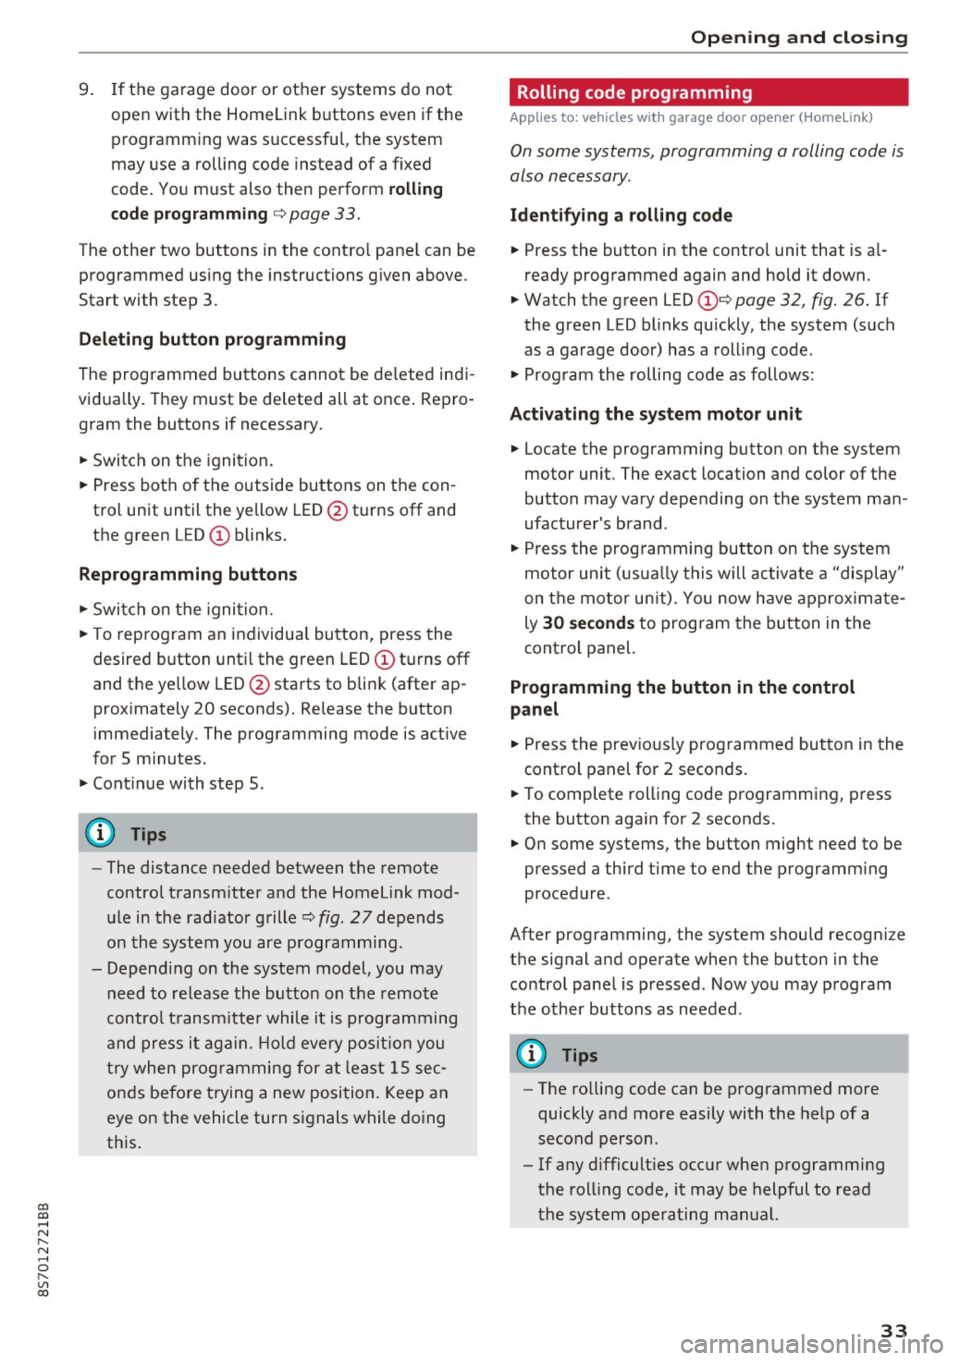
Fig. 27 D istance between the rad iator g rille and the re
mote contro l transm itter
Programming the button: step 1 on the
control panel
1. Switch on the ignition.
2. Press both of the outside buttons on the con
trol unit ¢
page 32, fig. 26 until the yellow
LED @turns off and the green LED
CD blinks.
This procedure clears the standard codes that
were set at the factory and does
not need to
be repeated again to program the other but
tons.
3. Briefly press the button in the control panel
that you want to program.
4. Wait until the yellow LED@blinks. The pro
gramming mode is active for S minutes.
5. Go in front of the vehicle w ith the origina l re
mote control transmitter for the system that
you are programming to the control panel button .
Programming the button: step 2 at the
radiator grille
6. Hold the remote control transmitter at the
vehicle radiator grille¢
fig. 27.
7 . Now press the remote control transm itter
until the turn signals on your veh icle blink .
This can take up to 30 seconds .
8. If the eme rgency flashers blink three times,
the programming was successful. If the
emergency flashers only blink one time, the
five -min ute time limit for programming has
expired or the programming was unsuccess
ful. Repeat the programming starting from
the third step or change the distance to the radiator grille.
Page 35 of 314
co
co
.... N
" N .... 0
" "' c:o
9. If the garage door or other systems do not
open with the Home link buttons even if the programm ing was successfu l, the system
may use a rolling code instead of a fixed
code. You must also then perform
ro lling
c o de progr amm ing
c:> page 33 .
The other two buttons in the contro l pane l can be
programmed using the instructions given above.
Star t wi th step 3 .
Dele ting button prog ramm ing
The programmed buttons cannot be de leted indi
vidually. They must be deleted all at once . Repro
gram the buttons if necessary.
"' Switch on the ignition.
.. Press both of the outside buttons on the con
trol unit until the yellow LED @turns off and
the green LED@ blinks.
Reprogramming button s
"'Switch on the ignition.
"'T o reprogram an individua l button, press the
desired b utton until the green LED(!) turns off
and the ye llow LED @star ts to blink (after ap
proximately 20 seconds). Release the button
immediately. The programming mode is active
for S m inutes.
"' Cont inue with step 5 .
@ Tips
-The distance needed between the remote
control transm itter and the Homelink mod
ule in the rad iator grille c:>
fig. 27 depends
on the system you are programm ing .
- Depending on the system model, you may need to release the button on the remote
control t ransm itter while it is programming
and press it again. Hold every posit ion you
try when programming for at least 15 sec
onds befo re trying a new posi tion. Keep an
eye on the vehicle turn signals while doing
this .
Op ening and cl osing
Rolling code programming
Applies to: vehicles with garage door opener (Home link)
On some systems, programming a rolling code is
also necessary.
Id enti fying a rolling c ode
"' Press the button in the control unit that is a l
ready programmed again and hold it down.
"' Watch the green LED (!)c:>
page 32 , fig. 26. If
the green L ED bl inks quickly, the system (such
as a garage door) has a roll ing code .
"' Program the rolling code as follows:
Acti vating the sys tem moto r unit
.. Locate the programming button on the system
motor unit. The exact location and color of the
button may vary depending on the system man
ufacturer 's brand .
"' Press the programming button on the system
motor unit (usua lly this will activa te a "display "
on the motor un it) . You now have approx ima te
ly
30 se cond s to prog ram the button in the
control panel.
Programming the button in the control
pan el
.. Press the previous ly programmed button in the
control panel for 2 seconds .
.. To complet e rolling code programming, press
the button again for 2 seconds.
.. On some systems, the button might need to be
pressed a third time to end the programm ing
procedure .
After programming, the system should recogni ze
the signal and operate when the button in the
control panel is pressed . Now you may program
the other buttons as needed .
(D Tips
-The ro lling code can be programmed more
quickly and more easily with the help of a
second person .
- If any d ifficult ies occur when programm ing
the roll ing code, it may be helpful to read
the system operating manual.
33
Page 55 of 314
CD
CD
.... N
" N ...... 0 r--. V, co
Automatic climate control system controls
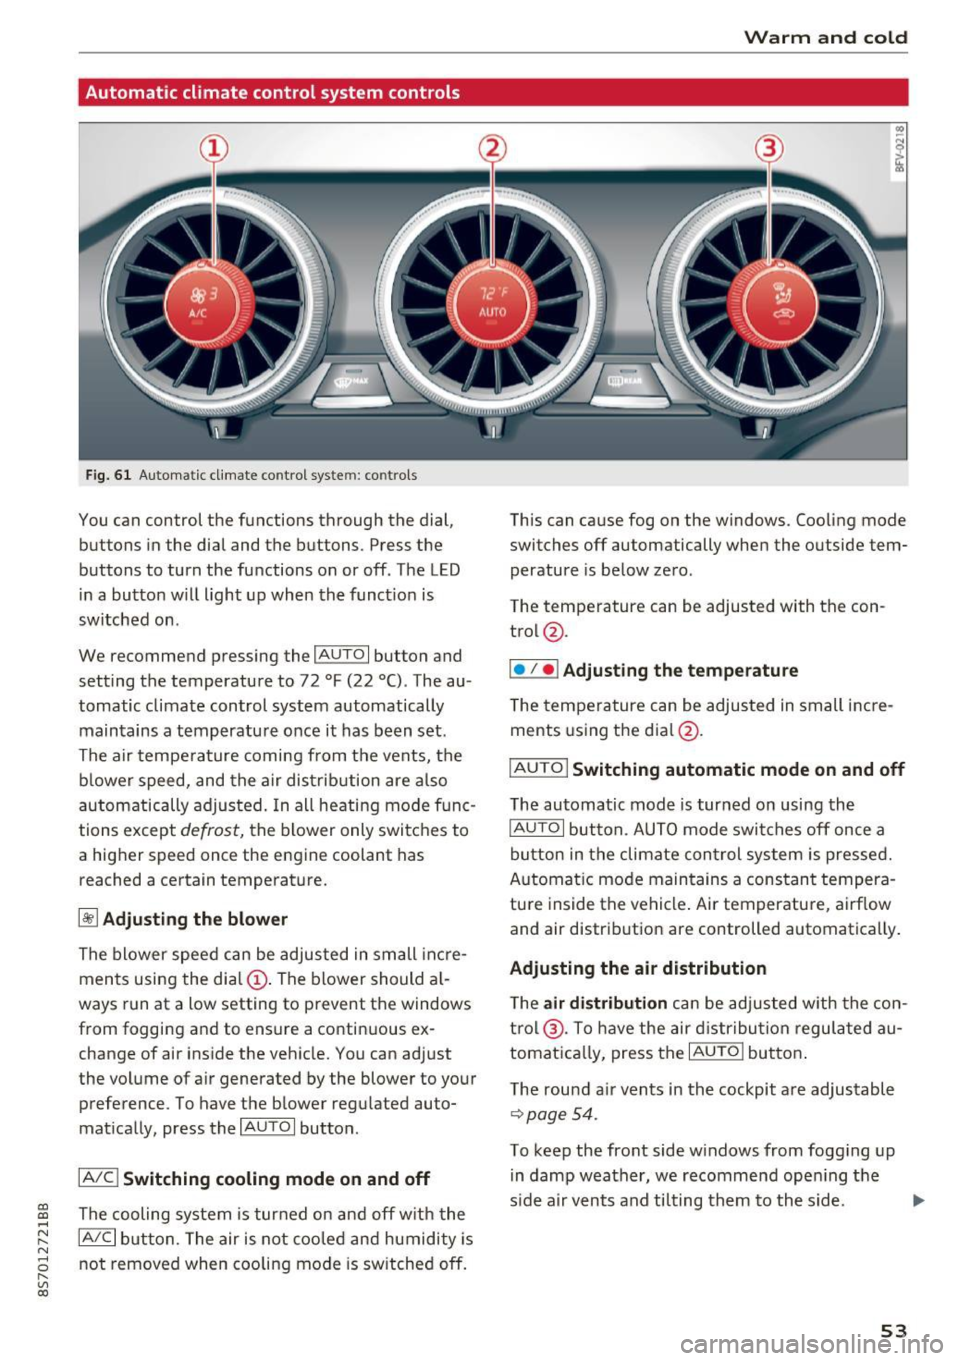
Fig. 61 Automatic climate control syste m: controls
You can control the functions through the dial,
buttons in the dial and the buttons. Press the
buttons to turn the functions on or off . The LED
in a button w ill light up when the funct ion is
switched on .
We recommend pressing the
IAUTOI button and
setting the temperature to 72 °F (22 °C). The au
tomatic climate control system automatically
maintains a temperature once it has been set .
The air tempe rature coming from the vents, the
b lower speed, and the air distribution are also
automatically adjusted. In all heating mode f unc
tions except
defrost, the b lower only switches to
a higher speed once the engine coolant has
reached a certain temperature.
~ Adjusting the blow er
The blower speed can be adjusted in small inc re
ments using the dia l
(D. The blower should a l
ways run at a low setting to prevent the windows
from fogging and to ensure a continuous ex
change of air inside the vehicle. You can adjust
the volume of air generated by the blower to your
preference. To have the blower regulated auto
mat ically, press the
IAU TOI button .
IA/Cj Switching cooling mode on and off
The cooling system is tur ned on and off w ith the
IA/C l button. The air is not cooled and humidity is
not removed when coo ling mode is sw itched off.
Warm and cold
This can cause fog on the windows. Cooling mode
switches off automatically when the outside tem
perature is be low zero .
The temperature can be adjusted with the con
trol @.
I• I • I Adjusting the temperature
T he tempe rature can be adjusted in small i ncre
ments using the dial@.
IAUTO I Switching automatic mode on and off
The automatic mode is turned on using the
IAUTOI button. AUTO mode switches off once a
button in the climate con trol system is pressed.
Automat ic mode maintains a cons tant tempera
tu re inside the vehicle . Air temperature, airf low
and air distribution are controlled automatically .
Adjusting the air distribution
The air distrib ution can be adjusted w ith the con
t rol @ . To have the air d istr ibution regulated au
tomat ica lly, press the
IAUTOI butto n.
T he rou nd a ir ven ts in the cockpit a re adjustable
~page 54.
To keep the front side w indows from fogging up
in damp weather, we recommend ope ning t he
s ide a ir vents and ti lting them to the side.
53