Page 201 of 220
 Communication:Bluetooth®
related functions are available.
Navigation: Navigation screen
(where provided) is displayed. If
the SD card for the navigation
system is not inserted, the
compass indicating")
Communication:Bluetooth®
related functions are available.
Navigation: Navigation screen
(where provided) is displayed. If
the SD card for the navigation
system is not inserted, the
compass indicating the direction
in which the vehicle is moving is
displayed. The compass may
not indicate the correct bearing
when the vehicle is stopped or
travelling at a slow speed.
Settings: overall setting menu
(such as display, sound,
Bluetooth®and Language).
Depending on the grade and
specification, the screen display
may differ.
OPERATING THE RADIO
Select the iconon the home screen
to display the “Entertainment” screen.
When selecting the desired radio, the
following icons are indicated in the
lower part of the display:
displays the “Entertainment”
menu. Use to switch to a
different audio source;
displays the list of receivable RDS
radio stations (FM only);
displays the station list (AM
only). Select“Update Station
List”to display the frequencies
of up to ten radio stations on the
auto memory preset list Select
the desired frequency.
displays the Favourites list.
Long-press to store radio station
currently being aired.
you can search for receivable
radio stations. Scanning stops at
each station for about five
seconds. Select again to
continue receiving the radio
station.
you can change the radio
frequency manually. Rotate the
commander knob, slide the
screen, or touch the radio
frequency. Press
orto
change the radio frequency one
step at a time. When
oris
long-pressed, the radio frequency
changes continually. It stops when
you remove your hand from the
icon or the commander knob.
switches the TA mode on and
off.
/Automatic radio station
selection. When
long-pressed, the radio
frequency changes
continually. It stops when
you remove your hand from
the icon or the commander
knob.
Displays the FM settings screen
(FM only). On/Off of Alternative
frequency and Region lock can be
set.
Displays sound settings to adjust
audio quality level.
NOTE When theoricon is
selected while FM is selected, each
programme is selected.
Digital Audio Broadcasting (DAB)
Radio
(where provided)
Select the icon
on the home screen
to display the “Entertainment” screen.
SelectDABthe following icons are
displayed at the bottom of the screen:
Displays the “Entertainment”
menu. Use to switch to a
different audio source.
Displays the station list (ensemble
and station). Select “Update List”
to update the station list. Select
“Select Ensemble” to select the
ensemble you want to display.
199
Page 202 of 220
 Displays the favorites list. Press
and hold to store the currently
tuned station to the favorites list.
Searches your desired station
from the station list. Tunes to
each station in the station list f")
Displays the favorites list. Press
and hold to store the currently
tuned station to the favorites list.
Searches your desired station
from the station list. Tunes to
each station in the station list for
10 seconds. Select again when
your desired station is tuned. If
the station list is not available, it
switches to the station list update
screen. Perform the station list
updating.
Switches the TA mode on and
off.
/Returns to the
previous/goes to the next
station. Touch and hold to
return to the top station in
the previous/next ensemble.
Displays the DAB radio setting
screen.
Displays sound settings to adjust
audio quality level.
SETTINGS
NOTE Depending on the grade and
specification, the screen display may
differ.
Select the
icon on the home screen
to display the Settings screen. Switch
the tab and select the setting item you
want to change.You can customize settings in the setup
display as follows:
“Display”: refer to “Volume/Display/
Sound controls” paragraph in Radio 7”
supplement;
“Sound”: refer to “Volume/Display/
Sound controls” paragraph in Radio 7”
supplement;
“Clock”: “Adjust Time”, “GPS Sync”,
“Time Format”, “Time Zone Select”,
“Daylight Savings Time”;
“Vehicle”: rain sensing Wiper/Door
Lock/Other;
“Devices”: selectBluetooth®or
“Network Management”;
“System”: “Tool Tips”, “Language”,
“Temperature”, “Distance”, “Music
Database Update”, “Factory Reset”,
“About (agreements and disclaimers)”,
“About (version Information)”
AUX / USB / iPod MODE
Audio can be heard from the vehicle's
speakers by connecting a commercially
available portable audio unit to the
auxiliary jack. A commercially-available,
non-impedance (3.5 Ø) stereo mini plug
lead is required.
In addition, audio can be played from
the vehicle audio device by connecting
a USB device or an iPod to the USB
port fig. 165 (1= USB ports/2=
auxiliary jack).How to connect USB port / auxiliary
jack
Connecting a device: if there is a
cover on the AUX jack or USB port,
remove the cover. Connect the
connector on the device to the USB
port.
Connecting with a connector lead:if
there is a cover on the AUX jack or USB
port, remove the cover. Connect the
device plug/connector lead to the
auxiliary jack/USB port
How to use AUX mode
Select the
icon on the home screen
to display the Entertainment screen.
SelectAUXto switch to the AUX mode.
Playable data: MP3/WMA/AAC/OGG
file.
NOTE If a device is not connected to
the auxiliary jack, the mode does not
switch to the AUX mode.
16506020700-122-001
200
MULTIMEDIA
Page 203 of 220
 NOTE Adjust the audio volume using
the portable audio device, commander
switch, or audio control switch. Audio
adjustments can also be made using
the portable audio device's volume
setting.
NOTE I")
NOTE Adjust the audio volume using
the portable audio device, commander
switch, or audio control switch. Audio
adjustments can also be made using
the portable audio device's volume
setting.
NOTE If the connection plug is pulled
out from the auxiliary jack while in AUX
mode, noise may occur.
NOTE This unit does not support a
USB 3.0 device. In addition, other
devices may not be supported
depending on the model or OS version.
USB devices formatted to FAT32 are
supported (USB devices formatted to
other formats such as NTFS are not
supported).
Bluetooth® HANDS FREE
Device pairing
To use
Bluetooth®audio and
Hands-Free, the device equipped with
Bluetooth®has to be paired to the
unit using the following procedure. A
maximum of seven devices including
Bluetooth®audio devices and
hands-free mobile phones can be
paired.
NOTE The
Bluetooth®system may
not operate for 1 or 2 minutes after the
ignition is switched to ACC or ON.
However, this does not indicate a
problem. If the
Bluetooth®system
does not connect automatically after
1 or 2 minutes have elapsed, makesure that the
Bluetooth®setting on
the device is normal and attempt to
reconnect the
Bluetooth®device from
the vehicle side.
NOTE To consult the list of compatibles
mobile phones visit the
http://124spiderinfotainment.com
website.
Pairing procedure
Proceed as follows:
select theicon on the home
screen to display the “Settings” screen;
select theDevicestab;
selectBluetooth®andturntheBluetooth®setting on;selectAdd New Deviceto display
the message and switch to the device
operation. Using your device, perform a
search for the
Bluetooth®device
(peripheral device);
select “124 Spider” from the device
list searched by the device;
Device withBluetooth®version
2.0 input the displayed 4-digit pairing
code into the device. Device with
Bluetooth®version 2.1 or higher make
sure the displayed 6-digit code on the
audio is also displayed on the device,
and touch theYes. Connection
permission and phonebook access
permission for your mobile device may
be required depending on the mobile
device. If pairing is successful, the
functions of the device connected to
Bluetooth®are displayed;
devices compatible with SMS
function SMS messages is downloaded
automatically. A download permission
operation for your device may be
required depending on the device.
After a device is registered, the system
automatically identifies the device.
Device selection
If several devices have been paired, the
Bluetooth®unit links the device last
paired. If you would like to link a
different paired device, it is necessary to
change the link. The order of device
priority after the link has been changed
is maintained even when the ignition is
switched off.
Connecting other devices
Proceed as follows:
select theicon on the home
screen to display the “Settings” screen;
select theDevicestab then select
Bluetooth®.TurntheBluetooth®
setting on and select the name of the
device you would like to connect;
Phone And Audio selection
connects both devices as hands-free
and
Bluetooth®audio.Phone Only
selectionconnects as a hands-free
device.Audio Only selection
connects as
Bluetooth®audio.
Making a call
Telephone calls can be made by saying
the contact name in the downloaded
201
Page 204 of 220
 phonebook or the name of a person
whose phone number has been
registered in the
Bluetooth®
hands-free. Press the talk button and
wait for the beep sound, say: “Call
XXXXX... (Ex. “John”) Mobile")
phonebook or the name of a person
whose phone number has been
registered in the
Bluetooth®
hands-free. Press the talk button and
wait for the beep sound, say: “Call
XXXXX... (Ex. “John”) Mobile” and follow
the voice guidance to place the call.
Import contact (download
Phonebook)
Phonebook data from your device
(Mobile phone) can be sent and
registered to your
Bluetooth®
hands-free phonebook using
Bluetooth®.
Automatic downloading: the “Auto
Download Contacts” setting must be
on. When hands-free is connected to
the device, the phonebook is
downloaded automatically.
Manually downloading: if the “Auto
Download Contacts” setting is off,
download the phonebook using the
following procedure:
select theicon on the home
screen to display the “Communication”
screen;
selectContactsto display the
contact list;
selectEdit Contacts;
selectImport All Contactsor
Import Selected Contactto switch to
the device operation. IfImport All
Contactsis selected, select
Download. Download will be started
from the mobile phone.
NOTE A maximum of 1000 contacts
can be registered to the phonebook.
Receiving an incoming call
When an incoming call is received, the
incoming call notification screen is
displayed. The “Incoming Call
Notifications” setting must be on.
To accept the callpress steering
wheel button on the audio control
switch or selectAnsweron the screen.
To reject the callpress the hang-up
button on the audio control switch or
selectIgnoreon the screen.
NAVIGATION
SD CARD
To use the navigation system, the SD
card containing the map information
needs to be inserted in the SD card slot
fig. 166.When inserting the SD card, never
move the slider on the side of the SD
card to the LOCK position. If the slider
is set to LOCK, the SD card cannot be
read and the navigation system will not
operate.
This SD card is valid for use in only one
vehicle. Never use it in another vehicle.
If the SD card is used first in one vehicle
and then in another, the navigation
system for either one of the vehicles
may become inoperable.
NOTE For navigation map updates visit
the http://124spiderinfotainment.com
16606020777-177-077AB
202
MULTIMEDIA
website or contact an Abarth
Dealership.
Page 205 of 220
 NAVIGATION MENU
Select
and open the navigation
menu.
You have the following options fig. 167:
/Open/close.Opensand
closes the UMP (menu bar). The UMP
(menu bar) is displayed on the lower
part of the s")
NAVIGATION MENU
Select
and open the navigation
menu.
You have the following options fig. 167:
/Open/close.Opensand
closes the UMP (menu bar). The UMP
(menu bar) is displayed on the lower
part of the screen.
Adds a destination. Select your
destination by entering an address or
selecting a POI (Point Of Interest), a
location on the map or one of your
Favourite destinations. You can also
look up your recent destinations from
the Smart History by entering the
coordinates. If an internet connection is
available, Local Search can be of
further help to find your destination.
iDisplays the screen where traffic
information and the GPS reception
conditions can be set and verified.
Cancels waypoint/route.
Finds Places nearby. You can
search for Points Of Interest (POI) near
the vehicle position.
Displays the route parameters
and the route in its full length on the
map. You can also perform
route-related actions such as editing or
cancelling your route, picking route
alternatives, avoiding parts of the route,
simulating navigation or adding the
destination to your Favourites.
2D/3DChanges View mode. The
map view mode can be changed (2D
north up/2D heading up/3D).
Switches to the Settings screen
where you change navigation settings.
NOTE Some functions are not available
depending on some countries and
regions.NAVIGATING ON THE MAP
The data fields fig. 168 are different
when you are navigating an active route
and when you have no specified
destination (the burgundy line is not
displayed).
48: shows the speed limit of the current
road if the map contains it.
2.0km/8:31: shows the distance you
need to travel on the route before
reaching your final destination and the
estimated arrival time at the final
destination of the route.
NOTE Some functions are not available
depending on some countries and
regions.
16711000001-121-112
16811000001-121-111
203
Page 206 of 220
 OBJECTS ON THE MAPStreets and roads: the navigation
system shows the roads in different
widths and colours so that they can be
easily identified. A motorway will be
thicker and a different colour than")
OBJECTS ON THE MAPStreets and roads: the navigation
system shows the roads in different
widths and colours so that they can be
easily identified. A motorway will be
thicker and a different colour than a
small street.
Turn preview and Next street:
when navigating a route, the top
section of the Map screen shows
information about the next manoeuvre,
street or town. There is an area at the
top left part of screen which indicates
the next operation. Displays both the
event type (such as turning, detouring,
exiting expressways) and the distance
from the current position.
Lane information and Signposts:
when navigating on multilane roads, it is
important to take the appropriate lane
in order to follow the recommended
route. If lane information is available in
the map data, the navigation system
displays the lanes and their directions
using small arrows at the bottom of the
map. Highlighted arrows represent the
lanes and direction you need to take.
Junction view:ifyouare
approaching a motorway exit or a
complex intersection and the needed
information exists, the map is replaced
with a 3D view of the junction.
Motorway exit services: you may
need a petrol station or a restaurantduring your journey. This feature
displays a new button on the map
when you are driving on motorways.
Select this Open button to open a panel
with the details of the next few exits or
service stations.
Elements of the active route: the
navigation system shows the route in
the following way.
SELECTING THE DESTINATION OF
A ROUTE
Entering an address
To enter an address as the destination,
do as follows:
Selectafter selectingon the
MAP screen.
SelectFind Address. By default, the
navigation system proposes the country
and town where you are. If needed,
selectCountry, enter the first few
letters of the country name on the
keyboard, and select one country from
the list of results.
If needed, select a new town: select
Townand Start entering the name of
the town on the keyboard. Find the
town you need: the most likely town
name is always shown in the input field.
To accept it, select. If the desired name
does not show up, the names that
match the string appear in a list after
entering a couple of characters (to open
the list of results before it appearsautomatically, select
and select
the town from the list).
Enter the street name: select
and start entering the
name of the town on the keyboard.
Find the street you need: the most likely
street name is always shown in the
input field. To accept it, select. If the
desired name does not show up, the
names that match the string appear in a
list after entering a couple of characters
(to open the list of results before it
appears automatically, select
and
select the street from the list).
Enter the house number: select
House Numberthen enter the house
number on the keyboard (to enter
letters, selectQWE). Select to finish
entering the address. (If the entered
house number cannot be found, the
midpoint of the street is selected as the
destination.
The selected location is shown on
the map. NavigationStartif is selected,
or after 10 seconds of no user
interaction. By touching the location
displayed on the screen, you can verify
the route. Additionally, the route can be
revised by selecting other options.
204
MULTIMEDIA
Page 207 of 220
 Selecting the destination from the
POI
(Point Of Interest)
If the name for a POI (Point Of Interest)
is input, a search candidate list is
displayed.
Proceed as follows:
Selectafter selectingon the
MAP")
Selecting the destination from the
POI
(Point Of Interest)
If the name for a POI (Point Of Interest)
is input, a search candidate list is
displayed.
Proceed as follows:
Selectafter selectingon the
MAP screen.
SelectFind Places.
SelectFilter by Name.
Using the keyboard, enter the name
of the POI (Point Of Interest). After
entering a few letters, select to open
the list of POI with names containing
the entered character sequence.
The selected location is shown on
the map. The system transitions to the
next screen by selectingNavigate To,
or it returns to the previous screen by
selecting the
location displayed on the screen, you
can change the destination to anywhere
on the map.
Selecting the destination from your
Favourites
Proceed as follows:
Selectafter selectingon the
MAP screen.
In the Navigation menu, select
Favourites. WhenFavouritesis
selected, the screen transfers to the
Favourites screen. Select yourregistered favourite.
The selected location is shown on
the map. The system transitions to the
next screen by selectingNavigate To,
or it returns to the previous screen by
selecting the
location displayed on the screen, you
can change the destination to anywhere
on the map.
Navigation starts ifStartis selected,
or after 10 seconds of no user
interaction. By touching the location
displayed on the screen, you can verify
the route. Additionally, the route can be
revised by selecting other options.
SELECTING A NEW DESTINATION
Proceed as follows:
SelectNew Routeto plan a new
route to the newly selected location.
The previous destination and
waypoint(s) are deleted.
SelectWaypointto add the newly
selected location as an intermediate
destination to your route. The other
destinations of the route remain intact.
Note: the new waypoint is placed
among destinations to keep the route
optimal. To decide where a waypoint to
appear, use the Edit Route feature.
SelectFinal Destinationto append
the newly selected destination at the
end of the route. The other destinations
of the route remain intact. The previousfinal destination is now the last
waypoint.
SETTINGS MENU
Select
icon after selectingon the
MAP screen.
Settings menu options:
Map Settings: you can fine-tune the
appearance of the Map screen. Adjust
the map view to your needs, show or
hide 3D buildings, and manage POI
(point of interest) display settings (which
POI to show on map).
Guidance Settings:a
guidance-related setting is available
during route guidance.
Warning Settings: a setting related
to warnings is available.
Route Settings.
Traffic Settings: a setting for traffic
information is available.
Connected Settings: a setting for
online service is available
NOTE Some functions are not available
depending on some countries and
regions.
205
Page 208 of 220
 MAP SETTINGS
The map is always shown on the
screen. Scroll the screen downward to
display the setting behind the lower part
of the screen:
View Mode: when this button is
selected, the map view mode ca")
MAP SETTINGS
The map is always shown on the
screen. Scroll the screen downward to
display the setting behind the lower part
of the screen:
View Mode: when this button is
selected, the map view mode can be
changed.3Ddisplays things such as
actual construction sites three
dimensionally on the map.2Dthe map
is rotated so that the direction of travel
is displayed in the upward direction/2D
Nthe map is displayed so that north is
up regardless of the direction of travel).
Viewpoint: adjust the basic zoom
and tilt levels to your needs. Three
levels are available.
Automatic Zoom: during route
guidance in any map view mode, the
function for zooming in on approaching
intersections turns on/off automatically.
Buildings: show or hide 3D town
models, 3D artistic or block
representation of all town building data
containing actual building sizes and
positions on the map.
Motorway Owerview: when
enabled, the map zooms out to show
an overview of the surrounding area if
the next route event (manoeuvre) is far
away. The system goes back to the
normal map view when you approach
the next event.
Place Markers: select which Places
to show on the map while navigating.
Too many Places make the map
crowded, so it is a good idea to show
as few as possible. You have the
following possibilities: select the
checkbox to show or hide the Place
category or Select the name of the
Place category to open the list of its
subcategories.
206
MULTIMEDIA
 1
1 2
2 3
3 4
4 5
5 6
6 7
7 8
8 9
9 10
10 11
11 12
12 13
13 14
14 15
15 16
16 17
17 18
18 19
19 20
20 21
21 22
22 23
23 24
24 25
25 26
26 27
27 28
28 29
29 30
30 31
31 32
32 33
33 34
34 35
35 36
36 37
37 38
38 39
39 40
40 41
41 42
42 43
43 44
44 45
45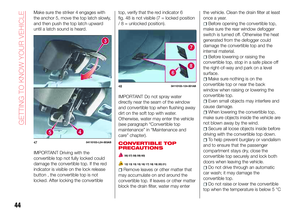 46
46 47
47 48
48 49
49 50
50 51
51 52
52 53
53 54
54 55
55 56
56 57
57 58
58 59
59 60
60 61
61 62
62 63
63 64
64 65
65 66
66 67
67 68
68 69
69 70
70 71
71 72
72 73
73 74
74 75
75 76
76 77
77 78
78 79
79 80
80 81
81 82
82 83
83 84
84 85
85 86
86 87
87 88
88 89
89 90
90 91
91 92
92 93
93 94
94 95
95 96
96 97
97 98
98 99
99 100
100 101
101 102
102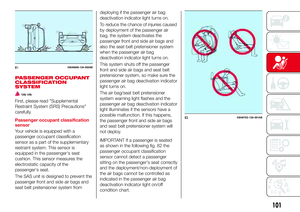 103
103 104
104 105
105 106
106 107
107 108
108 109
109 110
110 111
111 112
112 113
113 114
114 115
115 116
116 117
117 118
118 119
119 120
120 121
121 122
122 123
123 124
124 125
125 126
126 127
127 128
128 129
129 130
130 131
131 132
132 133
133 134
134 135
135 136
136 137
137 138
138 139
139 140
140 141
141 142
142 143
143 144
144 145
145 146
146 147
147 148
148 149
149 150
150 151
151 152
152 153
153 154
154 155
155 156
156 157
157 158
158 159
159 160
160 161
161 162
162 163
163 164
164 165
165 166
166 167
167 168
168 169
169 170
170 171
171 172
172 173
173 174
174 175
175 176
176 177
177 178
178 179
179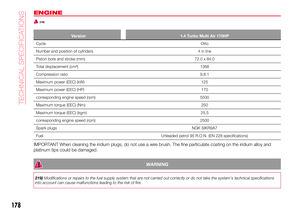 180
180 181
181 182
182 183
183 184
184 185
185 186
186 187
187 188
188 189
189 190
190 191
191 192
192 193
193 194
194 195
195 196
196 197
197 198
198 199
199 200
200 201
201 202
202 203
203 204
204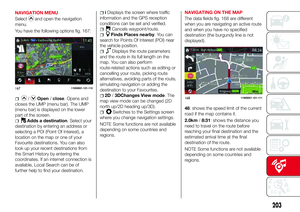 205
205 206
206 207
207 208
208 209
209 210
210 211
211 212
212 213
213 214
214 215
215 216
216 217
217 218
218 219
219