Page 193 of 220
 TIPS, CONTROLS
AND GENERAL
INFORMATION
ROAD SAFETY
221) 222)
Learn how to use the various system
functions before setting off.
Read the instructions for the system
carefully before setting off.
RECEPT")
TIPS, CONTROLS
AND GENERAL
INFORMATION
ROAD SAFETY
221) 222)
Learn how to use the various system
functions before setting off.
Read the instructions for the system
carefully before setting off.
RECEPTION CONDITIONS
Reception conditions change
constantly while driving.
Reception may be interfered with by the
presence of mountains, buildings or
bridges, especially when you are far
away from the broadcaster.
IMPORTANT The volume may be
increased when receiving traffic alerts
and news.
CARE AND
MAINTENANCE
57) 58)
Observe the following precautions to
ensure the system is fully operational:
the display lens should not come into
contact with pointed or rigid objects
which could damage its surface; use a
soft, dry anti-static cloth to clean and
do not press;
never use alcohol, petrols and
derivatives to clean the display lens;
prevent any liquid from entering the
system: this could damage it beyond
repair.
IMPORTANT
INFORMATION
Look at the screen only when it is
necessary and safe. If you need to look
at the screen for a long time, pull over
to a safe place so as not to be
distracted while driving.
Immediately stop using the system in
the event of a fault. Otherwise the
system might be damaged.
Contact a Dealership as soon as
possible to have the system repaired.
WARNING
221)Follow the safety rules below:
otherwise serious injuries may occur to the
occupants or the system may be
damaged.
222)If the volume is too loud this can be
dangerous. Adjust the volume so that you
can still hear background noises (e.g.
horns, ambulances, police vehicles, etc.).
IMPORTANT
57)Only clean the front panel and the
display lens with a soft, clean, dry,
anti-static cloth. Cleaning and polishing
products may damage the surface. Never
use alcohol, petrols and derivatives.
58)Do not use the display as a base for
supports with suction pads or adhesives for
external navigators or smartphones or
similar devices.
191
Page 194 of 220
RADIO 3”
FRONT PANEL
16006020300-121-001
192
MULTIMEDIA
Page 195 of 220
 STEERING WHEEL
CONTROLSVOLUME SWITCHES
Press up the volume switch+to
increase the volume. Press down the
volume switch–to decrease the
volume.
SEEK SWITCH
MW/LW/FM radio
Press the seek switch
/.
The")
STEERING WHEEL
CONTROLSVOLUME SWITCHES
Press up the volume switch+to
increase the volume. Press down the
volume switch–to decrease the
volume.
SEEK SWITCH
MW/LW/FM radio
Press the seek switch
/.
The radio switches to the next/previous
stored station in the order that it was
stored.
Press and hold the seek switch
/
to seek all usable stations at a
higher or lower frequency whether
programmed or not.
Radio stations which have been
previously stored in the auto memory
tuning can be called up by pressing the
seek switch
/while any
radio station stored in the auto memory
tuning is being received.
Radio stations can be called up in the
order they were stored with each press
of the switch
/.
USB Audio /
Bluetooth®Audio
Press the seek switch
to skip
forward to the beginning of the next
track. Press the seek switch
within a few seconds after
playback begins to track down to the
beginning of the previous track.
Press the seek switch
after a fewseconds have elapsed to start playback
from the beginning of the current track.
MUTE SWITCH
Press the mute switch
once to mute
audio, press it again to resume audio
output.
If the ignition is switched off with the
audio muted, the mute will be
cancelled. Therefore, when the engine
is restarted, the audio is not muted. To
mute the audio again, press the mute
switch
.
POWER / VOLUME
SOUND CONTROLS
Power ON / OFF
Switch the ignition to ACC or ON. Press
PUSH POWERbutton to turn the
audio system on. Press thePUSH
POWERbutton again to turn the audio
system off.
Volume adjustment
Turn theVOLdial. Turn theVOLdial
clockwise to increase volume,
anticlockwise to decrease it.
Audio sound adjustment
Press theMENUbutton to select the
function. The selected function will be
indicated.
Turn theVOLcontrol dial to adjust the
selected functions:
AF (Alternative Frequency);
1610620500-189-099AB
1620620500-188-088AB
193
The controls for the main system
functions are present on the steering
wheel fig. 161 (versions without
Bluetooth®hands-free) and
fig. 162 (versions withBluetooth®
hands-free) to make control easier.
Page 196 of 220
 REG (Regional Programme);
ALC (Automatic volume adjustment);
BASS (Low pitch sound);
TREB (Treble sound);
FADE (Front/back volume balance);
BAL (Left/right volume balance);
BEEP (Audio operation sound")
REG (Regional Programme);
ALC (Automatic volume adjustment);
BASS (Low pitch sound);
TREB (Treble sound);
FADE (Front/back volume balance);
BAL (Left/right volume balance);
BEEP (Audio operation sound);
12Hr < > 24Hr (12 Hr/24 Hr time
adjustment).
CLOCK
Setting the time
The clock can be set at any time when
the ignition is switched to ACC or ON.
To adjust the time, press the clock
buttonFM/AMfor about 2 seconds
until a beep is heard. The clock's
current time will flash.
Time adjustment
To adjust the time, press the
hour/minute set button
/
while the clock's current time is
flashing.
The hours advance while the hour set
button
is pressed. The minutes
advance while the minute
set
button is pressed.
Press the clock buttonFM/AMagain
to start the clock.
OPERATING THE RADIO
Radio ON: press a band selector
button FM/AM to turn the radio on.
Band selection: press the band
selector buttonFM/AMto switch the
bands as follows: M1–FM2–MW/LW
Manual tuning: select the station by
pressing the tuning button
/
lightly.
Seek tuning: press tuning button
/. The search stops when a
station is found.
Scan tuning: press and hold the scan
buttonMEDIAto automatically sample
strong stations. Scanning stops at each
station for about 5 seconds. To hold a
station, press and hold the scan button
MEDIA again during this interval.
Preset channel tuning
The 6 preset channels can be used to
store 6 MW/LW and 12 FM stations.
To set a channel first select MW/LW,
FM1, or FM2. Tune to the desired
station.
Press a channel preset button for
about 2 seconds until a beep is heard.
The preset channel number or station
frequency will be displayed. The station
is now held in the memory.
Repeat this operation for the other
stations and bands you want to store.
To tune one in the memory, selectMW/LW, FM1, or FM2 and then press
its channel preset button. The station
frequency or the channel number will be
displayed.
AUX / USB / iPod MODE
Auxiliary jack / USB port
Audio can be heard from the vehicle's
speakers by connecting a commercially
available portable audio unit to the
auxiliary jack. A commercially-available,
non-impedance (3.5 Ø) stereo mini plug
lead is required. In addition, audio can
be played from the vehicle audio device
by connecting a USB device or an iPod
to the USB port.
How to use AUX mode
Switch the ignition to ACC or ON, press
the power/volume dial to turn the audio
system on and press theMEDIA
button of the audio unit to change to
the AUX mode.
How to use USB mode
This unit does not support a USB
3.0 device. In addition, other devices
may not be supported depending on
the model or OS version.
Playback
Switch the ignition to ACC or ON, press
the power/volume dial to turn the audio
system on and press theMEDIA
194
MULTIMEDIA
Page 197 of 220
 button to switch to the USB mode and
start playback.
Track search
Press the track up button
once to
skip forward to the beginning of the
next track.
Press the track down button
within a few seconds af")
button to switch to the USB mode and
start playback.
Track search
Press the track up button
once to
skip forward to the beginning of the
next track.
Press the track down button
within a few seconds after
playback begins to track down to the
beginning of the previous track.
Press the track down button
after
a few seconds have elapsed to start
playback from the beginning of the
current track.
How to use iPod mode
An iPod may not be compatible
depending on the model or OS version.
In this case, an error message is
displayed.
NOTE The iPod functions on the iPod
cannot be operated while it is
connected to the unit because the unit
controls the iPod functions.Track search
Press the track up button
once to
skip forward to the beginning of the
next track.
Press the track down button
within a few seconds (depends
on iPod software version) after playback
begins to track down to the beginning
of the previous track.
Press the track down button
after
a few seconds (depends on iPod
software version) have elapsed to start
playback from the beginning of the
current track.
Category search: press the category
down button5to select the previous
category and press the category up
button6to select the next category.
The types of categories include Playlist,
Artist, Album, Song, Podcast, Genre,
Composer, and Audio book.
List search: press the list down button
to select the previous list and press
the list up button
to select the next
list. When the selected category is
Song or Audio book, there is no list.
Bluetooth® HANDS FREE
Device pairing
To use
Bluetooth®audio and
Hands-Free, the device equipped with
Bluetooth®hastobepairedtothe
unit using the following procedure. A
maximum of seven devices including
Bluetooth®audio devices and
hands-free mobile phones can be
paired.
NOTE The
Bluetooth®system may
not operate for 1 or 2 minutes after the
ignition is switched to ACC or ON.
However, this does not indicate a
problem. If the
Bluetooth®system
does not connect automatically after
1 or 2 minutes have elapsed, make
sure that the
Bluetooth®setting on
the device is normal and attempt to
reconnect the
Bluetooth®device from
the vehicle side.
Pairing code setting
The 4-digit pairing code setting for
registration of your cell phone (pairing)
can be set beforehand. The initial
setting value is “0000”.
Proceed as follows:
1: press the pick-up button or talk
button with a short press;
2Say: [Beep] “Setup”
3Prompt: “Select one of the
following: Pairing options, confirmation
prompts, language, passcode, select
phone or select music player.”
195
Page 198 of 220
![Abarth 124 Spider 2017 Owner handbook (in English) 4Say: [Beep] “Pairing options”
5Prompt: “Select one of the
following: Pair, Edit, Delete, List, or Set
Pairing Code.”
6Say: [Beep] “Set pairing code”
7Prompt: “Your current pairing code](/manual-img/40/31047/w960_31047-197.png "Abarth 124 Spider 2017 Owner handbook (in English) 4Say: [Beep] “Pairing options”
5Prompt: “Select one of the
following: Pair, Edit, Delete, List, or Set
Pairing Code.”
6Say: [Beep] “Set pairing code”
7Prompt: “Your current pairing code")
4Say: [Beep] “Pairing options”
5Prompt: “Select one of the
following: Pair, Edit, Delete, List, or Set
Pairing Code.”
6Say: [Beep] “Set pairing code”
7Prompt: “Your current pairing code
is XXXX. Do you want to change it to a
different pairing code?”
8Say: [Beep] “Yes”
9Prompt: “Please say a 4-digit
pairing code.”
10Say: [Beep] “YYYY”
11Prompt: “YYYY is this correct?”
12Say: [Beep] “Yes” or “No”. If “Yes”,
go to next step. If “No”, the procedure
returns to Step 9
13Prompt: “Your new pairing code
is YYYY. Use this pairing code when
pairing devices to the Hands free
system. Do you want to pair a device
now?”
14Say: [Beep] “Yes” or “No”. If “Yes”,
the system switches to the device
registration mode. If “No”, the system
returns to standby status.Device pairing
Proceed as follows:
1activate theBluetooth®
application of the device;
2press the pick-up button or talk
button with a short press;
3Say: [Beep] “Setup”
4Prompt:“Selectoneofthe
following: Pairing options, confirmation
prompts, language, passcode, select
phone or select music player.”
5Say: [Beep] “Pairing options”
6Prompt:“Selectoneofthe
following: Pair, Edit, Delete, List, or Set
Pairing Code.”
7Say: [Beep] “Pair”
8Prompt: “Start the pairing process
on your
Bluetooth®device. Your
pairing code is 0000 (XXXX). Input this
on your
Bluetooth®device when
prompted on the device. See device
manual for instructions.”
9using the device, perform a search
for the
Bluetooth®device (Peripheral
device)
select “124 Spider” from the device
list searched by the device and input
the 4-digit pairing code to the device;
10Prompt: “Please say the name of
the device after the beep.”
11Say:[Beep]“XXXX---”(saya
“device tag”, an arbitrary name for the
device.). Example:“Stan's device.”
12Prompt: “XXXXXX---(Ex.
“Stan's device”) (Device tag). Is this
correct?”
13Say: [Beep] “Yes”
14Prompt: “Pairing complete”
After a device is registered, the system
automatically identifies the device.
NOTE Say a paired “device tag” within
10 seconds. If more than two devices
aretobepaired,theycannotbepaired
with the same or similar “device tag”.
196
MULTIMEDIA
Page 199 of 220
 RADIO 7”
STEERING WHEEL
CONTROLS
The controls for the main system
functions are present on the steering
wheel (see figure) to make control
easier.
VOLUME SWITCHES
Press up the volume switch+to
incre")
RADIO 7”
STEERING WHEEL
CONTROLS
The controls for the main system
functions are present on the steering
wheel (see figure) to make control
easier.
VOLUME SWITCHES
Press up the volume switch+to
increase the volume. Press down the
volume switch–to decrease the
volume.
SEEK SWITCH
AM/FM radio
Press the seek switch
/.
The radio switches to the next/previous
stored station in the order that it was
stored.
Press and hold the seek switch
/
to seek all usable stations at ahigher or lower frequency whether
programmed or not.
Radio stations which have been
previously stored in the favourite radio
can be called up by pressing the seek
switch
/while any radio
station stored in the favourite radio is
being received.
Radio stations can be called up in the
order they were stored with each press
of the switch
/.
DAB radio
(where provided)
Press the Seek switch
/
while listening to DAB radio to call
up a station previously stored to the
favourites list.
Press and hold the seek switch
to
go to the next station,
to return to
the previous station.
USB Audio /
Bluetooth® Audio
Press the seek switch
to skip
forward to the beginning of the next
track.
Press the seek switch
within a
few seconds after playback begins to
track down to the beginning of the
previous track. Press the seek switch
after a few seconds have elapsed
to start playback from the beginning of
the current track.MUTE SWITCH
Press the mute switch
once to mute
audio, press it again to resume audio
output.
If the ignition is switched off with the
audio muted, the mute will be
cancelled. Therefore, when the engine
is restarted, the audio is not muted. To
mute the audio again, press the mute
switch
.
AUDIO SET
Commander switch operation
NOTE For safety reasons, some
operations are disabled while the
vehicle is being driven.
The following operations can be done
by pressing the switches around the
commander knob fig. 164:
displays the home screen.
1630620500-188-088AB
16406020400-122-002
197
Page 200 of 220
 displays the Entertainment
screen.
NAVdisplays the Navigation screen
(only navigation-equipped
vehicles). If the SD card for the
navigation system is not inserted,
the compass indicating the
direction")
displays the Entertainment
screen.
NAVdisplays the Navigation screen
(only navigation-equipped
vehicles). If the SD card for the
navigation system is not inserted,
the compass indicating the
direction in which the vehicle is
moving is displayed.
displays the Favourites screen.
Long-press to store particular
items in “Favourites” (radio,
phonebook and destination of
the navigation system can be
programmed).
returns to previous screen.
Volume dial operation
Press theVOLdial to switch the audio
MUTE on and off.
Turn the volume dial to adjust the
volume. The volume increases by
turning the dial clockwise, and
decreases by turning it anticlockwise.
Selection of icons on screen
Tilt or turn the commander knob and
move the cursor to the desired icon.
Press the commander knob and select
the icon.
NOTE Long-press operation of the
commander knob is also possible for
some functions.Touch panel operation
Touch & Tap: touch or tap on the item
indicated on the screen. The operation
is launched and the next item is
displayed.
Slide: touch the setting item displaying
a slider bar. Touch the slider with your
finger and move to the desired level.
Swipe: touch the screen with your
finger and move up or down. Items
which were not displayed can be
displayed.
IMPORTANT Do not press the screen
strongly or press it with a sharp-pointed
object. Otherwise, the screen could be
damaged.
NOTE For safety reasons, touch panel
operation is disabled while the vehicle is
moving.
AUDIO SOUND
ADJUSTMENT
Select theicon on the home screen
to display the Settings screen.
Select theSoundto select the item you
would like to change:
Bass(Low pitch sound): + Side low
pitch enhancement/– Side: low pitch
reduction;
Treble(Treble sound): + Side: treble
enhancement/– Side: treble reduction;
Fade(Front/rear volume balance):
Front (front speaker volumeenhancement)/Rear (rear speaker
volume enhancement);
Balance(Left/right volume balance):
Left (left speaker volume
enhancement)/Right (right speaker
volume enhancement);
ALC(Automatic volume adjustment)
(standard audio): Off-Adjustment at
seven levels;
Bose®AudioPilot(Automatic
volume adjustment) (Bose®Sound
System, where provided): On/Off;
Beep(Audio operation sound):
On/Off.
HOME SCREEN
Icons visualized on home screen are:
Applications: information such
as average fuel economy,
maintenance, and warnings can
be verified. Depending on the
grade and specification, the
screen display may differ.
Entertainment: operates audio
such as the radio. The audio
source most recently used is
displayed. An audio source
which cannot be used at that
time is skipped and the previous
audio source is displayed. To
change the audio source, select
the icon displayed at the bottom
of the screen.
198
MULTIMEDIA
 1
1 2
2 3
3 4
4 5
5 6
6 7
7 8
8 9
9 10
10 11
11 12
12 13
13 14
14 15
15 16
16 17
17 18
18 19
19 20
20 21
21 22
22 23
23 24
24 25
25 26
26 27
27 28
28 29
29 30
30 31
31 32
32 33
33 34
34 35
35 36
36 37
37 38
38 39
39 40
40 41
41 42
42 43
43 44
44 45
45 46
46 47
47 48
48 49
49 50
50 51
51 52
52 53
53 54
54 55
55 56
56 57
57 58
58 59
59 60
60 61
61 62
62 63
63 64
64 65
65 66
66 67
67 68
68 69
69 70
70 71
71 72
72 73
73 74
74 75
75 76
76 77
77 78
78 79
79 80
80 81
81 82
82 83
83 84
84 85
85 86
86 87
87 88
88 89
89 90
90 91
91 92
92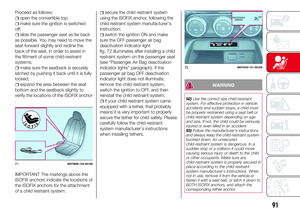 93
93 94
94 95
95 96
96 97
97 98
98 99
99 100
100 101
101 102
102 103
103 104
104 105
105 106
106 107
107 108
108 109
109 110
110 111
111 112
112 113
113 114
114 115
115 116
116 117
117 118
118 119
119 120
120 121
121 122
122 123
123 124
124 125
125 126
126 127
127 128
128 129
129 130
130 131
131 132
132 133
133 134
134 135
135 136
136 137
137 138
138 139
139 140
140 141
141 142
142 143
143 144
144 145
145 146
146 147
147 148
148 149
149 150
150 151
151 152
152 153
153 154
154 155
155 156
156 157
157 158
158 159
159 160
160 161
161 162
162 163
163 164
164 165
165 166
166 167
167 168
168 169
169 170
170 171
171 172
172 173
173 174
174 175
175 176
176 177
177 178
178 179
179 180
180 181
181 182
182 183
183 184
184 185
185 186
186 187
187 188
188 189
189 190
190 191
191 192
192 193
193 194
194 195
195 196
196 197
197 198
198 199
199 200
200 201
201 202
202 203
203 204
204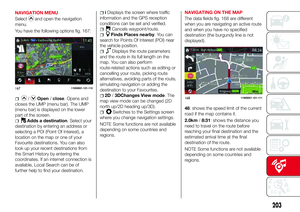 205
205 206
206 207
207 208
208 209
209 210
210 211
211 212
212 213
213 214
214 215
215 216
216 217
217 218
218 219
219 RADIO 3”
FRONT PANEL
16006020300-121-001
192
MULTIMEDIA")