Page 73 of 128

6-1
1
2
3
4
567
8
9
10
11
12
Operation and important riding points
EAU15952
Read the Owner’s Manual carefully to
become familiar with all controls. If
there is a control or function you do not
understand, ask your Yamaha dealer.
WARNING
EWA10272
Failure to familiarize yourself with
the controls can lead to loss of con-
trol, which could cause an accidentor injury.
EAU68220
TIPThis model is equipped with:
an inertial measurement unit (IMU)
that will stop the engine in case of
a turnover. In this case, the display
will indicate error code 30, but this
is not a malfunction. Turn the key
to “OFF” and then to “ON” to clear
the error code. Failing to do so will
prevent the engine from starting
even though the engine will crank
when pushing the start switch.
an engine auto-stop system. The
engine stops automatically if left
idling for 20 minutes. If the engine
stops, simply push the start switchto restart the engine.
EAU67072
Starting the engineIn order for the ignition circuit cut-off
system to enable starting, one of the
following conditions must be met:
The transmission is in the neutral
position.
The transmission is in gear with
the clutch lever pulled and the sid-
estand up. (See page 4-47.)
1. Turn the key to “ON” and make sure that the engine stop switch is
set to “ ”.
The following warning lights and
indicator lights should come on for
a few seconds, then go off.
Fuel level warning light
Shift timing indicator light
Engine trouble and system
warning light
Stability control indicator light
Immobilizer system indicator
light
The ABS warning light should
come on when the key is turned to
“ON” and stay on until the vehicle
reaches a traveling speed of 10
km/h (6 mi/h).
The oil pressure and coolant tem-
2CR-9-E1.book 1 ページ 2015年8月20日 木曜日 午後4時46分
Page 74 of 128

Operation and important riding points
6-2
1
2
3
4
56
7
8
9
10
11
12 perature warning light should
come on, go off briefly, and then
remain on until the engine is start-
ed.
NOTICE
ECA22510
If a warning or indicator light does
not work as described above, see
page 4-6 for the corresponding
warning and indicator light circuitcheck.
2. Shift the transmission into the neu- tral position. (The neutral indicator
light should come on.)
3. Start the engine by pushing the start switch.
If the engine does not start within 5
seconds of pressing the start
switch, wait 10 seconds before
pressing the switch again to allow
the battery voltage to restore.NOTICE
ECA11043
For maximum engine life, never ac-
celerate hard when the engine iscold!
EAU67080
ShiftingShifting gears lets you control the
amount of engine power available for
starting off, accelerating, climbing hills,
etc.
The gear positions are shown in the il-
lustration.TIPFor speedy upshifts, turn on the quick
shift system. See QSS on page 4-17 formore information.NOTICE
ECA22520
Even with the transmission in the neutral position, do not
coast for long periods of time
with the engine off, and do not
tow the motorcycle for long dis-
tances. The transmission is
properly lubricated only when
the engine is running. Inade-
quate lubrication may damage
the transmission.
Except when upshifting with the
QSS turned on, always use the
clutch while changing gears to
avoid damaging the engine,
transmission, and drive train,
which are not designed to with-
stand the shock of forced shift-ing.
EAU16682
To start out and accelerate
1. Pull the clutch lever to disengage the clutch.
2. Shift the transmission into first gear. The neutral indicator light
should go out.
3. Open the throttle gradually, and at the same time, release the clutch
lever slowly.
4. At the recommended shift points
1. Shift pedal
2. Neutral position
1
1
2
2 3 4
5 6
N
2CR-9-E1.book 2 ページ 2015年8月20日 木曜日 午後4時46分
Page 75 of 128

Operation and important riding points
6-3
1
2
3
4
567
8
9
10
11
12
shown in the following table, close
the throttle, and at the same time,
quickly pull the clutch lever in.
5. Shift the transmission into second gear. (Make sure not to shift the
transmission into the neutral posi-
tion.)
6. Open the throttle part way and gradually release the clutch lever.
7. Follow the same procedure when shifting to the next higher gear.
TIPWhen shifting gears in normal operat-
ing conditions, use the recommendedshift points.
EAU58270
To decelerate1. Release the throttle and apply both the front and the rear brakes
smoothly to slow the motorcycle.
2. At the recommended shift points shown in the following table, shift
to a lower gear.
3. When the motorcycle reaches 25 km/h (16 mi/h), the engine is about
to stall or runs roughly, pull the
clutch lever in, use the brakes to slow the motorcycle, and continue
to downshift as necessary.
4. Once the motorcycle has stopped, the transmission can be shifted
into the neutral position. The neu-
tral indicator light should come on
and then the clutch lever can be
released.
WARNING
EWA17380
Improper braking can cause
loss of control or traction. Al-
ways use both brakes and apply
them smoothly.
Make sure that the motorcycle
and the engine have sufficiently
slowed before shifting to a low-
er gear. Engaging a lower gear
when the vehicle or engine
speed is too high could make
the rear wheel lose traction or
the engine to over-rev. This
could cause loss of control, an
accident and injury. It could also
cause engine or drive train dam-age.
EAU58280
Recommended shift points
The recommended shift points during
acceleration and deceleration are
shown in the table below.
Shift up points:1st 2nd: 20 km/h (12 mi/h)
2nd 3rd: 30 km/h (19 mi/h)
3rd 4th: 40 km/h (25 mi/h)
4th 5th: 50 km/h (31 mi/h)
5th 6th: 60 km/h (37 mi/h)
Shift down points:
6th 5th: 45 km/h (28 mi/h)
5th 4th: 35 km/h (22 mi/h)
4th 3rd: 25 km/h (16 mi/h)
2CR-9-E1.book 3 ページ 2015年8月20日 木曜日 午後4時46分
Page 76 of 128

Operation and important riding points
6-4
1
2
3
4
56
7
8
9
10
11
12
EAU16811
Tips for reducing fuel
consumptionFuel consumption depends largely on
your riding style. Consider the following
tips to reduce fuel consumption:
Shift up swiftly, and avoid high en-
gine speeds during acceleration.
Do not rev the engine while shifting
down, and avoid high engine
speeds with no load on the engine.
Turn the engine off instead of let-
ting it idle for an extended length of
time (e.g., in traffic jams, at traffic
lights or at railroad crossings).
EAU16842
Engine break-inThere is never a more important period
in the life of your engine than the period
between 0 and 1600 km (1000 mi). For
this reason, you should read the follow-
ing material carefully.
Since the engine is brand new, do not
put an excessive load on it for the first
1600 km (1000 mi). The various parts in
the engine wear and polish themselves
to the correct operating clearances.
During this period, prolonged full-throt-
tle operation or any condition that might
result in engine overheating must be
avoided.
EAU17085
0–1000 km (0–600 mi)
Avoid prolonged operation above 7000
r/min. NOTICE: After 1000 km (600
mi) of operation, the engine oil must
be changed and the oil filter car-
tridge or element replaced.
[ECA10303]
1000–1600 km (600–1000 mi)
Avoid prolonged operation above 8400 r/min.
1600 km (1000 mi) and beyond
The vehicle can now be operated nor-
mally.
NOTICE
ECA10311
Keep the engine speed out of
the tachometer red zone.
If any engine trouble should oc-
cur during the engine break-in
period, immediately have a
Yamaha dealer check the vehi-cle.
TIPDuring and after the engine break-in
period, the exhaust heat may cause
discoloration of the exhaust pipe, butthis is normal.
2CR-9-E1.book 4 ページ 2015年8月20日 木曜日 午後4時46分
Page 77 of 128
Operation and important riding points
6-5
1
2
3
4
567
8
9
10
11
12
EAU17214
ParkingWhen parking, stop the engine, and
then remove the key from the main
switch.
WARNING
EWA10312
Since the engine and exhaust
system can become very hot,
park in a place where pedestri-
ans or children are not likely to
touch them and be burned.
Do not park on a slope or on soft
ground, otherwise the vehicle
may overturn, increasing the
risk of a fuel leak and fire.
Do not park near grass or other
flammable materials whichmight catch fire.
2CR-9-E1.book 5 ページ 2015年8月20日 木曜日 午後4時46分
Page 78 of 128

7-1
1
2
3
4
5
67
8
9
10
11
12
Periodic maintenance and adjustment
EAU17246
Periodic inspection, adjustment, and lu-
brication will keep your vehicle in the
safest and most efficient condition pos-
sible. Safety is an obligation of the vehi-
cle owner/operator. The most important
points of vehicle inspection, adjust-
ment, and lubrication are explained on
the following pages.
The intervals given in the periodic
maintenance charts should be simply
considered as a general guide under
normal riding conditions. However, de-
pending on the weather, terrain, geo-
graphical location, and individual use,
the maintenance intervals may need to
be shortened.
WARNING
EWA10322
Failure to properly maintain the ve-
hicle or performing maintenance ac-
tivities incorrectly may increase
your risk of injury or death during
service or while using the vehicle. If
you are not familiar with vehicle ser-
vice, have a Yamaha dealer performservice.
WARNING
EWA15123
Turn off the engine when performing
maintenance unless otherwise
specified.
A running engine has moving
parts that can catch on body
parts or clothing and electrical
parts that can cause shocks or
fires.
Running the engine while ser-
vicing can lead to eye injury,
burns, fire, or carbon monoxide
poisoning – possibly leading to
death. See page 1-2 for more in-
formation about carbon monox-ide.WARNING
EWA15461
Brake discs, calipers, drums, and
linings can become very hot during
use. To avoid possible burns, let
brake components cool beforetouching them.
EAU17303
Emission controls not only function to
ensure cleaner air, but are also vital to
proper engine operation and maximum
performance. In the following periodic
maintenance charts, the services relat-
ed to emissions control are grouped
separately. These services require
specialized data, knowledge, and
equipment. Maintenance, replacement,
or repair of the emission control devic-
es and systems may be performed by
any repair establishment or individual
that is certified (if applicable). Yamaha
dealers are trained and equipped to
perform these particular services.
2CR-9-E1.book 1 ページ 2015年8月20日 木曜日 午後4時46分
Page 79 of 128
Periodic maintenance and adjustment
7-2
1
2
3
4
5
678
9
10
11
12
EAU67090
Owner’s tool kitThe owner’s tool kit should be stored
separately from the vehicle. However,
there are two hexagon wrenches
stored under the passenger seat. (See
page 4-36.)
The service information included in this
manual and the tools provided are in-
tended to assist you in the performance
of preventive maintenance and minor
repairs. However, additional tools, such
as a torque wrench, are necessary to
perform certain maintenance work cor-
rectly.TIPIf you do not have the tools or experi- ence required for a particular job, have
a Yamaha dealer perform it for you.
1. Hexagon wrench
1
2CR-9-E1.book 2 ページ 2015年8月20日 木曜日 午後4時46分
Page 80 of 128

Periodic maintenance and adjustment
7-3
1
2
3
4
5
67
8
9
10
11
12
EAU46862
TIP
The annual checks must be performed every year, except if a kilometer-based maintenance, or for the UK, a
mileage-based maintenance, is performed instead.
From 50000 km (30000 mi), repeat the maintenance intervals starting from 10000 km (6000 mi).
Items marked with an asterisk should be performed by a Yamaha dealer as they require special tools, data and technicalskills.
EAU46911
Periodic maintenance chart for the emission control systemNO. ITEM CHECK OR MAINTENANCE JOB ODOMETER READING
ANNUAL
CHECK
1000 km
(600 mi) 10000 km
(6000 mi) 20000 km
(12000 mi) 30000 km
(18000 mi) 40000 km
(24000 mi)
1 *Fuel line Check fuel hoses for cracks or
damage.
2 *Spark plugs Check condition.
Clean and regap.
3 *Valves Check valve clearance.
Adjust. Every 40000 km (24000 mi)
4 *Fuel injection
system Adjust synchronization.
5 *Muffler and exhaust
pipe Check the screw clamp(s) for
looseness.
6 *Air induction
system Check the air cut-off valve, reed
valve, and hose for damage.
Replace any damaged parts if necessary.
2CR-9-E1.book 3 ページ 2015年8月20日 木曜日 午後4時46分
 1
1 2
2 3
3 4
4 5
5 6
6 7
7 8
8 9
9 10
10 11
11 12
12 13
13 14
14 15
15 16
16 17
17 18
18 19
19 20
20 21
21 22
22 23
23 24
24 25
25 26
26 27
27 28
28 29
29 30
30 31
31 32
32 33
33 34
34 35
35 36
36 37
37 38
38 39
39 40
40 41
41 42
42 43
43 44
44 45
45 46
46 47
47 48
48 49
49 50
50 51
51 52
52 53
53 54
54 55
55 56
56 57
57 58
58 59
59 60
60 61
61 62
62 63
63 64
64 65
65 66
66 67
67 68
68 69
69 70
70 71
71 72
72 73
73 74
74 75
75 76
76 77
77 78
78 79
79 80
80 81
81 82
82 83
83 84
84 85
85 86
86 87
87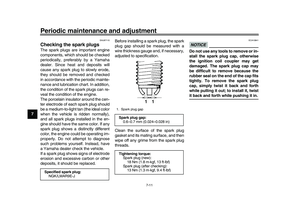 88
88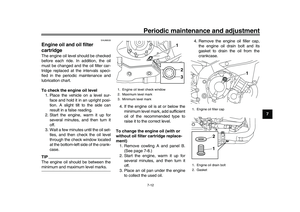 89
89 90
90 91
91 92
92 93
93 94
94 95
95 96
96 97
97 98
98 99
99 100
100 101
101 102
102 103
103 104
104 105
105 106
106 107
107 108
108 109
109 110
110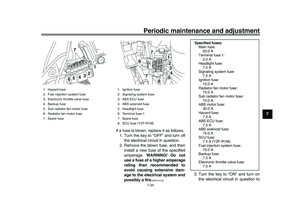 111
111 112
112 113
113 114
114 115
115 116
116 117
117 118
118 119
119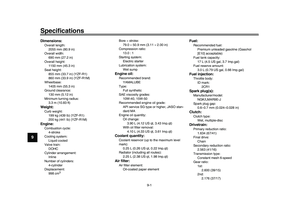 120
120 121
121 122
122 123
123 124
124 125
125 126
126 127
127
