Page 25 of 96

Instrument and control functions
3-11
1
2
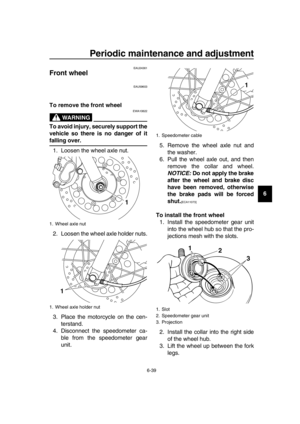
3
4
5
6
7
8
9
10
11
12
13
14
EAU13434
Catalytic converter
This model is equipped with a catalytic
converter in the exhaust system.
WARNING
EWA10863
The exhaust system is hot after op-
eration. To prevent a fire hazard or
burns:
Do not park the vehicle near
possible fire hazards such as
grass or other materials that
easily burn.
Park the vehicle in a place
where pedestrians or children
are not likely to touch the hot
exhaust system.
Make sure that the exhaust sys-
tem has cooled down before do-
ing any maintenance work.
Do not allow the engine to idle
more than a few minutes. Long
idling can cause a build-up of
heat.
NOTICE
ECA10702
Use only unleaded gasoline. The use
of leaded gasoline will cause unre-
pairable damage to the catalytic
converter.
EAU59491
Fuel cock
The fuel cock regulates and filters the
fuel supply from the fuel tank.
The fuel cock has two positions:
ON
With the lever in this position, fuel will
be supplied to the engine. Normal oper-
ation is done with the lever in this posi-
tion.
OFF
With the lever in this position, fuel will
not flow. Use this lever position when
performing certain maintenance work
or when storing the vehicle for a pro-
longed time.
1. Arrow mark positioned over “ON”
1. Arrow mark positioned over “OFF”
1
1
2RD-28199-E1.book 11 ページ 2015年9月3日 木曜日 午後3時42分
Page 26 of 96
Instrument and control functions
3-12
1
2
3
4
5
6
7
8
9
10
11
12
13
14
EAU13651
Kickstarter
To start the engine, fold out the kick-
starter lever, move it down lightly with
your foot until the gears engage, and
then push it down smoothly but force-
fully. This model is equipped with a pri-
mary kickstarter, allowing the engine to
be started in any gear if the clutch is
disengaged. However, shifting the
transmission into the neutral position
before starting is recommended.
EAU13701
Decompression lever
When this lever is pulled, the exhaust
valve is forced open so that the com-
pression pressure can be reduced.
This allows the piston to be moved just
past the compression stroke before
kick starting. (See page 5-2.)
1. Kickstarter
1
1. Decompression lever
1
2RD-28199-E1.book 12 ページ 2015年9月3日 木曜日 午後3時42分
Page 27 of 96

Instrument and control functions
3-13
1
2
3
4
5
6
7
8
9
10
11
12
13
14
EAU13962
Seat
To remove the seat
Remove the bolts, and then pull the
seat off.
To install the seat 1. Insert the projections on the front of the seat into the seat holders as
shown.
2. Place the seat in the original posi- tion, and then tighten the bolts.
TIP
Make sure that the seat is properly se-
cured before riding.
EAU14883
Adjusting the shock absorber
assemblies
WARNING
EWA10211
Always adjust both shock absorber
assemblies equally, otherwise poor
handling and loss of stability may
result.
Each shock absorber assembly is
equipped with a spring preload adjust-
ing ring.
NOTICE
ECA10102
To avoid damaging the mechanism,
do not attempt to turn beyond the
maximum or minimum settings.
Adjust the spring preload as follows.
To increase the spring preload and
thereby harden the suspension, turn
the adjusting ring on each shock ab-
sorber assembly in direction (a). To de-
crease the spring preload and thereby
soften the suspension, turn the adjust-
ing ring on each shock absorber as-
sembly in direction (b).
Align the appropriate notch in the ad-
justing ring with the position indicator
on the shock absorber.
1. Bolt
1. Seat holder
2. Projection
11
1 2
1. Spring preload adjusting ring
1
2
3
4
5
1
(a)
(b)
2RD-28199-E1.book 13 ページ 2015年9月3日 木曜日 午後3時42分
Page 28 of 96

Instrument and control functions
3-14
1
2
3
4
5
6
7
8
9
10
11
12
13
14
EAU15306
Sidestand
The sidestand is located on the left side
of the frame. Raise the sidestand or
lower it with your foot while holding the
vehicle upright.
TIP
The built-in sidestand switch is part of
the ignition circuit cut-off system, which
cuts the ignition in certain situations.
(See the following section for an expla-
nation of the ignition circuit cut-off sys-
tem.)
WARNING
EWA10242
The vehicle must not be ridden with
the sidestand down, or if the sides-
tand cannot be properly moved up
(or does not stay up), otherwise the
sidestand could contact the ground
and distract the operator, resulting
in a possible loss of control.
Yamaha’s ignition circuit cut-off
system has been designed to assist
the operator in fulfilling the respon-
sibility of raising the sidestand be-
fore starting off. Therefore, check
this system regularly and have a
Yamaha dealer repair it if it does not
function properly.
Spring preload setting: Minimum (soft):
1
Standard: 1
Maximum (hard): 5
2RD-28199-E1.book 14 ページ 2015年9月3日 木曜日 午後3時42分
Page 29 of 96
Instrument and control functions
3-15
1
2
3
4
5
6
7
8
9
10
11
12
13
14
EAU66820
Ignition circuit cut-off system
The ignition circuit cut-off system (com-
prising the sidestand switch, clutch
switch and neutral switch) has the fol-
lowing functions.
It prevents starting when the trans-
mission is in gear and the sides-
tand is up, but the clutch lever is
not pulled.
It prevents starting when the trans-
mission is in gear and the clutch le-
ver is pulled, but the sidestand is
still down.
It cuts the running engine when the
transmission is in gear and the sid-
estand is moved down.
Periodically check the operation of the
ignition circuit cut-of f system according
to the following procedure.
2RD-28199-E1.book 15 ページ 2015年9月3日 木曜日 午後3時42分
Page 30 of 96

Instrument and control functions
3-16
1
2
3
4
5
6
7
8
9
10
11
12
13
14
With the engine turned off:
1. Move the sidestand down.
2.
Make sure that the engine stop switch
is set to “ ”.
3. Turn the key on.
4. Shift the transmission into the neutral position.
5. Push the kick starter lever down.
Does the engine start?
With the engine still running:
6. Move the sidestand up.
7. Keep the clutch lever pulled.
8. Shift the transmission into gear.
9. Move the sidestand down.
Does the engine stall?
After the engine has stalled:
10. Move the sidestand up.
11. Keep the clutch lever pulled.
12. Push the kick starter lever down.
Does the engine start?
The system is OK. The motorcycle can
be ridden.
The neutral switch may not be working
correctly.
The motorcycle should not be ridden
until checked by a Yamaha dealer.
The sidestand switch may not be
working correctly.
The motorcycle should not be ridden
until checked by a Yamaha dealer.
The clutch switch may not be working
correctly.
The motorcycle should not be ridden
until checked by a Yamaha dealer.
WARNING
The vehicle must be placed on the centerstand during this inspection.
If a malfunction is noted, have a Yamaha dealer check the system
before riding.
YES NO
YESNO
YESNO
2RD-28199-E1.book 16 ページ 2015年9月3日 木曜日 午後3時42分
Page 31 of 96

4-1
1
2
3
4
5
6
7
8
9
10
11
12
13
14
For your safety – pre-operation checks
EAU63440
Inspect your vehicle each time you use it to make sure the vehicle is in safe oper-
ating condition. Always follow the in spection and maintenance procedures and
schedules described in the Owner’s Manual.
WARNING
EWA11152
Failure to inspect or maintain the vehicle properly increases the possibility
of an accident or equipment damage. Do not operate the vehicle if you find
any problem. If a problem cannot be corrected by the procedures provided
in this manual, have the vehicle inspected by a Yamaha dealer.
Before using this vehicle, check the following points:
ITEM CHECKSPAGE
Fuel Check fuel level in fuel tank.
Refuel if necessary.
Check fuel line for leakage.
Check fuel tank breather hose
for obstructions, cracks or
damage, and check hose connection. 3-9, 3-10
Engine oil Check oil level in oil tank.
If necessary, add recommended oil to specified level.
Check vehicle for oil leakage. 6-9
Front brake Check operation.
If soft or spongy, have Yamaha dealer bleed hydraulic
system.
Check lever free play.
Adjust if necessary.
Check brake pads for wear.
Replace if necessary.
Check fluid level in reservoir.
If necessary, add specified brak e fluid to specified level.
Check hydraulic system for leakage. 6-19,
6-22, 6-23
Rear brake Check operation.
Check pedal free play.
Adjust if necessary. 6-20,
6-22
Clutch Check operation.
Lubricate cable if necessary.
Check lever free play.
Adjust if necessary. 6-18
Throttle grip Make sure that operation is smooth.
Check throttle grip free play.
If necessary, have Yamaha dealer adjust throttle grip
free play and lubricate cable and grip housing. 6-14,
6-27
Control cables Make sure that operation is smooth.
Lubricate if necessary. 6-27
2RD-28199-E1.book 1 ページ 2015年9月3日 木曜日 午後3時42分
Page 32 of 96

For your safety – pre-operation checks
4-2
1
2
3
4
5
6
7
8
9
10
11
12
13
14
Drive chain Check chain slack.
Adjust if necessary.
Check chain condition.
Lubricate if necessary. 6-25,
6-26
Wheels and tires Check for damage.
Check tire condition and tread depth.
Check air pressure.
Correct if necessary. 6-15,
6-17
Shift pedal Make sure that operation is smooth.
Correct if necessary. 6-21
Brake pedal Make sure that operation is smooth.
Lubricate pedal pivoting point if necessary. 6-28
Brake and clutch
levers Make sure that operation is smooth.
Lubricate lever pivoting points if necessary.
6-28
Centerstand, sidestand Make sure that operation is smooth.
Lubricate pivots if necessary. 6-29
Chassis fasteners Make sure that all nuts, bol
ts and screws are properly
tightened.
Tighten if necessary. —
Instruments, lights,
signals and switches Check operation.
Correct if necessary.
—
Sidestand switch Check operation of ignition circuit cut-off system.
If system is not working correctly, have Yamaha dealer
check vehicle. 3-14
ITEM CHECKS PAGE
2RD-28199-E1.book 2 ページ 2015年9月3日 木曜日 午後3時42分