2016 VOLVO XC90 T8 engine
[x] Cancel search: enginePage 291 of 546

DRIVER SUPPORT
}}}}
289
When City Safety applies the brakes, the brake lights will illuminate. When City Safety is triggered and applies the brakes, a text message will be displayed in theinstrument panel.
Related information
•
City Safety
™ troubleshooting (p. 295)
• City Safety in crossing traffic (p. 291)
• City Safety limitations (p. 293)
• City Safety symbols and messages (p. 297)
• Detecting cyclists and pedestrians with City Safety (p. 290)
• Rear Collision Warning (RCW) (p. 292)
• City Safety warning level settings (p. 289)
• City Safety in crossing traffic (p. 291)
• Seat belts (p. 64)
City Safety warning level settings
City Safety is always activated but the function's warning distance can be adjusted.
NOTE
City Safety cannot be turned off and activates automatically each time the engine/electricmotor is started.
Setting a warning level (distance)
The distance set for warnings determines the system's responsiveness and sets the distance atwhich visual, audible and tangible (haptic) warn-ings will be triggered. To do so:1. Tap
Settings in the center display's Top
view.
2. Tap
My CarIntelliSafeCity Safety.
3. Choose among
Earlier, Normal or Later.
Begin by choosing
Earlier. If too many warnings
are given, change to Normal.
If the driver feels that warnings are given too often, the warning level can be lowered. Thismeans that warnings will be provided later, result-ing in fewer warnings being given. The setting
Later should only used in exceptional
circumstances, e.g., for a more dynamic driving style.
WARNING
• No automatic system can be guaranteed to function 100% correctly in all situa-tions. For that reason, never test CitySafety by driving toward a person orobject. This could result in serious injuryor death.
• Even if the setting
Earlier has been
selected, warnings may be perceived as being given late, e.g., if the difference inspeed is great or if the vehicle aheadbrakes suddenly.
• City Safety can provide a warning for apotential collision but it can never shortenthe driver's reaction time.
• To help make City Safety as effective as possible, always using the setting
Earlieris recommended.
NOTE
•Due to local traffic regulations in certain markets, RCW will
not activate the rear
turn signals. That part of the function will be deactivated.
• The use of the rear turn signals will alsobe deactivated if the City Safety warning level is set at
Later. See also the section
"Setting a warning level (distance)" in the article "City Safety settings."
• If RCW detects a vehicle approachingfrom behind, the seat belt pretensioners
Page 294 of 546

||
DRIVER SUPPORT
292
WARNING
•City Safety is a supplementary driving aid and does not function in all driving situa-tions or in all traffic, weather or road con-ditions.
• Warnings and braking for an approachingvehicle will usually come at a very latestage.
• The driver is responsible for maintaining asafe distance and speed. Never wait for awarning or for City Safety to take action.
LimitationsIn certain situations, it may be very difficult for City Safety to help the driver avoid a collision withan approaching vehicle in crossing traffic, forexample:
• on slippery roads when Electronic Stability Control is active
• if the approaching vehicle is detected at alate stage
• If the approaching vehicle is partiallyobscured by another vehicle
• if the approaching vehicle moves erratically(e.g., sudden lane changes at a late stage)
Related information
•
City Safety
™ (p. 287)
• City Safety limitations (p. 293)
Rear Collision Warning (RCW)
The
Rear Collision Warning with braking at
standstill (RCW) function can help the driver
avoid rear-end collisions.
RCW is activated automatically each time the engine is started and cannot be turned off. RCW can warn the driver of a vehicle approach- ing yours from behind by rapidly flashing yourrear turn signals. RCW is only activated when a vehicle is rapidly approaching your vehicle from behind. At speeds below 20 mph (30 km/h), if RCW determines that your vehicle is at risk of a rear-end collision, the front seat belt pretensionersand the Whiplash Protection System are acti-vated. Just prior to the collision, the brakes are also applied to help reduce your vehicle's forwardmovement if and when the collision occurs. How-ever, this can only happen if your vehicle is sta-tionary. The brakes will be released immediately if the accelerator pedal is pressed.
NOTE
• Due to local traffic regulations in certain markets, RCW will
not activate the rear
turn signals. That part of the function will be deactivated.
• The use of the rear turn signals will alsobe deactivated if the City Safety warning level is set at
Later. See also the section
"Setting a warning level (distance)" in the article "City Safety settings."
• If RCW detects a vehicle approachingfrom behind, the seat belt pretensionersand Whiplash Protection System will beactivated.
LimitationsIn some circumstances, it may be difficult for RCW to help the driver if there is a risk of a colli-sion, such as: •
In slippery conditions when Electronic Stability Control is active
• If the vehicle approaching from the rear isdetected at a late stage
• If the vehicle approaching from the rearchanges lanes at a late stage
• If the vehicle approaching from the rear ismoving at a speed above approx. 50 mph(80 km/h)
Page 295 of 546

DRIVER SUPPORT
}}
293
Related information
•City Safety
™ (p. 287)
• Whiplash protection system (p. 63)
• Seat belts (p. 64)
• City Safety warning level settings (p. 289)
City Safety limitations
City Safety ™ may have limited or reduced func-
tionality in certain situations.
The function has several limitations that the driver should be familiar with:
Low objects
Hanging objects, such as flags for overhanging loads or accessories such as auxiliary lights orfront protective grids that extend beyond theheight of the hood may limit City Safety's func-tion.
Slippery driving conditions
The extended braking distance on slippery roads may reduce City Safety's capacity to help avoid acollision. In situations of this type, the ABSbrakes and Electronic Stability Control will helpprovide braking power and stability.
Backlighting
Strong sunlight, reflections, extreme light con- trasts, the use of sunglasses, or if the driver is notlooking straight ahead may make the visual warn-ing signal in the windshield difficult to see.
Heat
If the temperature in the passenger compartment is very high, the camera and radar sensor may betemporarily turned off for approx. 15 minutesafter the engine has been started to protect theirelectronic components. When the temperaturehas cooled sufficiently, the camera and radarsensor will restart automatically. The visual warning signal may also be temporarilydisabled due to high passenger compartmenttemperatures caused by strong sunlight. Warnings may not be given if the distance to the vehicle ahead is short and the driver is activelyoperating the vehicle (clearly depressing a pedalor turning the steering wheel).
Reduced visibility
City Safety's functions may be greatly impeded or deactivated by e.g., intense snowfall or rain, indense fog, in very dusty conditions or if there isblowing snow in front of the vehicle. Condensa-tion, ice, snow or dirt on the windshield may alsoreduce the system's functionality.
NOTE
•
Keep the windshield in front of the radar sensor free of ice, snow, dirt, etc.
• Snow or ice on the hood deeper than2 inches (5 cm) may obstruct the sensor.Keep the hood free of ice and snow.
• Do not mount or in any way attach any-thing on the windshield that couldobstruct the radar sensor.
Page 301 of 546

DRIVER SUPPORT
}}
* Option/accessory, for more information, see Introduction.299
Starting and activating the Speed Limiter (SL)*
The Speed Limiter (SL) is a feature that has to be selected and activated in order to set a maxi-mum speed.
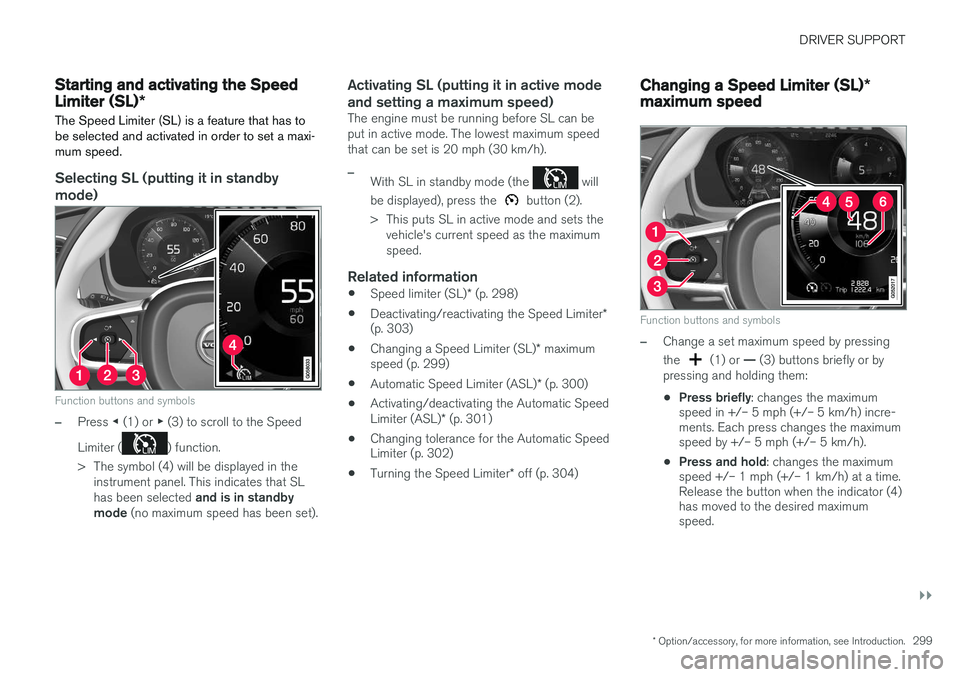
Selecting SL (putting it in standby mode)
Function buttons and symbols
–Press ◀ (1) or ▶ (3) to scroll to the Speed
Limiter (
) function.
> The symbol (4) will be displayed in the instrument panel. This indicates that SL has been selected and is in standby
mode (no maximum speed has been set).
Activating SL (putting it in active mode and setting a maximum speed)
The engine must be running before SL can be put in active mode. The lowest maximum speedthat can be set is 20 mph (30 km/h).
–With SL in standby mode (the will
be displayed), press the
button (2).
> This puts SL in active mode and sets the vehicle's current speed as the maximum speed.
Related information
• Speed limiter (SL)
* (p. 298)
• Deactivating/reactivating the Speed Limiter
*
(p. 303)
• Changing a Speed Limiter (SL)
* maximum
speed (p. 299)
• Automatic Speed Limiter (ASL)
* (p. 300)
• Activating/deactivating the Automatic Speed Limiter (ASL)
* (p. 301)
• Changing tolerance for the Automatic Speed Limiter (p. 302)
• Turning the Speed Limiter
* off (p. 304)
Changing a Speed Limiter (SL) *
maximum speed
Function buttons and symbols
–Change a set maximum speed by pressing the
(1) or — (3) buttons briefly or by
pressing and holding them: • Press briefly
: changes the maximum
speed in +/– 5 mph (+/– 5 km/h) incre- ments. Each press changes the maximumspeed by +/– 5 mph (+/– 5 km/h).
• Press and hold
: changes the maximum
speed +/– 1 mph (+/– 1 km/h) at a time.Release the button when the indicator (4)has moved to the desired maximumspeed.
Page 309 of 546

DRIVER SUPPORT
}}
307
The tone becomes constant when you are within approximately 1 ft (30 cm) of an object and theinnermost sensor field will be red. If there areobjects within this distance both behind and infront of the vehicle, the tone alternates betweenfront and rear speakers. While an audible signal is being given, its volume level can be raised/lowered using the
>II control
in the center console or can be adjusted in the Setting menu.
WARNING
Park Assist is an information system, NOT a safety system. This system is designed to bea supplementary aid when parking the vehicle.It is not, however, intended to replace the driv-er's attention and judgement.
Rear park assist
The system's rear sensors are activated automat- ically when the engine is started and are active ifthe vehicle rolls rearward with the gear selector in N or if R has been selected.
The distance monitored behind the vehicle is approximately 5 ft (1.5 m). The audible signalcomes from the rear speakers. The rear sensors will be deactivated automatically when towing a trailer if Volvo genuine trailer wir-ing is used. If a non-Volvo trailer hitch is beingused, it may be necessary to switch off the sys-tem manually.
Side park assist
The system's side sensors are activated automat- ically when the engine is started and are active atspeeds below approximately 6 mph (10 km/h). The distance monitored along the sides of thevehicle is approximately 1 ft (0.3 m). The audiblesignal comes from the side speakers.
Front park assist
The system's front sensors are activated auto- matically when the engine is started and areactive at speeds below approximately 6 mph(10 km/h). The distance monitored in front of the vehicle is approximately 2.5 ft (0.8 m). The audible signalcomes from the front speakers. Front Park Assist is deactivated if the parking brake is applied or if the gear selector is put in
P.
When installing auxiliary headlights, be sure that they do not obstruct the front sensors. Otherwise,these lights could trigger a Park Assist warning.
Page 310 of 546

||
DRIVER SUPPORT
* Option/accessory, for more information, see Introduction.
308
Related information
• Activating/deactivating Park Assist (p. 308)
• Park Assist limitations (p. 308)
• Park assist symbols and messages (p. 310)
Activating/deactivating Park Assist
The Park Assist system can be turned on or off.
On/OffPark Assist's front and side sensors are activated automatically when the engine is started. Therear sensors activate if the vehicle rolls rearward in N or if R is selected.
This function can be activated/ deactivated in the center dis-play's Function view.
–Tap the Park Assist button.
> Green indicator: the function is active. Gray indicator: the function is deactivated.
Related information
• Park Assist
* (p. 306)
• Park Assist limitations (p. 308)
• Park assist symbols and messages (p. 310)
Park Assist limitations
The Park Assist system has certain limitations.
NOTE
A trailer hitch whose wiring is integrated with the vehicle's electrical system will be takeninto account when measuring the availablespace behind the vehicle.
Page 320 of 546

DRIVER SUPPORT
* Option/accessory, for more information, see Introduction.
318
Using Park Assist Pilot (PAP) *
Park Assist Pilot (PAP) gives the driver instruc- tions during the parking procedure.
Symbols, images and text in the center display indicate when the various steps in the parkingprocedure will be carried out. PAP can be activated if the following conditions are met after the engine has started:
• The vehicle may not be towing a trailer.
• The vehicle's speed must be below approx. 30 mph (50 km/h).
NOTE
If a trailer hitch is configured in the vehicle's electrical system, PAP will take the trailerhitch into consideration when determining thenecessary size of a parking space.
ParkingProcedure for parking:
1. The system searches for and measures a
possible parking space.
2. The vehicle is steered while it is backing into the parking space.
3. The vehicle's position is adjusted in the park- ing space by moving forward and rearward.
1: Searching and measuring
Parallel parking
Perpendicular parking
PAP searches for a potential parking space and measures it to see if there is sufficient space foryour vehicle. To start this procedure: 1. Tap the
Park Assist button
in the center display's Function view. If necessary, slow down toa speed below 20 mph (30km/h) for parallel parking orapprox. 12 mph ( 20 km/h) forperpendicular parking.
2. Keep an eye on the display and be prepared to stop the vehicle when you are instructed by PAP to do so.
3. Select
Parallel parking or Perpendicular
parking and put the transmission in reverse.
4. Keep an eye on the display and be prepared to stop the vehicle when you are instructed by PAP to do so.
5. Stop the vehicle when instructed to do so.
NOTE
PAP normally searches for available parking spaces along the curb on the right (passeng-er's) side of the vehicle. However, it can alsoassist in finding and parking in spaces on thedriver's side. To do so:
• Activate the left turn signal. PAP will then search for a parking space on the leftside of the vehicle.
Page 325 of 546

DRIVER SUPPORT
}}
* Option/accessory, for more information, see Introduction.323
Adjustable steering force*
Steering force increases with the speed of the vehicle to give the driver an enhanced sense ofcontrol and stability. At low speed the vehicle iseasier to steer in order to facilitate parking, etc.
Changing the steering force levelTo change the level of steering force, see theinformation under the heading "individual" in arti-cle "Drive modes" for additional information.
NOTE
•This steering force level menu function cannot be accessed when the vehicle isin motion.
• In certain situations, the power steeringfunction may become too hot and mustbe temporarily cooled. During cooling,power steering effect will be reduced andmore force may be necessary to turn thesteering wheel and a message will bedisplayed in the instrument panel.
Related information
• Driver support systems (p. 252)
• Drive modes (p. 390)
Electronic Stability Control (ESC)
Electronic Stability Control (ESC) helps reduce wheel spin, counteract skidding and to generallyhelp improve directional stability.
A pulsating sound will be audi- ble when the system is activelyoperating and is normal. Accel-eration may also be slightlyslower than normal.
WARNING
ESC is a supplementary aid and cannot deal with all situations or road conditions. The driver is always responsible for operating the vehicle in a safe manner in accordancewith current traffic regulations.
ESC consists of the following functions: • Traction control
• Spin control
• Active Yaw Control
• Engine Drag Control
• Trailer Stability Assist
Traction controlThis function is designed to help reduce wheel spin by transferring power from a drive wheel that begins to lose traction to the wheel on the oppo-site side of the vehicle (on the same axle).
Spin controlThis function is designed to help prevent thedrive wheels from spinning while the vehicle isaccelerating.
Active Yaw ControlAt low speeds, this function helps maintain direc-tional stability by braking one or more of thewheels if the vehicle shows a tendency to skid orslide laterally.
Engine Drag Control EDCEDC helps keep the engine running if the wheelsshow a tendency to lock, e.g., when shifting downin the manual shifting mode or while using theengine's braking function on a slippery surface. Ifthe wheels were to lock, the vehicle wouldbecome more difficult to steer.
Trailer Stability Assist
*4TSA helps stabilize a vehicle that is towing atrailer when the vehicle and trailer have begun tosway. This system is automatically deactivated if the driver selects
Sport mode.
Related information
•Detachable trailer hitch (p. 368)
• Driving with a trailer (p. 367)
4
This function is included if the vehicle is equipped with a Volvo original trailer hitch.