2016 VOLVO XC90 T8 engine
[x] Cancel search: enginePage 152 of 546
||
INSTRUMENTS AND CONTROLS
* Option/accessory, for more information, see Introduction.
150
Ground lightingThe ground lighting comes on or goes off when a door is opened or closed.
Doorsill lightingThe doorsill lighting comes on or goes off when adoor is opened or closed.
Ambience lighting1. In the center display's Top view, select
SettingsMy CarLightsAmbient
Lighting
2. Choose among the following settings:
•Under
Ambient Light Intensity, choose:Off, Low or High.
•
Ambient Light Level: Reduced or Full.
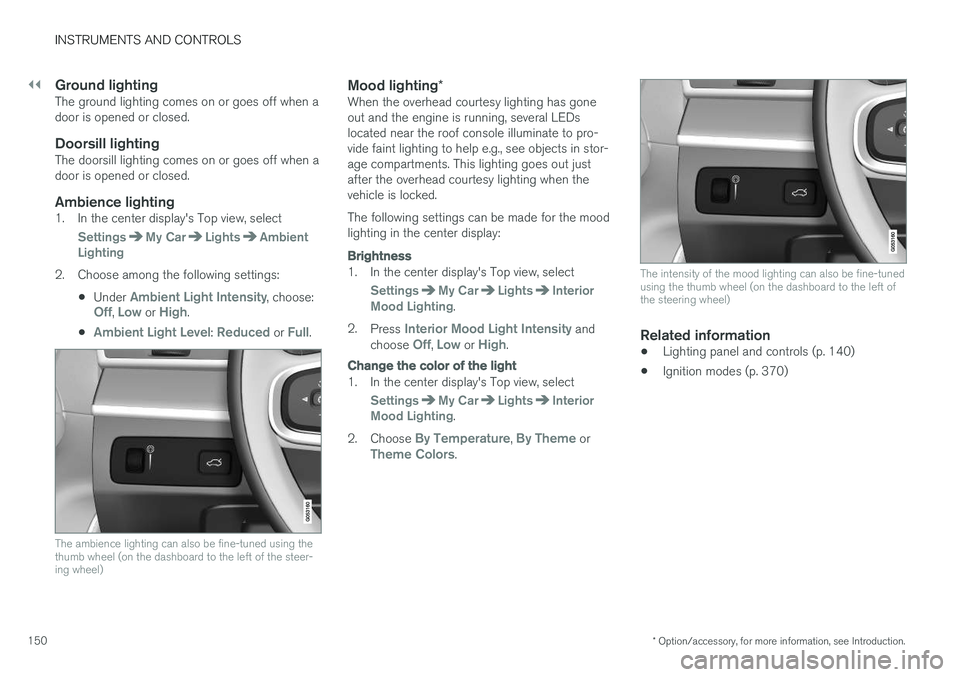
The ambience lighting can also be fine-tuned using the thumb wheel (on the dashboard to the left of the steer-ing wheel)
Mood lighting *When the overhead courtesy lighting has gone out and the engine is running, several LEDslocated near the roof console illuminate to pro-vide faint lighting to help e.g., see objects in stor-age compartments. This lighting goes out justafter the overhead courtesy lighting when thevehicle is locked. The following settings can be made for the mood lighting in the center display:
Brightness
1. In the center display's Top view, select
SettingsMy CarLightsInterior
Mood Lighting.
2. Press
Interior Mood Light Intensity and
choose Off, Low or High.
Change the color of the light
1. In the center display's Top view, select
SettingsMy CarLightsInterior
Mood Lighting.
2. Choose
By Temperature, By Theme orTheme Colors.
The intensity of the mood lighting can also be fine-tuned using the thumb wheel (on the dashboard to the left ofthe steering wheel)
Related information
• Lighting panel and controls (p. 140)
• Ignition modes (p. 370)
Page 154 of 546

||
INSTRUMENTS AND CONTROLS
152The message may be displayed along with graph- ics, symbols or buttons for e.g., confirming themessage or accepting a request.
Service messages
The following table lists a selection of important service messages and the action that should betaken.
MessageAction
Stop safelyAStop and switch off the engine. There is a risk ofserious damage to the vehi- cle
B
.
Turn off engineAStop and switch off the engine. There is a risk ofserious damage to the vehi- cle B
.
Service urgent Drive to workshop
A
Contact a workshop B
to have
the vehicle inspected imme- diately.
Service requiredAContact a workshop B
to have
the vehicle inspected as soon as possible.
Book time for maintenance Time for maintenanceTime for the next scheduled service. Contact a work- shop B
.
MessageAction
Maintenance overdueTime for the next scheduled service. Contact a work- shop B
. If the service sched-
ule is not followed, this may void all or part of the vehi-cle's warranty and result indamage to vehicle compo-nents.
Temporarily offAA function has been tempo- rarily deactivated and will bereactivated automaticallywhile driving or after theengine is restarted.
A Part of the message is context-dependent.
B Contact a Volvo retailer or a trained and qualified Volvo service technician.
Center display
Message in the center display's status bar
Messages with lower priority for the driver are shown in the center display. Most of the messages are shown in the center display's status bar. The message times out aftera short period of time or disappears if it has beenconfirmed or if action has been taken. Messages that need to be stored are saved under
My car
messages in Top view.
Some messages in the center display contain one or more buttons for e.g., confirming the mes-sage or accepting a request. Messages' form can vary and they may be dis- played with graphics, symbols or buttons for e.g.,confirming a message or accepting a request.
Page 157 of 546
INSTRUMENTS AND CONTROLS
155
Handling a saved message
In expanded form, some messages have two but- tons for booking service or reading the owner'smanual. Booking service:
–With the message in expanded form, tapRequest appoint./Call to make
Appointment13 to book a service/repair
appointment. >
Request appoint.: the Appointmentstab will open in the app and create a request for a service/repair appointment.
Call to make Appointment: the phone
app will start and initiate a call to your pre- ferred retailer to make a service/repairappointment.
Reading the owner's manual:
–With the message in expanded form, tapOwner's manual to read the section of the
owner's manual related to the message.
> The owner's manual will open in the cen- ter display and provide information related to the message.
Messages stored in the app will be erased auto-matically each time the engine is started.
Messages saved from the center display
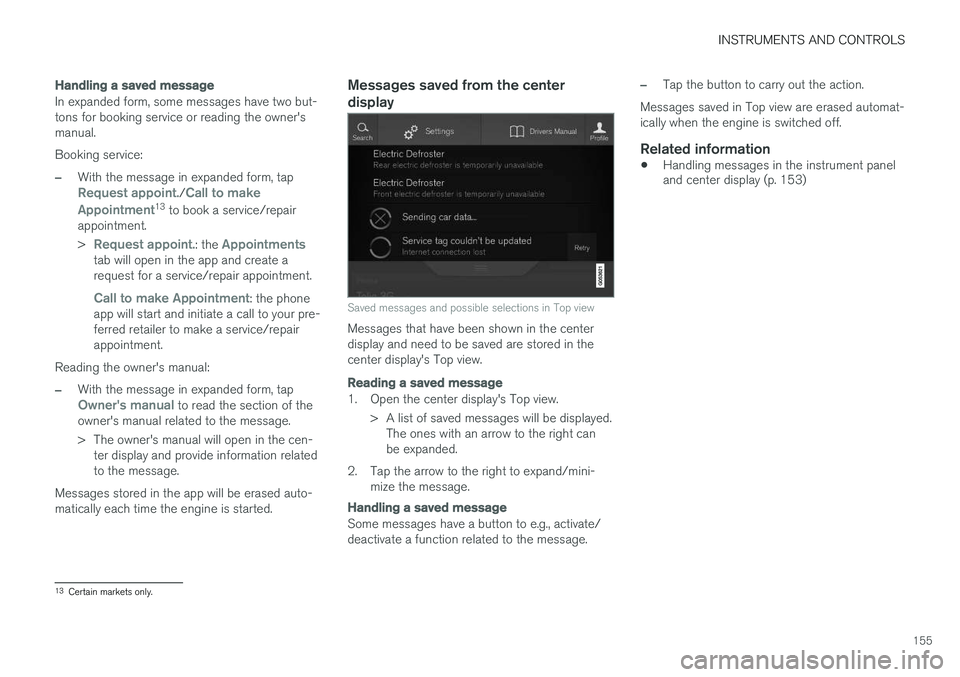
Saved messages and possible selections in Top view
Messages that have been shown in the center display and need to be saved are stored in thecenter display's Top view.
Reading a saved message
1. Open the center display's Top view. > A list of saved messages will be displayed.The ones with an arrow to the right can be expanded.
2. Tap the arrow to the right to expand/mini- mize the message.
Handling a saved message
Some messages have a button to e.g., activate/ deactivate a function related to the message.
–Tap the button to carry out the action.
Messages saved in Top view are erased automat- ically when the engine is switched off.
Related information
• Handling messages in the instrument panel and center display (p. 153)
13
Certain markets only.
Page 159 of 546

INSTRUMENTS AND CONTROLS
}}
157
Continuous wipersMove the lever upward for the wipers to operate at normal speed.
NOTE
Before using the wipers, be sure that the wiper blades are not frozen onto the wind-shield and that any ice or snow on the wind-shield has been removed.
Move the lever upward to the next posi- tion for maximum wiper speed.
Related information
•Tailgate window wiper and washer (p. 159)
• Activating/deactivating the rain sensor (p. 157)
• Windshield and headlight washers (p. 158)
Activating/deactivating the rain sensor
The rain sensor monitors the amount of water on the windshield and automatically regulates wiperspeed.
Right-side steering wheel lever
Rain sensor button
Thumb wheel for adjusting sensitivity/interval wiper speed
When the rain sensor is activated, the
symbol will illuminate in the instrument panel.
Activating the rain sensorWhen activating the rain sensor, the engine must be running or the ignition must be in mode I or II.
The windshield wiper lever must also be in posi-tion 0 or in the single sweep position. Activate the rain sensor by pressing the
button. The wipers will make one sweep. If the lever is pressed down, the wipers will make additional sweeps across the windshield. Move the thumb wheel upward for increased sen- sitivity or downward for decreased sensitivity. Thewipers will make one extra sweep if the thumbwheel is moved upward.
Deactivating the rain sensor
Deactivate the rain sensor by pressing the button or by moving the lever upward to another wiper position. The rain sensor is automatically deactivated in ignition mode
0.
The rain sensor is also automatically deactivated when the wipers blades are put in the serviceposition and will reactivate when the wipers havebeen returned to the normal operating position.
CAUTION
Deactivate the rain sensor when washing the vehicle in an automatic car wash if the engine is running or if the ignition is left in mode I or
II . The symbol in the instrument panel will go
out. If the rain sensor is not deactivated, the wipers may start inadvertently in the car washand could be damaged.
Page 160 of 546

||
INSTRUMENTS AND CONTROLS
* Option/accessory, for more information, see Introduction.
158
Activating/deactivating the memory function
The rain sensor's memory function can be set to activate the rain sensor each time the engine isstarted: 1.
In the center display, select
SettingsMy
Car
Wipers
2. Activate by selecting the Rain Sensor
Memory box.
Deactivate by deselecting the
Rain Sensor
Memory box.
Related information
• Using the windshield wipers (p. 156)
• Windshield wipers in the service position (p. 508)
• Tailgate window wiper and washer (p. 159)
Windshield and headlight washers
Use the windshield/headlight washers to help improve visibility.
Starting the windshield and headlight washers
Washing function
–Move the right-side steering wheel lever toward the wheel to start the windshield andheadlight washers.
> After the lever is released the wipers make several extra sweeps.
CAUTION
• Use ample washer fluid when washing the windshield. The windshield should bethoroughly wet when the wipers are inoperation.
• Avoid using the washers if the fluid reser-voir is frozen or empty to help avoid dam-age to the pump.
When the washing system is used, the length of time that the windshield washers operatedepends on the ambient temperature. In coldweather, the amount of washer fluid used willalso be increased automatically to help improvecleaning.
Heated washer nozzles
*The washer nozzles are heated automatically incold weather to help prevent the washer fluidfrom freezing.
High-pressure headlight washing *High-pressure headlight washing consumes alarge quantity of washer fluid. To save fluid, theheadlights are washed once for every five timesthe windshield is washed.
Reduced washingWhen approx. 1 US quart (1 liter) of washer fluidremains in the reservoir, the headlights will nolonger be washed to conserve fluid.
Page 165 of 546
INSTRUMENTS AND CONTROLS
* Option/accessory, for more information, see Introduction.163
Power front seats*
The power front seats offer a number of adjust- ment possibilities to help maximize comfort andergonomics.
The power seats have an overload protector that
activates if a seat is blocked by any object. If this occurs, put the ignition in mode I or 0 and wait
for a short period before operating the seat again. The power seat(s) can be adjusted for a short period after unlocking the door with the remotekey without switching the ignition on. Seat adjust-ment can always be made when the engine isrunning.
Related information
• Multifunctional front seats
* (p. 165)
• Adjusting power front seats
* (p. 163)
• Using the power seat memory function
*
(p. 164)
• Manually operated front seats (p. 162)
• Turning seat heating
* on and off (p. 199)
• Turning front seat ventilation
* on and off
(p. 200)
• Easy access to and from the driver seat (p. 169)
Adjusting power front seats
*
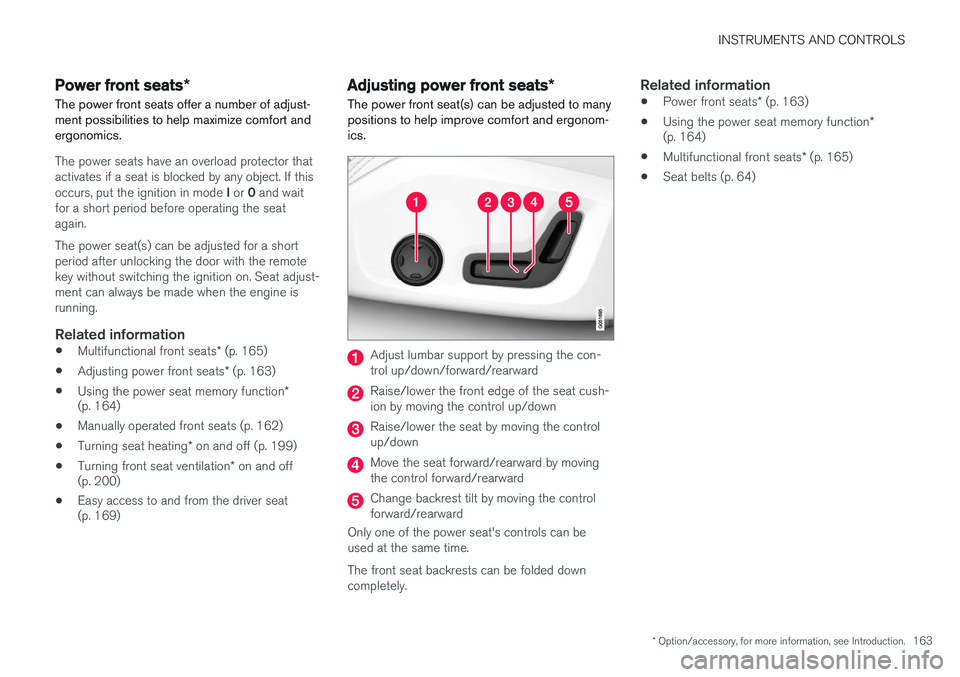
The power front seat(s) can be adjusted to many positions to help improve comfort and ergonom-ics.
Adjust lumbar support by pressing the con- trol up/down/forward/rearward
Raise/lower the front edge of the seat cush- ion by moving the control up/down
Raise/lower the seat by moving the control up/down
Move the seat forward/rearward by moving the control forward/rearward
Change backrest tilt by moving the control forward/rearward
Only one of the power seat's controls can beused at the same time. The front seat backrests can be folded down completely.
Related information
• Power front seats
* (p. 163)
• Using the power seat memory function
*
(p. 164)
• Multifunctional front seats
* (p. 165)
• Seat belts (p. 64)
Page 168 of 546
||
INSTRUMENTS AND CONTROLS
* Option/accessory, for more information, see Introduction.
166 center of the display. If both seats are adjusted, the settings for the driver seat are shown on theupper half of the screen and the ones made forthe passenger seat are on the lower half. Press the Home button on the center console to exit the seat adjustment setting view.
Related information
•
Power front seats
* (p. 163)
• Adjusting function settings in the multifunc- tional front seats
* (p. 166)
• Turning seat heating
* on and off (p. 199)
Adjusting function settings in the multifunctional front seats *
The multifunction controls on the side of the seat as well as the center display can be used tomake seat adjustments. The adjustment settings are shown in the center display *.
Multifunction control on the side of the seat
Turn the control up or down to activate.
Front seat massage settings *The front seat backrests have a massage func- tion. Air-filled cushions provide the massagingaction and a number of settings are available. The massage function can only be used when the engine is running.
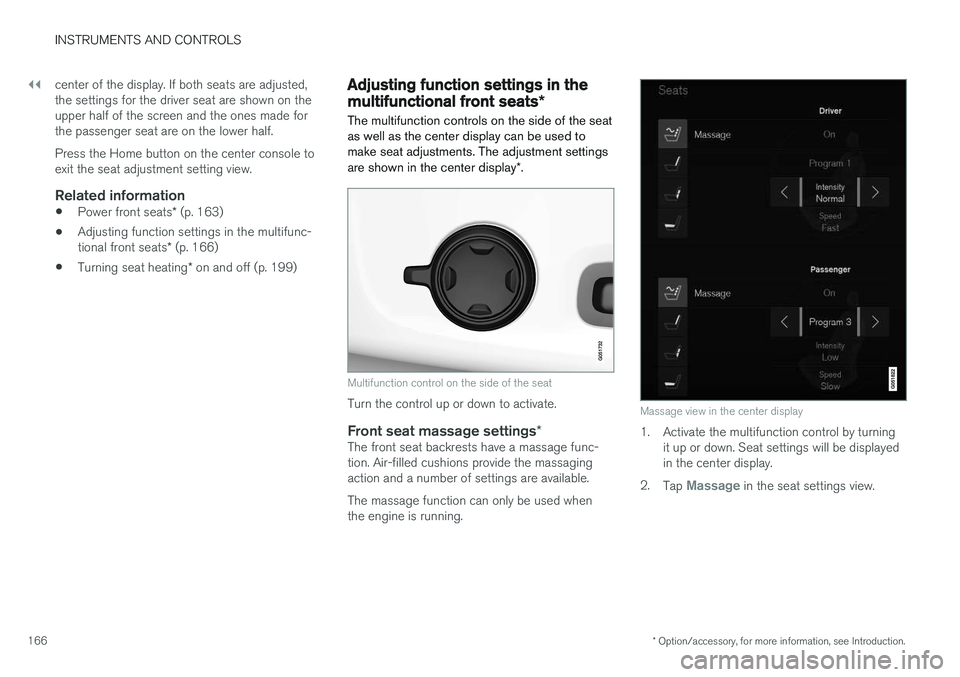
Massage view in the center display
1. Activate the multifunction control by turning
it up or down. Seat settings will be displayed in the center display.
2. Tap
Massage in the seat settings view.
Page 171 of 546
INSTRUMENTS AND CONTROLS
}}
* Option/accessory, for more information, see Introduction.169
Related information
•Multifunctional front seats
* (p. 165)
Rear seats
Your vehicle has three rows of seats. The sec- ond row of seats has three individual seatingpositions and the optional third row of seats hastwo individual seating positions.
Related information
• Adjusting the second row backrest tilt (p. 171)
• Adjusting the second row head restraints(p. 170)
• Folding the second row backrests (p. 172)
• Folding the third row backrests (p. 175)
• Getting into and out of the third row of seats(p. 174)
• Moving the second row seats forward/rear-ward (p. 174)
• Turning seat heating
* on and off (p. 199)
Easy access to and from the driver seat
The
Easy Ingress & Egress function can be
used to make getting into and out of the driver's seat easier.
Easy egressTo make getting out of the driver's seat easier, the seat is lowered, the side bolsters deflate andthe seat cushion retracts at the same time. The easy egress function must be activated in the center display. 1. Move the gear selector to the P position.
2. Switch off the engine.
3. Unbuckle the seat belt.
4. Open the driver's door. > The seat, side bolsters and seat cushionall move at the same time to a position that makes it easier to leave the seat.
Easy ingressThe seat remains in the easy egress positionwhen the driver leaves the vehicle. When thedriver returns to the vehicle, the seat is in a posi-tion to make sitting down easier. When the driveris seated, has buckled the seat belt and has put the ignition in at least mode 1, the seat will return
to the driver's preferred position.