Page 33 of 119

External devices33Playing audio
Starting playback If not connected, connect the device
3 31.
Press ; and then select USB, AUX
or Bluetooth .
Example: USB main menu
Function buttons
The media files on the USB and
Bluetooth devices may be operated
using the buttons on the instrument
panel.
Skipping to previous or next track
Press t or v once or several times
to skip to the previous or next track.
Fast forwarding or rewinding
Press and hold t or v to fast
forward or rewind the current track.
Pausing playback
Press T to pause playback.
Audio menus To display the respective audio
menu, press the multifunction knob.
Notice
Not all menu items are available in
all audio menus.Shuffle function
Press the multifunction knob to
display the USB or Bluetooth menu.
To play the tracks on the respective device in random order, activate
Shuffle .
To return to the normal playing order,
deactivate Shuffle.
Browsing
(only available in USB menus)
To search for a track within the
structure, select one of the menu
items, e.g. Folders, Play Lists or
Albums .
Browse through the structure until
you find the desired track.
Select the track to start playback.
Individual playlists
The system allows new playlists to be created via the Gracenote function.
Similar tracks are put together on a
list automatically generated by the
system.
Select the track around which you
wish to create a new playlist.
Page 34 of 119

34External devicesSelect Play More Like This... in the
respective audio menu. A new playlist
is created and stored in the Play
Lists menu.
To delete a playlist generated by the
system, select Delete automatic
playlist . A list of all generated playlists
is displayed. Select the playlist you
wish to delete. The playlist is deleted.
Displaying pictures Viewing pictures
Connect a USB device 3 31.
Press ; and then select Pictures to
open the Picture Viewer USB menu.
A list of all pictures and picture folders
found on the USB device is displayed.
Browse through the pictures and
folders until you find the desired
picture and select it. The picture is
displayed.
Function buttons
Info button
Select Info at the bottom of the screen
to display information on the picture
stored on the USB device, e.g. a
name or number. The respective
information is displayed above the
picture.
Skipping to the previous or next
picture
Select < or > at the bottom of the
screen to display the previous or next picture.
Slide show
To start a slideshow of all pictures
stored in the respective picture folder,
select 6 at the bottom of the screen.
The slideshow is started.
When the slideshow is started, 6
changes to Q.
Select Q to pause the slideshow.
Rotating the picture
Select R at the bottom of the screen
to rotate the picture.
Picture menu To display the picture menu, select
Menu at the bottom of the screen.
Picture Viewer Main
Select Picture Viewer Main to display
a list of all picture folders, see above.
Slideshow Timer
To adjust the time sequence in which
one picture is shown during a slide
show, select Slideshow Timer . The
respective submenu is displayed. Select the desired option.
Page 35 of 119
External devices35Shuffle Images
To display the pictures of a slide show
in random order, activate Shuffle
Images .
Using apps Connecting the smartphone
If not connected to the Infotainment
system, connect the smartphone:
● iPod/iPhone: connect the device
to the USB port 3 31.
● Android phone: establish a
Bluetooth connection 3 63.
Downloading the app Notice
Before an approved application can
be operated using the controls and
menus of the Infotainment system,
the respective app must be installed
on the smartphone.
Download the desired app to your
smartphone from the respective app
store.Starting the app
Press ; and then select the
respective smartphone app icon on
the home screen.
A connection to the application
installed on the smartphone is
established.
The main menu of the app is shown
on the display of the Infotainment
system.
Page 36 of 119

36NavigationNavigationGeneral information.....................36
Usage .......................................... 37
Destination input ..........................41
Guidance ..................................... 49General information
The navigation application will reliably guide you to your destination without
the need to read maps.
The current traffic situation is taken
into account in the route calculation.
For this reason, the Infotainment
system receives traffic
announcements in the current
reception area via RDS-TMC.
The navigation application cannot,
however, take into account traffic
incidents, traffic regulations changed at short notice and hazards or
problems that arise suddenly (e.g.
road works).Caution
The usage of the navigation
system does not release the driver
from the responsibility for a
correct, vigilant attitude in road
traffic. The relevant traffic
regulations must always be
followed. If a navigation instruction contradicts traffic regulations, the
traffic regulations always apply.
Functioning of the navigation
application
The position and movement of the
vehicle are detected by the navigation application using sensors. The
travelled distance is determined by
the vehicle's speedometer signal and
turning movements on bends by a
gyro sensor. The position is
determined by the GPS (Global
Positioning System) satellites.
By comparing the sensor signals with the digital maps, it is possible to
determine the position with an
accuracy of approx. 10 metres.
The system will also work with poor
GPS reception, however, the
accuracy of the determination of the
position will be reduced.
After the entry of the destination
address or point of interest (nearest
petrol station, hotel, etc.) the route is
calculated from the current location to
the destination selected.
Route guidance is provided by voice
commands and a direction arrow, as
well as with the aid of a multi-colour
map display.
Page 37 of 119

Navigation37Usage
Information on the map display To display the map around the current
location, you may optionally:
● Press NAV.
● Press ; and then select
Navigation .
Route guidance not activeIf route guidance is not active, the
following information is displayed:
● In the top line: information on the
audio source currently active and
the time.
● Below the top line: GPS symbol.
● In the upper left corner: a compass that indicates the north
direction.
● Map display of the area around the current position.
● Current position: indicated by a red triangle within a grey circle.
● Points of interest (POI), e.g. petrol stations, parking areas or
restaurants: indicated by
corresponding symbols (if
activated).
● In the bottom line: street name of
the current position.Route guidance active
If route guidance is active, the
following information is displayed:
● In the top line: information on the
audio source currently active and
the time.
● Below the top line: GPS symbol.
● Below the top line: name of the street to follow after the next
intersection.
● In the upper left corner: a compass symbol that indicates
the north direction.
● Map display of the area around the current position.
Page 38 of 119

38Navigation● Current position: indicated by ared triangle within a grey circle.
● Route: indicated by a blue line. ● Final destination: indicated by a black chequered flag.
● Waypoint (intermediate destination): indicated by a red
diamond.
● Points of interest (POI), e.g. petrol stations, parking areas, or
restaurants: indicated by
corresponding symbols (if
activated).
● Traffic incidents, e.g. traffic jam: indicated by corresponding
symbols (if activated).
● On the left side: direction arrow and distance to the next
manoeuvre.
● On the left side: remaining distance to the final destination or
to the next waypoint.
● On the left side: estimated arrival
time or remaining travel time.
● In the bottom line: street name of
the current position.Map manipulation
Moving the visible map section
The visible map section on the map display can be moved freely in all
directions using the eight-way switch.
The eight-way switch in the middle of the multifunction knob may be tilted in
all directions.
Tilt the switch to one side. The visible
map section moves in the respective
direction.
To redisplay the map around the
current location, press BACK.
Changing the map scale
When the map is displayed, turn the
multifunction knob to display a scale
bar at the bottom of the screen.
Turn the multifunction knob again to
adjust the scale as desired.
Changing the map mode
The map may be displayed in three
(route guidance not active),
respectively five (route guidance
active) different modes, see "Map
setup" below.Repeatedly press NAV to toggle
between the different map modes.
Map setup
Heading indicator
Press the multifunction knob to
display the Navigation Menu . Select
Heading Indicator to display the
respective submenu.
The following options are available: ● 2D North Up : 2D view, north
facing upwards.
● 2D Heading Up : 2D view, driving
direction facing upwards.
● 3D Heading Up : 3D view, driving
direction facing upwards.
Select the desired option.
Map modes
Press the multifunction knob to
display the Navigation Menu . Select
Map Modes to display the respective
submenu.
Page 39 of 119
: Full screen
map view, all function and
indication screen buttons
displayed.
● Full Glory : Full screen")
Navigation39The following options are available:● Full Map ("Normal" view
described above): Full screen
map view, all function and
indication screen buttons
displayed.
● Full Glory : Full screen map view,
most functions and indication
screen buttons hidden.
● Split with Turn List : Divided
screen with map on the left and
turn list on the right side.
● Split with Turn Arrow : Divided
screen with map on the left side
and turn arrow for the next
turning manoeuvre on the right
side.
● Split with Media : Divided screen
with map on the left side and
audio source currently active on the right side.
Select the desired option.
Map display
Press the multifunction knob to
display the Navigation Menu . Select
Map Settings and then Map Display
to display the respective submenu.Depending on the external lighting
conditions, activate Day or Night .
For an automatic adaption by the
system, activate Automatic.
Displaying POIs
Press the multifunction knob to
display the Navigation Menu .
Select Show POIs to display the
respective submenu.
If you wish all POIs available in the system to be displayed on the map,activate Show all POIs .
If you do not wish POIs to be
displayed on the map, activate Hide
all POIs .
To only display specific POIs, activate
User Defined and then activate the
POI categories you wish to be
displayed.
Changing screen information
The route information displayed on
the screen during active route
guidance may be customised.
Press the multifunction knob to
display the Navigation Menu . Scroll
through the list and select Switch
Route Time/Destination .Time information
If you wish to change the time
information displayed, select Switch
Arrival/Travel Time to display the
respective submenu.
Activate the information setting you
wish to be displayed.Destination information
If you are in a waypoint trip, you may
want to display the route information
for a waypoint instead of those for the final destination.
To change the setting, select Switch
Waypoint/Destination . A list of all
destinations in the waypoint trip
currently active is displayed.
Activate the information setting you
wish to be displayed.
Position information
Current position
Press the multifunction knob to
display the Navigation Menu . Select
Current Position Info .
Page 40 of 119

40NavigationOn the right side of the screen, the
current position is displayed on the
map. On the left side, the GPS
coordinates of the current position are shown.
Destination position
If route guidance is active, you may
display information on the destination
entered.
Press the multifunction knob to
display the Navigation Menu . Select
Destination Position Info .
On the right side of the screen, the destination is displayed on the map.
On the left side, the address and the
GPS coordinates of the destination
are shown.
Saving a position
The current position or a destination
position may be saved in the address book.
Select Save. Find a detailed
description on saving addresses in
the address book 3 41.Route simulation
The Infotainment system features a
route simulation mode for test
purposes.
To start the simulation mode, press
CONFIG and then select Navigation
Settings .
Scroll through the list and select
Route Simulation to display the
respective submenu.
Starting position
Since the simulation mode does not
draw on the GPS signal providing the current position of the vehicle, a start
position must be set manually.Use Last Known Position
To set the last position provided by a
GPS signal as starting point, select
Use Last Known Position .Use Previous Destination
To use one of the last destinations
entered as starting point, select Use
Previous Destination . The previous
destinations list is displayed.
Select the desired address.Use Specified Location
To use a specific location as starting
point, select Use Specified Location .
Enter an address. Find a detailed description 3 41.
Simulation mode is started.
Cancelling simulation mode
To leave the simulation mode, press
CONFIG and then select Navigation
Settings .
Scroll through the list and select
Route Simulation to display the
respective submenu.
Select Cancel Route Simulation .
Additional route simulation menu
When route guidance is active in the
simulation mode, an additional menu
is displayed in the Navigation Menu.
Press the multifunction knob to
display the Navigation Menu . Scroll
through the list and select Route
Simulation to display the respective
submenu.
 1
1 2
2 3
3 4
4 5
5 6
6 7
7 8
8 9
9 10
10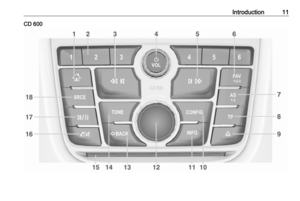 11
11 12
12 13
13 14
14 15
15 16
16 17
17 18
18 19
19 20
20 21
21 22
22 23
23 24
24 25
25 26
26 27
27 28
28 29
29 30
30 31
31 32
32 33
33 34
34 35
35 36
36 37
37 38
38 39
39 40
40 41
41 42
42 43
43 44
44 45
45 46
46 47
47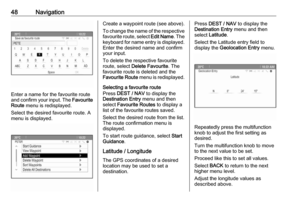 48
48 49
49 50
50 51
51 52
52 53
53 54
54 55
55 56
56 57
57 58
58 59
59 60
60 61
61 62
62 63
63 64
64 65
65 66
66 67
67 68
68 69
69 70
70 71
71 72
72 73
73 74
74 75
75 76
76 77
77 78
78 79
79 80
80 81
81 82
82 83
83 84
84 85
85 86
86 87
87 88
88 89
89 90
90 91
91 92
92 93
93 94
94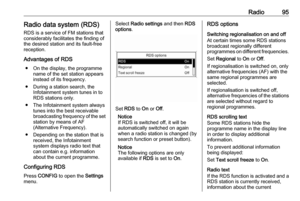 95
95 96
96 97
97 98
98 99
99 100
100 101
101 102
102 103
103 104
104 105
105 106
106 107
107 108
108 109
109 110
110 111
111 112
112 113
113 114
114 115
115 116
116 117
117 118
118