Basic operation17Press the multifunction knob
(Navi 950: press the outer ring) to
display the second Home Page with
further applications.
Using the multifunction knob, you
may then access the different
applications.
Notice
Most of the applications or
application menus may also be
directly accessed via the buttons on
the instrument panel.
BACK button
Press BACK:
● to exit a menu or screen
● to return from a submenu to the next higher menu level
● to delete the last character in a character sequence
Press and hold BACK for a few
seconds to delete the entire entry.Examples of menu operation
Selecting a screen element
Turn the multifunction knob to move
the cursor (= coloured background) to the desired option.
Press the multifunction knob to select
the marked icon, screen button or
menu item.
Notice
In subsequent chapters the
operating steps for selecting and
activating a screen button or menu
item will be described as "...select
Page 18 of 119
18Basic operationPress the multifunction knob to
confirm the set value.
Notice
In subsequent chapters the
operating steps for adjusting a
setting will be described as "...adjust to...".
Activating a menu item
Turn the multifunction knob to move
the cursor (= coloured background) to the desired option.
Press the multifunction knob to
activate the menu item. A checkmark
or a point appear within the box or ring
beside the respective menu item.Notice
In subsequent chapters the
operating steps for activating a
menu item will be described as
"...activate ".
Entering a character sequence
Turn the multifunction knob to select
the desired character.
Press the multifunction knob to enter
the respective character in the entry
field at the top of the screen.
The last character in the character sequence can be deleted pressing
Del on the screen or BACK on the
instrument panel. Pressing and
holding BACK deletes the entire
entry.
Press the multifunction knob to
confirm the selected character.
Notice
In subsequent chapters the
operating steps for entering
characters will be described "...enter the desired characters...".Messages
Before a system function is executed,
you are sometimes prompted with a
message. If requested, select one of
the options.
The selection and activation of a
screen button in a message function
are the same as described for
selecting an option in a menu.
Tone settings
Press ; and then select More at the
bottom of the screen. On the second
Home Page , select Tone. The tone
settings menu is displayed.
Page 19 of 119
Basic operation19
Bass
Use this setting to enhance or
attenuate the deep frequencies of the
audio sources.
Adjust the setting as desired.
Mid
Use this setting to enhance or
attenuate the midrange frequencies
of the audio source.
Adjust the setting as desired.
Treble
Use this setting to enhance or
attenuate the high frequencies of the
audio sources.
Adjust the setting as desired.
EQ mode
(EQ: Equaliser)
Use this setting to optimise the tone
for a specific style of music, e.g.
Rock or Classical .
Select EQ. A submenu with
predefined sound styles is displayed.
Select the desired sound style.
If one of the predefined sound styles
is selected, Bass, Mid and Treble are
preadjusted by the system.
If you manually adjust one of the
settings described above, EQ is set to
Manual .
Fade and Balance
When Fade or Balance are selected,
an illustration is displayed on the right side of the screen.
To adjust the volume distribution
between the front and rear speakers in the vehicle, select Fade. Adjust the
setting as desired.
To adjust the volume distribution
between the left and right speakers in
the vehicle, select Balance. Adjust
the setting as desired.
Volume settings
Adjusting the Auto Volume Press CONFIG and then select Radio
Settings .
Select Auto Volume to display the
respective menu.
Page 20 of 119
20Basic operationTo adjust the degree of volume
adaptation, set Auto Volume to Off,
Low , Medium or High .
Off : no enhancement of volume with
increasing vehicle speed.
High : maximum enhancement of
volume with increasing vehicle
speed.
Adjusting the Startup Volume
Press CONFIG and then select Radio
Settings .
Select Startup Volume to display the
respective menu.
Adjust the setting as desired.
Adjusting the volume of traffic
announcements
The volume of traffic announcements
can be preset to a level independent
of the "normal" volume level.
Press CONFIG and then select Radio
Settings .
Select RDS Options and then Traffic
Volume to display the respective
menu.
Adjust the setting as desired.Notice
While an announcement is given out, the volume may simply be
adjusted pressing m.
Adjusting the Chime Volume When operating the controls in thevehicle, beeping sounds confirm your
actions. The volume of the beeping
sounds may be adjusted.
Press CONFIG and then select
Vehicle Settings .
Select Comfort and Convenience and
then Chime Volume to display the
respective submenu. Select Low or
High .
Adjusting the Navigation Volume
Press CONFIG and then select
Navigation Settings .
Select Voice Prompt and then
Navigation Volume . The respective
submenu is displayed.
To adjust the volume of the
announcements, select
Announcement and then adjust the
setting as desired.To adjust the volume of the audio source possibly playing in the
background, select Background and
then adjust the setting as desired.
Select Volume Test to get an audio
example of the settings.
Notice
While an announcement is given out, the volume may simply be
adjusted pressing m.
System settings
Various Infotainment system settings
may be adjusted via the Config
application.
Page 21 of 119
Basic operation21Language settings
Press CONFIG and then select
Languages . A list of all languages
available is displayed.
Select the desired language.
Time and date settings
Press CONFIG and then select Time
and Date to display the respective
submenu.
Automatic time adjustment
The system constantly receives
information on the current time and
date.
If you wish the time and date settings
to be updated automatically, activate
RDS Auto Time Adjust .
If you wish to set time and date
manually, deactivate RDS Auto Time
Adjust .
Set time
To adjust the time settings, select Set
Time .
Adjust the settings as desired.
Set date
To adjust the date settings, select Set
Date . Adjust the settings as desired.
Time format
To choose the desired time format, select 12 hr / 24 hr Format . A
submenu is displayed. Activate 12
Hour or 24 Hour .
Software information
Press CONFIG and then select Radio
Settings .
Scroll through the list and select
Software Versions Menu to display
the respective submenu.
Software version information
To display a list of all software
versions installed, select Software
Version Information .
By default, all versions are activated.
Software update
To update your system software,
contact your workshop.
Log file
To generate a log file of your current
software version, select Create Log
File .
Licensing information
To display information on the
manufacturer of the Infotainment
system, select Licensing Information .
Factory defaults
To reset all Infotainment settings to
their factory defaults, select Clear and
Reset Radio .
Page 22 of 119
22Basic operationDisplay settings
Press CONFIG and then select
Display Settings to display the
respective submenu.
Home Page
Select Home Page Menu to display
the home page settings menu.
To access the menu from the Home
Page , select Menu at the bottom of
the screen.
The Home Page may be adjusted
according to your personal
preferences.Customise
The application icons displayed on
the first home page may be chosen as
desired.
Select Customise to display a list of
all applications installed in the
system. Activate the menu items of
those applications you wish to be
displayed on the first home page.
The other applications are then
arranged on the following pages.Sort
Up to eight application icons may be
arranged on each home page.The positions of the icons can be
changed as desired.
Select Sort to display the home pages
in edit mode.
Select the icon you wish to move.
Scroll to the position on the home
page where you wish the icon to be
located. Press the multifunction knob
to confirm.
The icon is moved to the new location. The icon that was located in that
position before is now displayed in the
position of the moved icon.Home page defaults
To reset the Home Page to its factory
defaults, select Restore Home Page
Defaults .
Display Off
To turn the display off, select Display
Off .
To turn the display back on, press any
button on the instrument panel
(except the m VOL knob).
Page 23 of 119
Radio23RadioUsage.......................................... 23
Station search .............................. 23
Autostore lists .............................. 24
Favourite lists ............................... 25
Radio data system (RDS) ............26
Digital audio broadcasting ...........27Usage
Activating radio
Press ; and then select AM, FM or
DAB .
The station last selected is played.
Notice
When an audio source is already
active, you may toggle between the
different audio sources by
repeatedly pressing SRCE.
Station search
Automatic station search Briefly press t or v to play the next
station in the station memory.
Manual station search
Press and hold t or v . Release the
button when the required frequency
has almost been reached on the frequency display.
Manual station tuningIn the FM and DAB waveband, press
the multifunction knob to open the
respective menu and then selectManual tuning . The frequency
currently active is displayed at the
bottom of the screen.
Turn the multifunction knob to reach
the desired frequency.
In the AM waveband, turn the
multifunction knob to adjust the
frequency.
Station listsIn the FM and DAB waveband, turn
the multifunction knob to display the
station list.
In the AM waveband, press the
multifunction knob to display the respective waveband menu.
Select AM Station List .
A list of all receivable stations of the
relevant waveband and in the current
reception area is displayed.
Notice
If no station list has been created
beforehand, the Infotainment
system performs an automatic
station search.
Page 24 of 119
24Radio
Select the desired station.Notice
The currently received station is
marked by i.
Category list Numerous RDS 3 26 and DAB
3 27 stations broadcast a PTY
code, which specifies the type of
programme transmitted (e.g. news).
Some stations also change the PTY
code depending on the content which is currently transmitted.
The Infotainment system stores these
stations in the corresponding
category list sorted by programme
type.
Notice
The category list submenu item is
only available for the FM and the
DAB wavebands.
To search for a programme type
determined by the stations, select the
waveband specific category list
option.
A list of programme types currently
available is displayed.
Select the desired programme type. A
list of stations is displayed
transmitting a programme of the
selected type.
Select the desired station.
Notice
The currently received station is
marked by i.
Updating the station lists
If the stations stored in the waveband-
specific station list can no longer be
received, the AM and the DAB station lists must be updated.Notice
The FM station list is updated
automatically.
Select the corresponding list item in
the waveband-specific menu to
update a station list.
A station search is started. Once the
search is finished, the station
previously selected is played.
To cancel the station search, press
the multifunction knob.
Notice
If a waveband-specific station list is
updated, the corresponding
category list is also updated.
Autostore lists The stations best received in a
waveband can be stored in and
selected from the autostore lists.
 1
1 2
2 3
3 4
4 5
5 6
6 7
7 8
8 9
9 10
10 11
11 12
12 13
13 14
14 15
15 16
16 17
17 18
18 19
19 20
20 21
21 22
22 23
23 24
24 25
25 26
26 27
27 28
28 29
29 30
30 31
31 32
32 33
33 34
34 35
35 36
36 37
37 38
38 39
39 40
40 41
41 42
42 43
43 44
44 45
45 46
46 47
47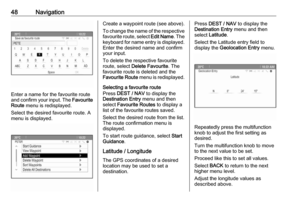 48
48 49
49 50
50 51
51 52
52 53
53 54
54 55
55 56
56 57
57 58
58 59
59 60
60 61
61 62
62 63
63 64
64 65
65 66
66 67
67 68
68 69
69 70
70 71
71 72
72 73
73 74
74 75
75 76
76 77
77 78
78 79
79 80
80 81
81 82
82 83
83 84
84 85
85 86
86 87
87 88
88 89
89 90
90 91
91 92
92 93
93 94
94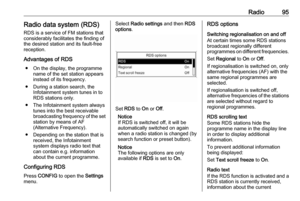 95
95 96
96 97
97 98
98 99
99 100
100 101
101 102
102 103
103 104
104 105
105 106
106 107
107 108
108 109
109 110
110 111
111 112
112 113
113 114
114 115
115 116
116 117
117 118
118 to
display the second Home Page with
further applications.
Using the multifunction knob, you
may then access the differe")


