Page 86 of 179
If Model X is equipped with Driver Assistance
components (see About Driver Assistance on
page 72), the forward looking camera
monitors the markers on the lane you are
driving in, and the ultrasonic sensors monitor
the blind spot for the presence of a vehicle. To
help you stay in your driving lane and to avoid
side collisions, Lane Assist provides two types of warnings:
Page 87 of 179
Controlling Lane Assist Warnings
To turn Lane Departure Warning on or
off,touch Controls > Settings > Driver
Assistance > Lane Departure Warning.
To turn Side Collision Warning on or
off, touch
Controls > Settings > Driver Assistance > Side
Collision Warning.
Note: Your chosen settings are retained until
you manually change them. They are also saved in your driver
profile.
Limitations and Inaccuracies
Lane Assist can not always clearly detect lanemarkings and you may experience
unnecessary or invalid lane departure
warnings in these situations:
Page 89 of 179
alert and always pay attention to the area
in front of Model X so you can anticipate whether any action is required.Warning: Forward Collision Warning does
not operate when Model X is traveling less than 7 km/h.
Automatic Emergency Braking
The forward looking camera and the radar
sensor are designed to determine the distance
from any object (vehicle, motorcycle, bicycle,
or pedestrian) traveling in front of Model X. When a frontal collision is considered
unavoidable, Automatic Emergency Braking is
designed to automatically apply the brakes to
reduce the severity of the impact.
When Automatic Emergency Braking applies
the brakes, the instrument panel displays a visual warning and you
Page 91 of 179

How Speed Assist Works
If Model X is equipped with Autopilot
components (see About Driver Assistance on
page 72), the forward looking camera detects
speed limit signs. The signs are then analyzed
and compared against GPS data to determine
the speed limit at your current driving
location. For routes where no signs are
present, speed limits are determined using GPS data (if available). Instead of determining
the speed limit based on signs and GPS data,
you can also manually enter an arbitrary speed limit.
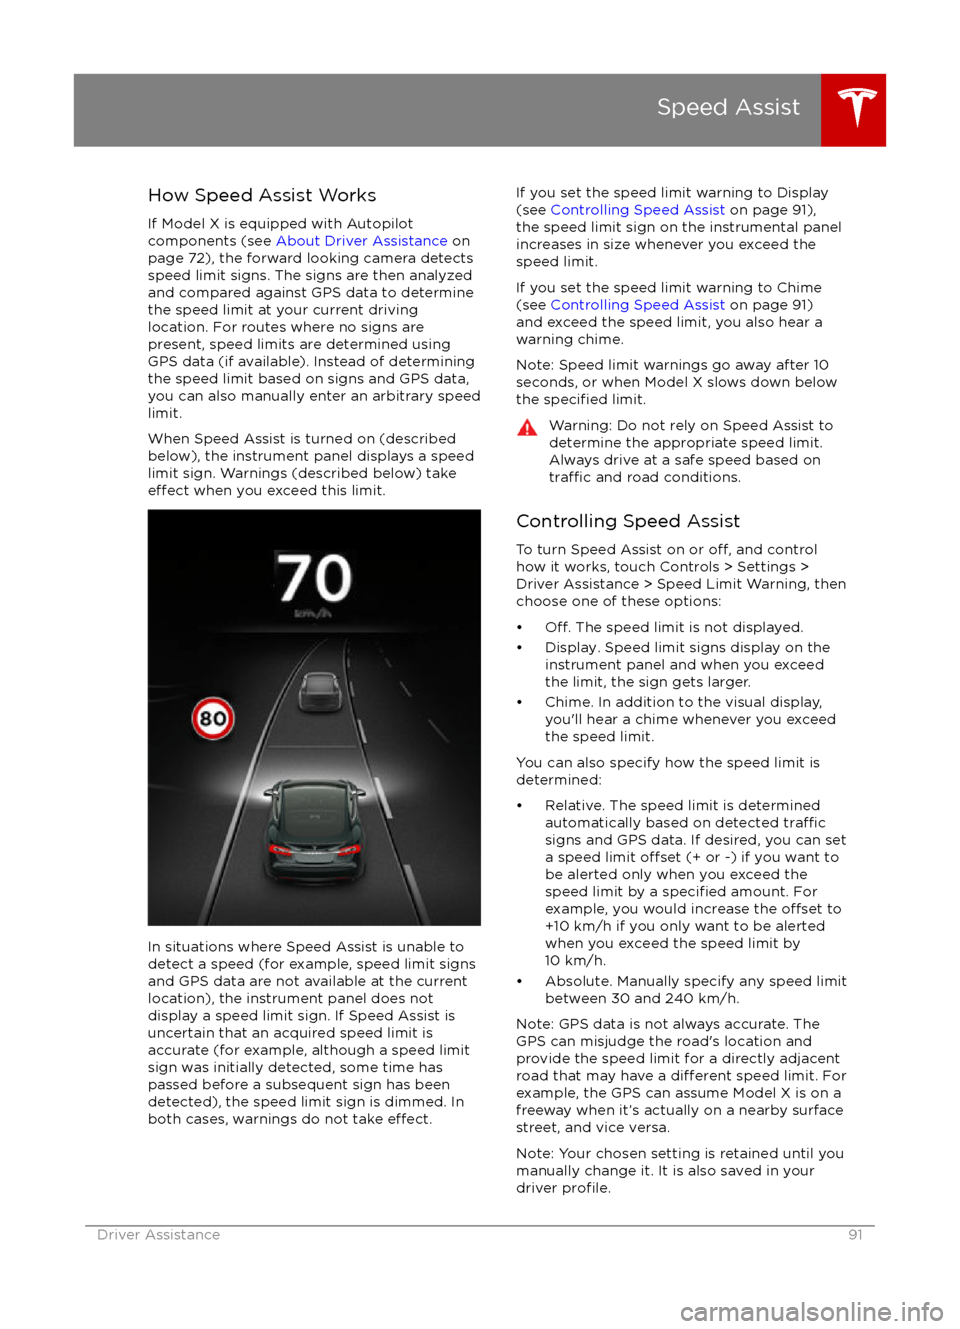
When Speed Assist is turned on (described
below), the instrument panel displays a speed
limit sign. Warnings (described below) take
effect when you exceed this limit.
In situations where Speed Assist is unable to
detect a speed (for example, speed limit signs
and GPS data are not available at the current
location), the instrument panel does not display a speed limit sign. If Speed Assist is
uncertain that an acquired speed limit is
accurate (for example, although a speed limit sign was initially detected, some time has
passed before a subsequent sign has been
detected), the speed limit sign is dimmed. In both cases, warnings do not take
effect.
If you set the speed limit warning to Display
(see Controlling Speed Assist on page 91),
the speed limit sign on the instrumental panel
increases in size whenever you exceed the
speed limit.
If you set the speed limit warning to Chime (see Controlling Speed Assist on page 91)
and exceed the speed limit, you also hear a warning chime.
Note: Speed limit warnings go away after 10 seconds, or when Model X slows down below
the
specified limit.
Warning: Do not rely on Speed Assist to
determine the appropriate speed limit. Always drive at a safe speed based on
traffic and road conditions.
Controlling Speed Assist
To turn Speed Assist on or
off, and control
how it works, touch Controls > Settings > Driver Assistance > Speed Limit Warning, then
choose one of these options:
Page 96 of 179
3. Main viewing areaThe main viewing area changes depending on the app you have chosen (in the example, the
Nav and Media apps are displayed). For some apps (such as Nav and Web), you can zoom in and out using standard touchscreen
finger gestures.
4. Maximize/minimize app
Touch the small rectangle to expand the associated app to
fill the entire main viewing area
(some apps are not expandable). Touch again to display two apps in half-screen view.
5. Volume control
Touch the up and down arrows to increase or decrease the volume of the speakers. You can
also adjust the volume using the scroll wheel on the left side of the steering wheel.
6. Climate controls (see Climate Controls on page 105).
7. Controls
Touch to access all Model X controls and settings (doors, locks, lights, etc).
8. Reverse the position of the two currently displayed apps.
Warning: Paying attention to road and traffic conditions must always be the driver
Page 114 of 179

USB Hub Connections
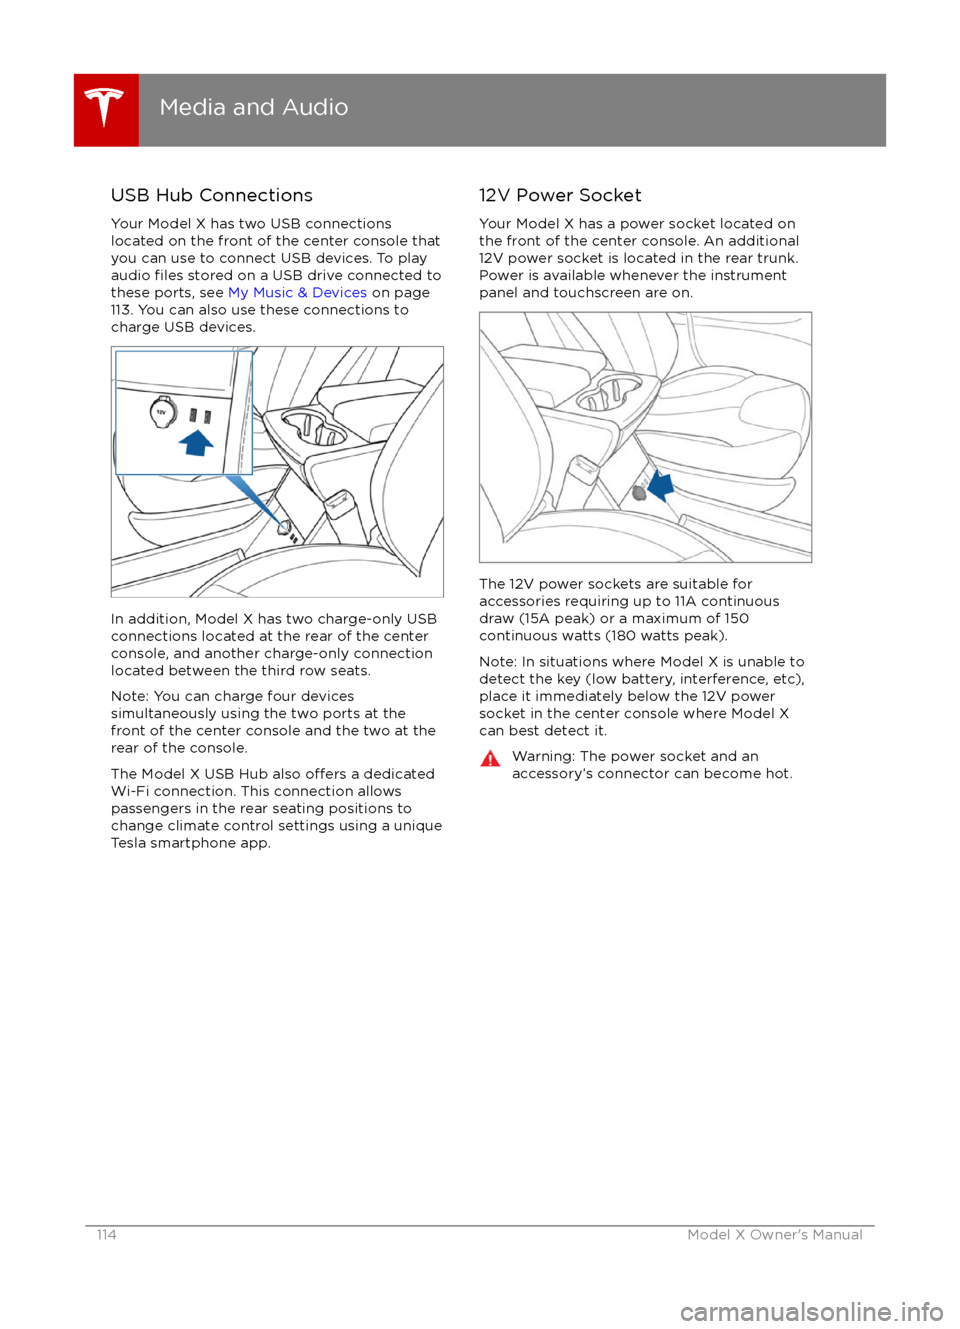
Your Model X has two USB connections
located on the front of the center console that
you can use to connect USB devices. To play
audio
files stored on a USB drive connected to
these ports, see My Music & Devices on page
113. You can also use these connections to
charge USB devices.
In addition, Model X has two charge-only USB
connections located at the rear of the center
console, and another charge-only connection located between the third row seats.
Note: You can charge four devices
simultaneously using the two ports at the
front of the center console and the two at the
rear of the console.
The Model X USB Hub also
offers a dedicated
Wi-Fi connection. This connection allows passengers in the rear seating positions tochange climate control settings using a unique
Tesla smartphone app.
12V Power Socket
Your Model X has a power socket located on
the front of the center console. An additional
12V power socket is located in the rear trunk.
Power is available whenever the instrument
panel and touchscreen are on.
The 12V power sockets are suitable for
accessories requiring up to 11A continuous
draw (15A peak) or a maximum of 150
continuous watts (180 watts peak).
Note: In situations where Model X is unable to detect the key (low battery, interference, etc),
place it immediately below the 12V power
socket in the center console where Model X
can best detect it.
Warning: The power socket and an
accessory
Page 126 of 179

Warning: The high voltage system has no user serviceable parts. Do not disassemble, removeor replace high voltage components, cables or connectors. High voltage cables are coloredorange for easy
identification.
Warning: Read and follow all instructions provided on the labels that are attached to Model X.
These labels are there for your safety.Warning: In the unlikely event that a fire occurs, immediately contact your local fireemergency responders.Charging Equipment
Charging equipment designed
specifically to
charge your Model X is available from Tesla. A
Tesla Wall Connector, which installs in your
garage, is the fastest way to charge Model X at home.
In several market regions, Model X is equipped
with a Mobile Connector and the adapter(s)
you need to plug into commonly used power outlets. When using the Mobile Connector,
first plug the Mobile Connector into the power
outlet, then plug in Model X. For more
information about your Mobile Connector, see
the Mobile Connector Owner
Page 134 of 179

Inspecting and Maintaining TiresRegularly inspect the tread and side walls for
any sign of distortion (bulges), cuts or wear.Warning: Do not drive Model X if a tire is
damaged, excessively worn, or inflated to
an incorrect pressure. Check tires
regularly for wear, and ensure there are
no cuts, bulges or exposure of the ply/
cord structure.
Tire Wear
Adequate tread depth is important for proper
tire performance. Tires with a tread depth less
than 3 mm are more likely to hydroplane in
wet conditions and should not be used. Tires
with a tread depth less than 4 mm do not
perform well in snow and slush and should not
be used when driving in winter conditions.
Model X is originally
fitted with tires that have
wear indicators molded into the tread pattern. When the tread has been worn down to3.18 mm, the indicators start to appear at the
surface of the tread pattern, producing the
effect of a continuous band of rubber across
the width of the tire. For optimal performance
and safety, Tesla recommends replacing tires
before the wear indicators are visible.
Tire Rotation, Balance, and Wheel Alignment
Tesla recommends rotating the tires every
8000 km.
Unbalanced wheels (sometimes noticeable as
vibration through the steering wheel)
affectvehicle handling and tire life. Even with regular
use, wheels can get out of balance. Therefore,
they should be balanced as required.
If tire wear is uneven (on one side of the tire
only) or becomes abnormally excessive, check
the alignment of wheels.
Note: When replacing only two tires, always
install the new tires on the rear.
Punctured Tires
A puncture eventually causes the tire to lose
pressure, which is why it is important to check tire pressures frequently. Permanently repair
or replace punctured or damaged tires as
soon as possible.
Your tubeless tires may not leak when
penetrated, provided the object remains in the
tire. If, however, you feel a sudden vibration or
ride disturbance while driving, or you suspect a tire is damaged, immediately reduce your
speed. Drive slowly, while avoiding heavy
braking or sharp steering and, when safe to do so, stop the vehicle. Arrange to have Model X
transported to a Tesla, or to a nearby tire
repair center.
Note: In some cases, you can temporarily repair small tire punctures (under 6 mm) using
an optional tire repair kit available from Tesla.
This allows you to slowly drive Model X to Tesla or to a nearby tire repair facility.Warning: Do not drive with a punctured
tire, even if the puncture has not causedthe tire to
deflate. A punctured tire candeflate suddenly at any time.
Flat Spots
If Model X is stationary for a long period in
high temperatures, tires can form
flat spots.
When Model X is driven, these flat spots cause
a vibration which gradually disappears as the
tires warm up and regain their original shape.
To minimize
flat spots during storage, inflatetires to the maximum pressure indicated on the tire wall. Then, before driving, release airto adjust tire pressure to the recommended
levels.
Improving Tire Mileage
To improve the mileage you get from your
tires, maintain tires at the recommended tire
pressures, observe speed limits and advisory
speeds, and avoid: