2016 SUBARU IMPREZA lights
[x] Cancel search: lightsPage 239 of 594

Instruments and controls/Headlight beam leveler
Headlight beam leveler (if
equipped)
&Automatic headlight beam
leveler (models with HID
headlights)
The HID headlights generate more light
than conventional halogen headlights.
Therefore a driver of an oncoming vehicle
may experience too much glare if your
headlight beam height adjustment is high
when the vehicle is carrying a heavy load.
The automatic headlight beam leveler
adjusts the headlight beam height auto-
matically and optimally according to the
load being carried by the vehicle.
Fog light switch (if equipped)
1) Headlight switch
2) Fog light switch
The front fog lights will turn on when the
fog light switch is placed in the “”
position while the headlights are in the
following condition.
. while the headlight switch is in the “
”
position
. for models with the auto on/off head-
lights, while the headlight switch is in the
“AUTO ”position and the low beam head-
lights turn on automatically
To turn off the front fog lights, turn the
switch back down to the “
”position.
Indicator light (type A)
Indicator light (type B)
The indicator light on the combination
meter will illuminate when the front fog
lights are illuminated.
3-94
Page 240 of 594
&Steering responsive fog
lights system (models with
EyeSight system)
The steering responsive fog lights system
automatically turns the front fog light on
and off based on the steering angle and
vehicle speed when entering a curve or
driving on curved roads. The system is
intended to help prevent accidents by
enabling better visibility of curves ahead
and early recognition of any disabled
vehicles or other obstacles.
The front fog light on the inside of a curve
will turn on if all of the following conditions
are met.
. The light control switch is in the “
”
position
. The light control switch is in the
“AUTO ”position and the low beam head-
lights turn on automatically
. The fog light switch is in the “
”
position
. The low beam mode is selected
. The select lever is in a position other
than the “R”position
. The steering response fog lights sys-
tem has not been deactivated
. The operating conditions such as the
steering angle and vehicle speed are met
The front fog lights on both sides will turn on as usual if all of the following conditions
are met.
.
The light control switch is in either of
the following conditions.
–in the “
”position
– in the “AUTO ”position and the low
beam headlights turn on automatically
. The fog light switch is in the “
”
position
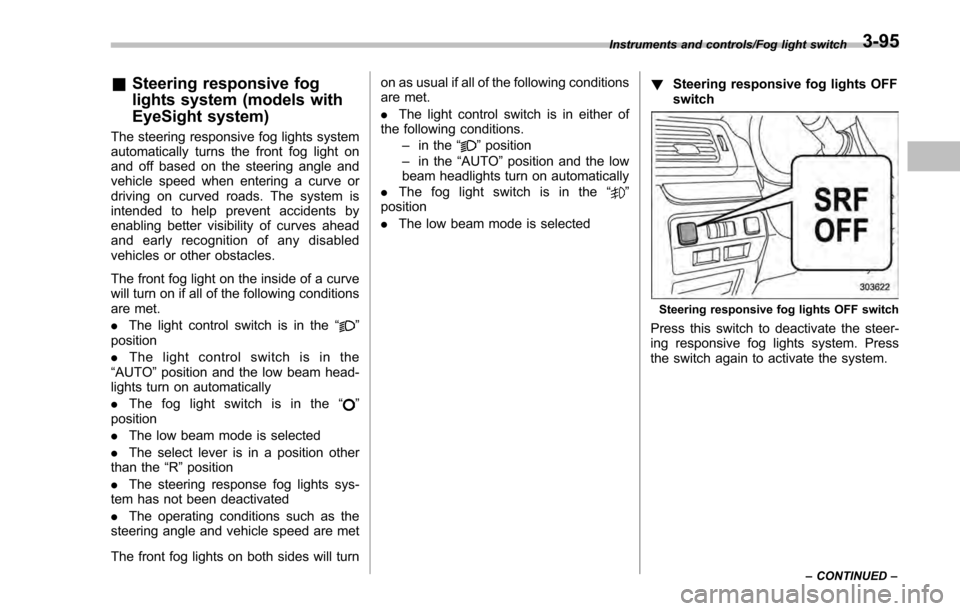
. The low beam mode is selected !
Steering responsive fog lights OFF
switch
Steering responsive fog lights OFF switch
Press this switch to deactivate the steer-
ing responsive fog lights system. Press
the switch again to activate the system.
Instruments and controls/Fog light switch
–CONTINUED –3-95
Page 241 of 594
Instruments and controls/Wiper and washer
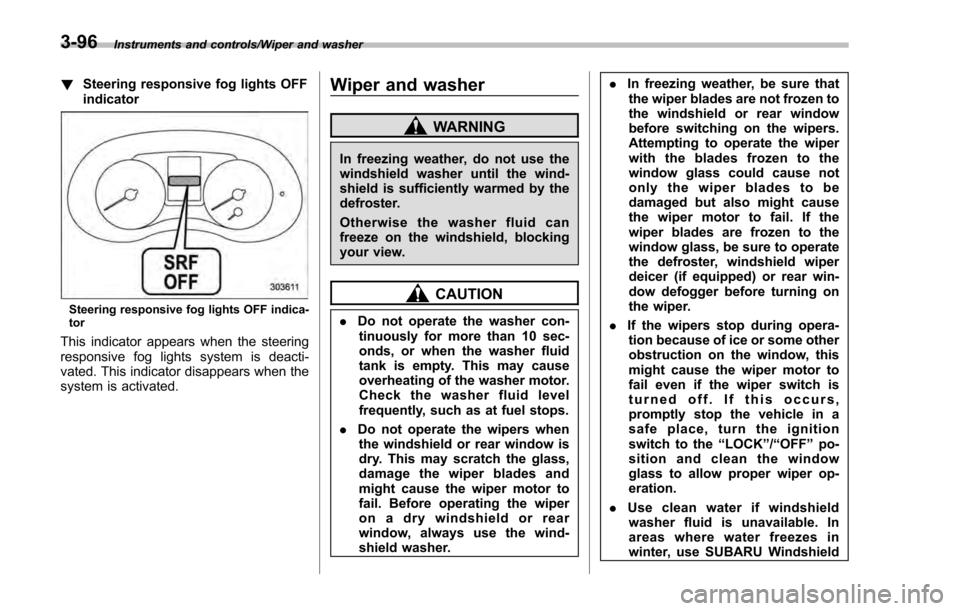
!Steering responsive fog lights OFF
indicator
Steering responsive fog lights OFF indica-
tor
This indicator appears when the steering
responsive fog lights system is deacti-
vated. This indicator disappears when the
system is activated.
Wiper and washer
WARNING
In freezing weather, do not use the
windshield washer until the wind-
shield is sufficiently warmed by the
defroster.
Otherwise the washer fluid can
freeze on the windshield, blocking
your view.
CAUTION
.Do not operate the washer con-
tinuously for more than 10 sec-
onds, or when the washer fluid
tank is empty. This may cause
overheating of the washer motor.
Check the washer fluid level
frequently, such as at fuel stops.
. Do not operate the wipers when
the windshield or rear window is
dry. This may scratch the glass,
damage the wiper blades and
might cause the wiper motor to
fail. Before operating the wiper
on a dry windshield or rear
window, always use the wind-
shield washer. .
In freezing weather, be sure that
the wiper blades are not frozen to
the windshield or rear window
before switching on the wipers.
Attempting to operate the wiper
with the blades frozen to the
window glass could cause not
only the wiper blades to be
damaged but also might cause
the wiper motor to fail. If the
wiper blades are frozen to the
window glass, be sure to operate
the defroster, windshield wiper
deicer (if equipped) or rear win-
dow defogger before turning on
the wiper.
. If the wipers stop during opera-
tion because of ice or some other
obstruction on the window, this
might cause the wiper motor to
fail even if the wiper switch is
turned off. If this occurs,
promptly stop the vehicle in a
safe place, turn the ignition
switch to the “LOCK”/“OFF ”po-
sition and clean the window
glass to allow proper wiper op-
eration.
. Use clean water if windshield
washer fluid is unavailable. In
areas where water freezes in
winter, use SUBARU Windshield
3-96
Page 245 of 594
Instruments and controls/Mirrors
fluid sprays until you release the knob.
To wash the rear window when the rear
wiper is not in use, turn the knob switch
downward to the“
”position. The washer
fluid sprays and the wiper operates until
you release the knob.
NOTE
When the amount of washer fluid is
getting low, the rear washer will run out
of fluid before the windshield washer.
This means that the amount of washer
fluid is low, and it should be added
immediately.
Mirrors
Always check that the inside and outside
mirrors are properly adjusted before you
start driving.
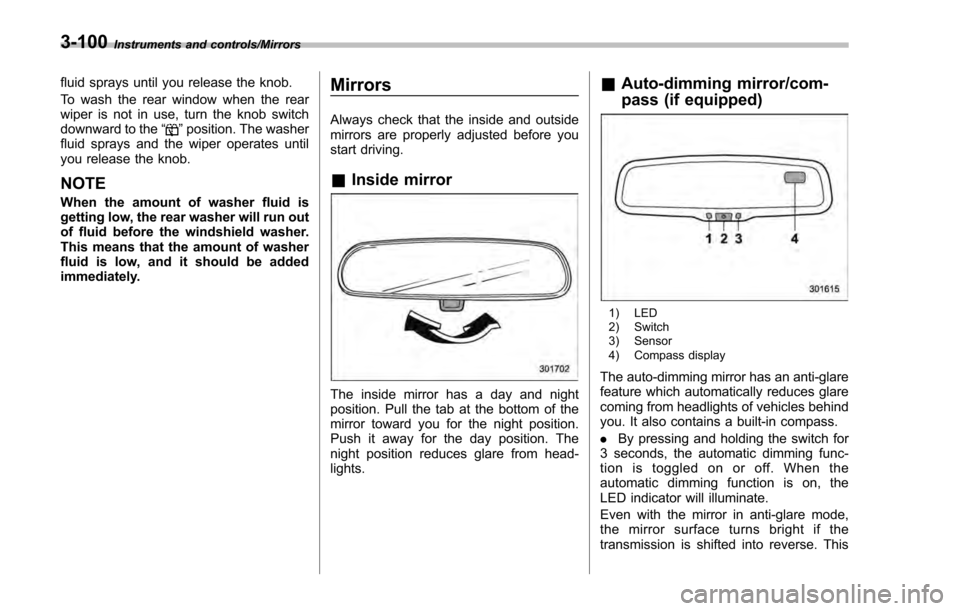
& Inside mirror
The inside mirror has a day and night
position. Pull the tab at the bottom of the
mirror toward you for the night position.
Push it away for the day position. The
night position reduces glare from head-
lights.
&Auto-dimming mirror/com-
pass (if equipped)
1) LED
2) Switch
3) Sensor
4) Compass display
The auto-dimming mirror has an anti-glare
feature which automatically reduces glare
coming from headlights of vehicles behind
you. It also contains a built-in compass.
. By pressing and holding the switch for
3 seconds, the automatic dimming func-
tion is toggled on or off. When the
automatic dimming function is on, the
LED indicator will illuminate.
Even with the mirror in anti-glare mode,
the mirror surface turns bright if the
transmission is shifted into reverse. This
3-100
Page 246 of 594
is to ensure good rearward visibility during
reversing.
.By pressing and releasing the switch
for less than 3 seconds, the compass
display is toggled on or off. When the
compass is on, an illuminated compass
reading will appear in the upper right
corner of the mirror.
When cleaning the mirror, use a paper
towel or similar material dampened with
glass cleaner. Do not spray glass cleaner
directly on the mirror as that may cause
theliquidcleanertoenterthemirror
housing and damage the mirror.
! Photosensors
The mirror has a photosensor attached on
the front and back sides. During nighttime
driving, these sensors detect distracting glare from vehicle headlights behind you
and automatically dim the mirror to elim-
inate glare and preserve your vision. For
this reason, use care not to cover the
sensors with stickers, or other similar
items. Periodically wipe the sensors clean
using a piece of dry soft cotton cloth or an
applicator.
!
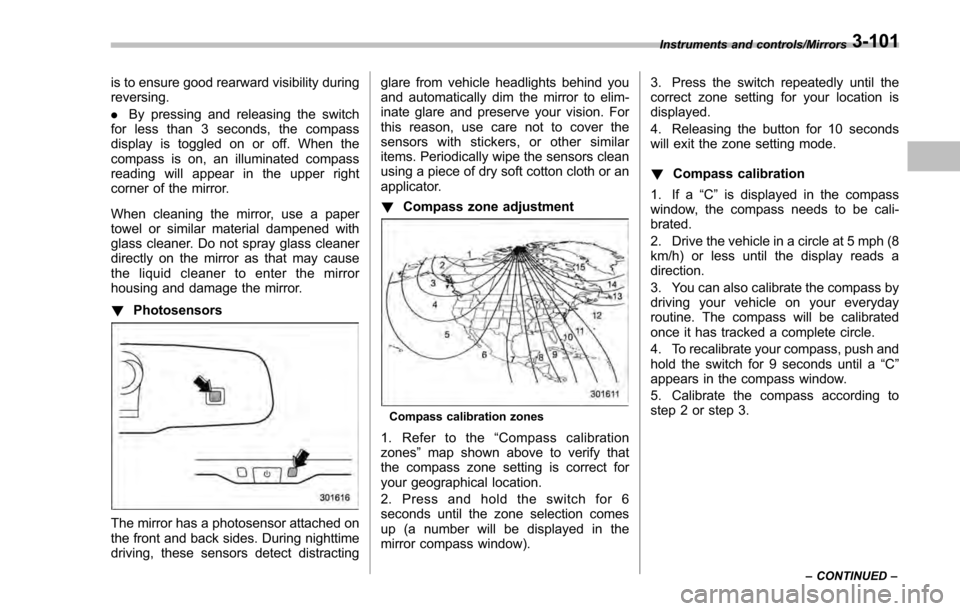
Compass zone adjustment
Compass calibration zones
1. Refer to the “Compass calibration
zones” map shown above to verify that
the compass zone setting is correct for
your geographical location.
2. Press and hold the switch for 6
seconds until the zone selection comes
up (a number will be displayed in the
mirror compass window). 3. Press the switch repeatedly until the
correct zone setting for your location is
displayed.
4. Releasing the button for 10 seconds
will exit the zone setting mode.
!
Compass calibration
1. If a “C”is displayed in the compass
window, the compass needs to be cali-
brated.
2. Drive the vehicle in a circle at 5 mph (8
km/h) or less until the display reads a
direction.
3. You can also calibrate the compass by
driving your vehicle on your everyday
routine. The compass will be calibrated
once it has tracked a complete circle.
4. To recalibrate your compass, push and
hold the switch for 9 seconds until a “C”
appears in the compass window.
5. Calibrate the compass according to
step 2 or step 3.
Instruments and controls/Mirrors
–CONTINUED –3-101
Page 247 of 594
Instruments and controls/Mirrors
&Auto-dimming mirror/com-
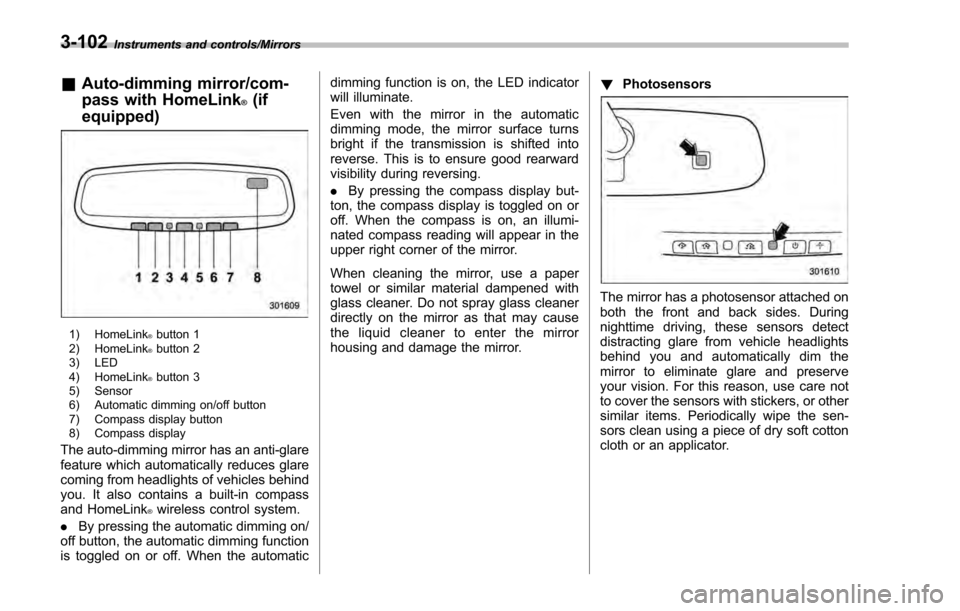
pass with HomeLink
®(if
equipped)
1) HomeLink®button 1
2) HomeLink®button 2
3) LED
4) HomeLink
®button 3
5) Sensor
6) Automatic dimming on/off button
7) Compass display button
8) Compass display
The auto-dimming mirror has an anti-glare
feature which automatically reduces glare
coming from headlights of vehicles behind
you. It also contains a built-in compass
and HomeLink
®wireless control system.
. By pressing the automatic dimming on/
off button, the automatic dimming function
is toggled on or off. When the automatic dimming function is on, the LED indicator
will illuminate.
Even with the mirror in the automatic
dimming mode, the mirror surface turns
bright if the transmission is shifted into
reverse. This is to ensure good rearward
visibility during reversing.
.
By pressing the compass display but-
ton, the compass display is toggled on or
off. When the compass is on, an illumi-
nated compass reading will appear in the
upper right corner of the mirror.
When cleaning the mirror, use a paper
towel or similar material dampened with
glass cleaner. Do not spray glass cleaner
directly on the mirror as that may cause
the liquid cleaner to enter the mirror
housing and damage the mirror. !
Photosensors
The mirror has a photosensor attached on
both the front and back sides. During
nighttime driving, these sensors detect
distracting glare from vehicle headlights
behind you and automatically dim the
mirror to eliminate glare and preserve
your vision. For this reason, use care not
to cover the sensors with stickers, or other
similar items. Periodically wipe the sen-
sors clean using a piece of dry soft cotton
cloth or an applicator.
3-102
Page 366 of 594

Interior lights....................................................... 6-2Dome light.......................................................... 6-2
Cargo area light (5-door models) ......................... 6-2
Map lights ........................................................... 6-3
OFF delay timer .................................................. 6-3
Sun visors........................................................... 6-4Sun visor extension plate (models with the
EyeSight system) .............................................. 6-4
Vanity mirror ....................................................... 6-5
Storage compartment ......................................... 6-5Glove box........................................................... 6-6
Center console .................................................... 6-6
Cup holders......................................................... 6-7
Bottle holders ...................................................... 6-7
Accessory power outlets .................................... 6-8
Use with a cigarette lighter (dealer option) ........... 6-9
Ashtray (dealer option)...................................... 6-10 Floor mat (if equipped)
...................................... 6-11
Coat hook ........................................................... 6-11
Shopping bag hook (5-door) ............................. 6-12
Cargo area cover (5-door –if equipped) .......... 6-12
Using the cover ................................................. 6-12
To remove the cover housing ... .......................... 6-13
Stowage of the cargo area cover ........................ 6-13
To install the cover housing ............................... 6-14
Cargo tie-down hooks (5-door –if
equipped) ........................................................ 6-14
Under-floor storage compartment (if equipped) ........................................................ 6-15
Rear view camera .............................................. 6-15
How to use the rear view camera ....................... 6-17
Viewing range on the screen .............................. 6-17
Help line ............................................................ 6-18
Interior equipment
6
Page 367 of 594
Interior equipment/Interior lights
Interior lights
CAUTION
When leaving your vehicle, make
sure the lights are turned off to
avoid battery discharge.
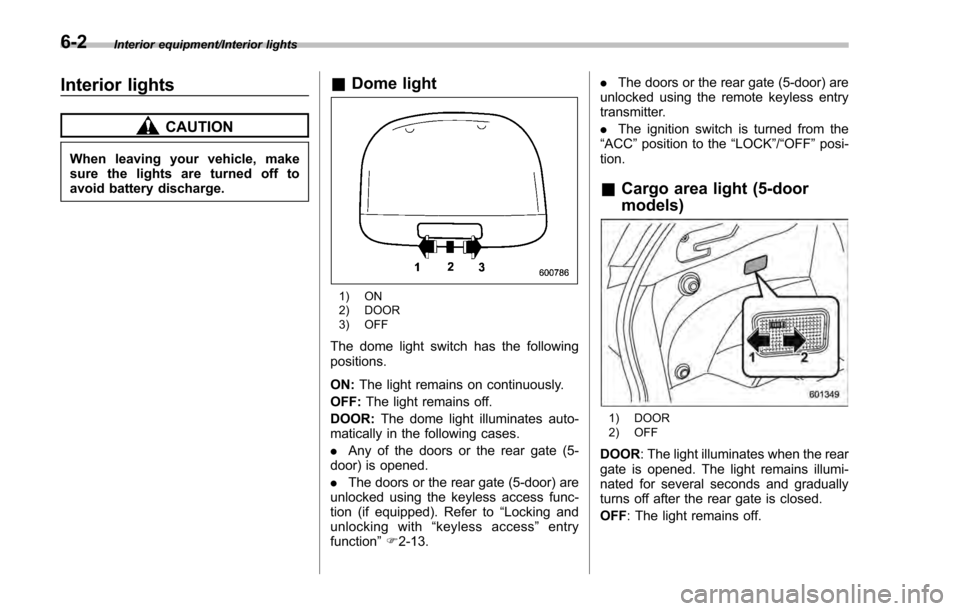
&Dome light
1) ON
2) DOOR
3) OFF
The dome light switch has the following
positions.
ON: The light remains on continuously.
OFF: The light remains off.
DOOR: The dome light illuminates auto-
matically in the following cases.
. Any of the doors or the rear gate (5-
door) is opened.
. The doors or the rear gate (5-door) are
unlocked using the keyless access func-
tion (if equipped). Refer to “Locking and
unlocking with “keyless access” entry
function ”F 2-13. .
The doors or the rear gate (5-door) are
unlocked using the remote keyless entry
transmitter.
. The ignition switch is turned from the
“ ACC ”position to the “LOCK”/ “OFF”posi-
tion.
& Cargo area light (5-door
models)
1) DOOR
2) OFF
DOOR : The light illuminates when the rear
gate is opened. The light remains illumi-
nated for several seconds and gradually
turns off after the rear gate is closed.
OFF : The light remains off.
6-2