2016 SUBARU IMPREZA transmission
[x] Cancel search: transmissionPage 8 of 594

&Abbreviation list
You may find several abbreviations in this
manual. The meanings of the abbrevia-
tions are shown in the following list.
Abbreviation Meaning
A/C Air conditioner
ALR/ELR Automatic locking retractor/
Emergency locking retractor
ABS Anti-lock brake system
AKI Anti knock index
ALR Automatic locking retractor
AWD All-wheel drive
BSD/RCTA Blind Spot Detection/Rear
Cross Traffic Alert
CVT Continuously variable trans-
mission
DRL Daytime running light
EBD Electronic brake force distri-
bution
ELR Emergency locking retractor
GAW Gross axle weight
GAWR Gross axle weight rating
GPS Global positioning system
GVW Gross vehicle weight
GVWR Gross vehicle weight rating
HID High intensity discharge Abbreviation
Meaning
INT Intermittent
LATCH Lower anchors and tethers for
children
LED Light emitting diode
MIL Malfunction indicator light
MMT Methylcyclopentadienyl man-
ganese tricarbonyl
MT Manual transmission
OBD On-board diagnostics
RON Research octane number
SRF Steering responsive fog lights
system
SRS Supplemental restraint sys-
tem
TIN Tire identification number
TPMS Tire pressure monitoring sys-
tem
Vehicle symbols
There are some of the symbols you may
see on your vehicle.
For warning and indicator lights, refer to
“
Warning and indicator lights ”F 22.
Mark Name
WARNING
CAUTION
Read these instructions care-
fully
Wear eye protection
Battery fluid contains sulfuric
acid
Keep children away
Keep flames away
Prevent explosions
3
Page 113 of 594

Keys and doors/Keyless access with push–button start system
– Do not wash the access key in
an ultrasonic washer.
– Do not leave the access key in
humid or dusty locations.
Doing so may cause malfunc-
tions.
– Do not leave the access key
near personal computers or
home electric appliances.
Doing so may cause the ac-
cess key to malfunction, re-
sulting in battery discharge.
. If the access key is dropped, the
integrated mechanical key inside
may become loose. Be careful
not to lose the mechanical key.
. When you carry the access key
on an airplane, do not press the
button of the access key while in
the airplane. When any button of
the access key is pressed, radio
waves are sent and may affect
the operation of the airplane.
When you carry the access key
in a bag on an airplane, take
measures to prevent the buttons
of the access key from being
pressed.NOTE
. The operational/non-operational
setting for the keyless access function
can be changed. For the setting proce-
dure, refer to “Disabling keyless ac-
cess function” F2-18. The setting can
also be changed by a SUBARU dealer.
For more details, contact a SUBARU
dealer.
. For detailed information about the
operation method for the push-button
ignition switch while the keyless ac-
cess function is switched to the non-
operational mode, refer to “Access key
– if access key does not operate
properly ”F 9-18.
. The keyless access with push-but-
ton start system uses weak radio
waves. The status of the access key
and environmental conditions may in-
terfere with the communication be-
tween the access key and the vehicle
under the following conditions, and it
may not be possible to lock or unlock
the doors or start the engine.
–When operating near a facility
where strong radio waves are trans-
mitted, such as a broadcast station
and power transmission lines
– When products that transmit
radio waves are used, such as an
access key or a remote transmitter key of another vehicle
–
When carrying more than one
access key
– When the access key is placed
near wireless communication
equipment such as a cell phone
– When the access key is placed
near a metallic object
– When metallic accessories are
attached to the access key
– When carrying the access key
with electronic appliances such as
a laptop computer
– When the battery of the access
key is discharged
. The access key is always commu-
nicating with the vehicle and is con-
tinuously using the battery. Although
the life of the battery varies depending
on the operating conditions, it is ap-
proximately 1 to 2 years. If the battery
becomes fully discharged, replace it
with a new one.
. If an access key is lost, it is
recommended that all of the remaining
access keys be reregistered. For rere-
gistration of an access key, contact a
SUBARU dealer.
. For a spare access key, contact a
SUBARU dealer.
. Up to 7 access keys can be regis-
tered for one vehicle.
2-12
Page 157 of 594

Instruments and controls/Meters and gauges
ving. The engine will resume run-
ning normally after the engine speed
is reduced below the red zone.
NOTE
To protect the engine/transmission
while the select lever is in the“P ” or
“N ”position (for CVT models) or the
shift lever is in the neutral position (for
MT models), the engine is controlled so
that the engine speed may not become
too high even if the accelerator pedal is
pressed hard.
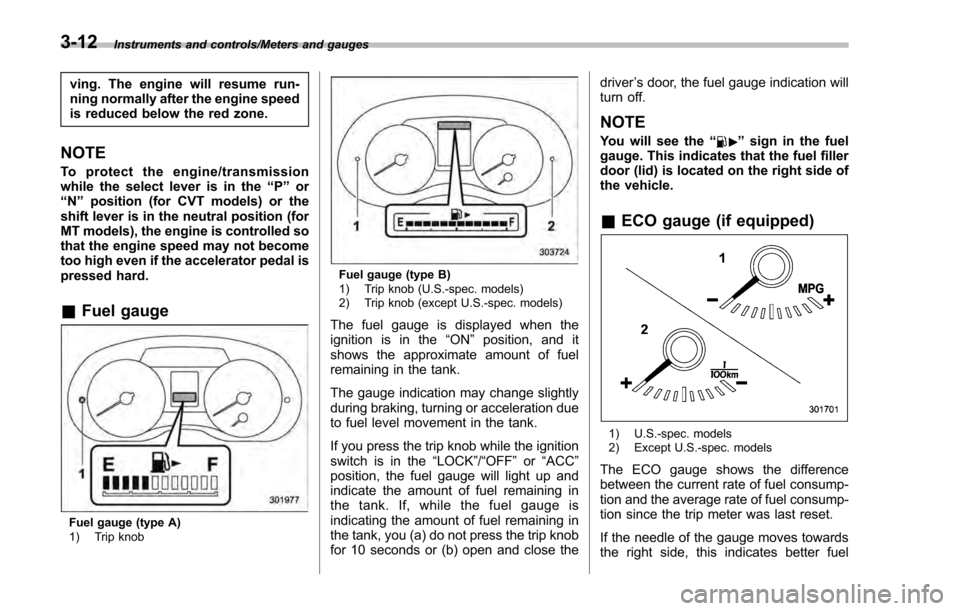
& Fuel gauge
Fuel gauge (type A)
1) Trip knob
Fuel gauge (type B)
1) Trip knob (U.S.-spec. models)
2) Trip knob (except U.S.-spec. models)
The fuel gauge is displayed when the
ignition is in the “ON”position, and it
shows the approximate amount of fuel
remaining in the tank.
The gauge indication may change slightly
during braking, turning or acceleration due
to fuel level movement in the tank.
If you press the trip knob while the ignition
switch is in the “LOCK”/ “OFF”or “ACC ”
position, the fuel gauge will light up and
indicate the amount of fuel remaining in
the tank. If, while the fuel gauge is
indicating the amount of fuel remaining in
the tank, you (a) do not press the trip knob
for 10 seconds or (b) open and close the driver
’s door, the fuel gauge indication will
turn off.
NOTE
You will see the “”sign in the fuel
gauge. This indicates that the fuel filler
door (lid) is located on the right side of
the vehicle.
& ECO gauge (if equipped)
1) U.S.-spec. models
2) Except U.S.-spec. models
The ECO gauge shows the difference
between the current rate of fuel consump-
tion and the average rate of fuel consump-
tion since the trip meter was last reset.
If the needle of the gauge moves towards
the right side, this indicates better fuel
3-12
Page 164 of 594

NOTE
.After replacing or adding the engine
oil, if the engine oil level is within the
normal range when restarting the en-
gine on a level surface, the warning
light will turn off.
. The warning light may illuminate
temporarily in the following conditions
because a low oil level may be detected
as a result of significant oil movement
in the engine.
–when the vehicle is considerably
inclined on an uphill or steep slope
– when the vehicle has continu-
ously accelerated and decelerated
– when the vehicle is continuously
turned
– when the vehicle is driven on a
road that alternates continuously
between uphill and downhill
&Windshield washer
fluid warning light
This light illuminates when the fluid level in
the windshield washer fluid tank de-
creases to the lower limit (approximately
1.1 US qt, 1.0 liter, 0.9 Imp qt).
&AT OIL TEMP warning
light (CVT models)
If this light illuminates when the engine is
running, it may indicate that the transmis-
sion fluid temperature is too hot.
If the light illuminates while driving, im-
mediately stop the vehicle in a safe place
and let the engine idle until the warning
light turns off.
! Transmission control system warn-
ing
If the “AT OIL TEMP ”warning light flashes
after the engine has started, it may
indicate that the transmission control
system is not working properly. Contact
your nearest SUBARU dealer for service
immediately.
&Low tire pressure
warning light (U.S.-spec.
models)
When the ignition switch is turned to the
“ON ”position, the low tire pressure warn-
ing light will illuminate for approximately 2
seconds to check that the tire pressure
monitoring system (TPMS) is functioning
properly. If there is no problem and all tires
are properly inflated, the light will turn off.
Each tire, including the spare (if provided), should be checked monthly when cold
and inflated to the inflation pressure
recommended by the vehicle manufac-
turer on the vehicle placard or tire inflation
pressure label. (If your vehicle has tires of
a different size than the size indicated on
the vehicle placard or tire inflation pres-
sure label, you should determine the
proper tire inflation pressure for those
tires.)
As an added safety feature, your vehicle
has been equipped with a tire pressure
monitoring system (TPMS) that illuminates
a low tire pressure telltale when one or
more of your tires is significantly under-
inflated. Accordingly, when the low tire
pressure telltale illuminates, you should
stop and check your tires as soon as
possible, and inflate them to the proper
pressure. Driving on a significantly under-
inflated tire causes the tire to overheat and
can lead to tire failure. Under-inflation also
reduces fuel efficiency and tire tread life,
and may affect the vehicle
’s handling and
stopping ability.
Please note that the TPMS is not a
substitute for proper tire maintenance,
and it is the driver ’s responsibility to
maintain correct tire pressure, even if
under-inflation has not reached the level
to trigger illumination of the TPMS low tire
pressure telltale.
Instruments and controls/Warning and indicator lights
–CONTINUED –3-19
Page 176 of 594

Type B
1) Upshift indicator
2) Downshift indicator
3) Select lever/gear position indicator
This indicator shows the position of the
select lever.
For models with manual mode, when the
manual mode is selected, the gear posi-
tion indicator (which shows the current
gear selection) and the upshift/downshift
indicator light up. Refer to“Continuously
variable transmission ”F 7-23.
&Turn signal indicator
lights
These lights show the operation of the turn
signal or lane change signal.
If the indicator lights do not blink or blink rapidly, the turn signal bulb may be burned
out. Replace the bulb as soon as possible.
Refer to
“Replacing bulbs ”F 11-36.
&High beam indicator
light
This light shows that the headlights are in
the high beam mode.
This indicator light also illuminates when
the headlight flasher is operated.
&Cruise control indica-
tor light (if equipped)
This light illuminates when the cruise
control main button is pressed to activate
the cruise control function. For details,
refer to “To set cruise control” F7-45.
CAUTION
If the CHECK ENGINE warning light/
malfunction indicator light illumi-
nates, the cruise control indicator
light flashes at the same time. At
this time, avoid driving at high
speed and have your vehicle in-
spected at a SUBARU dealer as
soon as possible.
&Cruise control set in-
dicator light (if
equipped)
This light illuminates when vehicle speed
has been set to use the cruise control
function. Refer to “To set cruise control ”
F 7-45.
&Automatic headlight
beam leveler warning
light (models with HID
headlights)
This light illuminates when the automatic
headlight beam leveler does not operate
normally.
If this light illuminates while driving or does
not turn off approximately 3 seconds after
turning the ignition switch to the “ON”
position, have your vehicle inspected at
your SUBARU dealer.
&Front fog light indicator
light (if equipped)
This indicator light illuminates while the
front fog lights are illuminated.
Instruments and controls/Warning and indicator lights
–CONTINUED –3-31
Page 245 of 594

Instruments and controls/Mirrors
fluid sprays until you release the knob.
To wash the rear window when the rear
wiper is not in use, turn the knob switch
downward to the“
”position. The washer
fluid sprays and the wiper operates until
you release the knob.
NOTE
When the amount of washer fluid is
getting low, the rear washer will run out
of fluid before the windshield washer.
This means that the amount of washer
fluid is low, and it should be added
immediately.
Mirrors
Always check that the inside and outside
mirrors are properly adjusted before you
start driving.
& Inside mirror
The inside mirror has a day and night
position. Pull the tab at the bottom of the
mirror toward you for the night position.
Push it away for the day position. The
night position reduces glare from head-
lights.
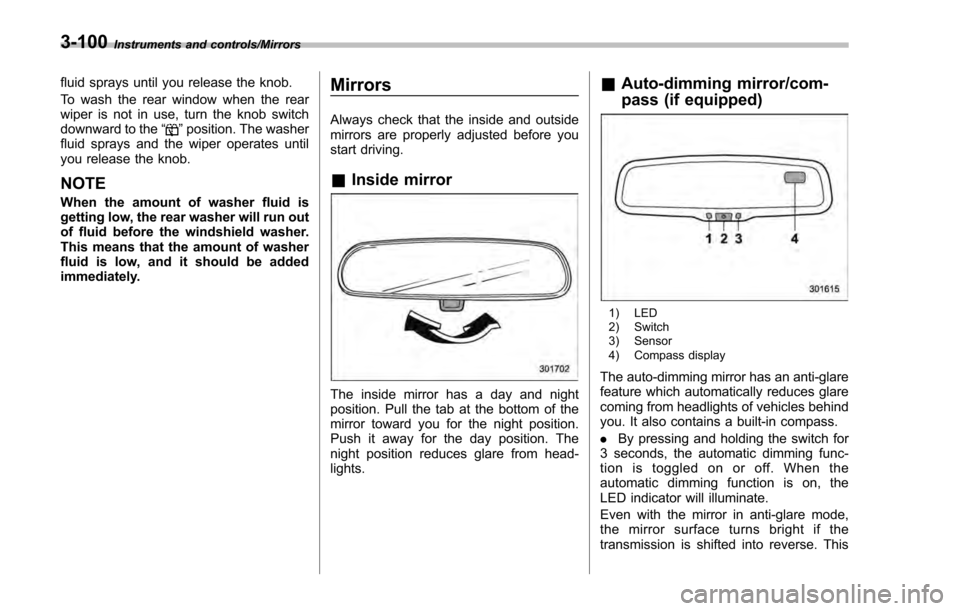
&Auto-dimming mirror/com-
pass (if equipped)
1) LED
2) Switch
3) Sensor
4) Compass display
The auto-dimming mirror has an anti-glare
feature which automatically reduces glare
coming from headlights of vehicles behind
you. It also contains a built-in compass.
. By pressing and holding the switch for
3 seconds, the automatic dimming func-
tion is toggled on or off. When the
automatic dimming function is on, the
LED indicator will illuminate.
Even with the mirror in anti-glare mode,
the mirror surface turns bright if the
transmission is shifted into reverse. This
3-100
Page 247 of 594

Instruments and controls/Mirrors
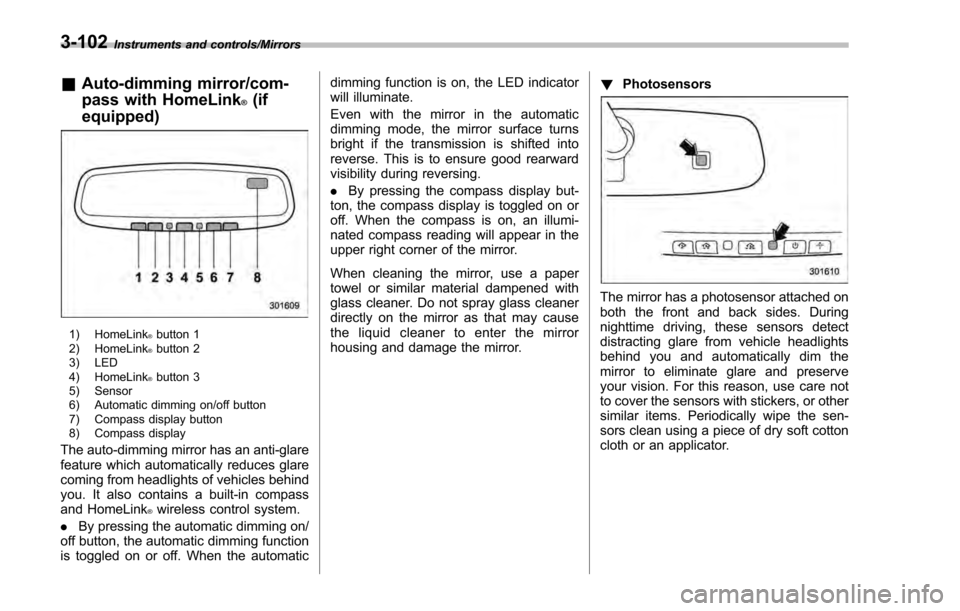
&Auto-dimming mirror/com-
pass with HomeLink
®(if
equipped)
1) HomeLink®button 1
2) HomeLink®button 2
3) LED
4) HomeLink
®button 3
5) Sensor
6) Automatic dimming on/off button
7) Compass display button
8) Compass display
The auto-dimming mirror has an anti-glare
feature which automatically reduces glare
coming from headlights of vehicles behind
you. It also contains a built-in compass
and HomeLink
®wireless control system.
. By pressing the automatic dimming on/
off button, the automatic dimming function
is toggled on or off. When the automatic dimming function is on, the LED indicator
will illuminate.
Even with the mirror in the automatic
dimming mode, the mirror surface turns
bright if the transmission is shifted into
reverse. This is to ensure good rearward
visibility during reversing.
.
By pressing the compass display but-
ton, the compass display is toggled on or
off. When the compass is on, an illumi-
nated compass reading will appear in the
upper right corner of the mirror.
When cleaning the mirror, use a paper
towel or similar material dampened with
glass cleaner. Do not spray glass cleaner
directly on the mirror as that may cause
the liquid cleaner to enter the mirror
housing and damage the mirror. !
Photosensors
The mirror has a photosensor attached on
both the front and back sides. During
nighttime driving, these sensors detect
distracting glare from vehicle headlights
behind you and automatically dim the
mirror to eliminate glare and preserve
your vision. For this reason, use care not
to cover the sensors with stickers, or other
similar items. Periodically wipe the sen-
sors clean using a piece of dry soft cotton
cloth or an applicator.
3-102
Page 306 of 594

!Troubleshooting guide
Experience CauseAction
Mismatch of time alignment - a user may hear
a short period of programming replayed or an
echo, stutter or skip. The radio stations analog and digital volume is
not properly aligned or the station is in ballgame
mode.
None, radio broadcast issue. A user can contact
the radio station.
Sound fades, blending in and out. Radio is shifting between analog and digital
audio. Reception issue. May clear-up as the vehicle
continues to be driven. Turning the indicator of the
HD Radio
TMoff will change the radio mode to
analog audio.
Audio mute condition when an HD2/HD3
multicast channel had been playing. The radio does not have access to digital
signals at the moment. This is normal behavior, wait until the digital signal
returns. If out of the coverage area, seek a new
station.
Audio mute delay when selecting an HD2/
HD3 multicast channel preset. The digital multicast content is not available until
HD Radio
TMbroadcast can be decoded and
make the audio available. This takes up to 7
seconds. This is normal behavior, wait for the audio to
become available.
Text information does not match the present
song audio. Data service issue by the radio broadcaster. Broadcaster should be notified. Complete the form;
www.ibiquity.com/automotive/report_radio
_station_experiences.
No text information shown for the present
selected frequency. Data service issue by the radio broadcaster. Broadcaster should be notified. Complete the form;
www.ibiquity.com/automotive/report_radio
_station_experiences.
The “Acquiring ”caution message appears
when the system attempts to acquire digital
transmission. When acquiring digital data while receiving a
digital broadcast and SPS station. .
When the reception in digital of the SPS station
is confirmed.
. When the system determined that the SPS
station could not be received.
. When the SPS broadcast is ended (stopped) by
the radio station while receiving SPS. Audio/Audio set
–CONTINUED –
5-35