2016 SUBARU IMPREZA rear view mirror
[x] Cancel search: rear view mirrorPage 72 of 594
SRS side airbag deployment.
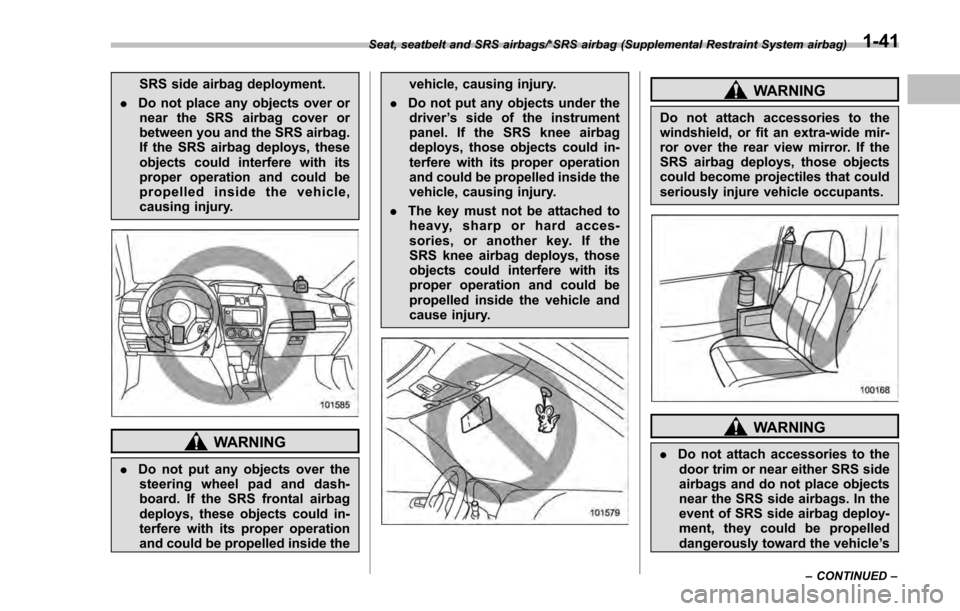
. Do not place any objects over or
near the SRS airbag cover or
between you and the SRS airbag.
If the SRS airbag deploys, these
objects could interfere with its
proper operation and could be
propelled inside the vehicle,
causing injury.
WARNING
. Do not put any objects over the
steering wheel pad and dash-
board. If the SRS frontal airbag
deploys, these objects could in-
terfere with its proper operation
and could be propelled inside the vehicle, causing injury.
. Do not put any objects under the
driver ’s side of the instrument
panel. If the SRS knee airbag
deploys, those objects could in-
terfere with its proper operation
and could be propelled inside the
vehicle, causing injury.
. The key must not be attached to
heavy, sharp or hard acces-
sories, or another key. If the
SRS knee airbag deploys, those
objects could interfere with its
proper operation and could be
propelled inside the vehicle and
cause injury.
WARNING
Do not attach accessories to the
windshield, or fit an extra-wide mir-
ror over the rear view mirror. If the
SRS airbag deploys, those objects
could become projectiles that could
seriously injure vehicle occupants.
WARNING
. Do not attach accessories to the
door trim or near either SRS side
airbags and do not place objects
near the SRS side airbags. In the
event of SRS side airbag deploy-
ment, they could be propelled
dangerously toward the vehicle ’s
Seat, seatbelt and SRS airbags/*SRS airbag (Supplemental Restraint System airbag)
–CONTINUED –1-41
Page 253 of 594
Instruments and controls/Defogger and deicer
&Outside mirrors
! Convex mirror (passenger side)
WARNING
Objects look smaller in a convex
mirror and farther away than when
viewed in a flat mirror. Do not use
the convex mirror to judge the
distance of vehicles behind you
when changing lanes. Use the inside
mirror (or glance backwards) to
determine the actual size and dis-
tance of objects that you view in
convex mirror. !
Remote control mirror switch
: Select side to adjust
: Direction control
The remote control mirrors operate only
when the ignition switch is in the “ON”or
“ACC ”position.
1. Turn the control switch to the side that
you want to adjust. “L”is for the left mirror,
“R ”is for the right mirror.
2. Move the control switch in the direction
you want to move the mirror.
3. Return the control switch to the neutral
position to prevent unintentional opera-
tion.
The mirrors can also be adjusted manu-
ally.
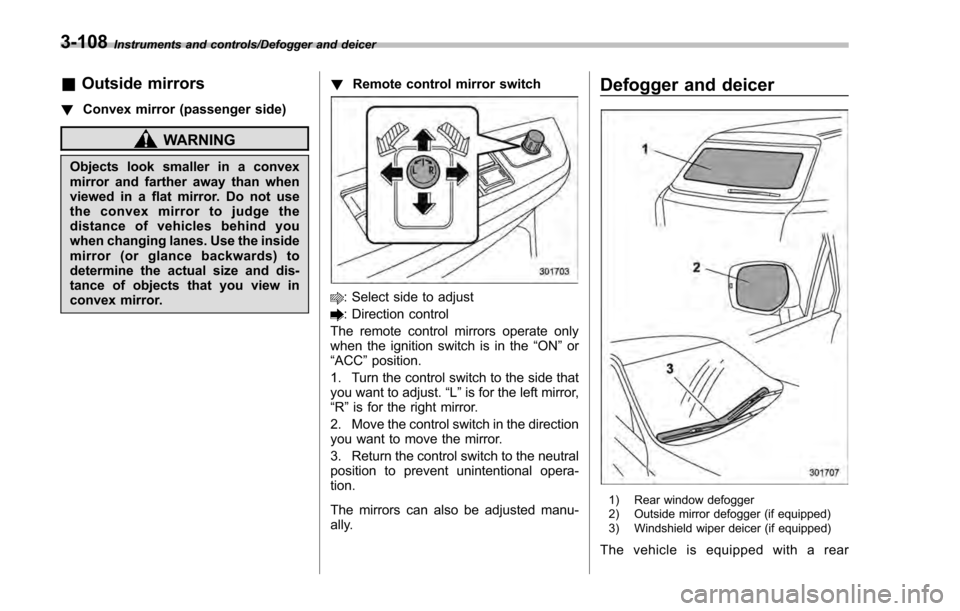
Defogger and deicer
1) Rear window defogger
2) Outside mirror defogger (if equipped)
3) Windshield wiper deicer (if equipped)
The vehicle is equipped with a rear
3-108
Page 366 of 594
Interior lights....................................................... 6-2Dome light.......................................................... 6-2
Cargo area light (5-door models) ......................... 6-2
Map lights ........................................................... 6-3
OFF delay timer .................................................. 6-3
Sun visors........................................................... 6-4Sun visor extension plate (models with the
EyeSight system) .............................................. 6-4
Vanity mirror ....................................................... 6-5
Storage compartment ......................................... 6-5Glove box........................................................... 6-6
Center console .................................................... 6-6
Cup holders......................................................... 6-7
Bottle holders ...................................................... 6-7
Accessory power outlets .................................... 6-8
Use with a cigarette lighter (dealer option) ........... 6-9
Ashtray (dealer option)...................................... 6-10 Floor mat (if equipped)
...................................... 6-11
Coat hook ........................................................... 6-11
Shopping bag hook (5-door) ............................. 6-12
Cargo area cover (5-door –if equipped) .......... 6-12
Using the cover ................................................. 6-12
To remove the cover housing ... .......................... 6-13
Stowage of the cargo area cover ........................ 6-13
To install the cover housing ............................... 6-14
Cargo tie-down hooks (5-door –if
equipped) ........................................................ 6-14
Under-floor storage compartment (if equipped) ........................................................ 6-15
Rear view camera .............................................. 6-15
How to use the rear view camera ....................... 6-17
Viewing range on the screen .............................. 6-17
Help line ............................................................ 6-18
Interior equipment
6
Page 370 of 594
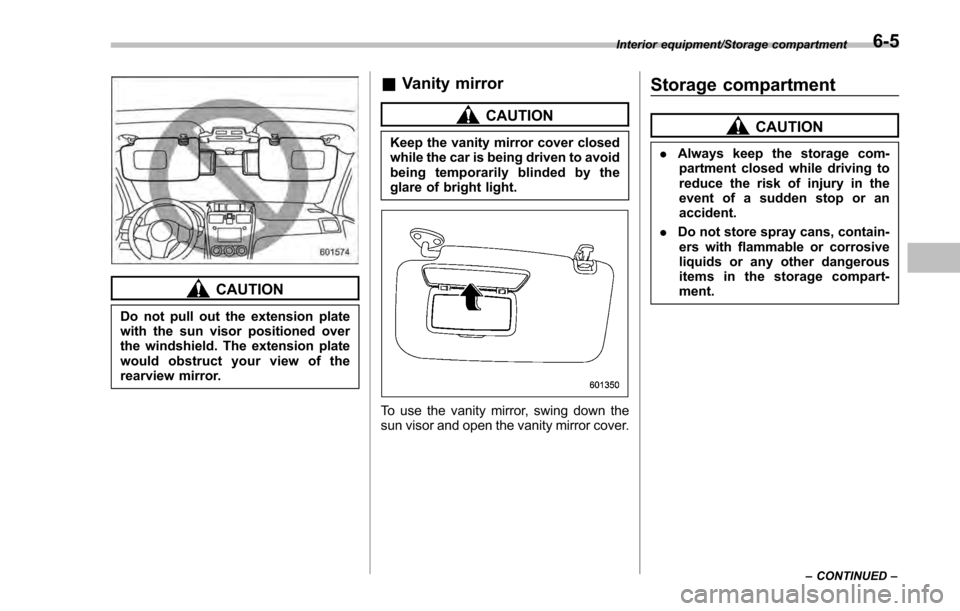
CAUTION
Do not pull out the extension plate
with the sun visor positioned over
the windshield. The extension plate
would obstruct your view of the
rearview mirror.
&Vanity mirror
CAUTION
Keep the vanity mirror cover closed
while the car is being driven to avoid
being temporarily blinded by the
glare of bright light.
To use the vanity mirror, swing down the
sun visor and open the vanity mirror cover.
Storage compartment
CAUTION
. Always keep the storage com-
partment closed while driving to
reduce the risk of injury in the
event of a sudden stop or an
accident.
. Do not store spray cans, contain-
ers with flammable or corrosive
liquids or any other dangerous
items in the storage compart-
ment.
Interior equipment/Storage compartment
–CONTINUED –6-5
Page 381 of 594
Interior equipment/Rear view camera
.Since the range of the image on
the monitor is limited, you should
always check the rear view and
the surrounding area with your
eyes and mirrors, and move
backward at a slow speed. Mov-
ing backward only by checking
the rear view image from the
camera could cause an accident.
. Do not disassemble or modify the
camera, switch or wiring. If
smoke comes out or you smell
a strange odor, stop using the
rear view camera immediately.
Contact your SUBARU dealer
for an inspection. Continued use
may result in accident, fire or
electric shock.
CAUTION
. If your vehicle is washed with a
high-pressure washer, do not
allow water to contact the camera
directly. Entry of water in the
camera lens may result in con-
densation, malfunction, fire or
electric shock.
. Since the camera is a precision
device, do not subject it to strong
impacts. Otherwise, malfunction, fire or electric shock may occur.
. If mud or snow sticks to or is
frozen on the camera, you must
be very careful when removing it.
Otherwise, damage to the camera
may cause a fire or electric
shock. Pour water or lukewarm
water over the camera to remove
mud and ice, and wipe it with a
soft, dry cloth.
. Do not put a flame close to the
camera or wiring. Otherwise, da-
mage or fire may occur.
. When replacing the fuse, be sure
to use a fuse with the specified
rating. Use of a fuse with a
different rating may result in a
malfunction.
. If the rear view camera is used for
a long time while the engine is
not operated, the battery may
become completely discharged.
NOTE
. Do not wipe the camera with alcohol,
benzine or paint thinner. Otherwise,
discoloration may occur. To remove
contamination, wipe the camera with a
cloth moistened with a diluted neutral
detergent and then wipe it with a soft, dry cloth.
.
When waxing the vehicle, be careful
not to apply the wax to the camera. If it
comes in contact with the camera,
moisten a clean cloth with a diluted
neutral detergent to remove the wax.
. The camera lens has a hard coating
to help prevent scratches. However,
when washing the vehicle or cleaning
the camera lens, be careful not to
scratch the camera lens. Do not use a
washing brush directly on the camera
lens. The image quality of the rear view
camera may deteriorate.
. Strong light shined on the camera
lens may develop vertical lines around
the light source. This is not a malfunc-
tion.
. Under fluorescent light, the display
may flicker. However, this is not a
malfunction.
. The image of the rear view camera
may be slightly different from the
actual color of the objects.
6-16
Page 382 of 594
&How to use the rear view
camera
When the shift lever/select lever is set to
“R”, the rear view camera automatically
displays the rear view image from the
vehicle. When the lever is set to other
positions, the image before setting to “R”
is displayed.
1. Set the ignition switch to “ON”.
2. Set the shift lever/select lever to “R”.
NOTE
. For models with the genuine
SUBARU navigation system, while the
navigation system is activated, the
image of the rear view camera will not
be displayed. However, the image of
the rear view camera has priority over
other screen displays.
. The image of the rear view camera is
horizontally reversed as is the case
with the vehicle rearview mirror or the
side view mirror.
. It may be difficult to see the image of
the rear view camera in the following
cases. This is not a malfunction of the
camera.
–The vehicle is in a dark place (at
night, in a tunnel, etc.).
– The vehicle is in an extremely hot
or cold place. –
An object (such as raindrops,
snow, dirt, etc.) that disturbs the
view of the rear view camera sticks
to the lens of the camera.
– Strong light shined directly on
the camera lens (occasionally, there
are vertical lines on the screen).
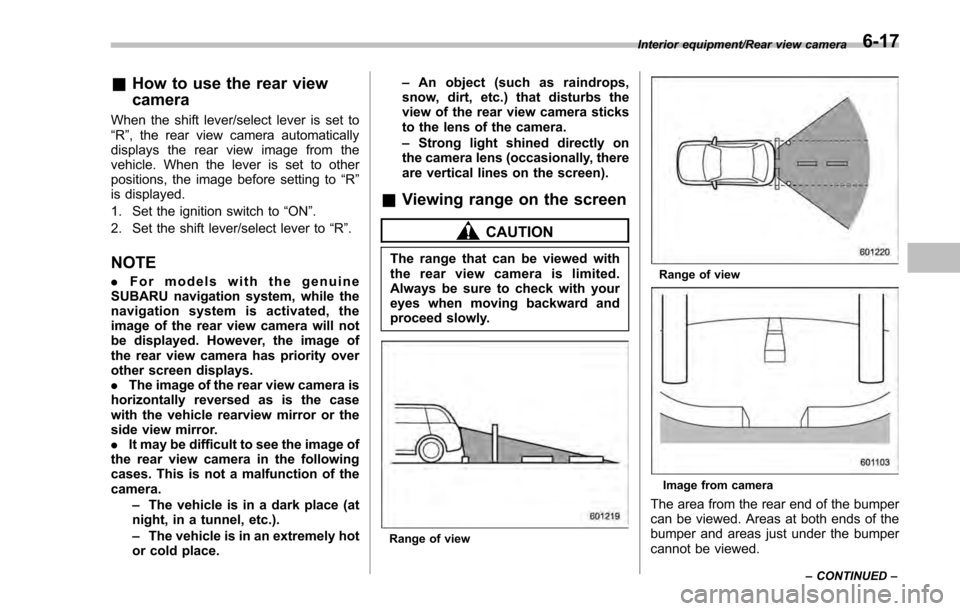
& Viewing range on the screen
CAUTION
The range that can be viewed with
the rear view camera is limited.
Always be sure to check with your
eyes when moving backward and
proceed slowly.
Range of view
Range of view
Image from camera
The area from the rear end of the bumper
can be viewed. Areas at both ends of the
bumper and areas just under the bumper
cannot be viewed.
Interior equipment/Rear view camera
–CONTINUED –6-17
Page 466 of 594
hitch or other trailer towing
equipment.
. Do not use axle-mounted hitches
as they can cause damage to the
axle housing, wheel bearings,
wheels or tires.
Do not use a trailer hitch other than
genuine SUBARU trailer hitch. A genuine
SUBARU hitch is available from your
SUBARU dealer.
& Connecting a trailer
! Trailer brakes
WARNING
.Adequate size trailer brakes are
required when the trailer and its
cargo exceed 1,000 lbs (453 kg)
total weight.
. Do not directly connect your
trailer ’s hydraulic brake system
to the hydraulic brake system in
your vehicle. Direct connection
would cause the vehicle’ s brake
performance to deteriorate and
could lead to an accident.
If your trailer ’s total weight (trailer weight
plus its cargo weight) exceeds 1,000 lbs (453 kg), the trailer is required to be
equipped with its own brake system.
Electric brakes or surge brakes are
recommended, and must be installed
properly. Check that your trailer
’s brakes
conform with Federal, state/province and/
or other applicable regulations. Your
SUBARU ’s brake system is not designed
to be tapped into the trailer ’s hydraulic
brake system. Please ask your SUBARU
dealer and professional trailer supplier for
more information about the trailer ’s brake
system.
! Trailer safety chains
WARNING
Always use safety chains between
your vehicle and the trailer. Towing
trailer without safety chains could
create a traffic safety hazard if the
trailer separates from the hitch due
to coupling damage or hitch ball
damage.
In case the trailer hitch connector or hitch
ball should break or become discon-
nected, the trailer could get loose and
create a traffic safety hazard.
For safety, always connect the towing
vehicle and trailer with trailer safety
chains. Two chains should be used in total, one to the right side and the other to
the left side trailer tongue. Pass the chains
crossing each other under the trailer
tongue to prevent the trailer from dropping
onto the ground in case the trailer tongue
should disconnect from the hitch ball.
Allow sufficient slack in the chains taking
tight turn situations into account; however,
be careful not to let them drag on the
ground.
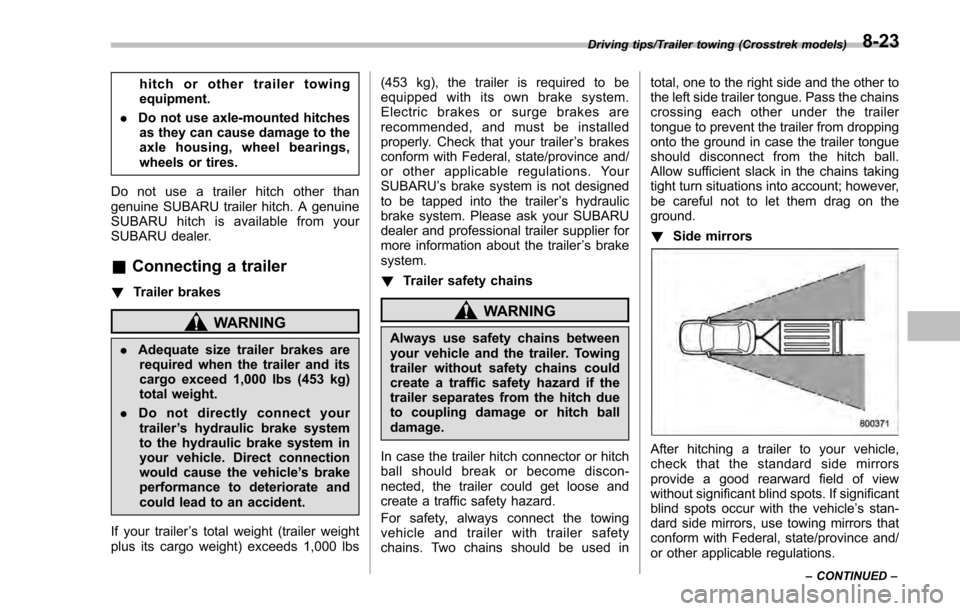
!
Side mirrors
After hitching a trailer to your vehicle,
check that the standard side mirrors
provide a good rearward field of view
without significant blind spots. If significant
blind spots occur with the vehicle’ s stan-
dard side mirrors, use towing mirrors that
conform with Federal, state/province and/
or other applicable regulations.
Driving tips/Trailer towing (Crosstrek models)
–CONTINUED –8-23
Page 468 of 594
is tipped sharply up at the front and down
at the rear, check the total trailer weight,
GVW, GAWs and tongue load again, then
confirm that the load and its distribution
are acceptable.
.Check that the tire rating and pressures
are correct.
. Check that the vehicle and trailer are
connected properly. Confirm that:
–the trailer tongue is connected
properly to the hitch ball.
– the trailer lights connector is con-
nected properly and trailer ’s brake
lights illuminate when the vehicle ’s
brake pedal is pressed, and that the
trailer ’s turn signal lights flash when
the vehicle’ s turn signal lever is oper-
ated.
– the safety chains are connected
properly.
– all cargo in the trailer is secured
safely in position.
– the side mirrors provide a good
rearward field of view without a sig-
nificant blind spot.
. Sufficient time should be taken to learn
the “feel ”of the vehicle/trailer combination
before starting out on a trip. In an area free
of traffic, practice turning, stopping and
backing up. !
Driving with a trailer
. You should allow for considerably more
stopping distance when towing a trailer.
Avoid sudden braking because it may
result in skidding or jackknifing and loss of
control.
. Avoid abrupt starts and sudden accel-
erations. If your vehicle has a manual
transmission, always start out in first gear
and release the clutch at moderate engine
revolution.
. Avoid uneven steering, sharp turns and
rapid lane changes.
. Slow down before turning. Make a
longer than normal turning radius because
the trailer wheels will be closer than the
vehicle wheels to the inside of the turn. In
a tight turn, the trailer could hit your
vehicle.
. Crosswinds will adversely affect the
handling of your vehicle and trailer, caus-
ing sway. Crosswinds can be due to
weather conditions or the passing of large
trucks or buses. If swaying occurs, firmly
grip the steering wheel and promptly begin
decelerating your vehicle at a gradual
pace.
. When passing other vehicles, consid-
erable distance is required because of the
added weight and length caused by
attaching the trailer to your vehicle.
1) Left turn
2) Right turn
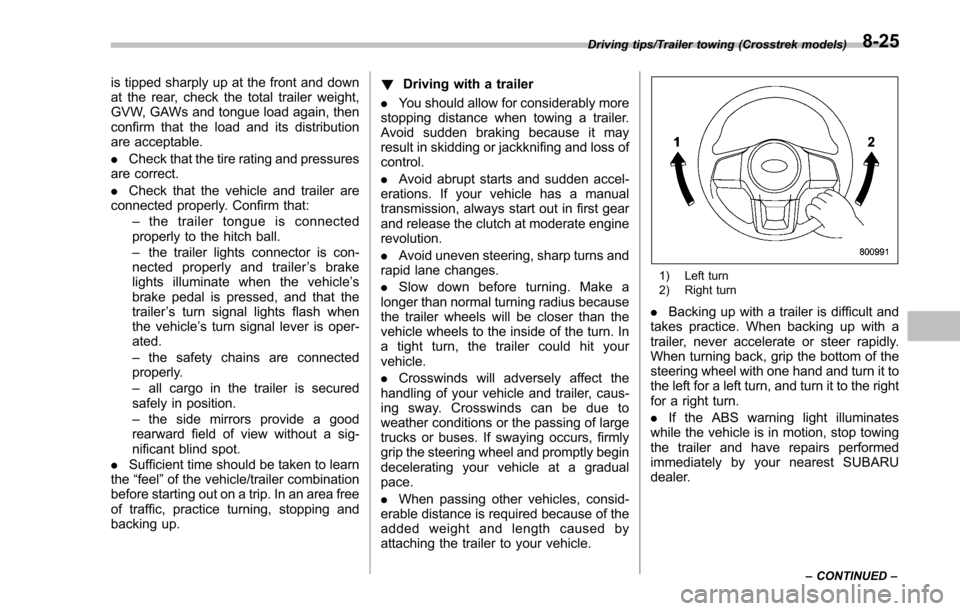
. Backing up with a trailer is difficult and
takes practice. When backing up with a
trailer, never accelerate or steer rapidly.
When turning back, grip the bottom of the
steering wheel with one hand and turn it to
the left for a left turn, and turn it to the right
for a right turn.
. If the ABS warning light illuminates
while the vehicle is in motion, stop towing
the trailer and have repairs performed
immediately by your nearest SUBARU
dealer.
Driving tips/Trailer towing (Crosstrek models)
–CONTINUED –8-25