2016 SUBARU IMPREZA fuses
[x] Cancel search: fusesPage 395 of 594
Starting and operating/Starting and stopping the engine (models without push–button start system)
. When starting the engine, be sure
to sit in the driver ’s seat (except
when using the remote engine
start system).
NOTE
. Avoid rapid racing and rapid accel-
eration immediately after the engine
has started.
. For a short time after the engine has
started, the engine speed is kept high.
When the warm-up is completed, the
engine speed lowers automatically.
. On rare occasions, it may be difficult
to start the engine depending on the
fuel and the usage condition (repeated
driving of a distance in which the
engine has not warmed up sufficiently).
In such a case, it is recommended that
you change to a different brand of fuel.
. On rare occasions, transient knock-
ing may be heard from the engine when
the accelerator is operated rapidly
such as a rapid start-up and a rapid
acceleration. This is not a malfunction.
. The engine starts more easily when
the headlights, air conditioner and rear
window defogger are turned off.
. After the engine starts, the engine
speed will be kept high until the engine
has warmed up sufficiently. !
MT models
1. Apply the parking brake.
2. Turn off unnecessary lights and ac-
cessories.
3. Depress the clutch pedal to the floor
and shift the shift lever into neutral. Hold
the clutch pedal to the floor while starting
the engine.
The starter motor will only operate when
the clutch pedal is depressed fully to the
floor.
4. Turn the ignition switch to the “ON”
position and check the operation of the
warning and indicator lights. Refer to
“Warning and indicator lights ”F 3-13.
5. Turn the ignition switch to the “START”
position without depressing the accelera-
tor pedal. Release the key immediately
after the engine has started.
If the engine does not start, try the
following procedure.
(1) Turn the ignition switch to the
“LOCK” /“OFF ”position and wait for at
least 10 seconds. After checking that
the parking brake is firmly set, turn the
ignition switch to the “START”position
while depressing the accelerator pedal
slightly (approximately a quarter of the
full stroke). Release the accelerator
pedal as soon as the engine starts.
(2) If this fails to start the engine, turn the ignition switch back to the
“LOCK”/
“ OFF ”position and wait for at least 10
seconds. Then fully depress the accel-
erator pedal and turn the ignition
switch to the “START”position. If the
engine starts, quickly release the
accelerator pedal.
(3) If this fails to start the engine, turn
the ignition switch again to the
“LOCK ”/“OFF ”position. After waiting
for 10 seconds or longer, turn the
ignition switch to the “START ”position
without depressing the accelerator
pedal.
(4) If the engine still refuses to start,
contact your nearest SUBARU dealer
for assistance.
6. Confirm that all warning and indicator
lights have turned off after the engine has
started. The fuel injection system auto-
matically lowers the idle speed as the
engine warms up.
! CVT models
1. Apply the parking brake.
2. Turn off unnecessary lights and ac-
cessories.
3. Shift
the select lever to the “P”or “N”
position (preferably the “P ”position).
The starter motor will only operate when
the select lever is at the “P ”or “N”position.
7-10
Page 396 of 594
4. Turn the ignition switch to the“ON”
position and check the operation of the
warning and indicator lights. Refer to
“Warning and indicator lights ”F 3-13.
5. Turn the ignition switch to the “START”
position without depressing the accelera-
tor pedal. Release the key immediately
after the engine has started.
If the engine does not start, try the
following procedure.
(1) Turn the ignition switch to the
“LOCK”/ “OFF”position and wait for at
least 10 seconds. After checking that
the parking brake is firmly set, turn the
ignition switch to the “START”position
while depressing the accelerator pedal
slightly (approximately a quarter of the
full stroke). Release the accelerator
pedal as soon as the engine starts.
(2) If this fails to start the engine, turn
the ignition switch back to the “LOCK”/
“OFF ”position and wait for at least 10
seconds. Then fully depress the accel-
erator pedal and turn the ignition
switch to the “START ”position. If the
engine starts, quickly release the
accelerator pedal.
(3) If this fails to start the engine, turn
theignitionswitchagaintothe
“LOCK”/ “OFF”position. After waiting
for 10 seconds or longer, turn the
ignition switch to the “START”position without depressing the accelerator
pedal.
(4) If the engine still refuses to start,
contact your nearest SUBARU dealer
for assistance.
6. Confirm that all warning and indicator
lights have turned off after the engine has
started. The fuel injection system auto-
matically lowers the idle speed as the
engine warms up.
While the engine is warming up, make
sure that the select lever is at the “P”or
“N ”position and that the parking brake is
applied.
CAUTION
If you restart the engine while the
vehicle is moving, shift the select
lever into the “N”position. Do not
attempt to place the select lever of a
moving vehicle into the “P”posi-
tion.
& Stopping the engine
The ignition switch should be turned off
only when the vehicle is stopped and the
engine is idling.
WARNING
Do not stop the engine when the
vehicle is moving. This will cause
loss of power to the power steering
and the brake booster, making steer-
ing and braking more difficult. It
could also result in accidental acti-
vation of the “LOCK”/“OFF ”posi-
tion on the ignition switch, causing
the steering wheel to lock.
Starting and operating/Starting and stopping the engine (models without push –button start system)7-11
Page 497 of 594

Maintenance and service
Tire rotation..................................................... 11-26
Tire replacement .............................................. 11-27
Wheel replacement ........................................... 11-28
Aluminum wheels............................................. 11-28
Windshield washer fluid .................................. 11-28
Adding the windshield washer fluid .................. 11-29
Windshield washer fluid ................................... 11-29
Replacement of wiper blades .......................... 11-30Windshield wiper blade assembly ..................... 11-30
Windshield wiper blade rubber ......................... 11-31
Rear window wiper blade assembly .................. 11-32
Rear window wiper blade rubber ....................... 11-32
Battery............................................................... 11-34
Fuses ................................................................ 11-35
Installation of accessories ............................... 11-36 Replacing bulbs
............................................... 11-36
Headlights (models with HID headlights) ........... 11-36
Headlights (models without HID headlights) ...... 11-37
Front turn signal light ...................................... 11-38
Parking light .................................................... 11-38
Front fog light (if equipped) .............................. 11-38
Rear combination lights ................................... 11-38
License plate light ........................................... 11-41
Map light ......................................................... 11-42
Dome light and cargo area light ....................... 11-42
Trunk light ....................................................... 11-43
Other bulbs ..................................................... 11-43
Replacing key battery ...................................... 11-43Safety precautions........................................... 11-43
Replacing battery of access key ....................... 11-44
Replacing transmitter battery ........................... 11-45
Page 506 of 594
diluted with another brand or
type, the maintenance interval is
shortened to that of the mixing
coolant.
. Do not splash the engine coolant
over painted parts. The alcohol
contained in the engine coolant
may damage the paint surface.
& Cooling fan, hose and con-
nections
Your vehicle employs an electric cooling
fan which is thermostatically controlled to
operate when the engine coolant reaches
a specific temperature.
If the radiator cooling fan does not operate
even when the coolant temperature high
warning light blinks or illuminates in RED,
the cooling fan circuit may be defective.
Refer to “Coolant temperature low indica-
tor light/Coolant temperature high warning
light ”F 3-17.
Check the fuse and replace it if necessary.
Refer to “Fuses”F 11-35 and “Fuse panel
located in the engine compartment ”F 12-
12.
If the fuse is not blown, have the cooling
system checked by your SUBARU dealer.
If frequent addition of coolant is neces- sary, there may be a leak in the engine
cooling system. It is recommended that
the cooling system and connections be
checked for leaks, damage, or looseness.
&
Engine coolant
! Checking the coolant level
WARNING
Never attempt to remove the radia-
tor cap until the engine has been
shut off and has cooled down
completely. Since the coolant is
under pressure, you may suffer
serious burns from a spray of boil-
ing hot coolant when the cap is
removed.
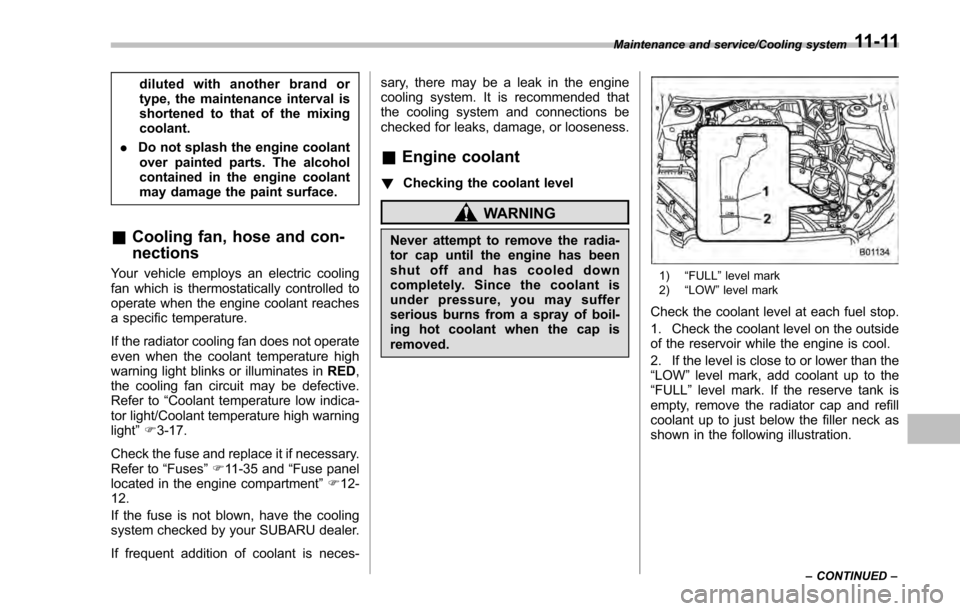
1) “FULL ”level mark
2) “LOW ”level mark
Check the coolant level at each fuel stop.
1. Check the coolant level on the outside
of the reservoir while the engine is cool.
2. If the level is close to or lower than the
“LOW ”level mark, add coolant up to the
“FULL ”level mark. If the reserve tank is
empty, remove the radiator cap and refill
coolant up to just below the filler neck as
shown in the following illustration.
Maintenance and service/Cooling system
–CONTINUED –11-11
Page 530 of 594
Fuses
CAUTION
Never replace a fuse with one hav-
ing a higher rating or with material
other than a fuse because serious
damage or a fire could result.
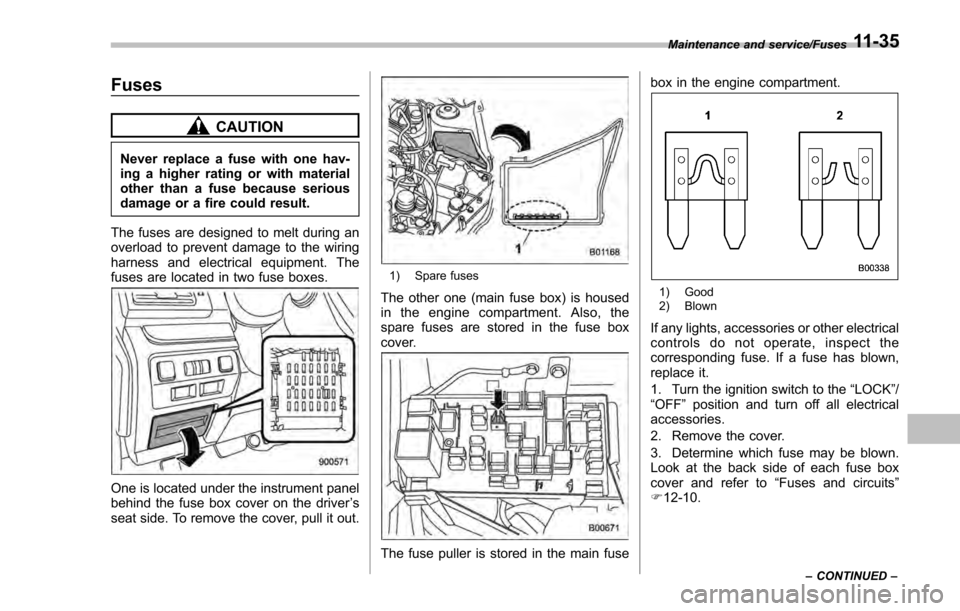
The fuses are designed to melt during an
overload to prevent damage to the wiring
harness and electrical equipment. The
fuses are located in two fuse boxes.
One is located under the instrument panel
behind the fuse box cover on the driver ’s
seat side. To remove the cover, pull it out.
1) Spare fuses
The other one (main fuse box) is housed
in the engine compartment. Also, the
spare fuses are stored in the fuse box
cover.
The fuse puller is stored in the main fuse box in the engine compartment.
1) Good
2) Blown
If any lights, accessories or other electrical
controls do not operate, inspect the
corresponding fuse. If a fuse has blown,
replace it.
1. Turn the ignition switch to the
“LOCK”/
“OFF ”position and turn off all electrical
accessories.
2. Remove the cover.
3. Determine which fuse may be blown.
Look at the back side of each fuse box
cover and refer to “Fuses and circuits”
F 12-10.
Maintenance and service/Fuses
–CONTINUED –11-35
Page 542 of 594

Specifications..................................................... 12-2Dimensions........................................................ 12-2
Engine ............................................................... 12-3
Fuel ................................................................... 12-3
Engine oil .......................................................... 12-4
Manual transmission, front differential and rear differential gear oil ........................................... 12-6
Fluids ................................................................ 12-7
Engine coolant ................................................... 12-7
Electrical system ................................................ 12-7
Tires .................................................................. 12-8 Brake disc
......................................................... 12-9Fuses and circuits ........................................... 12-10Fuse panel located in the passenger
compartment ................................................. 12-10
Fuse panel located in the engine compartment ................................................. 12-12
Bulb chart......................................................... 12-14Safety precautions ........................................... 12-14
Bulb chart ....................................................... 12-15
Vehicle identification ....................................... 12-17
Specifications
12
Page 551 of 594
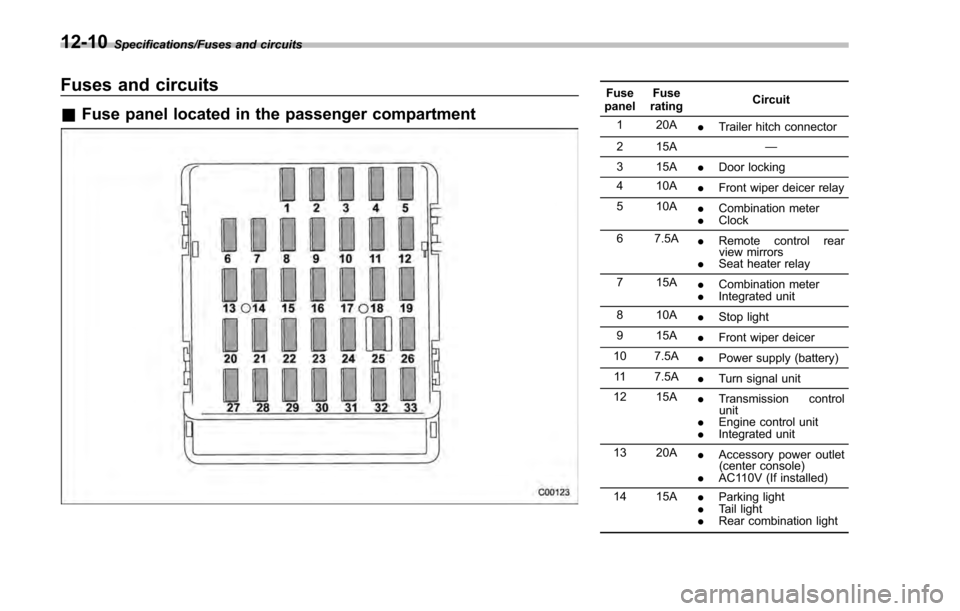
Specifications/Fuses and circuits
Fuses and circuits
&Fuse panel located in the passenger compartment
Fuse
panel Fuse
rating Circuit
1 20A .Trailer hitch connector
2 15A —
3 15A .Door locking
4 10A .Front wiper deicer relay
5 10A .Combination meter
. Clock
6 7.5A .Remote control rear
view mirrors
. Seat heater relay
7 15A .Combination meter
. Integrated unit
8 10A .Stop light
9 15A .Front wiper deicer
10 7.5A .Power supply (battery)
11 7.5A .Turn signal unit
12 15A .Transmission control
unit
. Engine control unit
. Integrated unit
13 20A .Accessory power outlet
(center console)
. AC110V (If installed)
14 15A .Parking light
. Tail light
. Rear combination light
12-10
Page 552 of 594

Fuse
panel Fuse
rating Circuit
15 10A .Luggage light
. Clock
16 7.5A .Illumination
17 15A .Seat heaters
18 10A .Backup light
19 7.5A .Power window relay
. Radiator main fan relay
20 10A .Accessory power outlet
(instrument panel)
21 10A .Starter relay
22 7.5A .Air conditioner
. Rear window defogger
relay coil
23 Empty
24 10A .Audio unit
. Clock
25 15A .SRS airbag system
26 Empty
27 15A .Blower fan
28 15A .Blower fan
29 15A .Fog light
30 Empty
31 7.5A .Auto air conditioner unit
. Integrated unit Fuse
panel Fuse
rating Circuit
32 7.5A .Clutch switch
. Steering lock control
unit
33 7.5A .Vehicle Dynamics Con-
trol unit Specifications/Fuses and circuits
–CONTINUED –
12-11