Page 265 of 336

■Door lock cylinder
■ Make sure that as little water as possible gets into the locking cylinder
when washing the vehicle - there is a risk of freezing the lock cylinder!■
Wheels
■ Heavy contamination of the wheels can affect the balance of the wheels -
this can result in vibrations and, under some circumstances, can cause pre-
mature wear of the steering wheel.
Remove ice and snow from the windows
Fig. 313
Installation location of the ice
scraper, removing the scraper
Read and observe and on page 260 first.
Use a plastic ice scraper for removing snow and ice from the windows and mir-
rors. This can be on the inside of the fuel filler flap.
›
Open the fuel filler flap and slide the scraper in the direction of arrow
» Fig. 313 .
CAUTION
■
Move the scraper in one direction only, otherwise there is a risk of damage to
the glass surface.■
Do not remove snow / ice on the surface that is soiled (e.g. pea gravel, sand,
road salt) - there is a risk of damaging the surface.
■
Remove snow / ice carefully, otherwise there is a risk of damaging the labels
that have been fitted by the factory.
Caring for the interior
Read and observe
and on page 260 first.
Vehicle compo- nentFacts of thematterRemedy
Natural leather /
Faux leather /
Alcantara ®
/
Material
Dust, surface
contaminationVacuum cleanerStubborn stainsSpecially prepared detergentCare (natural
leather)Treat the leather periodically with a
suitable leather protector and use a
care cream with light blocker and im-
pregnation after each cleaning.Care (Alcan-
tara ®
/ fabric)Remove stubborn hairs using a “clean-
ing glove”
Remove pills from materials with a
brushPlastic partsSoilingWater, slightly damp cloth or sponge, or
cleaning agent provided for this pur-
poseWindowsSoilingWash with clean water and dry using
the intended clothCovers of electri-
cally heated seatsSoilingSpecially provided cleaning agentSeat belts » Soilingsoft cloth and mild soap solution a)a)
Mild soap solution = 2 tablespoons of natural soap to 1 litre of lukewarm water.
WARNING■
Never clean the seat belts chemically as chemical cleaning products could
destroy the fabric.■
Air fresheners and scents can be hazardous to heath when the tempera-
ture inside the vehicle is high.
CAUTION
■ Natural leather /Faux leather / Alcantara ®
/ material
■ In lengthy periods in bright sunlight, it might be sensible to cover these
materials in order to avoid bleaching. ■ Fresh stains (e.g. from pens, lipstick, shoe polish etc.) should be removed as
soon as possible. 263Care and maintenance
Page 266 of 336

■Ensure that no part of the leather is soaked through during cleaning and
that no water gets into the seams.
■ Do not clean the roof panelling with a brush – risk of damage to the surface
of the panelling.
■ Do not use solvents, floor wax, shoe cream, stain remover or similar agents
on Alcantara ®
seat upholstery.
■ Some clothing fabrics (e.g. dark denim) do not have sufficient colour fast-
ness - this may leave evident marks on upholstery. This is not a defect in the
fabric.
■ Sharp objects on garments (e.g. zips, rivets, sharp- edged belts) can dam-
age the upholstery fabrics in the vehicle. Such damage cannot be subse-
quently recognised as a justified complaint.■
Plastic parts ■ Do not attach scents or air fresheners to the dashboard – there is a risk of
damage to the dashboard.
■
Windows
■ Do not attach any stickers to the filaments or glass antenna - there is risk
of damage.
■
Covers of electrically heated seats
■ Do not clean with water or other liquids - there is a risk of damage to the
heating system.
■ Do not dry by switching on the heating.
■
Seat belts
■ Allow to dry before rolling up the seat belts.
Note
During vehicle use, the leather and Alcantara ®
parts may show minor changes
(e.g. folds, discolouration).Inspecting and replenishing
Fuel
Introduction
Fig. 314
Stickers with prescribed fuel
This chapter contains information on the following subjects:
Petrol and diesel refuelling
265
Unleaded petrol
265
Diesel fuel
266
The correct grades of fuel for your vehicle are stated on a sticker affixed to the
inside of the fuel filler flap » Fig. 314.
The fuel tank has a capacity of about 66 litres, including a reserve of approx.
6 litres .
WARNINGFuel vapours are explosive - can be fatal!
CAUTION
■
Never drive until the fuel tank is completely empty! The irregular supply of
fuel can cause misfiring, which can result in damage to parts of the engine and
the exhaust system.■
Immediately remove any fuel that has spilled onto the vehicle's paintwork –
risk of paint damage.
■
If you would like to operate your vehicle in countries other than those with
its intended weather conditions, please contact a ŠKODA Partner. They will tell
you whether the fuel specified by the manufacturer is offered in the accompa-
nying country or whether it is permissible to operate the vehicle with another
fuel.
264General Maintenance
Page 267 of 336

Petrol and diesel refuellingFig. 315
Open fuel filler flap / unscrew tank cap / place the tank cap on
the fuel filler flap
Fig. 316
Fuel filler tube on vehicles with
diesel engines
Read and observe and on page 264 first.
Perform the refuelling under the following conditions.
The vehicle is unlocked.
The ignition is switched off.
The auxiliary heating and ventilation is switched off.
›
Press the fuel filler flap in direction of arrow
1
and fold in the direction of
arrow
2
» Fig. 315 .
›
Unscrew the tank cap in the direction of arrow
3
.
›
Remove the tank cap and place in the recess on top of the fuel filler flap in
the direction of arrow
4
.
›
Insert the pump nozzle into the fuel filler neck as far as it will go, and refuel.
The fuel tank is full just as soon as the pump nozzle switches off for the first
time. Not continue refuelling.›
Remove the pump nozzle from the fuel filler neck and put it back in the
pump.
›
Place the filler cap onto the fuel filler neck and turn it in the opposite direc-
tion to the arrow until it securely engages
3
.
›
Close the fuel filler flap until it clicks into place.
Incorrect refuelling guard on vehicles with diesel engines
The fuel filler tube on vehicles with diesel engines can be fitted with an incor-
rect refuelling guard » Fig. 316.
If the diesel pump nozzle does not sit directly in the fuel filler tube, move it to
and fro with slight pressure to insert it correctly.
The diameter of the diesel pump nozzle can be identical to that of the petrol
pump nozzle in some countries. When driving in these countries, the incorrect
fuelling protection should be removed by a specialist company.
Unleaded petrol
Read and observe
and on page 264 first.
The correct grades of fuel for your vehicle are stated on a sticker affixed to theinside of the fuel filler flap » Fig. 314 on page 264 .
The vehicle can only be operated using unleaded petrol that complies with the
standard EN 2281)
contains and maximum 10% bioethanol (E10).
Prescribed fuel 95 / min. 92 and 93 RON/ROZ
We recommend using petrol 95 RON.
Optionally, the petrol 92 or. 93 RON can be used (slight power loss, a slightly
increased fuel consumption).
In an emergency petrol 91 RON can be used (slight power loss, slightly in-
creased fuel consumption) »
.
Unleaded petrol min. 95 RON / ROZ
Use min. 95 ROZ petrol.
In an emergency petrol 91, 92 or 93 RON can be used (slight loss, a slightly in-
creased fuel consumption) »
.
1)
In Germany also DIN 51626-1 or E10 for unleaded petrol with octane number 91 or 95 or DIN 51626-2 or E5
for unleaded petrol with octane number 95 and 98.
265Inspecting and replenishing
Page 268 of 336

Prescribed petrol 98/(95) RON / ROZ
We recommend using petrol 98 RON.
Optionally, petrol 95 RON can be used (slight power loss, a slightly increased
fuel consumption).
In an emergency petrol 91, 92 or 93 RON can be used (slight loss, a slightly in-
creased fuel consumption) »
.
CAUTION
The following instructions must be observed, otherwise there is a risk of en-
gine damage and damage to the exhaust system.■
If gasoline is used which is lower than the prescribed octane number, then
continue driving at medium engine speeds and minimum engine load. Refuel
using petrol of the prescribed octane number as soon as possible.
■
Petrol with a lower Octane count than 91 should not even be used in an
emergency!
■
If a fuel other than unleaded fuel which complies to the above mentioned
standards (e.g. leaded petrol) is put in the tank by mistake, do not start the en-
gine or switch on the ignition.
CAUTION
Petrol additives (additives)■Unleaded petrol in accordance with the EN 228 standard 1)
meets all the con-
ditions for a smooth-running engine. Therefore, we recommend that you do
not add any fuel additives to the petrol - there is a risk of engine damage or
damage to the exhaust system.■
The following additives and auxiliary products may not be used - there is a
risk of engine damage or damage to the exhaust system! ■ Additives with metal components (metallic additives), in particular with
manganese and iron content. ■ Fuels with metallic content (e.g. LRP - lead replacement petrol).
Note■ Unleaded petrol that has a higher octane number than that required by the
engine can be used without limitations.■
The use of petrol with an octane rating higher than 95 RON in does not re-
sult in either a noticeable increase in power nor lower fuel consumption in ve-
hicles for which unleaded petrol 95/min 92 or 93 RON is specified.
■
On vehicles using prescribed petrol of min. 95 RON, the use of petrol with a
higher octane number than 95 RON can increase the power and reduce fuel
consumption.
Diesel fuel
Read and observe
and on page 264 first.
The correct grades of fuel for your vehicle are stated on a sticker affixed to theinside of the fuel filler flap » Fig. 314 on page 264 .
The vehicle can only be operated using diesel fuel that complies with the
standard EN 5902)
and contains a maximum 7% biodiesel (B7)3)
.
Operating under different weather conditions
Use only diesel in accordance with the current or expected weather conditions.
Ask the petrol station personnel whether the diesel fuel offered corresponds
to these conditions.
CAUTION
The following instructions must be observed, otherwise there is a risk of en-
gine damage and damage to the exhaust system.■
If a different fuel other than diesel fuel, which complies to the above men-
tioned standards (e.g. petrol) is put into the tank, do not start the engine or
switch on the ignition!
■
The biofuel RME must not be used!
1)
In Germany also DIN 51626-1 or E10 for unleaded petrol with octane number 91 or 95 or DIN 51626-2 or E5
for unleaded petrol with octane number 95 and 98.
2)
In Germany DIN 51628, in Austria ÖNORM C 1590, in Russia GOST R 52368-2005 / EN 590: 2004, in India
IS 1460 / Bharat IV or in an emergency IS 1460 / Bharat III.
3)
In Germany according to the DIN 52638 standard, in Austria ÖNORM C 1590, in France EN 590.
266General Maintenance
Page 269 of 336

CAUTIONDiesel fuel additives■The diesel fuel in accordance with the prescribed standards meets all the
conditions for a smooth running engine. Therefore, we recommend that you do
not add any fuel additives to the diesel - - there is a risk of engine damage or
damage to the exhaust system.
AdBlue ®
and its refilling
Introduction
This chapter contains information on the following subjects:
Check level
267
AdBlue ®
Refill
267
In order to reduce pollutant emissions from vehicles with diesel engines and
the SCR catalyst, a urea - AdBlue ®
solution is injected into the exhaust system.
Only use AdBlue ®
that corresponds to the standard ISO 22241-1. Do not add
additives to AdBlue ®
.
The AdBlue ®
-consumption depends on driving style, the operating tempera-
ture of the system and on the weather conditions.
The AdBlue ®
-tank filling is about 13 litres.
WARNINGAdBlue®
can cause skin, eye and respiratory irritation. If your eyes or skin
come into contact with the AdBlue ®
fluid, immediately wash the affected
area for a few minutes long with a lot of water. Seek medical assistance if
required.
CAUTION
AdBlue ®
attacks the surface of some materials (e.g. as painted parts, plastics,
fabrics). Clean the areas affected with AdBlue ®
using a damp cloth and plenty
of cold water. Remove any dried AdBlue ®
with warm water and a sponge.
Note
■ The AdBlue ®
solution freezes at a temperature of -11° C and lower. The sys-
tem has a heater to ensure the operability at low temperatures.■
We recommend purchasing AdBlue ®
refill bottles from the ŠKODA original
parts.
■ The working life of the AdBlue ®
solution is 4 years. Thereafter the solution
must be replaced by a specialist garage.■
AdBlue ®
is a registered trademark of the VDA. AdBlue ®
is also known as AUS
32 (Aqueous Urea Solution) or DEF (Diesel Exhaust Fluid).
Check level
Read and observe
and on page 267 first.
The AdBlue ®
level is automatically monitored.
If the available travel distance that can be completed with the remaining AdBl- ue ®
tank capacity drops to about 2400 km, the warning
appears on the in-
strument cluster and a request for replenishment of AdBlue ®
appears.
An indication also appears in the instrument cluster showing the maximum
and minimum AdBlue ®
tank capacity.
If the available travel distance that can be driven with the existing AdBlue ®
-
tank capacity drops down to 0 km, then no motor start is possible.
The distance which can still be driven with the remaining AdBlue ®
, can be de-
termined using the travel data » page 46.
AdBlue®
Refill
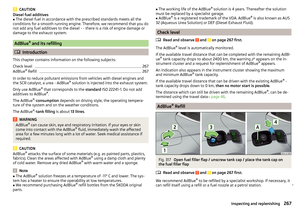
Fig. 317
Open fuel filler flap / unscrew tank cap / place the tank cap on
the fuel filler flap
Read and observe
and on page 267 first.
We recommend AdBlue ®
to be refilled by a specialist workshop. If necessary, it
can refill itself using a refill or a fuel nozzle at a petrol station.
267Inspecting and replenishing
Page 270 of 336

We recommend when refilling using refill bottles that you use refill bottles
from ŠKODA Original Accessories.
When adding AdBlue ®
take note of the minimum and maximum AdBlue ®
tank
capacity shown in the display of the instrument cluster » page 40.
Refill AdBlue ®
under the following conditions.
The vehicle is on a horizontal surface.
The ignition is switched off.
Refilling›
Press the fuel filler flap in direction of arrow
1
and fold in the direction of
arrow
2
» Fig. 317 .
›
Unscrew the tank cap in the direction of arrow
3
.
›
Remove the tank cap and place in the recess on top of the fuel filler flap in
the direction of arrow
4
.
›
Refill AdBlue ®
in the neck
A
by means of a refill or a fuel nozzle refill (follow
the instructions on the container or the instructions of the petrol station op-
erator).
The AdBlue ®
- tank is full when no AdBlue ®
flows from the refill bottle or as
soon as the correctly operated pump cuts out for the first time. Do not contin-
ue refilling AdBlue ®
.
›
After refilling AdBlue ®
put the cap on the fuel filler neck and turn in the oppo-
site direction of the arrow
3
until it engages.
›
Close the fuel filler flap until it clicks into place.
Before continuing your journey , switch on just the ignition for 30 s so that the
refilling can be recognized by the system. Only then start the engine.
Engine compartment
Introduction
This chapter contains information on the following subjects:
Open the bonnet and close
269
Engine compartment overview
269
Windscreen washer fluid
270WARNINGNever cover the engine with additional insulation material (e.g. with a cov-
er) – risk of fire!WARNINGWhen working in the engine compartment, the following instructions must
be observed - risk of injury or fire. The engine compartment of your car is a
hazardous area!WARNINGInstructions before beginning work in the engine compartment■Stop the engine and remove the ignition key, on vehicles with the KESSY
system, open the driver's door.■
Switch on the parking brake.
■
For vehicles with manual transmission the lever into the neutral position.
On vehicles with automatic transmission , place the selector lever in the P
position.
■
Allow the engine to cool.
■
Never open the bonnet if you can see steam or coolant flowing out of the
engine compartment – risk of scalding! Wait until the steam or coolant has
stopped escaping.
WARNINGInformation for working in the engine room■Keep everyone away from the engine compartment.■
Do not touch any hot engine parts – risk of burns!
■
Never touch the radiator fan. The radiator fan suddenly switch on approx.
10 minutes after switching off the ignition!
■
Do not smoke or use open flames in the vicinity of the engine.
■
Do not leave any items (e.g. cloths or tools) in the engine compartment.
This presents a fire hazard and the risk of engine damage.
■
Read and observe the information and warning instructions on the fluid
containers.
WARNINGInformation for working in the engine compartment with the engine run-
ning■
If it is necessary to work on the engine compartment with the engine run-
ning, then observe the rotating engine parts and electrical plants - it can
be fatal!
■
Never touch the electric wiring on the ignition system.
■
Avoid short circuits in the electrical system, particularly on the vehicle's
battery.
268General Maintenance
Page 271 of 336

CAUTIONRefill only operating fluids of the correct specification - danger of damaging
the vehicle!
Note
■ Fluids with the proper specifications can be purchased from the ŠKODA Origi-
nal Accessories or from the ŠKODA Genuine Parts ranges.■
We recommend you have the battery replaced by a specialist garage.
Open the bonnet and close
Fig. 318
Opening the bonnet
Read and observe
and on page 268 first.
Open flap
›
Make sure that the windscreen wiper arms are not folded away from the
windscreen - there is a risk of damage to the bonnet.
›
Open the driver's door and pull the unlocking lever below the dashboard in
the direction of arrow
1
» Fig. 318 .
›
Press the release lever in the direction of the arrow
2
and the bonnet is un-
locked.
›
Hold the bonnet and lift up until it is held open by the pressurised gas spring.
Close the bonnet lid
›
Pull the bonnet lid down far enough to overcome the force of the pressur-
ised gas spring.
›
From around 20 cm, lightly push the bonnet lid closed until it securely engag-
es.
If the bonnet lid is not properly closed, the display of the instrument cluster
will show this.
WARNING■ Never drive if the bonnet is open - could cause an accident!■Make sure that when closing the engine compartment lid, no body parts
are crushed - there is danger of injury!
Engine compartment overview
Fig. 319
Arrangement example in the engine compartment
Read and observe
and on page 268 first.
Coolant expansion reservoir
272
Engine oil dipstick
271
Engine oil filler opening
271
Brake fluid reservoir
273
Vehicle battery
273
Windscreen washer fluid reservoir
270ABCDEF269Inspecting and replenishing
Page 272 of 336

Windscreen washer fluidFig. 320
Windscreen washer fluid reservoir
Read and observe
and on page 268 first.
The installation location of the container support can differ depending on the
type of engine » Fig. 320.
The capacity of the reservoir
A
is about 3.1 litres or about 4.7 litres on vehicles
that have a headlight cleaning system. The contents of the container
B
are
approximately 3.7 litres.
Use a suitable windscreen washer fluid in accordance with the current or ex-
pected weather conditions. We recommend that you use accessories from
ŠKODA Original Accessories.
CAUTION
■ If the vehicle is equipped with a headlight cleaning system, then only use
windscreen washer fluid types that do not attack the polycarbonate coating of
the headlights - otherwise there is a risk of damage to headlights.■
Do not remove the filter from the windscreen washer fluid reservoir when re-
plenishing it with liquid otherwise the liquid transportation system can be-
come contaminated, which can cause the windscreen washer system to mal-
function.
Engine oil
Introduction
This chapter contains information on the following subjects:
Specification
270
Check and refill
271
The engine has been factory-filled with a high-grade oil that can be use
throughout the year - except in extreme climate zones.
We therefore recommend that the oil change is carried out by a ŠKODA Service
Partner.
The engine oil should be changed after specified service intervals » page 258.
Depending on the driving style and operating conditions, the engine uses
some oil (up to 0.5 l / 1 000 km). Consumption may be slightly higher than this
during the first 5 000 km.
WARNINGThe following warning instructions must be followed at all times when
working in the engine compartment » page 268.
CAUTION
Do not add additives to the engine oil - risk of engine damage.
Note
We recommend that you use oils from ŠKODA Original Accessories.
Specification
Read and observe
and on page 270 first.
The specifications (VW standards) stated in the following can be indicated sep-arately or together with other specifications on the bottle.
Vehicles with variable service intervals
Petrol enginesSpecification1.4 l/92, 110 kW TSI
VW 504 00
1.8 ltr./132 kW TSI2.0 l/162, 206 kW TSI 270General Maintenance