Page 122 of 258
2.30
DRIVER CORRECTION DEVICES AND AIDS (4/4)
Hill start assistance
This function assists the driver when
starting on hills. It prevents the vehicle
from rolling backwards, depending on
the slope, by automatically applying the
brakes when the driver lifts his/her foot
off the brake pedal to depress the ac-
celerator pedal.
System operation
It only operates when the gear lever is
in a position other than neutral (other
than N or P for automatic transmis-
sions) and the vehicle is completely
stationary (brake pedal depressed)
The system holds the vehicle for ap-
proximately 2 seconds. The brakes are
then gradually released (the vehicle will
move according to the slope).The hill start assistance
system cannot completely
prevent the vehicle from
rolling backwards in all sit-
uations (extremely steep gradients,
etc.).
In all cases, the driver may depress
the brake pedal to prevent the ve-
hicle from rolling forwards or back-
wards.
The hill start assistance function
should not be used for prolonged
stops: use the brake pedal.
This function is not designed to im-
mobilise the vehicle permanently.
If necessary, use the brake pedal to
stop the vehicle.
The driver must remain particularly
vigilant when driving on slippery or
low-grip surfaces and/or on hills.
Risk of serious injury.
Page 126 of 258
2.34
The cruise control function helps you to
maintain your driving speed at a speed
that you choose, called the cruising
speed.
This cruising speed may be set at any
speed above 20 mph (30 km/h).
This function is an addi-
tional driving aid. However,
the function does not take
the place of the driver.
Therefore, it can under no circum-
stances replace the driver’s respon-
sibility to respect speed limits and to
be vigilant (the driver must always
be ready to brake).
Cruise control must not be used in
heavy traffic, on undulating or slip-
pery roads (black ice, aquaplan-
ing, gravel) and during bad weather
(fog, rain, side winds etc.).
There is a risk of accidents.
The cruise control function
is in no way linked to the
braking system.
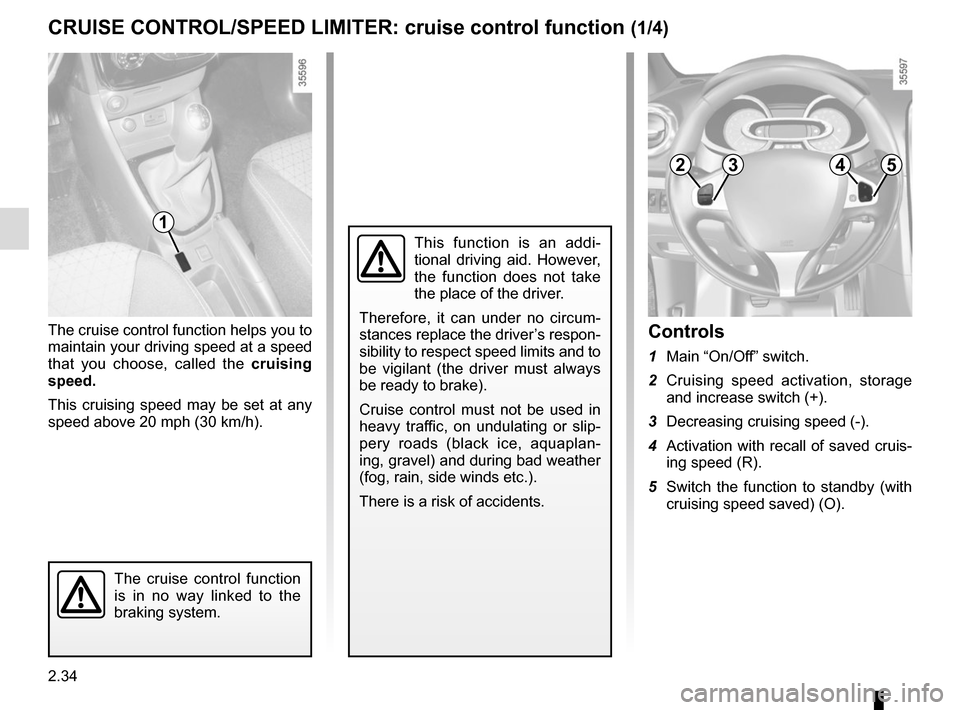
Controls
1 Main “On/Off” switch.
2 Cruising speed activation, storage and increase switch (+).
3 Decreasing cruising speed (-).
4 Activation with recall of saved cruis- ing speed (R).
5 Switch the function to standby (with cruising speed saved) (O).
CRUISE CONTROL/SPEED LIMITER: cruise control function (1/4)
1
2354
Page 129 of 258
2.37
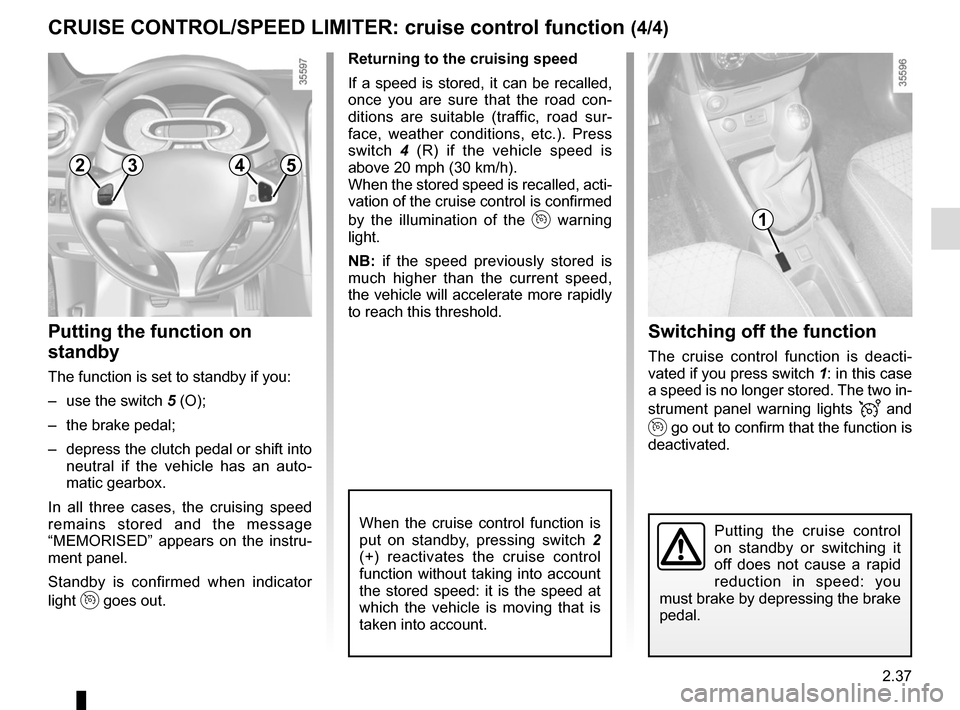
Switching off the function
The cruise control function is deacti-
vated if you press switch 1: in this case
a speed is no longer stored. The two in-
strument panel warning lights
� and
� go out to confirm that the function is
deactivated.
Returning to the cruising speed
If a speed is stored, it can be recalled,
once you are sure that the road con-
ditions are suitable (traffic, road sur-
face, weather conditions, etc.). Press
switch
4 (R) if the vehicle speed is
above 20 mph (30 km/h).
When the stored speed is recalled, acti-
vation of the cruise control is confirmed
by the illumination of the
� warning
light.
NB: if the speed previously stored is
much higher than the current speed,
the vehicle will accelerate more rapidly
to reach this threshold.
When the cruise control function is
put on standby, pressing switch 2
(+) reactivates the cruise control
function without taking into account
the stored speed: it is the speed at
which the vehicle is moving that is
taken into account.
Putting the function on
standby
The function is set to standby if you:
– use the switch 5 (O);
– the brake pedal;
– depress the clutch pedal or shift into neutral if the vehicle has an auto-
matic gearbox.
In all three cases, the cruising speed
remains stored and the message
“MEMORISED” appears on the instru-
ment panel.
Standby is confirmed when indicator
light
� goes out.
CRUISE CONTROL/SPEED LIMITER: cruise control function (4/4)
Putting the cruise control
on standby or switching it
off does not cause a rapid
reduction in speed: you
must brake by depressing the brake
pedal.
1
2354
Page 134 of 258
2.42
Operation
With the selection lever 1 in position P,
switch on the ignition.
To move out of position P, you must de-
press the brake pedal before pressing
the unlocking button 2.
With your foot on the brake pedal
(warning light 3 on the display goes
out), move the lever out of position P.
Only engage D or R when the vehi-
cle is stopped, with your foot on the
brake and the accelerator pedal re-
leased.
Selector lever 1
P: park
R: reverse
N: Neutral
D: automatic mode
M: manual mode
+: upper gear
–: lower gear
4: displays the gear engaged in manual
mode.
Note: Press the button 2 to go from po-
sition D or N to R or P.
AUTOMATIC TRANSMISSION (1/3)
1
4
32
Gear change paddles 5
The paddles 5 enable you to change
gear while the gear lever is in ‘manual
mode’ position or, if driving, in ‘auto-
matic mode’ position.
P, N and R are not accessible using the
paddles.
The display 4 notifies the driver about
the current mode and gear.
55
Page 136 of 258
2.44
AUTOMATIC TRANSMISSION (3/3)
Parking the vehicle
When the vehicle is stopped, move the
lever to position P while keeping your
foot on the brake pedal: the gearbox is
in neutral and the drive wheels are me-
chanically locked by the driveshaft.
Apply the handbrake.
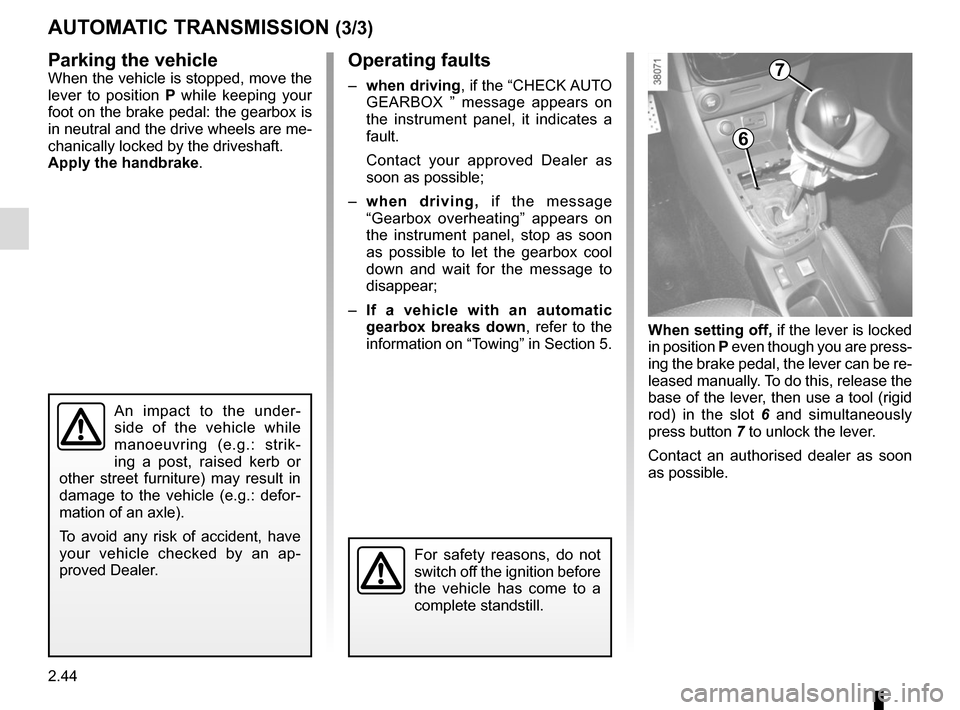
When setting off, if the lever is locked
in position P even though you are press-
ing the brake pedal, the lever can be re-
leased manually. To do this, release the
base of the lever, then use a tool (rigid
rod) in the slot 6 and simultaneously
press button 7 to unlock the lever.
Contact an authorised dealer as soon
as possible.Operating faults
– when driving , if the “CHECK AUTO
GEARBOX ” message appears on
the instrument panel, it indicates a
fault.
Contact your approved Dealer as
soon as possible;
– when driving, if the message
“Gearbox overheating” appears on
the instrument panel, stop as soon
as possible to let the gearbox cool
down and wait for the message to
disappear;
– If a vehicle with an automatic
gearbox breaks down, refer to the
information on “Towing” in Section 5.
For safety reasons, do not
switch off the ignition before
the vehicle has come to a
complete standstill.
An impact to the under-
side of the vehicle while
manoeuvring (e.g.: strik-
ing a post, raised kerb or
other street furniture) may result in
damage to the vehicle (e.g.: defor-
mation of an axle).
To avoid any risk of accident, have
your vehicle checked by an ap-
proved Dealer.
6
7
Page 159 of 258
3.23
Do not place any objects,
especially heavy or hard
objects, on the parcel shelf.
These may pose a risk to
the vehicle occupants if the driver
has to brake suddenly or if the vehi-
cle is involved in an accident.
Opening the doors manually
from the inside
If it is impossible to unlock the tailgate,
it can be done manually from inside:
– access the luggage compartment by tilting the rear bench seatback(s),
– insert a pencil or similar object in recess 3 and slide the unit as shown
in the illustration;
– push the tailgate to open it.
BOOT
To open
Press button 1 and lift the tailgate.
To close
Lower the tailgate using the handles 2
inside the tailgate to help you.
13
2
Page 160 of 258
3.24
Utility version
Unclip mountings 3 on either side of the
parcel shelf, then remove it via the boot.
To refit it, proceed in the reverse order
to removal.
Do not place any objects,
especially heavy or solid
objects on the luggage
compartment cover. These
may pose a risk to the vehicle occu-
pants if the driver has to brake sud-
denly or if the vehicle is involved in
an accident.
3
REAR PARCEL SHELF
A
1
Removal
– Lower the rear headrests;
– unhook the two cords 1 from the boot
door;
– lift the parcel shelf 2 to half height in order to unclip it (movement A);
Maximum weight on rear parcel
shelf: 25 kg, evenly distributed.
– push the shelf in (B movement) and
turn it;
– pull the shelf towards you.
To refit, proceed in the reverse order to
removal.
A
22
B
Page 161 of 258
3.25
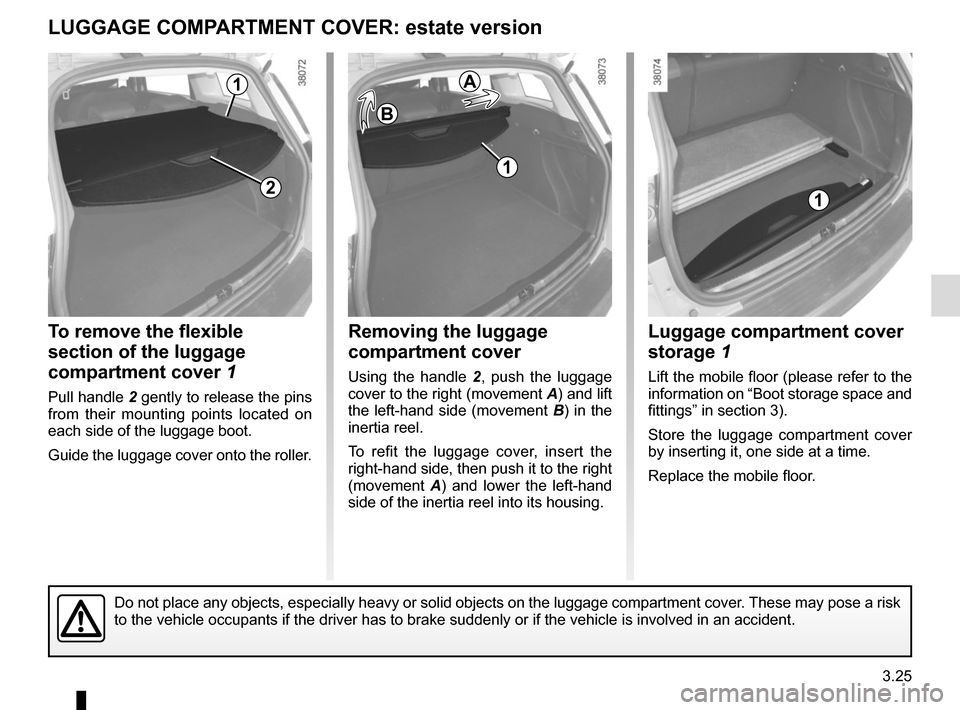
To remove the flexible
section of the luggage
compartment cover 1
Pull handle 2 gently to release the pins
from their mounting points located on
each side of the luggage boot.
Guide the luggage cover onto the roller.
LUGGAGE COMPARTMENT COVER: estate version
Removing the luggage
compartment cover
Using the handle 2, push the luggage
cover to the right (movement A) and lift
the left-hand side (movement B) in the
inertia reel.
To refit the luggage cover, insert the
right-hand side, then push it to the right
(movement A) and lower the left-hand
side of the inertia reel into its housing.
Luggage compartment cover
storage 1
Lift the mobile floor (please refer to the
information on “Boot storage space and
fittings” in section 3).
Store the luggage compartment cover
by inserting it, one side at a time.
Replace the mobile floor.
1
2
B
A
1
1
Do not place any objects, especially heavy or solid objects on the lugga\
ge compartment cover. These may pose a risk
to the vehicle occupants if the driver has to brake suddenly or if the v\
ehicle is involved in an accident.