2016 RENAULT CLIO SPORT TOURER buttons
[x] Cancel search: buttonsPage 9 of 258

1.3
Integrated key 5
The integrated key is used to lock or
unlock the front left-hand door if the
RENAULT card does not work:
– when the RENAULT card battery is drained, flat battery, etc.
– use of devices using the same fre- quency as the card;
– vehicle located in a high electromag- netic radiation zone.
Access to key 5
Press button 6 and pull on key 5 then
release the button.
Using the key
Please refer to the information on
“Locking and unlocking the opening
elements”.
Once you have accessed the vehicle
using the integrated key, replace it
in its housing in the RENAULT card,
then insert the RENAULT card into
the card reader to start the vehicle.
RENAULT CARD: general information (2/3)
5
6
RENAULT card operating
range
This varies according to the surroun-
dings: when handling the RENAULT
card, it is important to make sure that
you do not lock or unlock the doors by
inadvertently pressing the buttons.
Driver’s responsibility
when parking or stopping
the vehicle
Never leave an animal,
child or adult who is not self-suffi-
cient alone on your vehicle, even for
a short time.
They may pose a risk to themselves
or to others by starting the engine,
activating equipment such as the
electric windows or locking the
doors.
Also, in hot and/or sunny weather,
please remember that the tempera-
ture inside the passenger compart-
ment increases very quickly.
RISK OF DEATH OR SERIOUS
INJURY.
Page 11 of 258
1.5
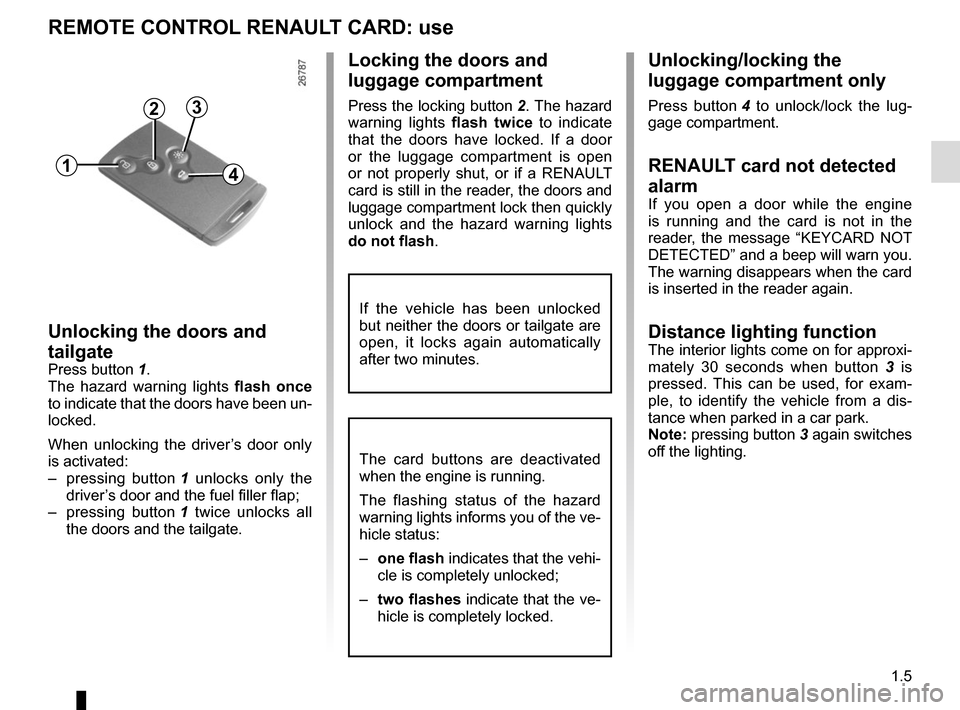
Unlocking/locking the
luggage compartment only
Press button 4 to unlock/lock the lug-
gage compartment.
RENAULT card not detected
alarm
If you open a door while the engine
is running and the card is not in the
reader, the message “KEYCARD NOT
DETECTED” and a beep will warn you.
The warning disappears when the card
is inserted in the reader again.
Distance lighting functionThe interior lights come on for approxi-
mately 30 seconds when button 3 is
pressed. This can be used, for exam-
ple, to identify the vehicle from a dis-
tance when parked in a car park.
Note: pressing button 3 again switches
off the lighting.
Locking the doors and
luggage compartment
Press the locking button 2. The hazard
warning lights flash twice to indicate
that the doors have locked. If a door
or the luggage compartment is open
or not properly shut, or if a RENAULT
card is still in the reader, the doors and
luggage compartment lock then quickly
unlock and the hazard warning lights
do not flash .
Unlocking the doors and
tailgate
Press button 1.
The hazard warning lights flash once
to indicate that the doors have been un-
locked.
When unlocking the driver’s door only
is activated:
– pressing button 1 unlocks only the
driver’s door and the fuel filler flap;
– pressing button 1 twice unlocks all
the doors and the tailgate.
REMOTE CONTROL RENAULT CARD: use
The card buttons are deactivated
when the engine is running.
The flashing status of the hazard
warning lights informs you of the ve-
hicle status:
– one flash indicates that the vehi-
cle is completely unlocked;
– two flashes indicate that the ve-
hicle is completely locked.
If the vehicle has been unlocked
but neither the doors or tailgate are
open, it locks again automatically
after two minutes.
1
2
4
3
Page 12 of 258
1.6
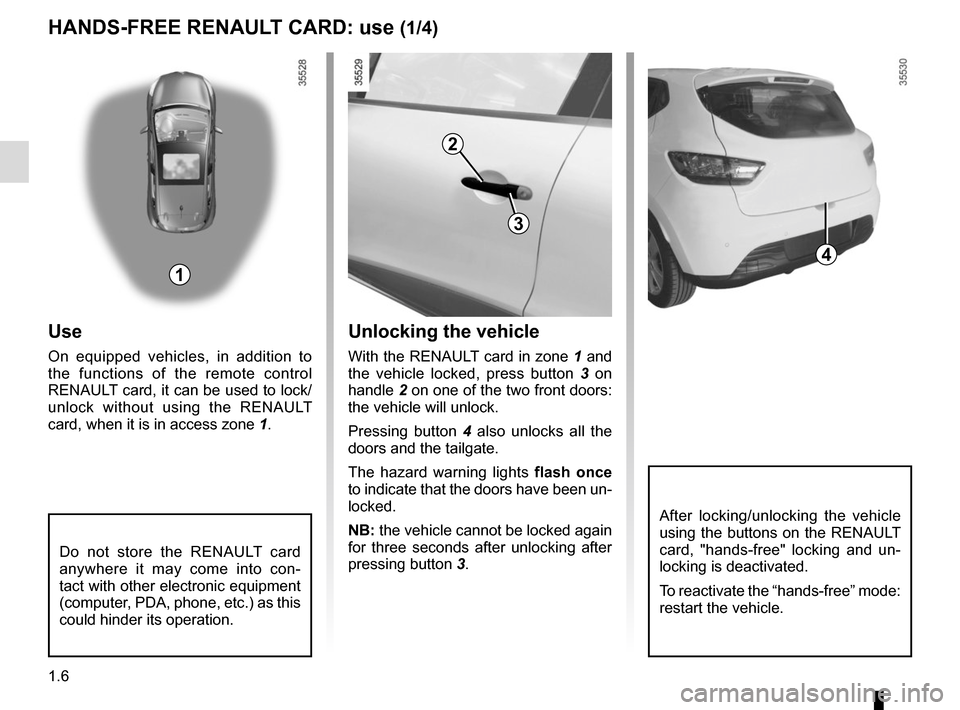
Unlocking the vehicle
With the RENAULT card in zone 1 and
the vehicle locked, press button 3 on
handle 2 on one of the two front doors:
the vehicle will unlock.
Pressing button 4 also unlocks all the
doors and the tailgate.
The hazard warning lights flash once
to indicate that the doors have been un-
locked.
NB: the vehicle cannot be locked again
for three seconds after unlocking after
pressing button 3.
Use
On equipped vehicles, in addition to
the functions of the remote control
RENAULT card, it can be used to lock/
unlock without using the RENAULT
card, when it is in access zone 1.
HANDS-FREE RENAULT CARD: use (1/4)
1
2
4
3
Do not store the RENAULT card
anywhere it may come into con-
tact with other electronic equipment
(computer, PDA, phone, etc.) as this
could hinder its operation.
After locking/unlocking the vehicle
using the buttons on the RENAULT
card, "hands-free" locking and un-
locking is deactivated.
To reactivate the “hands-free” mode:
restart the vehicle.
Page 14 of 258
1.8
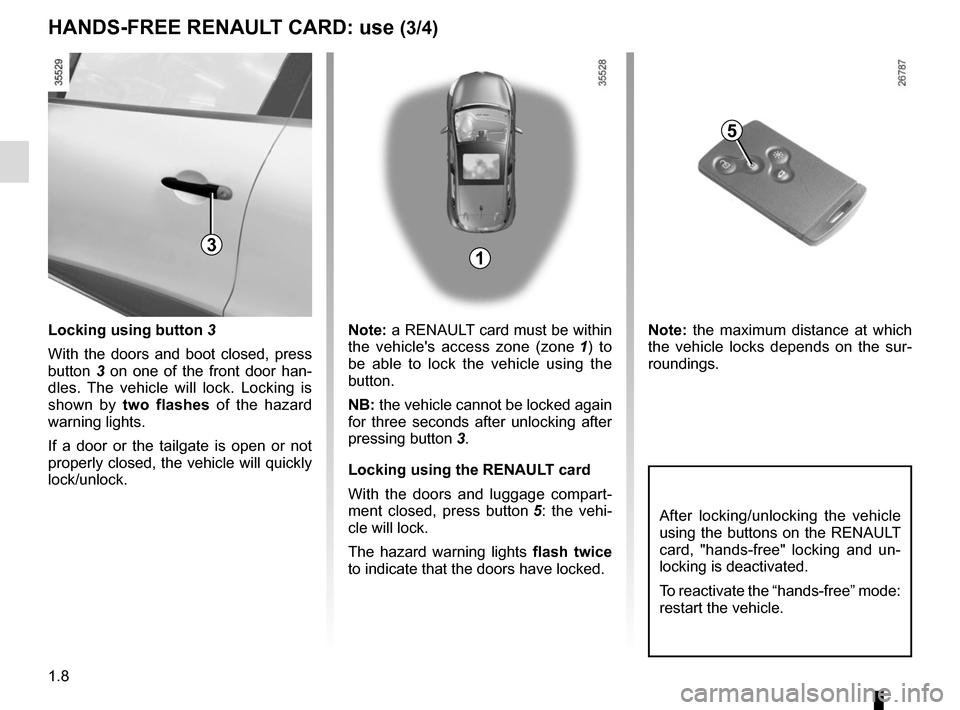
Locking using button 3
With the doors and boot closed, press
button 3 on one of the front door han-
dles. The vehicle will lock. Locking is
shown by two flashes of the hazard
warning lights.
If a door or the tailgate is open or not
properly closed, the vehicle will quickly
lock/unlock. Note: the maximum distance at which
the vehicle locks depends on the sur-
roundings.
HANDS-FREE RENAULT CARD: use (3/4)
5
3
After locking/unlocking the vehicle
using the buttons on the RENAULT
card, "hands-free" locking and un-
locking is deactivated.
To reactivate the “hands-free” mode:
restart the vehicle.
Note: a RENAULT card must be within
the vehicle's access zone (zone
1) to
be able to lock the vehicle using the
button.
NB: the vehicle cannot be locked again
for three seconds after unlocking after
pressing button 3.
Locking using the RENAULT card
With the doors and luggage compart-
ment closed, press button 5: the vehi-
cle will lock.
The hazard warning lights flash twice
to indicate that the doors have locked.
1
Page 20 of 258

1.14
LOCKING/UNLOCKING THE DOORS (2/2)
Door and tailgate status
indicator
With the ignition on, the warning light
integrated in switch 3 informs you of the
locking status of the opening elements:
– indicator light on, the doors and tail- gate are locked,
– indicator light off, the doors and tail- gate are unlocked.
When you lock the doors, the indicator
light remains lit and then goes out.
Locking the doors without
the RENAULT card
For example, in the event of a dis-
charged battery or the RENAULT card
temporarily not working, etc.
With the engine switched off and
an opening element (door or boot)
open, press and hold switch 3 for more
than five seconds.
When the door is closed, all the doors
and the tailgate will be locked.
Unlocking the vehicle from the outside
is only possible with the RENAULT card
in the vehicle's access zone or using
the key integrated in the RENAULT
card.
Interior locking/unlocking
door control
Switch 3 controls the doors, boot and,
depending on the vehicle, the fuel filler
flap simultaneously.
If a door or the tailgate is open or not
closed properly, the doors and tailgate
lock/unlock quickly.
If you need to transport objects with the
boot open, the other opening elements
can still be locked: with the engine
stopped, press switch 3 for more than
five seconds to lock the other opening
elements.
3
After locking/unlocking the vehicle
using the buttons on the RENAULT
card, "hands-free" locking and un-
locking is deactivated.
To reactivate the “hands-free” mode:
restart the vehicle.Driver’s responsibility
If you decide to keep the
doors locked when you are
driving, remember that it
may be more difficult for those as-
sisting you to gain access to the
passenger compartment in the
event of an emergency.
Never leave your vehicle
with the RENAULT card
inside.
Page 73 of 258
1.67
TRIP COMPUTER: trip settings (3/5)
The display of information shown below DEPENDS ON THE VEHICLE EQUIPMENT \
AND COUNTRY.
Examples of selectionsInterpreting the display selected
On-board computer with mileage-
before-service message
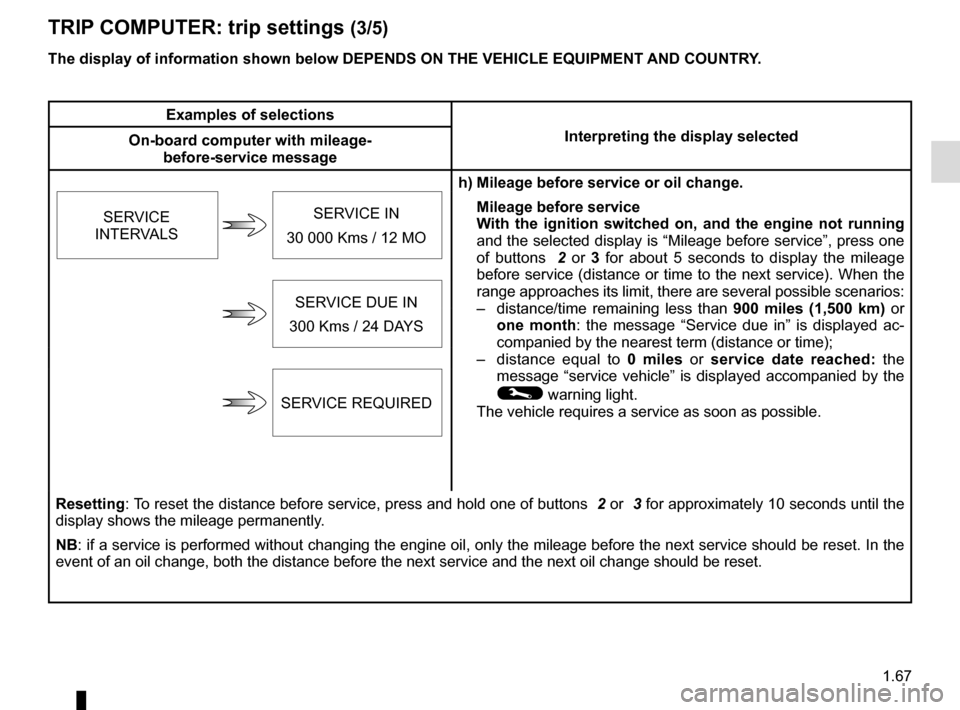
h) Mileage before service or oil change.Mileage before service
With the ignition switched on, and the engine not running
and the selected display is “Mileage before service”, press one
of buttons 2 or 3 for about 5 seconds to display the mileage
before service (distance or time to the next service). When the
range approaches its limit, there are several possible scenarios:
– distance/time remaining less than 900 miles (1,500 km) or
one month : the message “Service due in” is displayed ac-
companied by the nearest term (distance or time);
– distance equal to 0 miles or service date reached: the
message “service vehicle” is displayed accompanied by the
© warning light.
The vehicle requires a service as soon as possible.
SERVICE
INTERVALS
SERVICE IN
30 000 Kms / 12 MO
SERVICE DUE IN
300 Kms / 24 DAYS
SERVICE REQUIRED
Resetting: To reset the distance before service, press and hold one of buttons 2 or 3 for approximately 10 seconds until the
display shows the mileage permanently.
NB: if a service is performed without changing the engine oil, only the mi\
leage before the next service should be reset. In the
event of an oil change, both the distance before the next service and th\
e next oil change should be reset.
Page 74 of 258
1.68
The display of information shown below DEPENDS ON THE VEHICLE EQUIPMENT \
AND COUNTRY.
TRIP COMPUTER: trip settings (4/5)
Examples of selectionsInterpreting the display selected
On-board computer with distance before
next service message (cntd.)
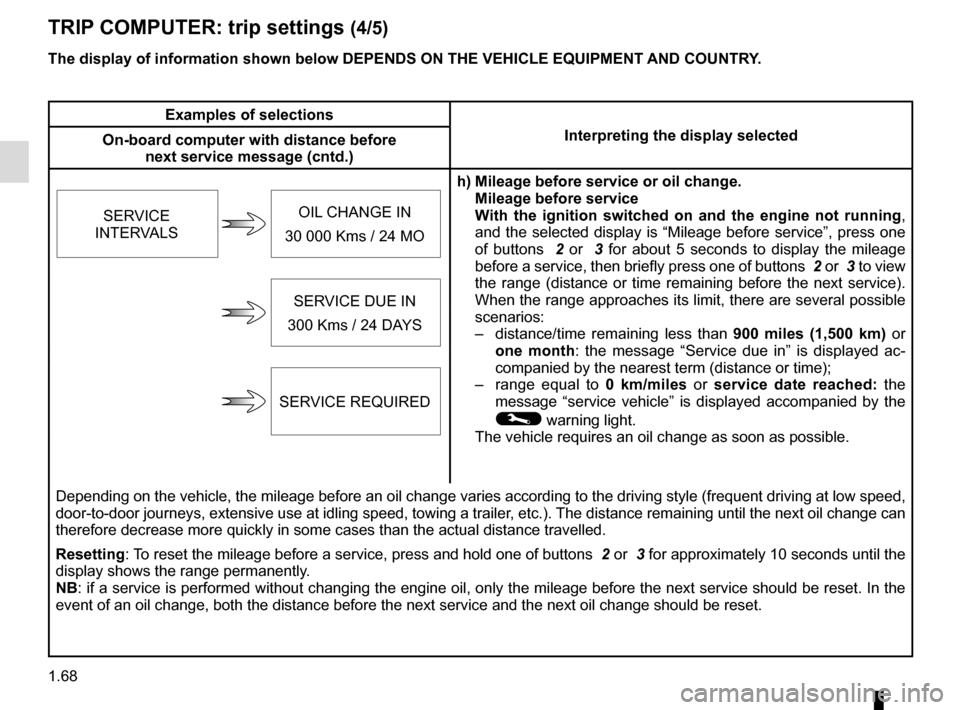
h) Mileage before service or oil change.Mileage before service
With the ignition switched on and the engine not running ,
and the selected display is “Mileage before service”, press one
of buttons 2 or 3 for about 5 seconds to display the mileage
before a service, then briefly press one of buttons 2 or 3 to view
the range (distance or time remaining before the next service).
When the range approaches its limit, there are several possible
scenarios:
– distance/time remaining less than 900 miles (1,500 km) or
one month : the message “Service due in” is displayed ac-
companied by the nearest term (distance or time);
– range equal to 0 km/miles or service date reached: the
message “service vehicle” is displayed accompanied by the
© warning light.
The vehicle requires an oil change as soon as possible.
SERVICE
INTERVALS
OIL CHANGE IN
30 000 Kms / 24 MO
SERVICE DUE IN
300 Kms / 24 DAYS
SERVICE REQUIRED
Depending on the vehicle, the mileage before an oil change varies accord\
ing to the driving style (frequent driving at low speed ,
door-to-door journeys, extensive use at idling speed, towing a trailer, etc.). The distance remaining until the next oil change can
therefore decrease more quickly in some cases than the actual distance t\
ravelled.
Resetting: To reset the mileage before a service, press and hold one of buttons 2 or 3 for approximately 10 seconds until the
display shows the range permanently.
NB: if a service is performed without changing the engine oil, only the mi\
leage before the next service should be reset. In the
event of an oil change, both the distance before the next service and th\
e next oil change should be reset.
Page 144 of 258
3.8
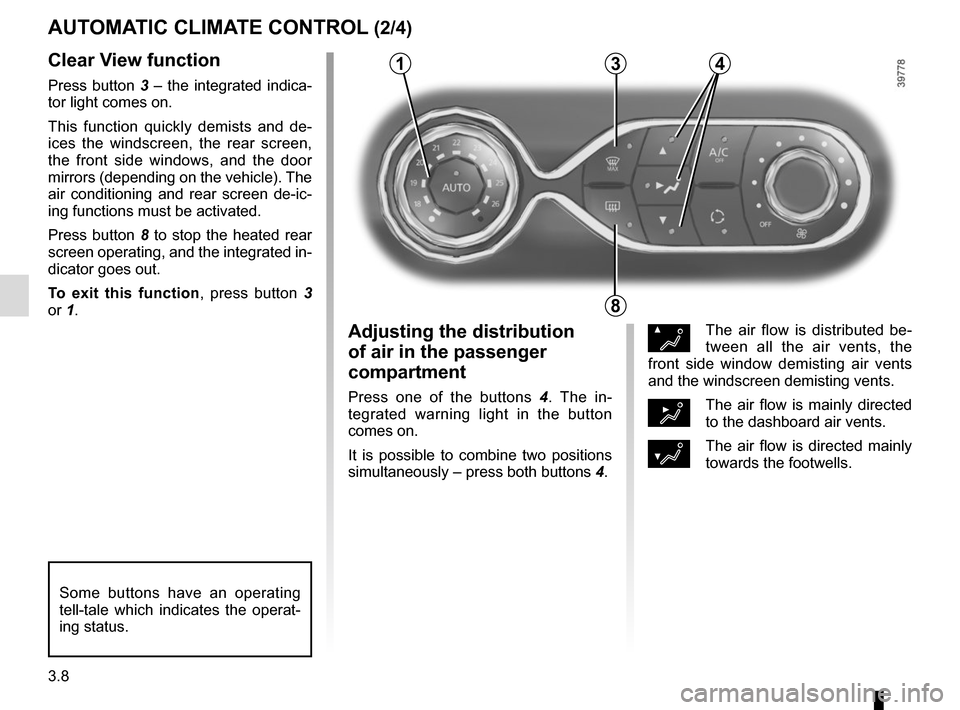
Clear View function
Press button 3 – the integrated indica-
tor light comes on.
This function quickly demists and de-
ices the windscreen, the rear screen,
the front side windows, and the door
mirrors (depending on the vehicle). The
air conditioning and rear screen de-ic-
ing functions must be activated.
Press button 8 to stop the heated rear
screen operating, and the integrated in-
dicator goes out.
To exit this function, press button 3
or 1.
AUTOMATIC CLIMATE CONTROL (2/4)
ØThe air flow is distributed be-
tween all the air vents, the
front side window demisting air vents
and the windscreen demisting vents.
½The air flow is mainly directed
to the dashboard air vents.
¿The air flow is directed mainly
towards the footwells.
Adjusting the distribution
of air in the passenger
compartment
Press one of the buttons 4 . The in-
tegrated warning light in the button
comes on.
It is possible to combine two positions
simultaneously – press both buttons 4.
8
3
Some buttons have an operating
tell-tale which indicates the operat-
ing status.
14