2016 Peugeot 308 ECU
[x] Cancel search: ECUPage 79 of 398
77
308_en_Chap03_ergonomie-et-confort_ed02-2015
Rear seats (hatchback)
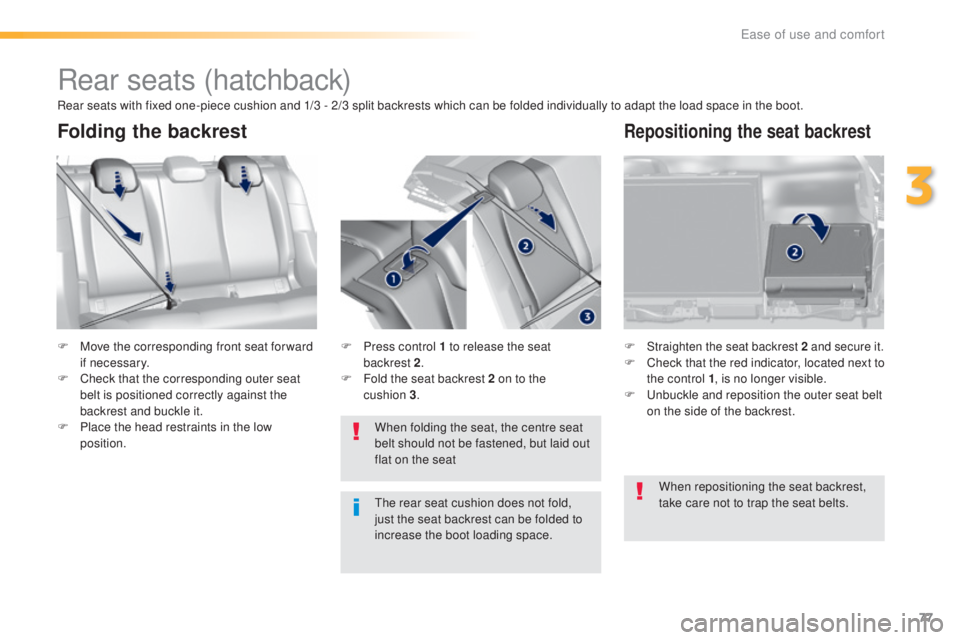
F Move the corresponding front seat for ward
if necessary.
F
Che
ck that the corresponding outer seat
belt is positioned correctly against the
backrest and buckle it.
F
Pl
ace the head restraints in the low
position. F Straighten the seat backrest 2 and secure it.F Check that the red indicator, located next to
t
he control 1 , is no longer visible.
F
u
nb
uckle and reposition the outer seat belt
on the side of the backrest.
When folding the seat, the centre seat
belt should not be fastened, but laid out
flat on the seat
F
Pr
ess control 1 to release the seat
backrest 2 .
F Fo
ld the seat backrest 2 on to the
cushion
3 .
Folding the backrestRepositioning the seat backrest
Rear seats with fixed one-piece cushion and 1/3 - 2/3 split backrests which can be folded individually to adapt the load space in the boot.
the r
ear seat cushion does not fold,
just the seat backrest can be folded to
increase the boot loading space. When repositioning the seat backrest,
take care not to trap the seat belts.
3
ease of use and comfort
Page 81 of 398
79
308_en_Chap03_ergonomie-et-confort_ed02-2015
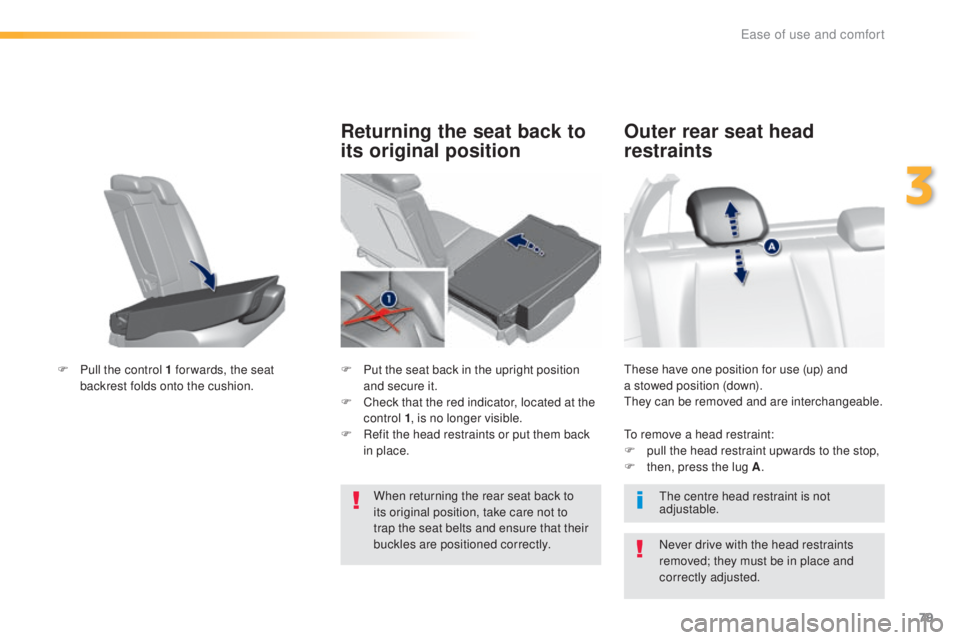
these have one position for use (up) and
a s towed position (down).
the
y can be removed and are interchangeable.
Outer rear seat head
restraints
Never drive with the head restraints
removed; they must be in place and
correctly adjusted.
to re
move a head restraint:
F
pu
ll the head restraint upwards to the stop,
F
th
en, press the lug A
.
the c
entre head restraint is not
adjustable.
F
Pu
ll the control 1 for wards, the seat
backrest folds onto the cushion.
Returning the seat back to
its original position
F Put the seat back in the upright position
a nd secure it.
F
Ch
eck that the red indicator, located at the
control 1 , is no longer visible.
F
Re
fit the head restraints or put them back
in place.
When returning the rear seat back to
its original position, take care not to
trap the seat belts and ensure that their
buckles are positioned correctly.
3
ease of use and comfort
Page 83 of 398

81
308_en_Chap03_ergonomie-et-confort_ed02-2015
Mats
When fitting the mat for the first time, on the
driver's side use only the fixings provided in the
wallet attached.
the o
ther mats are simply placed on the
carpet.
Fitting Removal
Refitting
to avoid any risk of jamming of the
ped als:
-
on
ly use mats which are suited to
the fixings already present in the
vehicle; these fixings must be used,
-
ne
ver fit one mat on top of another.
the u
se of mats not approved by
P
eu
ge
Ot m
ay inter fere with access to
the pedals and hinder the operation of
the cruise control / speed limiter.
the m
ats approved by P
eu
ge
Ot h
ave
two fixings located below the seat.
to re
move the mat on the driver's side:
F
mov
e the seat as far back as possible,
F
unc
lip the fixings,
F
re
move the mat.
to re
fit the mat on the driver's side:
F
po
sition the mat correctly,
F
re
fit the fixings by pressing,
F
ch
eck that the mat is secured correctly.
3
ease of use and comfort
Page 91 of 398
89
308_en_Chap03_ergonomie-et-confort_ed02-2015
To install
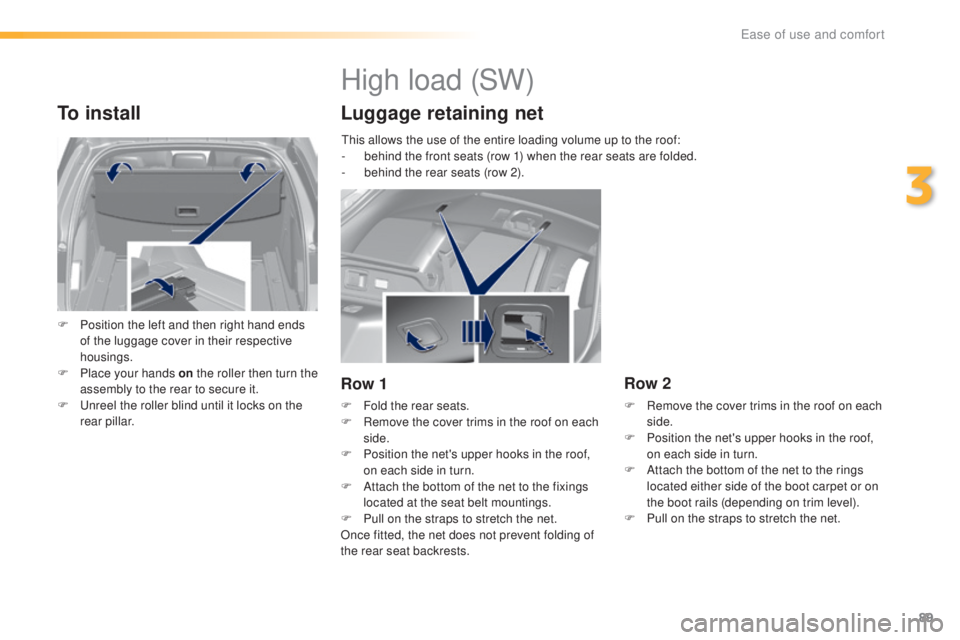
F Position the left and then right hand ends
of the luggage cover in their respective
housings.
F
Pl
ace your hands on the roller then turn the
assembly to the rear to secure it.
F
u
nr
eel the roller blind until it locks on the
rear pillar.
High load (SW)
Luggage retaining net
Row 1
F Fold the rear seats.
F Re move the cover trims in the roof on each
side.
F
Po
sition the net's upper hooks in the roof,
on each side in turn.
F
At
tach the bottom of the net to the fixings
located at the seat belt mountings.
F
Pu
ll on the straps to stretch the net.
Once fitted, the net does not prevent folding of
the rear seat backrests.
Row 2
F Remove the cover trims in the roof on each
si de.
F
Po
sition the net's upper hooks in the roof,
on each side in turn.
F
At
tach the bottom of the net to the rings
located either side of the boot carpet or on
the boot rails (depending on trim level).
F
Pu
ll on the straps to stretch the net.
thi
s allows the use of the entire loading volume up to the roof:
-
be
hind the front seats (row 1) when the rear seats are folded.
-
be
hind the rear seats (row 2).
3
ease of use and comfort
Page 121 of 398
119
308_en_Chap05_securite_ed02-2015
Automatic operation of
hazard warning lamps
Hazard warning lamps
When braking in an emergency, depending on
the rate of deceleration, as well as when the
ABS regulation is invoked or in the event of an
impact, the hazard warning lamps come on
automatically.
the
y switch off automatically the first time you
accelerate.
F
Yo
u can also switch them off by pressing
the button.
emergency or
a ssistance call
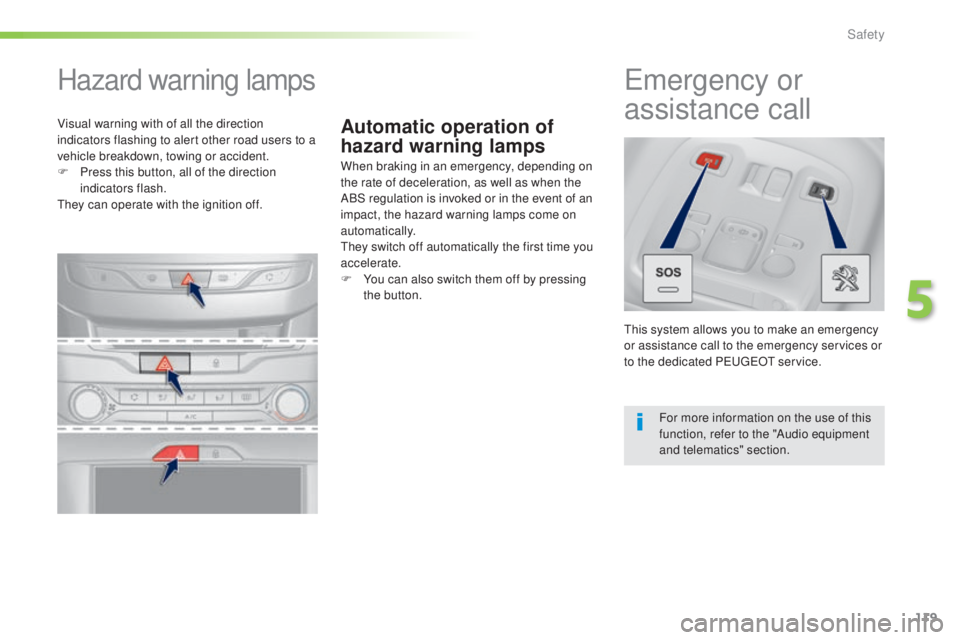
this system allows you to make an emergency
o r assistance call to the emergency services or
to the dedicated P
eu
ge
Ot s
ervice.
For more information on the use of this
function, refer to the "Audio equipment
and telematics" section.
Visual warning with of all the direction
indicators flashing to alert other road users to a
vehicle breakdown, towing or accident.
F
Pr
ess this button, all of the direction
indicators flash.
the
y can operate with the ignition off.
5
Safety
Page 122 of 398

120
308_en_Chap05_securite_ed02-2015
electronic Stability Control (eSC) incorporating
the following systems:
-
an
ti-lock braking system (ABS) and the
electronic brake force distribution (
eBF
D),
-
emer
gency braking assistance (
eBA)
,
-
wh
eel anti-slip regulation (ASR) or traction
control,
-
dy
namic stability control (DSC).
electronic stability control (eSC )
Definitions
Anti-lock braking system (ABS)
and electronic brake force
distribution (EBFD)
this system improves the stability and
m anoeuvrability of your vehicle when braking
and contributes towards improved control in
corners, in particular on poor or slippery road
surfaces.
the A
BS prevents wheel lock in the event of
emergency braking.
the e
lectronic brake force distribution system
manages the braking pressure wheel by wheel.
Emergency braking assistance
(EBA)
In an emergency, this system enables you to
reach the optimum braking pressure more
quickly and therefore reduce the stopping
distance.
It is triggered according to the speed at which
the brake pedal is pressed.
thi
s is felt by a
reduction in the resistance of the pedal and an
increase in the effectiveness of the braking.
Anti-slip regulation (ASR)
the ASR system (also known as tra ction
Control) optimises traction in order to limit
wheel slip by acting on the brakes of the driving
wheels and on the engine. It also improves
the directional stability of the vehicle on
acceleration.
Dynamic stability control (DSC)
If there is a difference between the path
followed by the vehicle and that required by
the driver, the DSC monitors each wheel and
automatically acts on the brake of one or more
wheels and on the engine to return the vehicle
to the required path, within the limits of the laws
of physics.
Horn
F Press the central part of the steering
w heel.
Safety
Page 123 of 398

121
308_en_Chap05_securite_ed02-2015
Operation
Anti-lock braking system (ABS)
and electronic brake force
distribution (EBFD)
In emergency braking, press
very firmly without releasing the
pressure. When changing wheels (tyres and rims),
make sure that these are approved for
your vehicle.
Normal operation of the ABS may make
itself felt by slight vibrations of the brake
pedal.
When this warning lamp comes on,
accompanied by an audible signal
and a message, it indicates that there
is a fault with the ABS, which could
cause loss of control of the vehicle
when braking.
When this warning lamp comes on,
coupled with the STOP
warning
lamp, accompanied by an audible
signal and a message, it indicates
Intelligent traction control
system
the use of snow tyres is strongly recommended
o n sur faces offering low levels of adhesion.
that there is a fault with the electronic brake
force distribution (
eBF
D), which could cause
loss of control of the vehicle when braking.
You must stop as soon as it is safe to do so.
In both cases, contact a P
eu
ge
Ot d
ealer or a
qualified workshop.
Depending on version, your vehicle has a
system to help driving on snow: intelligent
traction control
.
thi
s system detects situations of difficult
sur face adhesion that could make it difficult to
move off or make progress on deep fresh snow
or compacted snow.
In these situations, the intelligent traction
control limits the amount of wheel slip to
provide the best traction and trajectory control
for your vehicle.
5
Safety
Page 124 of 398
122
308_en_Chap05_securite_ed02-2015
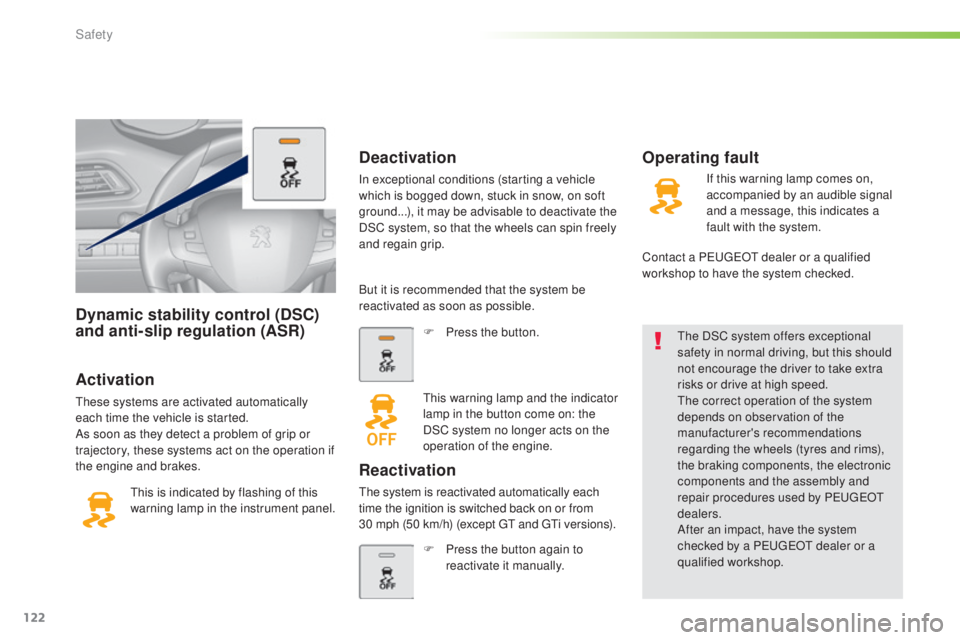
Dynamic stability control (DSC)
and anti-slip regulation (ASR)
Activation
these systems are activated automatically
e ach time the vehicle is started.
As soon as they detect a problem of grip or
trajectory, these systems act on the operation if
the engine and brakes.
thi
s is indicated by flashing of this
warning lamp in the instrument panel.
the D
SC system offers exceptional
safety in normal driving, but this should
not encourage the driver to take extra
risks or drive at high speed.the c orrect operation of the system
depends on observation of the
manufacturer's recommendations
regarding the wheels (tyres and rims),
the braking components, the electronic
components and the assembly and
repair procedures used by P
eu
ge
Ot
d
ealers.
After an impact, have the system
checked by a P
eu
ge
Ot d
ealer or a
qualified workshop.
Deactivation
In exceptional conditions (starting a vehicle
which is bogged down, stuck in snow, on soft
ground...), it may be advisable to deactivate the
DSC system, so that the wheels can spin freely
and regain grip.
Operating fault
But it is recommended that the system be
reactivated as soon as possible.
F
Pr
ess the button.
thi
s warning lamp and the indicator
lamp in the button come on: the
DSC system no longer acts on the
operation of the engine.
Reactivation
the system is reactivated automatically each
t ime the ignition is switched back on or from
30 mph (50 km/h) (except
g
t
a
nd
g
t
i ve
rsions).
F
Pr
ess the button again to
reactivate it manually. If this warning lamp comes on,
accompanied by an audible signal
and a message, this indicates a
fault with the system.
Contact a P
eu
ge
Ot d
ealer or a qualified
workshop to have the system checked.
Safety