2016 Peugeot 308 services
[x] Cancel search: servicesPage 39 of 398

37
308_en_Chap01_instruments-de-bord_ed02-2015
touch screen
It gives access to:
- the heating/air conditioning controls,
-
me
nus for adjusting settings for vehicle
functions and systems,
-
au
dio and display configuration menus,
-
au
dio system and telephone controls and
the display of associated information.
For reasons of safety, the driver
should only carr y out operations
that require close attention, with the
vehicle stationary.
Some functions are not accessible
when driving.General operation
Recommendations
It is necessary to press firmly, particularly for
"flick" gestures (scrolling through lists, moving
the map...).
A light wipe is not enough.
the s
creen does not recognise pressing with
more than one finger.
thi
s technology allows use at all temperatures
and when wearing gloves.
Do not use pointed objects on the touch
screen.
Do not touch the touch screen with wet hands.
use
s a soft clean cloth to clean the touch
screen.
And, depending on equipment, it allows:
-
th
e display of alert messages and the
visual parking sensors information,
-
ac
cess to the controls for the navigation
system and Internet services, and the
display of associated information.
State of indicator lamps
Some buttons contain an indicator lamp that
gives the state of the corresponding function.
gre
en indicator: you have switched on the
corresponding function.
Orange indicator: you have switched off the
corresponding function.
1
Instruments
Page 40 of 398

38
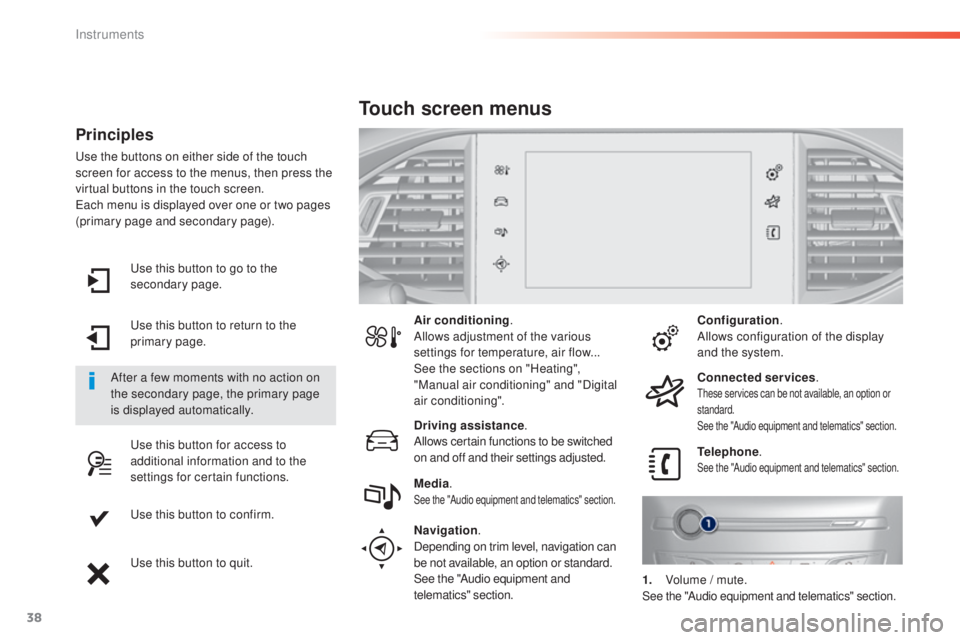
use this button to go to the
s econdary page.
use t
his button to return to the
primary page.
use t
his button for access to
additional information and to the
settings for certain functions.
use t
his button to confirm.
use t
his button to quit.
Principles
use the buttons on either side of the touch
s creen for access to the menus, then press the
virtual buttons in the touch screen.
eac
h menu is displayed over one or two pages
(primary page and secondary page).
After a few moments with no action on
the secondary page, the primary page
is displayed automatically. Air conditioning
.
Allows adjustment of the various
settings for temperature, air flow...
See the sections on "Heating",
"Manual air conditioning" and "Digital
air conditioning".
Touch screen menus
Driving assistance .
Allows certain functions to be switched
on and off and their settings adjusted. Telephone
.
See the "Audio equipment and telematics" section.Media.See the "Audio equipment and telematics" section.
Navigation .
Depending on trim level, navigation can
be not available, an option or standard.
See the "Audio equipment and
telematics" section. Configuration
.
Allows configuration of the display
and the system.
Connected services .
these services can be not available, an option or
s tandard.
See the "Audio equipment and telematics" section.
1. Volume / m ute.See the "Audio equipment and telematics" section.
Instruments
Page 51 of 398

49
308_en_Chap02_ouvertures_ed02-2015
Selective unlocking
F to unlock the driver's door only,
p ress the open padlock once.
Using the remote control
Complete unlocking is activated by default.this is set in the " Driving assistance " menu,
then " Vehicle settings " and "Vehicle access ".
unl
ocking is confirmed by rapid
flashing of the direction indicators for
approximately two seconds.
According to version, the door mirrors
unfold at the same time as the first
unlocking action.
F
t
o un
lock the other doors and the boot,
press the open padlock again.
use t
his button for access to
additional information. Locking is confirmed by fixed
lighting of the direction indicators for
approximately two seconds.
According to version, the door mirrors
fold at the same time.
Driving with the doors locked may
render access for the emergency
services difficult in an emergency.
As a safety measure (children on
board), never leave the vehicle without
taking your key, even for a short period.
Normal locking
Using the remote control
F Press the closed padlock to lock
t he vehicle completely.
Using the key
F turn the key towards the rear of the vehicle
t o lock the vehicle completely.
If your vehicle has an alarm, this will not be
activated.
Maintaining the locking action (key or remote
control) automatically closes the windows. When a door or the boot is not
fully closed, engine running or
vehicle moving (speed above 6 mph
(10
k
m/h)), a message appears for a
few seconds.
2
Access
Page 56 of 398

54
308_en_Chap02_ouvertures_ed02-2015
"Keyless entry and Starting" with remote
control
Complete unlocking Selective unlocking
System for the central locking or unlocking
of the vehicle using the door lock or from a
distance.
It is also used to locate and start the vehicle, as
well as providing protection against theft.
Complete unlocking is activated by default.
unl
ocking is confirmed by rapid
flashing of the direction indicators for
two
se
conds.
At the same time, depending on
version, the door mirrors unfold. And
if your vehicle has an alarm, it is
deactivated F
t
o un
lock only the driver's door,
press the open padlock once.
F
Pr
ess the open padlock to unlock
the vehicle. F
t
o un
lock the other doors and the boot,
press the open padlock again.
thi
s setting is done in the "Driving
assistance" menu, then "Vehicle settings"
and "Vehicle access" .
use t
his button for access to
additional information.
Locking
Locking is confirmed by fixed lighting of
the direction indicators for a few s econds.
Depending on your version, the door
mirrors fold, the alarm is activated. F
Pr
ess the closed padlock to lock
the vehicle completely.
Ho
ld the button down until the
windows close completely.
Driving with the doors locked may make
access to the passenger compartment
by the emergency services difficult in
the event of an emergency.
Be aware of children when operating
the windows. If a door or the boot is not properly
closed, with the engine running
or the vehicle moving (speed
above 6
m
ph (10 km/h)), a message
appears for a few seconds.
Access
Page 65 of 398

63
308_en_Chap02_ouvertures_ed02-2015
Lost keys, remote control, electronic key
Visit a PeugeOt dealer with the vehicle's registration certificate, your personal identification documents and if possible, the label bearing the
key code.
the Peu
ge
Ot d
ealer will be able to retrieve the key code and the transponder code required to order a new key
Remote control
the high frequency remote control is a sensitive system; do not operate it while it is in your pocket as there is a possibility that it may unlock the
v ehicle, without you being aware of it.
Do not repeatedly press the buttons of your remote control out of range and out of sight of your vehicle. You run the risk of stopping it from
working and the remote control would have to be reinitialised.
the r
emote control does not operate when the key is in the ignition, even when the ignition is switched off.
Locking the vehicle
Driving with the doors locked may make access to the passenger compartment by the emergency services more difficult in an emergency.
As a safety precaution (with children on board), remove the key from the ignition or take the electronic key when you leave the vehicle, even for
a short time.
Electrical interference
the Keyless ent ry and Starting electronic key may not operate if close to certain electronic devices: telephone, laptop computer, strong
magnetic fields, ...
Anti-theft protection
Do not make any modifications to the electronic engine immobiliser system; this could cause malfunctions.
Don't forget to turn the steering to engage the steering lock.
When purchasing a second-hand vehicle
Have the key codes memorised by a Peu geOt d ealer, to ensure that the keys in your possession are the only ones which can start the vehicle.
2
Access
Page 66 of 398

64
308_en_Chap02_ouvertures_ed02-2015
Locking/ unlocking from the inside
After unlocking, if no door is opened
within 30 seconds, the doors lock again
automatically.If the vehicle is deadlocked or locked
with the remote control or the door
handles, the button is not active. In this
case, use the key or the remote control
to unlock. Driving with the doors locked may make
access to the passenger compartment
by the emergency services more
difficult in an emergency.
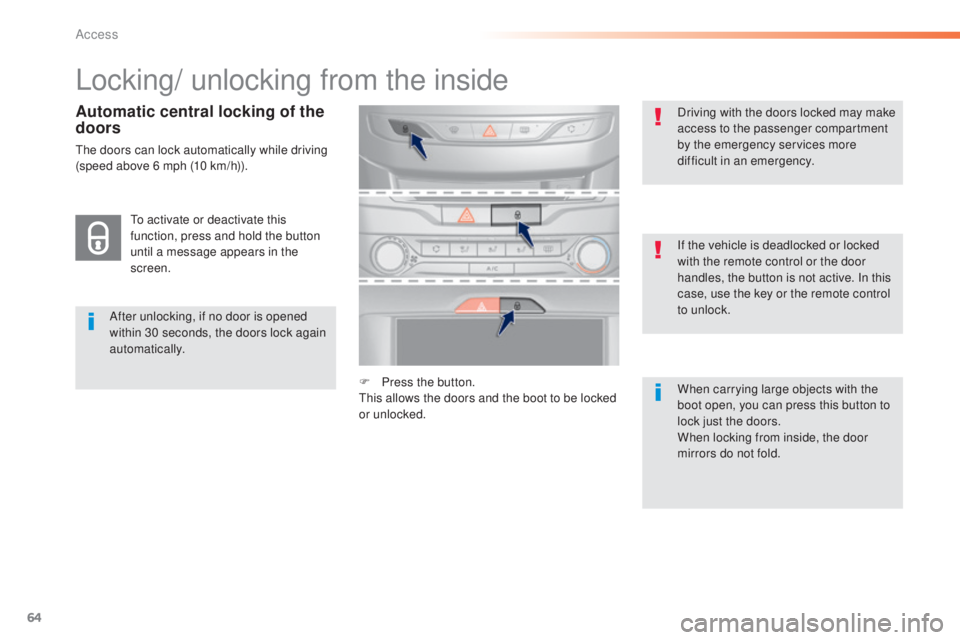
F
Pr
ess the button.
thi
s allows the doors and the boot to be locked
or unlocked. When carrying large objects with the
boot open, you can press this button to
lock just the doors.
When locking from inside, the door
mirrors do not fold.
to ac
tivate or deactivate this
function, press and hold the button
until a message appears in the
screen.
Automatic central locking of the
doors
the doors can lock automatically while driving
( speed above 6 mph (10 km/h)).
Access
Page 121 of 398

119
308_en_Chap05_securite_ed02-2015
Automatic operation of
hazard warning lamps
Hazard warning lamps
When braking in an emergency, depending on
the rate of deceleration, as well as when the
ABS regulation is invoked or in the event of an
impact, the hazard warning lamps come on
automatically.
the
y switch off automatically the first time you
accelerate.
F
Yo
u can also switch them off by pressing
the button.
emergency or
a ssistance call
this system allows you to make an emergency
o r assistance call to the emergency services or
to the dedicated P
eu
ge
Ot s
ervice.
For more information on the use of this
function, refer to the "Audio equipment
and telematics" section.
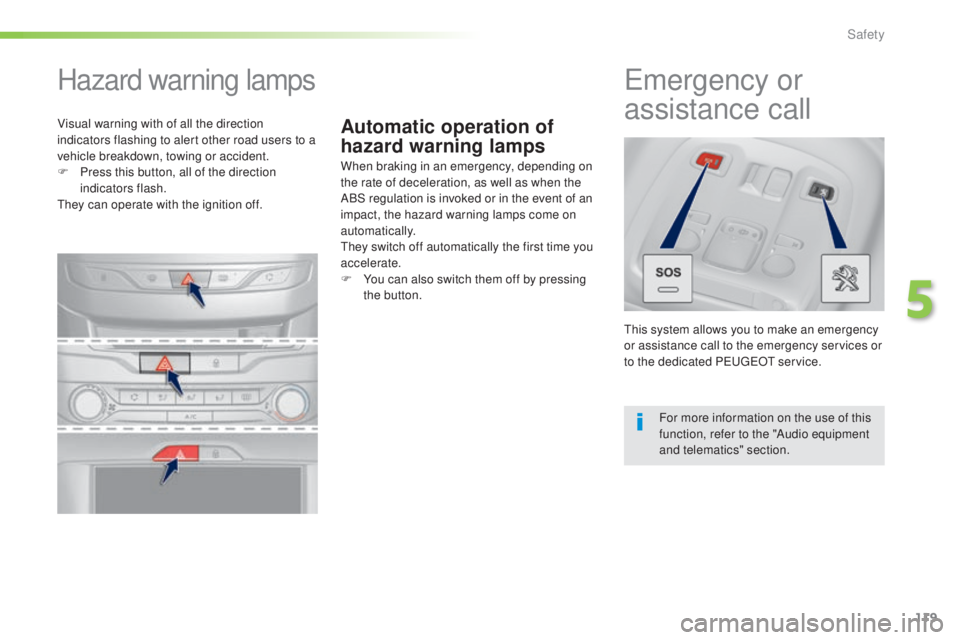
Visual warning with of all the direction
indicators flashing to alert other road users to a
vehicle breakdown, towing or accident.
F
Pr
ess this button, all of the direction
indicators flash.
the
y can operate with the ignition off.
5
Safety
Page 231 of 398

229
308_en_Chap07_info-pratiques_ed02-2015
Checking levels
take care when working under the bonnet, as certain areas of the engine may be extremely hot (risk of burns) and the cooling fan could start at
a ny time (even with the ignition off).
Engine oil level
the check is carried out either when
t he ignition is switched on using the
oil level indicator in the instrument
panel for vehicles so equipped, or
using the dipstick.Checking using the dipstick
F Locate the dipstick in the engine
c ompartment of your vehicle.
For more information on the petrol or Diesel
engine, refer to the corresponding section.
F
t
ak
e the dipstick by its coloured grip and
remove it completely.
F
Wi
pe the end of the dipstick using a clean
non-fluffy cloth.
F
Re
fit the dipstick and push fully down, then
pull it out again to make the visual check:
the correct level is between the marks A
and B .
Check all of these levels regularly, in line with the manufacturer's service schedule.
top t
hem up if necessary, unless other wise indicated.
If a level drops significantly, have the corresponding system checked by a P
eu
ge
Ot d
ealer or a qualified workshop.
A = MA X
to en
sure that the reading is correct, your
vehicle must be parked on a level sur face
with the engine having been off for more than
30
m
inutes.
It is normal to top up the oil level between
two services (or oil changes). P
eu
ge
Ot
r
ecommends that you check the level, and top
up if necessary, every 3 000 miles (5 000 kms). B = MIN
If you find that the level is above the A mark or
below the B mark, do not star t the engine .
-
If t
he level is above the MAX mark (risk
of damage to the engine), contact a
P
eu
ge
Ot d
ealer or a qualified workshop.
-
If t
he level is below the MIN mark, you
must top up the engine oil.
7
Practical information