2016 NISSAN NOTE starter battery
[x] Cancel search: starter batteryPage 3161 of 3641

SYSTEMSTR-9
< SYSTEM DESCRIPTION >
C
DE
F
G H
I
J
K L
M A
STR
NP
O
STARTING SYSTEM (WITH INTELL
IGENT KEY) : System DiagramINFOID:0000000012432066
STARTING SYSTEM (WITH INTELLIG ENT KEY) : System DescriptionINFOID:0000000012432067
• When the selector lever is in the P or N position, power is supplied to starter relay and starter control relay by
the transmission range switch. The BCM and IPDM E/R (C PU) will detect the selector lever position by the
input signal.
• When the starter operating condition is met, the IPDM E/R will turn the starter control relay ON by starter
control relay control signal.
• When engine cranking condition is met, the BCM turns ON the starter relay by starter control relay signal.
• Then battery power is supplied to starter motor (“S” terminal) through the starter control relay and starter
relay.
ALBIA1231GB
Revision: August 2015 2016 Versa Note
cardiagn.com
Page 3174 of 3641
STR-22
< BASIC INSPECTION >
DIAGNOSIS AND REPAIR WORKFLOW
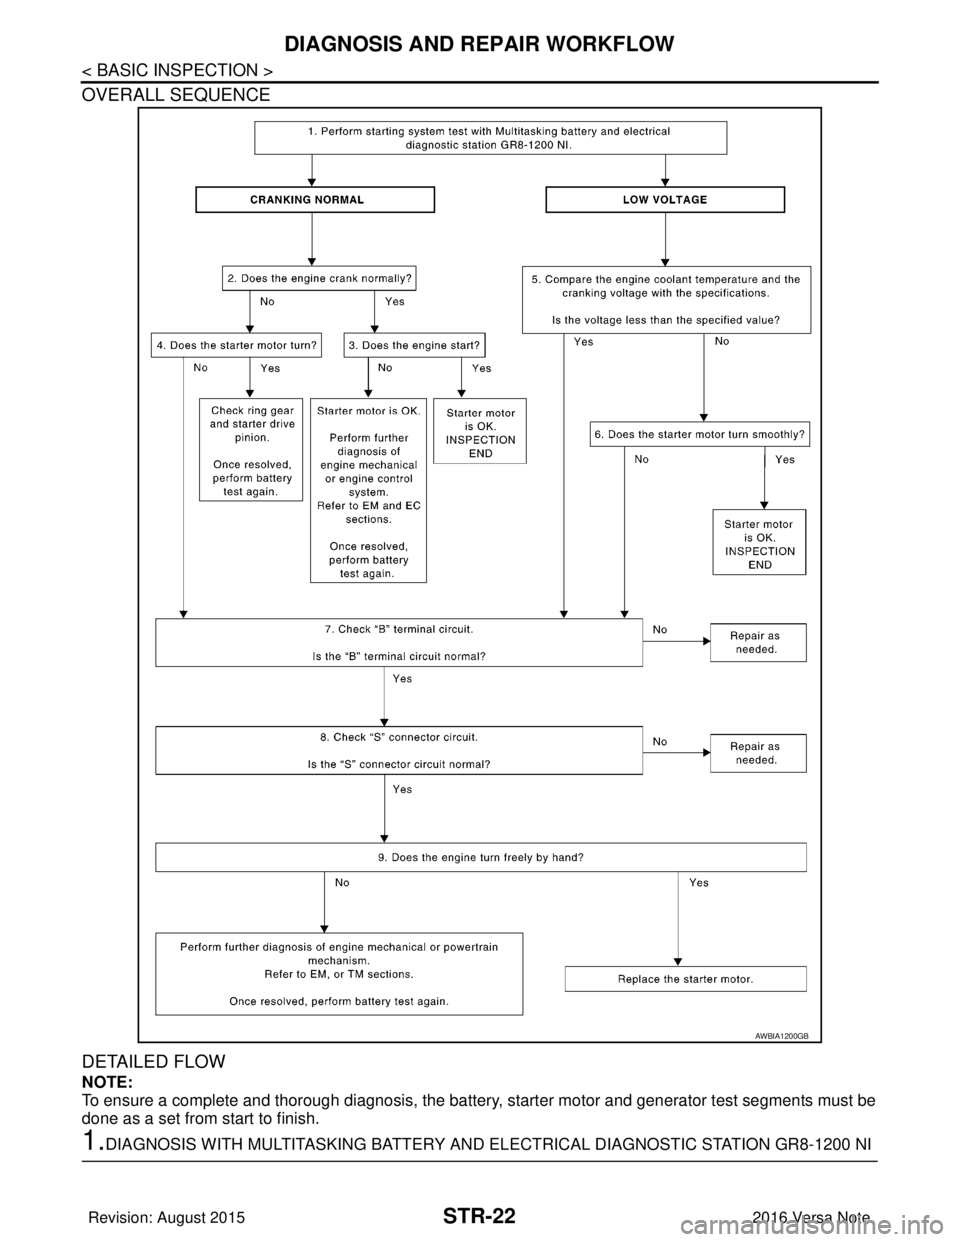
OVERALL SEQUENCE
DETAILED FLOW
NOTE:
To ensure a complete and thorough diagnosis, the battery, starter motor and generator test segments must be
done as a set from start to finish.
1.DIAGNOSIS WITH MULTITASKING BATTERY AND ELECTRICAL DIAGNOSTIC STATION GR8-1200 NI
AWBIA1200GB
Revision: August 2015 2016 Versa Note
cardiagn.com
Page 3175 of 3641
DIAGNOSIS AND REPAIR WORKFLOWSTR-23
< BASIC INSPECTION >
C
DE
F
G H
I
J
K L
M A
STR
NP
O
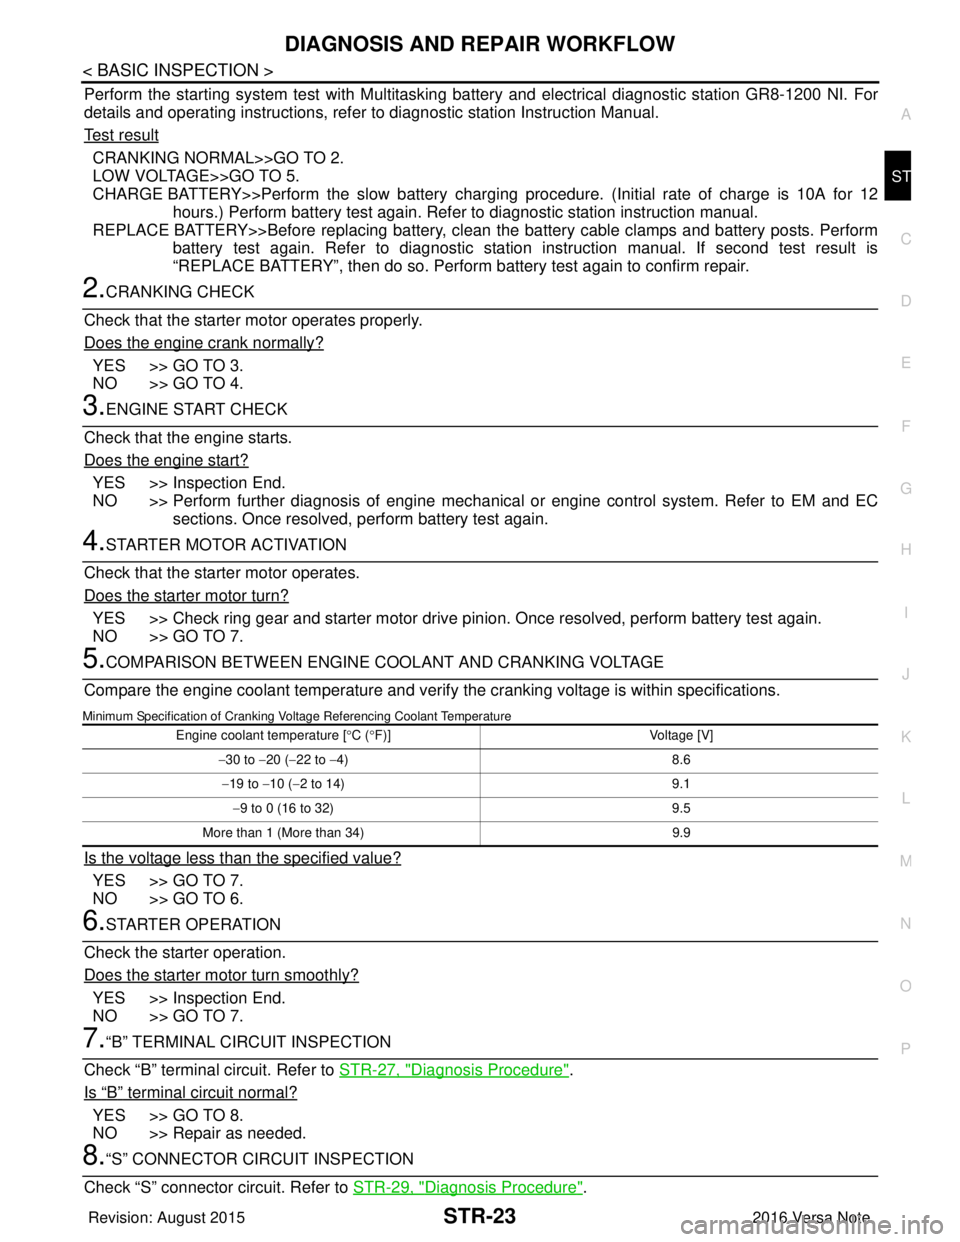
Perform the starting system test with Multitasking bat
tery and electrical diagnostic station GR8-1200 NI. For
details and operating instructions, refer to diagnostic station Instruction Manual.
Test result
CRANKING NORMAL>>GO TO 2.
LOW VOLTAGE>>GO TO 5.
CHARGE BATTERY>>Perform the slow battery charging procedure. (Initial rate of charge is 10A for 12
hours.) Perform battery test again. Refer to diagnostic station instruction manual.
REPLACE BATTERY>>Before replacing battery, clean the battery cable clamps and battery posts. Perform battery test again. Refer to diagnostic station instruction manual. If second test result is
“REPLACE BATTERY”, then do so. Perform battery test again to confirm repair.
2.CRANKING CHECK
Check that the starter motor operates properly.
Does the engine crank normally?
YES >> GO TO 3.
NO >> GO TO 4.
3.ENGINE START CHECK
Check that the engine starts.
Does the engine start?
YES >> Inspection End.
NO >> Perform further diagnosis of engine mechanical or engine control system.\
Refer to EM and EC sections. Once resolved, perform battery test again.
4.STARTER MOTOR ACTIVATION
Check that the starter motor operates.
Does the starter motor turn?
YES >> Check ring gear and starter motor drive pinion. Once resolved, perform battery test again.
NO >> GO TO 7.
5.COMPARISON BETWEEN ENGINE C OOLANT AND CRANKING VOLTAGE
Compare the engine coolant temperature and verify the cranking voltage is within specifications.
Minimum Specification of Cranking Voltage Referencing Coolant Temperature
Is the voltage less than the specified value?
YES >> GO TO 7.
NO >> GO TO 6.
6.STARTER OPERATION
Check the starter operation.
Does the starter motor turn smoothly?
YES >> Inspection End.
NO >> GO TO 7.
7.“B” TERMINAL CIRCUIT INSPECTION
Check “B” terminal circuit. Refer to STR-27, "
Diagnosis Procedure".
Is
“B” terminal circuit normal?
YES >> GO TO 8.
NO >> Repair as needed.
8.“S” CONNECTOR CIRCUIT INSPECTION
Check “S” connector circuit. Refer to STR-29, "
Diagnosis Procedure".
Engine coolant temperature [°C ( °F)] Voltage [V]
− 30 to −20 ( −22 to − 4) 8.6
− 19 to − 10 (−2 to 14) 9.1
− 9 to 0 (16 to 32) 9.5
More than 1 (More than 34) 9.9
Revision: August 2015 2016 Versa Note
cardiagn.com
Page 3176 of 3641

STR-24
< BASIC INSPECTION >
DIAGNOSIS AND REPAIR WORKFLOW
Is “S” connector circuit normal?
YES >> GO TO 9.
NO >> Repair as needed.
9.ENGINE ROTATION STATUS
Check that the engine can be rotated by hand.
Does the engine turn freely by hand?
YES >> Replace starter motor. Refer to STR-31, "Removal and Installation".
NO >> Perform further diagnosis of engine mechanical or powertrain mechanism. Once resolved, per-
form battery test again using Multitasking battery and electrical diagnostic station GR8-1200 NI.
Refer to the diagnostic station Instruction Manual for proper testing procedures.
Revision: August 2015 2016 Versa Note
cardiagn.com
Page 3178 of 3641
STR-26
< BASIC INSPECTION >
DIAGNOSIS AND REPAIR WORKFLOW
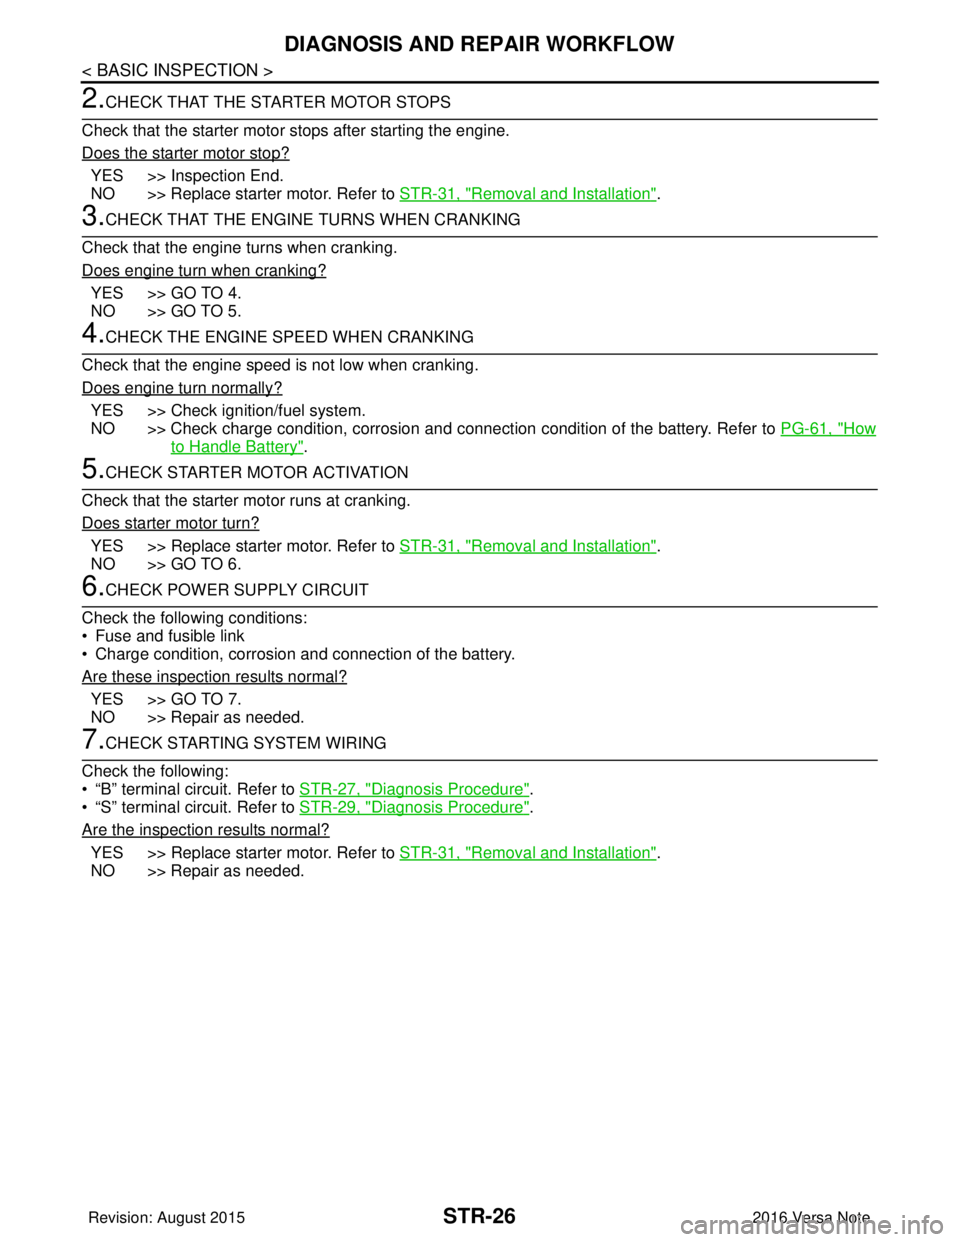
2.CHECK THAT THE STARTER MOTOR STOPS
Check that the starter motor stops after starting the engine.
Does the starter motor stop?
YES >> Inspection End.
NO >> Replace starter motor. Refer to STR-31, "
Removal and Installation".
3.CHECK THAT THE ENGINE TURNS WHEN CRANKING
Check that the engine turns when cranking.
Does engine turn when cranking?
YES >> GO TO 4.
NO >> GO TO 5.
4.CHECK THE ENGINE SPEED WHEN CRANKING
Check that the engine speed is not low when cranking.
Does engine turn normally?
YES >> Check ignition/fuel system.
NO >> Check charge condition, corrosion and connection condition of the battery. Refer to PG-61, "
How
to Handle Battery".
5.CHECK STARTER MOTOR ACTIVATION
Check that the starter motor runs at cranking.
Does starter motor turn?
YES >> Replace starter motor. Refer to STR-31, "Removal and Installation".
NO >> GO TO 6.
6.CHECK POWER SUPPLY CIRCUIT
Check the following conditions:
• Fuse and fusible link
• Charge condition, corrosion and connection of the battery.
Are these inspection results normal?
YES >> GO TO 7.
NO >> Repair as needed.
7.CHECK STARTING SYSTEM WIRING
Check the following:
• “B” terminal circuit. Refer to STR-27, "
Diagnosis Procedure".
• “S” terminal circuit. Refer to STR-29, "
Diagnosis Procedure".
Are the inspection results normal?
YES >> Replace starter motor. Refer to STR-31, "Removal and Installation".
NO >> Repair as needed.
Revision: August 2015 2016 Versa Note
cardiagn.com
Page 3179 of 3641
B TERMINAL CIRCUITSTR-27
< DTC/CIRCUIT DIAGNOSIS >
C
DE
F
G H
I
J
K L
M A
STR
NP
O
DTC/CIRCUIT DIAGNOSIS
B TERMINAL CIRCUIT
DescriptionINFOID:0000000012432072
Terminal “B” is constantly supplied with battery power.
Diagnosis ProcedureINFOID:0000000012432073
Regarding Wiring Diagram information, refer to
STR-10, "Wiring Diagram - With Intelligent Key System" or
STR-16, "
Wiring Diagram - Without Intelligent Key System".
CAUTION:
Perform diagnosis under the cond ition that the engine cannot start by the following procedure.
1. Remove fuel pump fuse.
2. Crank or start the engine (where possi ble) until the fuel pressure is released.
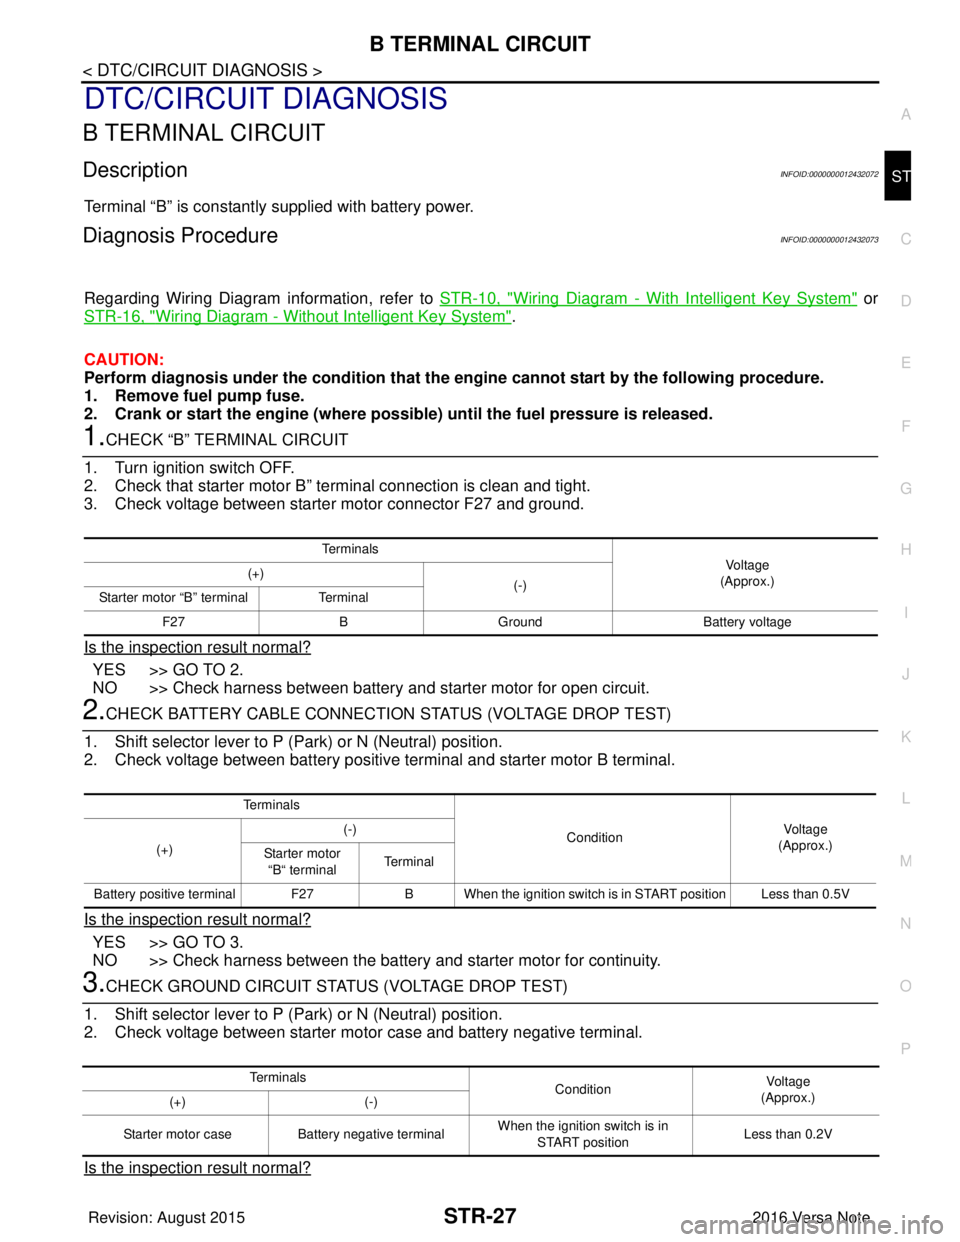
1.CHECK “B” TERMINAL CIRCUIT
1. Turn ignition switch OFF.
2. Check that starter motor B” terminal connection is clean and tight.
3. Check voltage between starter motor connector F27 and ground.
Is the inspection result normal?
YES >> GO TO 2.
NO >> Check harness between battery and starter motor for open circuit.
2.CHECK BATTERY CABLE CONNECTION STATUS (VOLTAGE DROP TEST)
1. Shift selector lever to P (P ark) or N (Neutral) position.
2. Check voltage between battery positive terminal and starter motor B terminal.
Is the inspection result normal?
YES >> GO TO 3.
NO >> Check harness between the battery and starter motor for continuity.
3.CHECK GROUND CIRCUIT STATUS (VOLTAGE DROP TEST)
1. Shift selector lever to P (P ark) or N (Neutral) position.
2. Check voltage between starter motor case and battery negative terminal.
Is the inspection result normal?
Te r m i n a l s
Voltage
(Approx.)
(+)
(-)
Starter motor “B” terminal Terminal
F27 BGround Battery voltage
Te r m i n a l s
ConditionVoltage
(Approx.)
(+) (-)
Starter motor “B“ terminal Terminal
Battery positive terminal F27 B When the ignition switch is in START position Less than 0.5V
Te r m i n a l s
ConditionVoltage
(Approx.)
(+) (-)
Starter motor case Battery negative terminal When the ignition switch is in
START position Less than 0.2V
Revision: August 2015
2016 Versa Note
cardiagn.com
Page 3181 of 3641
S CONNECTOR CIRCUITSTR-29
< DTC/CIRCUIT DIAGNOSIS >
C
DE
F
G H
I
J
K L
M A
STR
NP
O
S CONNECTOR CIRCUIT
DescriptionINFOID:0000000012432074
The starter motor magnetic switch is supplied with power when the ignition switch is turned to the START posi-
tion while the selector lever is in the P (Park) or N (Neutral) position.
Diagnosis ProcedureINFOID:0000000012432075
Regarding Wiring Diagram information, refer to
STR-10, "Wiring Diagram - With Intelligent Key System" or
STR-16, "
Wiring Diagram - Without Intelligent Key System".
CAUTION:
Perform diagnosis under the cond ition that engine cannot start by the following procedure.
1. Remove fuel pump fuse.
2. Crank or start the engine (where possi ble) until the fuel pressure is released.
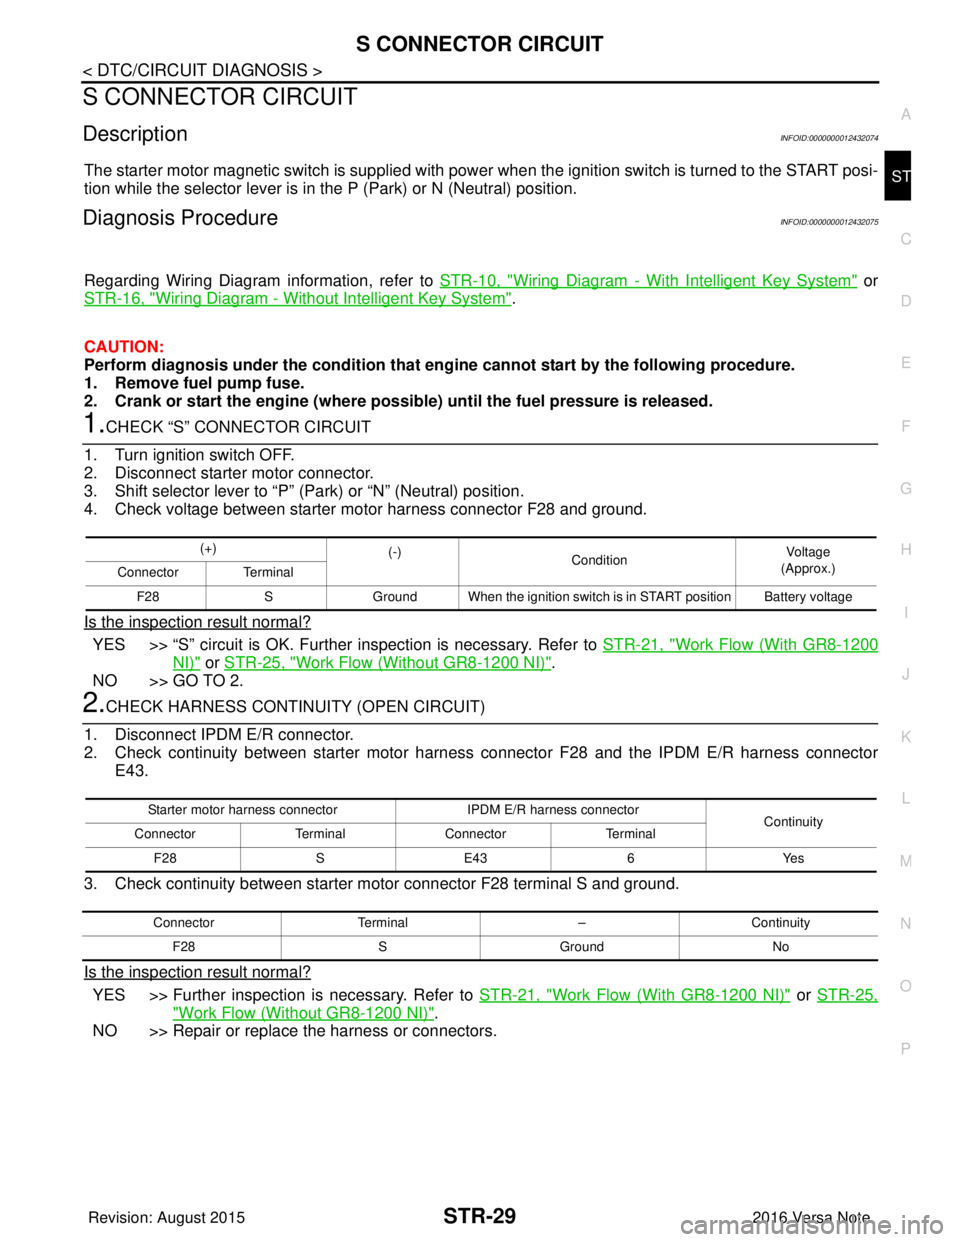
1.CHECK “S” CONNECTOR CIRCUIT
1. Turn ignition switch OFF.
2. Disconnect starter motor connector.
3. Shift selector lever to “P” (Park) or “N” (Neutral) position.
4. Check voltage between starter motor harness connector F28 and ground.
Is the inspection result normal?
YES >> “S” circuit is OK. Further inspection is necessary. Refer to STR-21, "Work Flow (With GR8-1200
NI)" or STR-25, "Work Flow (Without GR8-1200 NI)".
NO >> GO TO 2.
2.CHECK HARNESS CONTINUI TY (OPEN CIRCUIT)
1. Disconnect IPDM E/R connector.
2. Check continuity between starter motor harnes s connector F28 and the IPDM E/R harness connector
E43.
3. Check continuity between starter motor connector F28 terminal S and ground.
Is the inspection result normal?
YES >> Further inspection is necessary. Refer to STR-21, "Work Flow (With GR8-1200 NI)" or STR-25,
"Work Flow (Without GR8-1200 NI)".
NO >> Repair or replace the harness or connectors.
(+) (-)
Condition Voltage
(Approx.)
Connector Terminal
F28 SGround When the ignition switch is in START position Battery voltage
Starter motor harness connector IPDM E/R harness connector
Continuity
Connector TerminalConnector Terminal
F28 SE43 6Yes
Connector Terminal –Continuity
F28 SGround No
Revision: August 2015 2016 Versa Note
cardiagn.com
Page 3183 of 3641
STARTER MOTORSTR-31
< REMOVAL AND INSTALLATION >
C
DE
F
G H
I
J
K L
M A
STR
NP
O
REMOVAL AND INSTALLATION
STARTER MOTOR
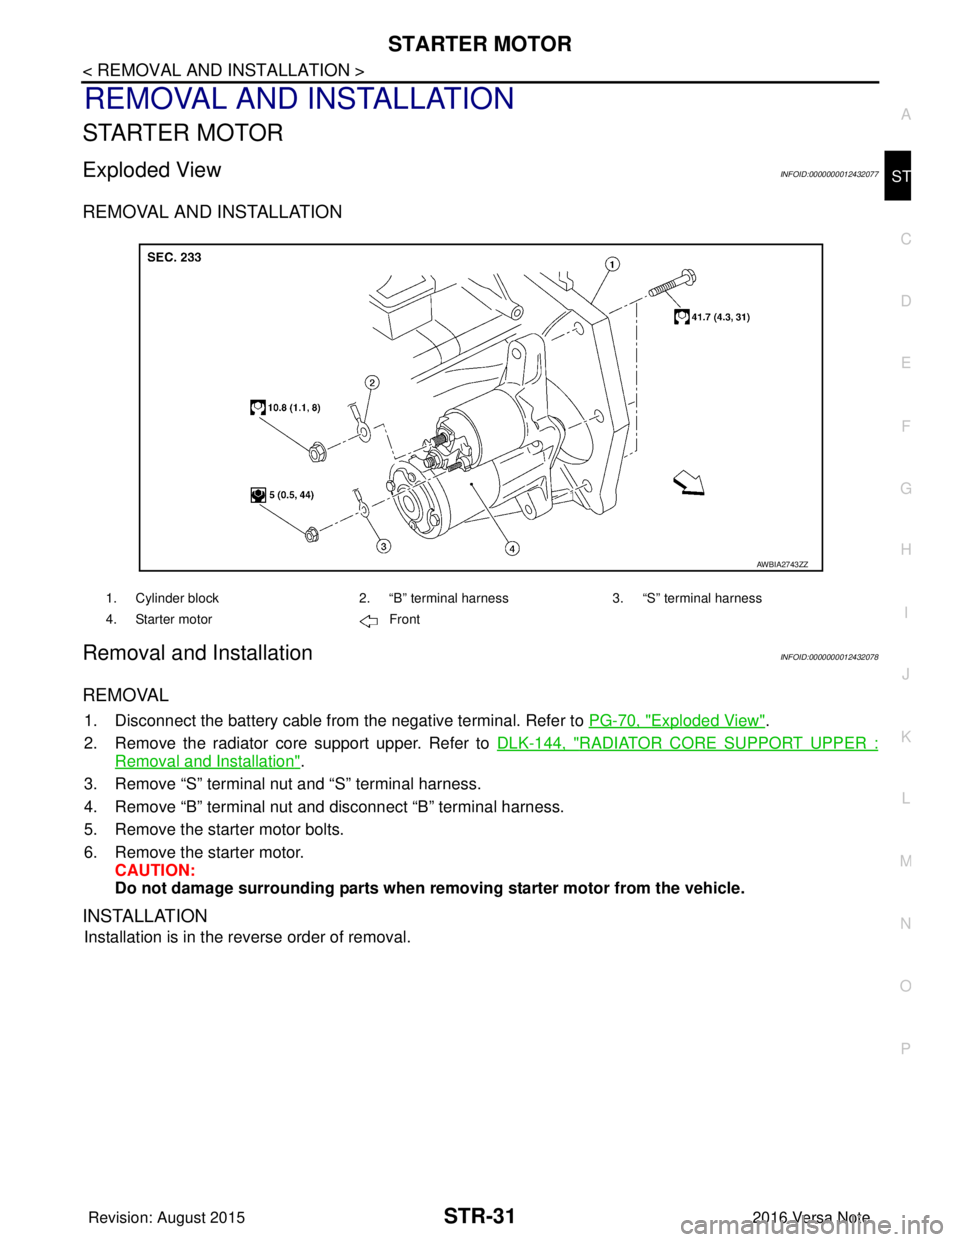
Exploded ViewINFOID:0000000012432077
REMOVAL AND INSTALLATION
Removal and InstallationINFOID:0000000012432078
REMOVAL
1. Disconnect the battery cable from
the negative terminal. Refer to PG-70, "Exploded View".
2. Remove the radiator core support upper. Refer to DLK-144, "
RADIATOR CORE SUPPORT UPPER :
Removal and Installation".
3. Remove “S” terminal nut and “S” terminal harness.
4. Remove “B” terminal nut and disconnect “B” terminal harness.
5. Remove the starter motor bolts.
6. Remove the starter motor. CAUTION:
Do not damage surrounding parts when re moving starter motor from the vehicle.
INSTALLATION
Installation is in the reverse order of removal.
1. Cylinder block2. “B” terminal harness3. “S” terminal harness
4. Starter motor Front
AWBIA2743ZZ
Revision: August 2015 2016 Versa Note
cardiagn.com