2016 NISSAN NOTE engine
[x] Cancel search: enginePage 3218 of 3641
STC-34
< SYMPTOM DIAGNOSIS >
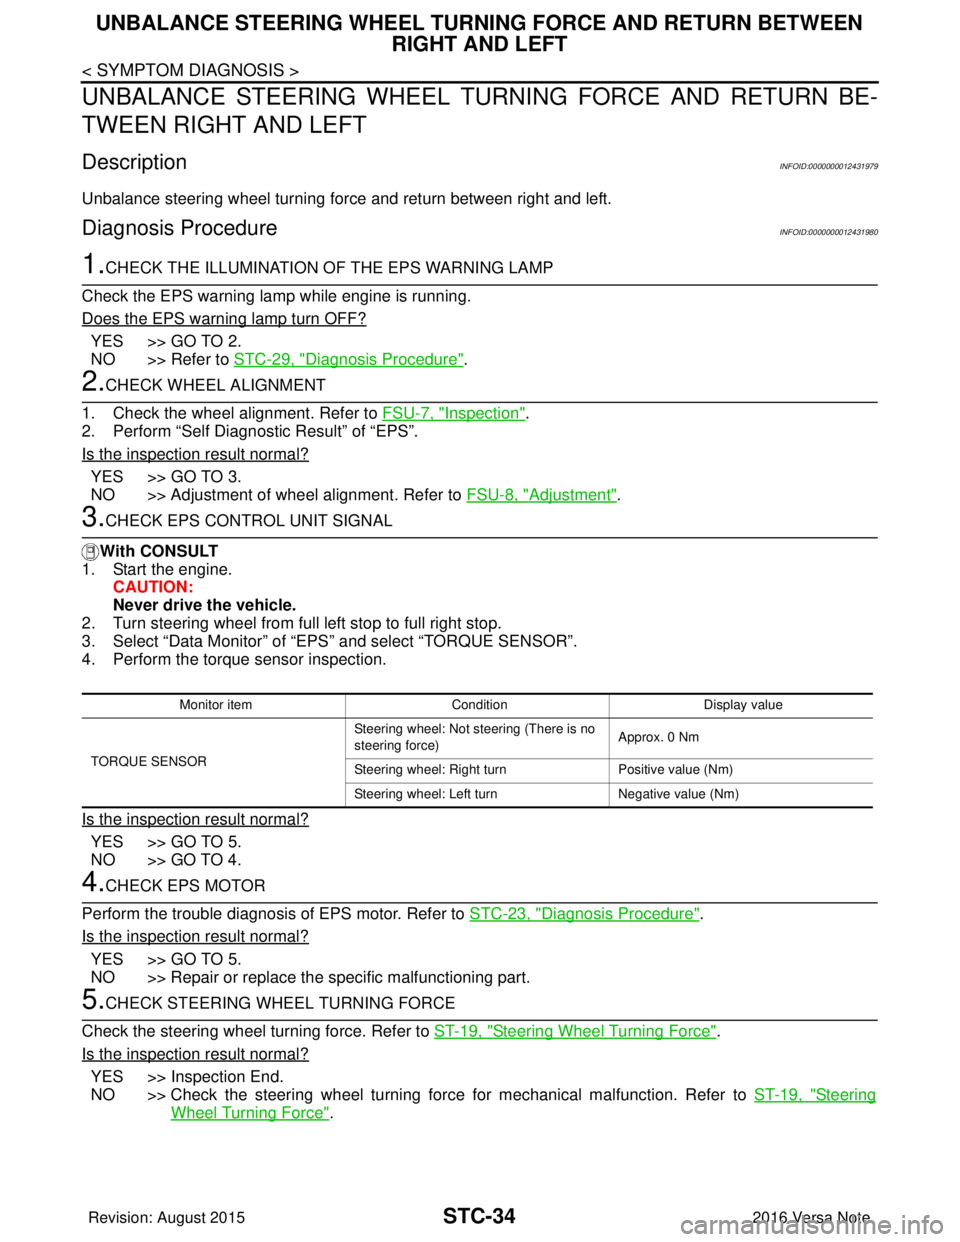
UNBALANCE STEERING WHEEL TURNING FORCE AND RETURN BETWEEN RIGHT AND LEFT
UNBALANCE STEERING WHEEL TU RNING FORCE AND RETURN BE-
TWEEN RIGHT AND LEFT
DescriptionINFOID:0000000012431979
Unbalance steering wheel turning force and return between right and left.
Diagnosis ProcedureINFOID:0000000012431980
1.CHECK THE ILLUMINATION OF THE EPS WARNING LAMP
Check the EPS warning lamp while engine is running.
Does the EPS warning lamp turn OFF?
YES >> GO TO 2.
NO >> Refer to STC-29, "
Diagnosis Procedure".
2.CHECK WHEEL ALIGNMENT
1. Check the wheel alignment. Refer to FSU-7, "
Inspection".
2. Perform “Self Diagnostic Result” of “EPS”.
Is the inspection result normal?
YES >> GO TO 3.
NO >> Adjustment of wheel alignment. Refer to FSU-8, "
Adjustment".
3.CHECK EPS CONTROL UNIT SIGNAL
With CONSULT
1. Start the engine.
CAUTION:
Never drive the vehicle.
2. Turn steering wheel from full left stop to full right stop.
3. Select “Data Monitor” of “EPS” and select “TORQUE SENSOR”.
4. Perform the torque sensor inspection.
Is the inspection result normal?
YES >> GO TO 5.
NO >> GO TO 4.
4.CHECK EPS MOTOR
Perform the trouble diagnosis of EPS motor. Refer to STC-23, "
Diagnosis Procedure".
Is the inspection result normal?
YES >> GO TO 5.
NO >> Repair or replace the specific malfunctioning part.
5.CHECK STEERING WHEEL TURNING FORCE
Check the steering wheel turning force. Refer to ST-19, "
Steering Wheel Turning Force".
Is the inspection result normal?
YES >> Inspection End.
NO >> Check the steering wheel turning force for mechanical malfunction. Refer to ST-19, "
Steering
Wheel Turning Force".
Monitor item ConditionDisplay value
TORQUE SENSOR Steering wheel: Not st
eering (There is no
steering force) Approx. 0 Nm
Steering wheel: Right turn Positive value (Nm)
Steering wheel: Left turn Negative value (Nm)
Revision: August 2015 2016 Versa Note
cardiagn.com
Page 3219 of 3641
UNBALANCE STEERING WHEEL TURNING FORCE (TORQUE VARIATION)
STC-35
< SYMPTOM DIAGNOSIS >
C
D E
F
H I
J
K L
M A
B
STC
N
O P
UNBALANCE STEERING WHEEL TU RNING FORCE (TORQUE VARIA-
TION)
DescriptionINFOID:0000000012431981
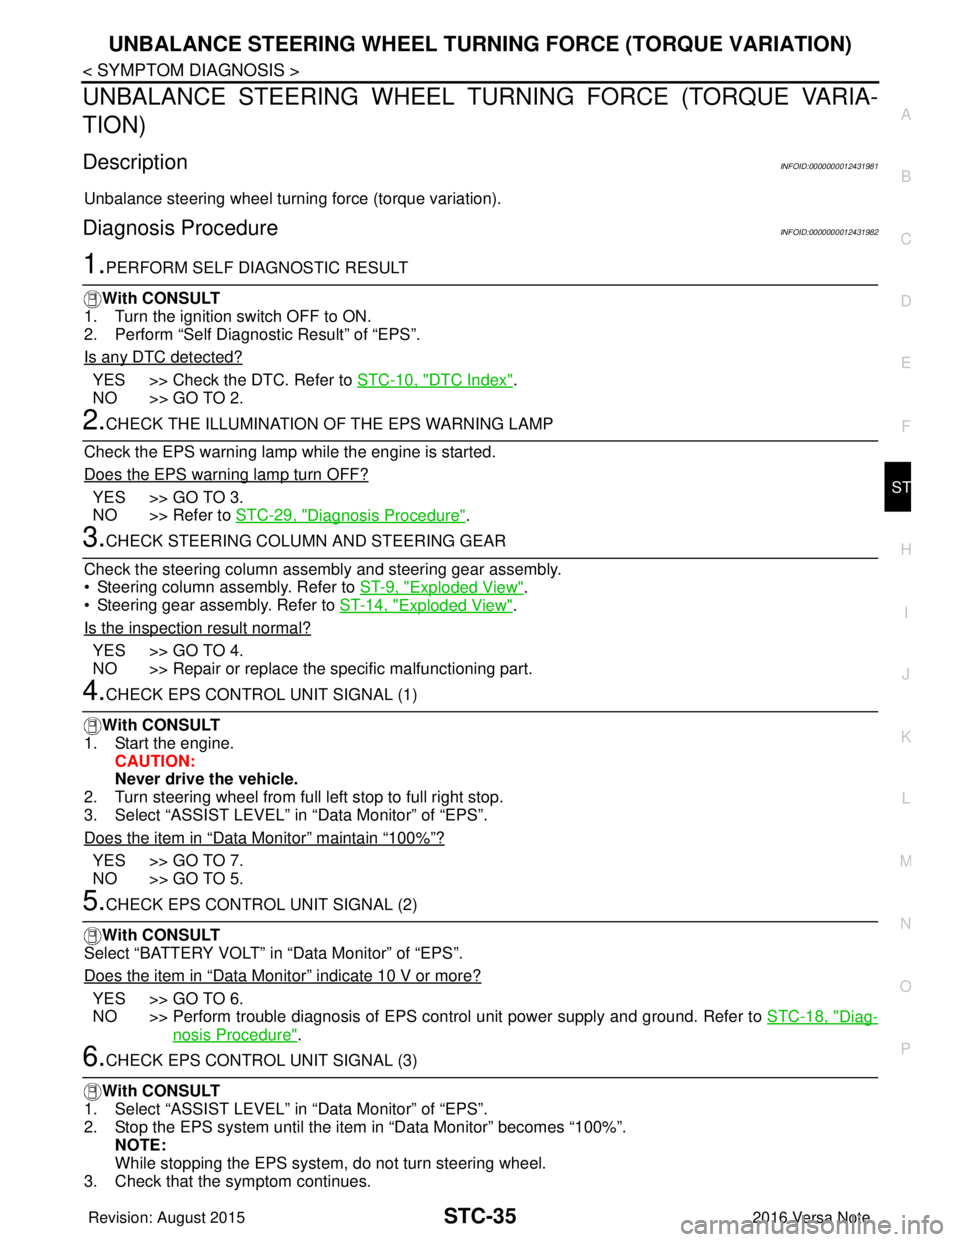
Unbalance steering wheel turning force (torque variation).
Diagnosis ProcedureINFOID:0000000012431982
1.PERFORM SELF DIAGNOSTIC RESULT
With CONSULT
1. Turn the ignition switch OFF to ON.
2. Perform “Self Diagnostic Result” of “EPS”.
Is any DTC detected?
YES >> Check the DTC. Refer to STC-10, "DTC Index".
NO >> GO TO 2.
2.CHECK THE ILLUMINATION OF THE EPS WARNING LAMP
Check the EPS warning lamp while the engine is started.
Does the EPS warning lamp turn OFF?
YES >> GO TO 3.
NO >> Refer to STC-29, "
Diagnosis Procedure".
3.CHECK STEERING COLU MN AND STEERING GEAR
Check the steering column assembly and steering gear assembly.
• Steering column assembly. Refer to ST-9, "
Exploded View".
• Steering gear assembly. Refer to ST-14, "
Exploded View".
Is the inspection result normal?
YES >> GO TO 4.
NO >> Repair or replace the specific malfunctioning part.
4.CHECK EPS CONTROL UNIT SIGNAL (1)
With CONSULT
1. Start the engine. CAUTION:
Never drive the vehicle.
2. Turn steering wheel from full left stop to full right stop.
3. Select “ASSIST LEVEL” in “Data Monitor” of “EPS”.
Does the item in
“Data Monitor” maintain “100%”?
YES >> GO TO 7.
NO >> GO TO 5.
5.CHECK EPS CONTROL UNIT SIGNAL (2)
With CONSULT
Select “BATTERY VOLT” in “Data Monitor” of “EPS”.
Does the item in
“Data Monitor” indicate 10 V or more?
YES >> GO TO 6.
NO >> Perform trouble diagnosis of EPS control unit power supply and ground. Refer to STC-18, "
Diag-
nosis Procedure".
6.CHECK EPS CONTROL UNIT SIGNAL (3)
With CONSULT
1. Select “ASSIST LEVEL” in “Data Monitor” of “EPS”.
2. Stop the EPS system until the item in “Data Monitor” becomes “100%”. NOTE:
While stopping the EPS system, do not turn steering wheel.
3. Check that the symptom continues.
Revision: August 2015 2016 Versa Note
cardiagn.com
Page 3220 of 3641
STC-36
< SYMPTOM DIAGNOSIS >
UNBALANCE STEERING WHEEL TURNING FORCE (TORQUE VARIATION)
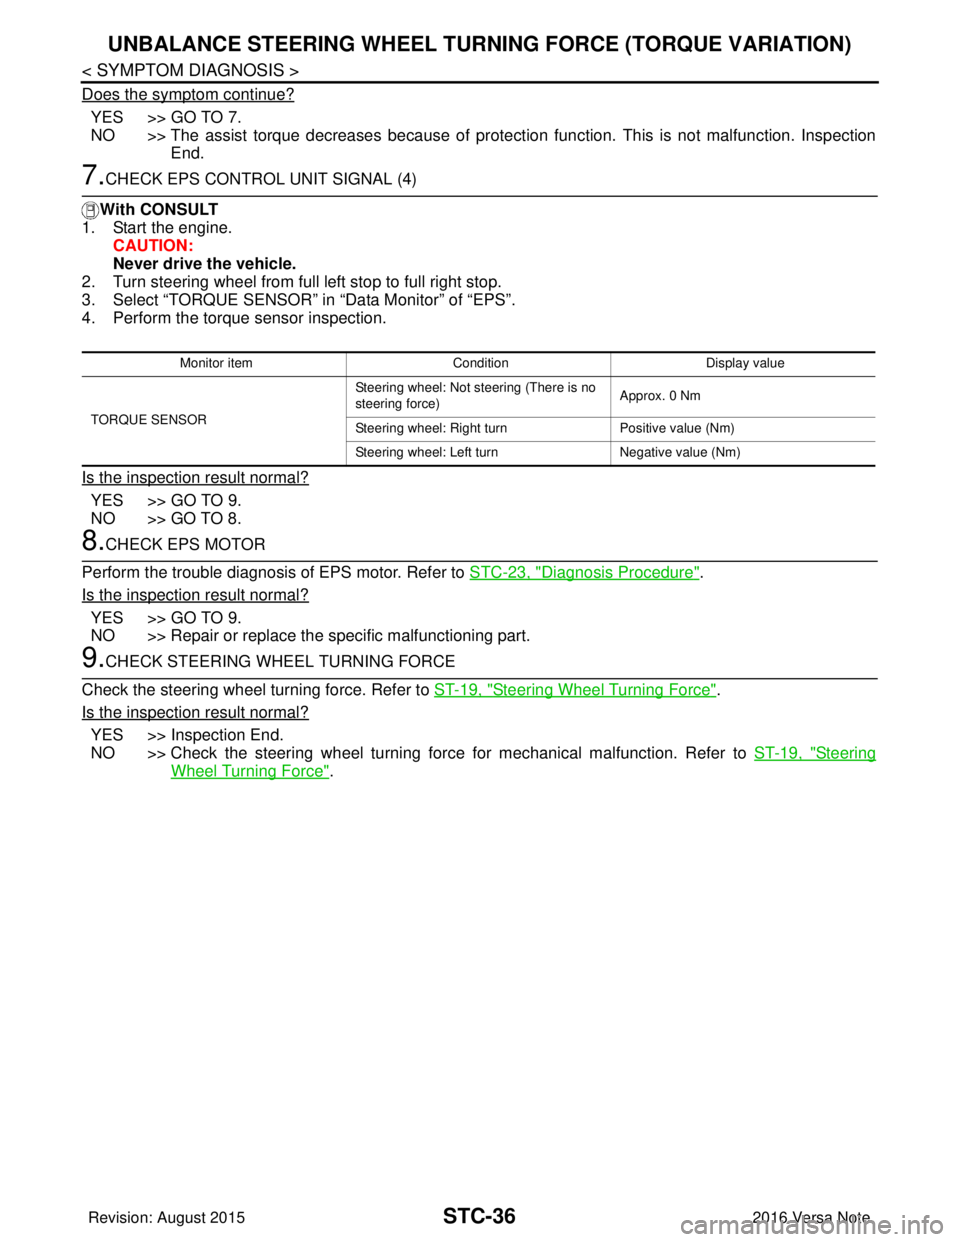
Does the symptom continue?
YES >> GO TO 7.
NO >> The assist torque decreases because of protection function. This is not malfunction. Inspection
End.
7.CHECK EPS CONTROL UNIT SIGNAL (4)
With CONSULT
1. Start the engine.
CAUTION:
Never drive the vehicle.
2. Turn steering wheel from full left stop to full right stop.
3. Select “TORQUE SENSOR” in “Data Monitor” of “EPS”.
4. Perform the torque sensor inspection.
Is the inspection result normal?
YES >> GO TO 9.
NO >> GO TO 8.
8.CHECK EPS MOTOR
Perform the trouble diagnosis of EPS motor. Refer to STC-23, "
Diagnosis Procedure".
Is the inspection result normal?
YES >> GO TO 9.
NO >> Repair or replace the specific malfunctioning part.
9.CHECK STEERING WHEEL TURNING FORCE
Check the steering wheel turning force. Refer to ST-19, "
Steering Wheel Turning Force".
Is the inspection result normal?
YES >> Inspection End.
NO >> Check the steering wheel turning force for mechanical malfunction. Refer to ST-19, "
Steering
Wheel Turning Force".
Monitor item ConditionDisplay value
TORQUE SENSOR Steering wheel: Not steering (There is no
steering force)
Approx. 0 Nm
Steering wheel: Right turn Positive value (Nm)
Steering wheel: Left turn Negative value (Nm)
Revision: August 2015 2016 Versa Note
cardiagn.com
Page 3223 of 3641

ST-2
< PRECAUTION >
PRECAUTIONS
PRECAUTION
PRECAUTIONS
Precaution for Supplemental Restraint System (SRS) "AIR BAG" and "SEAT BELT
PRE-TENSIONER"
INFOID:0000000012430493
The Supplemental Restraint System such as “A IR BAG” and “SEAT BELT PRE-TENSIONER”, used along
with a front seat belt, helps to reduce the risk or severity of injury to the driver and front passenger for certain
types of collision. Information necessary to service the system safely is included in the SR and SB section of
this Service Manual.
WARNING:
• To avoid rendering the SRS inopera tive, which could increase the risk of personal injury or death in
the event of a collision which would result in air bag inflation, all maintenance must be performed by
an authorized NISSAN/INFINITI dealer.
• Improper maintenance, including in correct removal and installation of the SRS, can lead to personal
injury caused by unintent ional activation of the system. For re moval of Spiral Cable and Air Bag
Module, see the SR section.
• Do not use electrical test equipmen t on any circuit related to the SRS unless instructed to in this
Service Manual. SRS wiring harn esses can be identified by yellow and/or orange harnesses or har-
ness connectors.
PRECAUTIONS WHEN USING POWER TOOLS (AIR OR ELECTRIC) AND HAMMERS
WARNING:
• When working near the Airbag Diagnosis Sensor Unit or other Airbag System sensors with the Igni-
tion ON or engine running, DO NOT use air or electri c power tools or strike near the sensor(s) with a
hammer. Heavy vibration could activate the sensor( s) and deploy the air bag(s), possibly causing
serious injury.
• When using air or electric power tools or hammers , always switch the Ignition OFF, disconnect the
battery and wait at least three minutes before performing any service.
Service Notice or Precautions for Steering SystemINFOID:0000000012430494
• In case of removing the steering gear, make the final tightening with grounded and unloaded vehicle condi- tion, and then check wheel alignment.
• Observe the following precautions when disassembling.
- Before disassembly, thoroughly clean the outside of the unit.
- Disassembly should be done in a clean work area. It is im portant to prevent the internal parts from becoming
contaminated by dirt or other foreign matter.
- For easier and proper assembly, place disassembled parts in order on a parts rack.
- Use nylon cloth or paper towels to clean the parts; co mmon shop rags can leave lint that might interfere with
their operation.
- Do not reuse non-reusable parts.
- Before assembling, apply the specified grease to the directed parts.
FOR ELECTRIC POWER STEERING (EPS)
• During quick steering, rasping noise may be heard from around the steering wheel. This is not a malfunction.
The noise is an operating noise of the EPS system under normal conditions. If the rasping noise occurs dur-
ing slow steering, this may not be an operating noise of the system. In this case, it is necessary to find out
the location of the noise and repair, if necessary.
• Do not repeat static steering. (Mot or and EPS control unit could be heated.)
Revision: August 2015 2016 Versa Note
cardiagn.com
Page 3226 of 3641
STEERING WHEELST-5
< BASIC INSPECTION >
C
DE
F
H I
J
K L
M A
B
ST
N
O P
BASIC INSPECTION
STEERING WHEEL
InspectionINFOID:0000000012430497
CONDITION OF INSTALLATION
• Check installation conditions of steering gear, front suspension, axle and steering column.
• Check if movement exists when steering wheel is mo ved up and down, to the left and right and to the axial
direction.
• Verify that the steering gear nuts are tightened to specification. Refer to ST-14, "
Exploded View".
STEERING WHEEL PLAY
1. Set the front wheels and tires in the straight-ahead position, start engine, then lightly turn steering wheel
to the left and right until the front wheels start to move. Measure steering wheel movement on the outer
circumference.
2. When the measurement value is outside the standard va lue, check backlash for each joint of steering col-
umn and installation condition of steering gear.
STEERING WHEEL NEUTRAL POSITION
Check steering wheel neutral position using the following procedure:
1. Confirm that front wheel alignment is correct. Refer to FSU-8, "
Adjustment".
2. Set the front wheels and tires in the straight-ahead posit ion, check if steering wheel is in the neutral posi-
tion.
3. If it is not in the neutral position, remo ve steering wheel and reinstall it correctly.
4. If the neutral position cannot be attained by repositi oning the steering wheel two teeth or less on steering
stem, loosen the steering gear outer socket lock nuts, then adjust the inner sockets by the same amount
in the opposite direction.
5. Re-check the front wheel alignment. Refer to FSU-8, "
Adjustment".
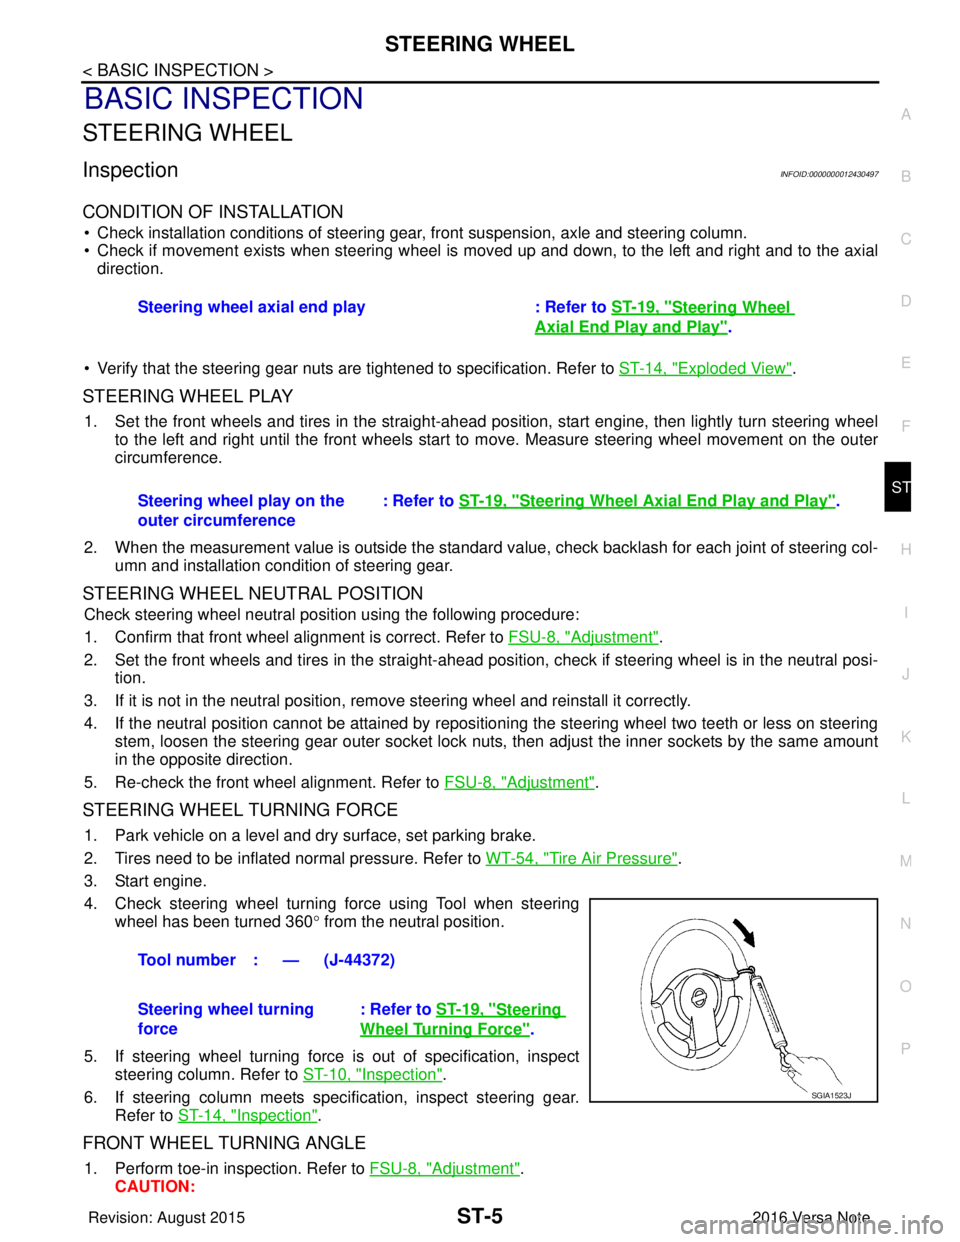
STEERING WHEEL TURNING FORCE
1. Park vehicle on a level and dry surface, set parking brake.
2. Tires need to be inflated normal pressure. Refer to WT-54, "
Tire Air Pressure".
3. Start engine.
4. Check steering wheel turning force using Tool when steering wheel has been turned 360 ° from the neutral position.
5. If steering wheel turning force is out of specification, inspect steering column. Refer to ST-10, "
Inspection".
6. If steering column meets specification, inspect steering gear. Refer to ST-14, "
Inspection".
FRONT WHEEL TURNING ANGLE
1. Perform toe-in inspection. Refer to FSU-8, "Adjustment".
CAUTION: Steering wheel axial end play : Refer to
ST-19, "
Steering Wheel
Axial End Play and Play".
Steering wheel play on the
outer circumference : Refer to
ST-19, "
Steering Wheel Axia l End Play and Play".
Tool number : — (J-44372)
Steering wheel turning
force : Refer to
ST-19, "
Steering
Wheel Turning Force".
SGIA1523J
Revision: August 2015 2016 Versa Note
cardiagn.com
Page 3227 of 3641
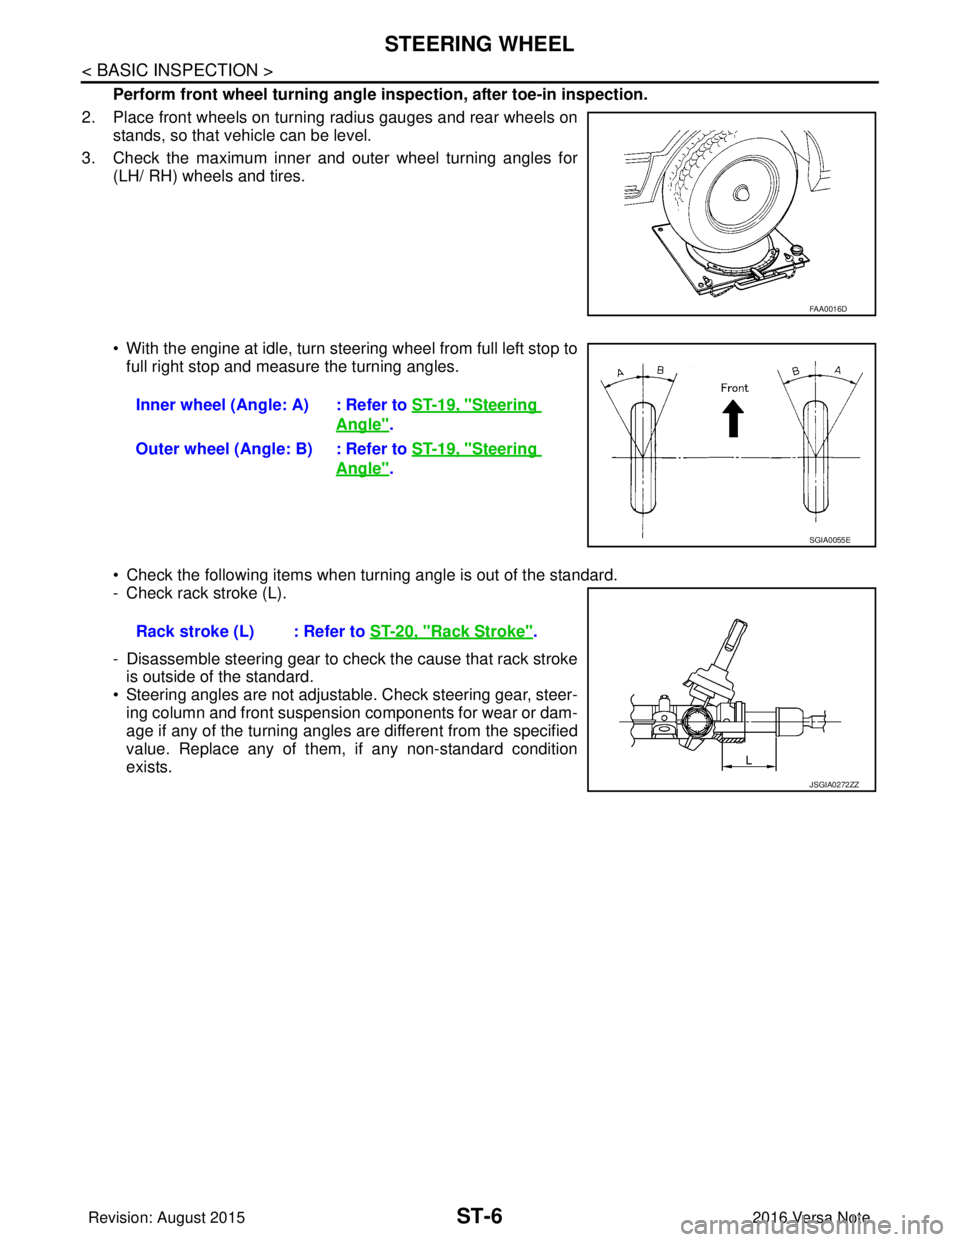
ST-6
< BASIC INSPECTION >
STEERING WHEEL
Perform front wheel turning angle inspection, after toe-in inspection.
2. Place front wheels on turning radius gauges and rear wheels on stands, so that vehicle can be level.
3. Check the maximum inner and outer wheel turning angles for (LH/ RH) wheels and tires.
• With the engine at idle, turn steering wheel from full left stop tofull right stop and measure the turning angles.
• Check the following items when turning angle is out of the standard.
- Check rack stroke (L).
- Disassemble steering gear to check the cause that rack stroke is outside of the standard.
• Steering angles are not adjustable. Check steering gear, steer- ing column and front suspension components for wear or dam-
age if any of the turning angles are different from the specified
value. Replace any of them, if any non-standard condition
exists.
FAA0016D
Inner wheel (Angle: A) : Refer to ST-19, "Steering
Angle".
Outer wheel (Angle: B) : Refer to ST-19, "
Steering
Angle".
SGIA0055E
Rack stroke (L) : Refer to ST-20, "Rack Stroke".
JSGIA0272ZZ
Revision: August 2015 2016 Versa Note
cardiagn.com
Page 3243 of 3641

TM-2
INPUT SHAFT AND GEAR ...............................45
Exploded View ..................................................... ...45
Disassembly ...........................................................45
Assembly ................................................................45
Inspection ...............................................................45
MAINSHAFT AND GEAR ..................................47
Exploded View ..................................................... ...47
Disassembly ...........................................................47
Assembly ................................................................49
Inspection ...............................................................50
FINAL DRIVE .....................................................52
Exploded View ..................................................... ...52
Disassembly ...........................................................52
Assembly ................................................................52
Inspection ...............................................................52
SERVICE DATA AND SPECIFICATIONS
(SDS) ........................................................ ...
54
SERVICE DATA AND SPECIFICATIONS
(SDS) ............................................................... ...
54
General Specifications ......................................... ...54
CVT: RE0F11A
PRECAUTION .............. ...............................
55
PRECAUTIONS .............................................. ...55
Precaution for Supplemental Restraint System
(SRS) "AIR BAG" and "SEAT BELT PRE-TEN-
SIONER" .............................................................. ...
55
Precaution for Procedure without Cowl Top Cover ...55
Precaution for TCM, Transaxle Assembly or Con-
trol Valve Replacement ..........................................
55
Precaution for G Sensor Removal/Installation or
Replacement ..........................................................
55
General Precautions ...............................................56
On Board Diagnosis (OBD) System of CVT and
Engine ....................................................................
57
Removal and Installation Procedure for CVT Unit
Connector ...............................................................
57
PREPARATION ...........................................59
PREPARATION .............................................. ...59
Special Service Tools .......................................... ...59
Commercial Service Tools ......................................59
SYSTEM DESCRIPTION ............................61
COMPONENT PARTS .................................... ...61
CVT CONTROL SYSTEM ...................................... ...61
CVT CONTROL SYSTEM : Component Parts Lo-
cation ......................................................................
61
CVT CONTROL SYSTEM : TCM ...........................63
CVT CONTROL SYSTEM : ROM Assembly ....... ...63
CVT CONTROL SYSTEM : Transmission Range
Switch .................................................................. ...
63
CVT CONTROL SYSTEM : Primary Speed Sen-
sor ........................................................................ ...
63
CVT CONTROL SYSTEM : Secondary Speed
Sensor .....................................................................
63
CVT CONTROL SYSTEM : Output Speed Sensor ...64
CVT CONTROL SYSTEM : CVT Fluid Tempera-
ture Sensor .......................................................... ...
64
CVT CONTROL SYSTEM : Secondary Pressure
Sensor .................................................................. ...
65
CVT CONTROL SYSTEM : Primary Pressure So-
lenoid Valve ......................................................... ...
65
CVT CONTROL SYSTEM : Low Brake Solenoid
Valve .......................................................................
65
CVT CONTROL SYSTEM : High Clutch & Re-
verse Brake Solenoid Valve ....................................
66
CVT CONTROL SYSTEM : Torque Converter
Clutch Solenoid Valve .............................................
66
CVT CONTROL SYSTEM : Line Pressure Sole-
noid Valve ............................................................ ...
66
CVT CONTROL SYSTEM : G Sensor ....................66
CVT CONTROL SYSTEM : Overdrive Control
Switch .....................................................................
66
CVT CONTROL SYSTEM : O/D OFF Indicator
Lamp .......................................................................
66
CVT CONTROL SYSTEM : Shift Position Indica-
tor ............................................................................
68
CVT CONTROL SYSTEM : Malfunction Indicator
Lamp (MIL) ..............................................................
68
SHIFT LOCK SYSTEM ..............................................68
SHIFT LOCK SYSTEM : Co mponent Parts Loca-
tion ....................................................................... ...
68
STRUCTURE AND OPERATION ......................70
TRANSAXLE .......................................................... ...70
TRANSAXLE : Cross-Sectional View .....................70
TRANSAXLE : Transaxle Mechanism ... .................70
TRANSAXLE : Operation Stat us .............................72
TRANSAXLE : Oil Pressure System .......................73
TRANSAXLE : Component De scription ..................73
FLUID COOLER & FLUID WARMER SYSTEM ..... ...74
FLUID COOLER & FLUID WARMER SYSTEM :
System Description .................................................
74
SHIFT LOCK SYSTEM ..............................................74
SHIFT LOCK SYSTEM : Syst em Description .........75
KEY LOCK SYSTEM .............................................. ...75
KEY LOCK SYSTEM : System Description ............75
SYSTEM ......................................................... ...76
CVT CONTROL SYSTEM .........................................76
CVT CONTROL SYSTEM : System Description . ...76
CVT CONTROL SYSTEM : Fail-safe ......................78
CVT CONTROL SYSTEM : Protection Control .......80
LINE PRESSURE CONTROL ................................ ...81
LINE PRESSURE CONTROL : System Descrip-
tion ....................................................................... ...
82
Revision: August 2015 2016 Versa Note
cardiagn.com
Page 3248 of 3641
![NISSAN NOTE 2016 Service Repair Manual PRECAUTIONSTM-7
< PRECAUTION > [5MT: RS5F91R]
C
EF
G H
I
J
K L
M A
B
TM
N
O P
PRECAUTION
PRECAUTIONS
Precaution for Supplemental Restraint System (SRS) "AIR BAG" and "SEAT BELT
PRE-TENSIONER"
INFOID NISSAN NOTE 2016 Service Repair Manual PRECAUTIONSTM-7
< PRECAUTION > [5MT: RS5F91R]
C
EF
G H
I
J
K L
M A
B
TM
N
O P
PRECAUTION
PRECAUTIONS
Precaution for Supplemental Restraint System (SRS) "AIR BAG" and "SEAT BELT
PRE-TENSIONER"
INFOID](/manual-img/5/57363/w960_57363-3247.png)
PRECAUTIONSTM-7
< PRECAUTION > [5MT: RS5F91R]
C
EF
G H
I
J
K L
M A
B
TM
N
O P
PRECAUTION
PRECAUTIONS
Precaution for Supplemental Restraint System (SRS) "AIR BAG" and "SEAT BELT
PRE-TENSIONER"
INFOID:0000000012430936
The Supplemental Restraint System such as “AIR BAG” and “SEAT BELT PRE-TENSIONER”, used along
with a front seat belt, helps to reduce the risk or severi ty of injury to the driver and front passenger for certain
types of collision. Information necessary to service the system safely is included in the SR and SB section of
this Service Manual.
WARNING:
• To avoid rendering the SRS inoper ative, which could increase the risk of personal injury or death in
the event of a collision which would result in air bag inflation, all maintenance must be performed by
an authorized NISSAN/INFINITI dealer.
• Improper maintenance, including in correct removal and installation of the SRS, can lead to personal
injury caused by unintentional act ivation of the system. For removal of Spiral Cable and Air Bag
Module, see the SR section.
• Do not use electrical test equipm ent on any circuit related to the SRS unless instructed to in this
Service Manual. SRS wiring harnesses can be identi fied by yellow and/or orange harnesses or har-
ness connectors.
PRECAUTIONS WHEN USING POWER TOOLS (AIR OR ELECTRIC) AND HAMMERS
WARNING:
• When working near the Airbag Diagnosis Sensor Un it or other Airbag System sensors with the Igni-
tion ON or engine running, DO NOT use air or el ectric power tools or strike near the sensor(s) with a
hammer. Heavy vibration could activate the sensor( s) and deploy the air bag(s), possibly causing
serious injury.
• When using air or electric power tools or hammers, always switch the Ignition OFF, disconnect the
battery and wait at least three mi nutes before performing any service.
General PrecautionsINFOID:0000000012430937
CAUTION:
• Do not reuse CSC (Concentric Sl ave Cylinder). CSC slides back to th e original position every time
when removing transaxle assembly. At this time, du st on the sliding parts may damage the seal of
CSC and may cause clutch fluid leakage. Refer to CL-17, "
Removal and Installation".
• Do not reuse transaxle gear oi l, once it has been drained.
• Check oil level or replace gear oil with vehicle on level surface.
• During removal or installation, keep insi de of transaxle clear of dust or dirt.
• Check for the correct installation alignment prior to removal or disassembly. If matching marks are
required, be certain they do not interfer e with the function of the parts marked.
• In principle, tighten bolts or nu ts gradually in several steps workin g diagonally from inside to out-
side. If tightening sequence is specified, use it.
• Do not damage sliding surfaces and mating surfaces.
Precaution for WorkINFOID:0000000012430938
• When removing or disassembling each component, be ca reful not to damage or deform it. If a component
may be subject to interference, be sure to protect it with a shop cloth.
• When removing (disengaging) components with a screwdriver or similar tool, be sure to wrap the component with a shop cloth or vinyl tape to protect it.
• Protect the removed parts with a shop cloth and prevent them from being dropped.
• Replace a deformed or damaged clip.
• If a part is specified as a non-reusabl e part, always replace it with a new one.
• Be sure to tighten bolts and nuts securely to the specified torque.
• After installation is complete, be sure to check that each part works properly.
• Follow the steps below to clean components:
- Water soluble dirt:
• Dip a soft cloth into lukewarm water, wring the water out of the cloth and wipe the dirty area.
• Then rub with a soft, dry cloth.
Revision: August 2015 2016 Versa Note
cardiagn.com