2016 MITSUBISHI OUTLANDER SPORT bulb
[x] Cancel search: bulbPage 9 of 398
2-1
2
If this warning light comes on or
flashes while you’re driving...
Quick index
N00200702175
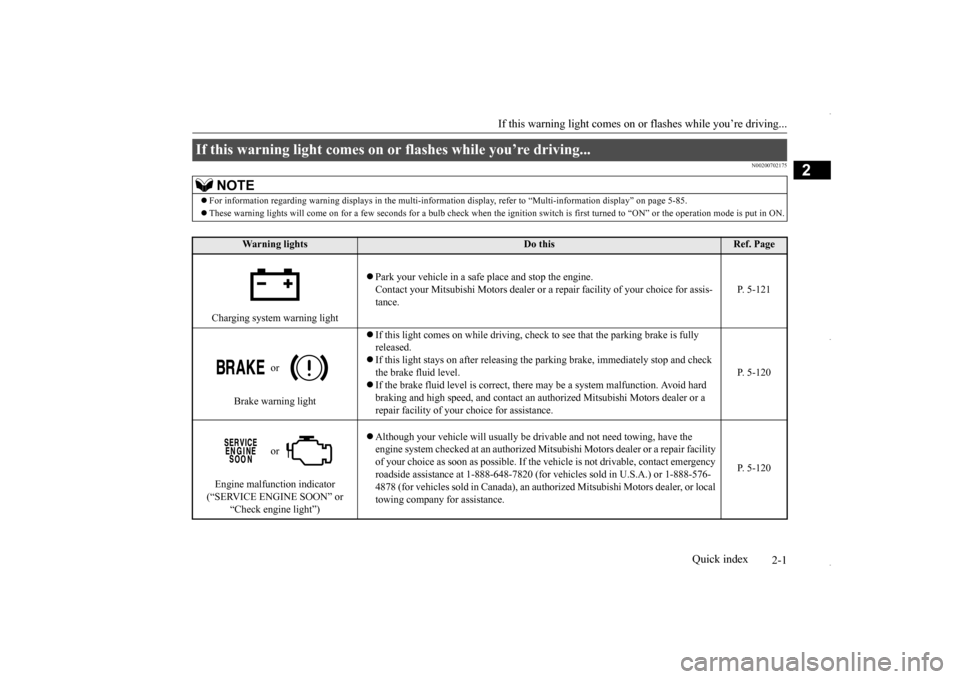
If this warning light comes on or flashes while you’re driving...
NOTE
For information regarding warning displays in the multi-informat
ion display, refer to “Multi-information display” on page 5-85.
These warning lights will come on for a few seconds for a bulb check
when the ignition switch is first turned to “ON” or the op
eration mode is put in ON.
Wa r n i n g l i g h t s
Do this
Ref. Page
Charging system warning light
Park your vehicle in a safe place and stop the engine. Contact your Mitsubishi Motors dealer or
a repair facility of your choice for assis-
tance.
P. 5-121
or
Brake warning light
If this light comes on while driving, check to see that the parking brake is fully released. If this light stays on after releasing the parking brake, immediately stop and check the brake fluid level. If the brake fluid level is correct, there may be a system malfunction. Avoid hard braking and high speed, and contact an aut
horized Mitsubishi Mo
tors dealer or a
repair facility of your choice for assistance.
P. 5-120
or
Engine malfunction indicator (“SERVICE ENGINE SOON” or
“Check engine light”)
Although your vehicle will usually be drivable and not need towing, have the engine system checked at an authorized Mits
ubishi Motors dealer or a repair facility
of your choice as soon as possible. If the
vehicle is not drivable, contact emergency
roadside assistance at 1-888-648-7820 (for ve
hicles sold in U.S.A.) or 1-888-576-
4878 (for vehicles sold in Canada), an auth
orized Mitsubishi Moto
rs dealer, or local
towing company for assistance.
P. 5-120
BK0229600US.bo
ok 1 ページ 2015年10月1日 木曜日 午後2時29分
Page 182 of 398
Warning lights 5-120 Features and controls
5
N00520100086
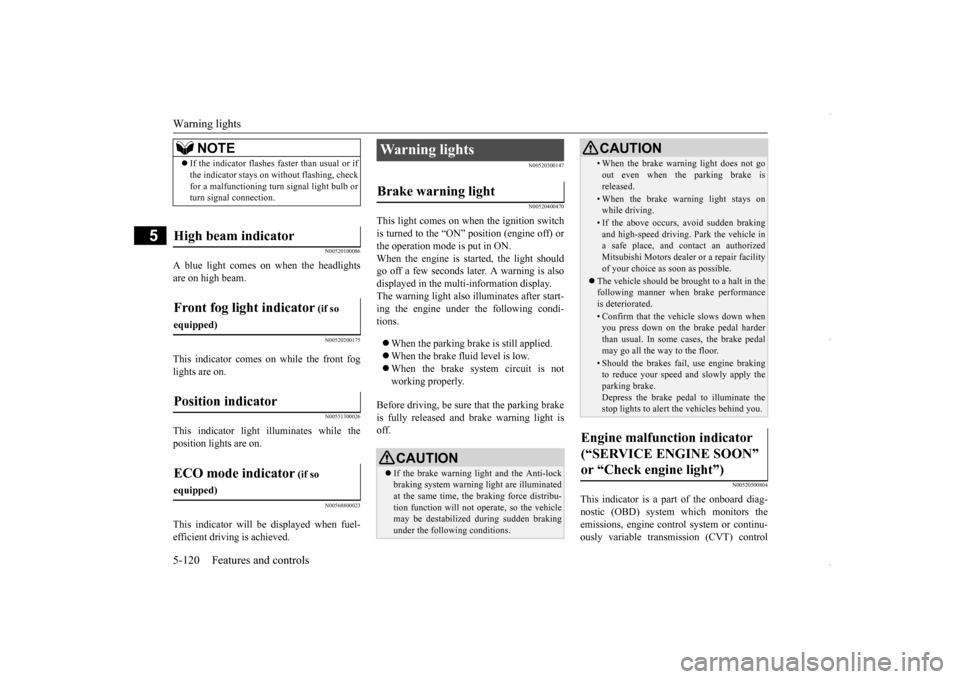
A blue light comes on when the headlights are on high beam.
N00520200175
This indicator comes on while the front fog lights are on.
N00551300026
This indicator light illuminates while theposition lights are on.
N00568800023
This indicator will be displayed when fuel-efficient driving is achieved.
N00520300147 N00520400470
This light comes on when the ignition switch is turned to the “ON” position (engine off) orthe operation mode is put in ON. When the engine is started, the light should go off a few seconds later. A warning is alsodisplayed in the multi-information display.The warning light also illuminates after start- ing the engine under the following condi- tions. When the parking brake is still applied. When the brake fluid level is low. When the brake system circuit is not working properly.
Before driving, be sure that the parking brake is fully released and brake warning light is off.
N00520500804
This indicator is a part of the onboard diag- nostic (OBD) system which monitors the emissions, engine contro
l system or continu-
ously variable transmission (CVT) control
NOTE
If the indicator flashes faster than usual or if the indicator stays on without flashing, check for a malfunctioning turn signal light bulb or turn signal connection.
High beam indicator Front fog light indicator
(if so
equipped)Position indicator ECO mode indicator
(if so
equipped)
Warning lights Brake warning light
CAUTION If the brake warning light and the Anti-lock braking system warning light are illuminated at the same time, the braking force distribu- tion function will not operate, so the vehiclemay be destabilized during sudden braking under the following conditions.
• When the brake warning light does not goout even when the parking brake is released.• When the brake warning light stays onwhile driving.• If the above occurs, avoid sudden brakingand high-speed driving. Park the vehicle in a safe place, and contact an authorized Mitsubishi Motors dealer or a repair facilityof your choice as soon as possible.
The vehicle should be brought to a halt in the following manner when brake performance is deteriorated.• Confirm that the vehicle slows down whenyou press down on the brake pedal harder than usual. In some cases, the brake pedalmay go all the way to the floor.• Should the brakes fail, use engine brakingto reduce your speed and slowly apply the parking brake. Depress the brake pedal to illuminate thestop lights to alert the vehicles behind you.
Engine malfunction indicator (“SERVICE ENGINE SOON” or “Check engine light”)
CAUTION
BK0229600US.book
120 ページ 2015年10月1日 木曜日 午後2時29分
Page 191 of 398
Headlight leveling switch (if so equipped)
Features and controls 5-129
5
N00537100105
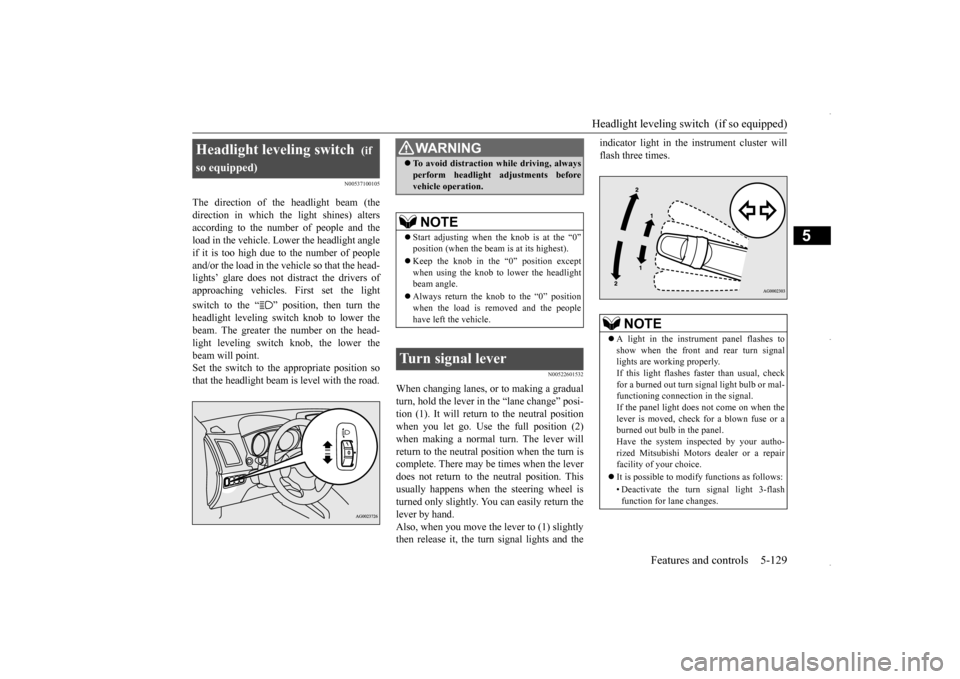
The direction of the headlight beam (the direction in which the light shines) alters according to the number of people and the load in the vehicle. Lower the headlight angleif it is too high due to the number of people and/or the load in the vehicle so that the head- lights’ glare does not distract the drivers ofapproaching vehicles. First set the light switch to the “ ” position, then turn the headlight leveling switch knob to lower the beam. The greater the number on the head- light leveling switch knob, the lower thebeam will point. Set the switch to the appropriate position so that the headlight beam is level with the road.
N00522601532
When changing lanes, or to making a gradual turn, hold the lever in
the “lane change” posi-
tion (1). It will return to the neutral positionwhen you let go. Use the full position (2) when making a normal turn. The lever will return to the neutral position when the turn iscomplete. There may be times when the lever does not return to the neutral position. This usually happens when the steering wheel isturned only slightly. You can easily return the lever by hand. Also, when you move the lever to (1) slightlythen release it, the turn signal lights and the
indicator light in the instrument cluster will flash three times.
Headlight leveling switch
(if
so equipped)
WA R N I N G To avoid distraction while driving, always perform headlight adjustments before vehicle operation.NOTE
Start adjusting when
the knob is at the “0”
position (when the beam is at its highest). Keep the knob in the “0” position except when using the knob to lower the headlightbeam angle. Always return the knob to the “0” position when the load is removed and the people have left the vehicle.
Turn signal lever
NOTE
A light in the instrument panel flashes to show when the front and rear turn signal lights are working properly. If this light flashes faster than usual, checkfor a burned out turn signal light bulb or mal- functioning connection in the signal. If the panel light does not come on when thelever is moved, check for a blown fuse or a burned out bulb in the panel. Have the system inspected by your autho-rized Mitsubishi Motors dealer or a repair facility of your choice. It is possible to modify functions as follows: • Deactivate the turn signal light 3-flash function for lane changes.
BK0229600US.book
129 ページ 2015年10月1日 木曜日 午後2時29分
Page 365 of 398
Replacement of light bulbs
Vehicle care and maintenance 9-29
9
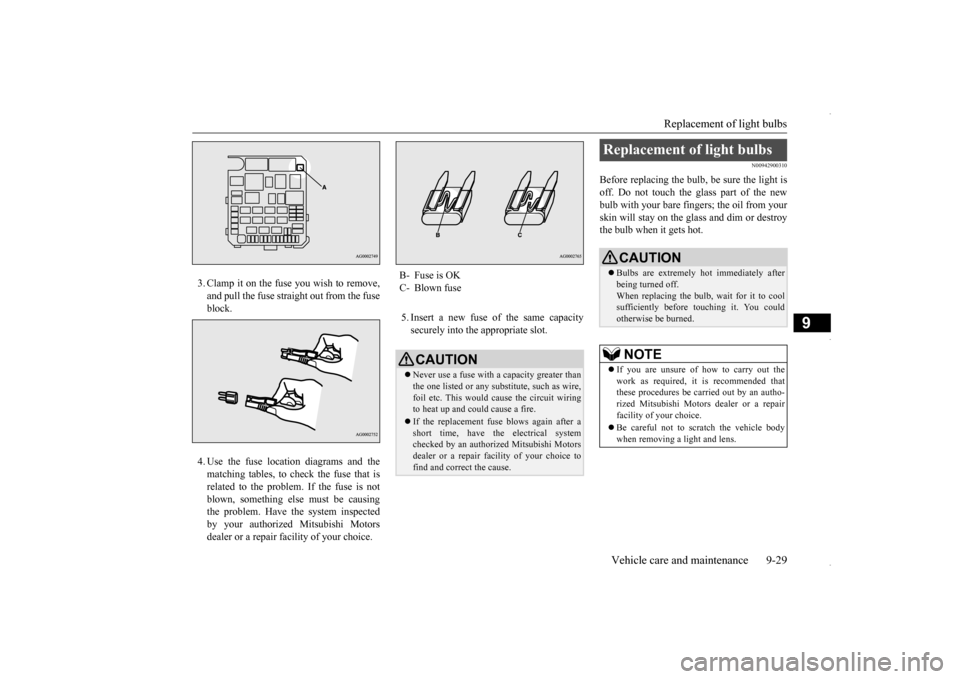
3. Clamp it on the fuse you wish to remove, and pull the fuse straight out from the fuse block. 4. Use the fuse location diagrams and the matching tables, to check the fuse that isrelated to the problem. If the fuse is notblown, something else must be causing the problem. Have the system inspected by your authorized Mitsubishi Motorsdealer or a repair facility of your choice.
5. Insert a new fuse of the same capacity securely into the appropriate slot.
N00942900310
Before replacing the bulb, be sure the light is off. Do not touch the glass part of the newbulb with your bare fingers; the oil from your skin will stay on the glass and dim or destroy the bulb when it gets hot.
B- Fuse is OKC- Blown fuse
CAUTION Never use a fuse with a capacity greater than the one listed or any substitute, such as wire, foil etc. This would cause the circuit wiring to heat up and could cause a fire. If the replacement fuse blows again after a short time, have the electrical systemchecked by an authorized Mitsubishi Motors dealer or a repair facility of your choice to find and correct the cause.
Replacement of light bulbs
CAUTION Bulbs are extremely hot immediately after being turned off.When replacing the bulb, wait for it to cool sufficiently before touching it. You could otherwise be burned.NOTE
If you are unsure of how to carry out the work as required, it is recommended that these procedures be carried out by an autho-rized Mitsubishi Motors dealer or a repair facility of your choice. Be careful not to scratch the vehicle body when removing a light and lens.
BK0229600US.bo
ok 29 ページ 2015年10月1日 木曜日 午後2時29分
Page 366 of 398

Replacement of light bulbs 9-30 Vehicle care and maintenance
9
N00943000132
The bulb should only be replaced with a new bulb with the same ra
ting and type. The type
and rating are listed on the base of the bulb.
N00950302014
* : If so equipped
When it rains, or when the vehicle has been washed, the inside of the lens sometimes becomes temporarily foggy. This is the same phenomenon as when window glass mists up on a humid day, and does not indicate a func-tional problem. When the light is switched on, the heat will remove the fog. However, if water gathersinside the light, please have it checked by an authorized Mitsubishi Motors dealer or a repair facility of your choice.
Bulb capacity Outside
NOTE
Front
Description
Wa t t - age
ANSI Tr a d e No. or Bulb type
1 Front turn signal light 21 W WY21W2 Headlight, high beam 60 W HB3 3
Daytime running light / Front fog light (Type 1)
* Front fog light 35 W H8Daytime run- ning light
13 W P13W
Front fog light (Type 2) *
19 W H16
4
Headlight, low beam (Halogen bulb)
55 W H11
Headlight, low beam (Discharge bulb)
35 W —
Front side-marker and parking light
5W WY5W
6
Side turn signal light (on fender)
*
5W —
Side turn signal light (on outside rearview mirror)
*
——
WA R N I N G Check with an authorized Mitsubishi Motors dealer or a repair facility of your choice when it is necessary to repair a high intensity discharge headlight or to replace the bulb.The power circuit, bulb and electrodes generate high voltages that may cause a severe shock.NOTE
It is not possible to re
pair or replace only the
bulb for the side turn signal light. Check with an authorized Mitsubishi Motorsdealer or a repair
facility of your choice
when the light needs to be repaired or replaced. The side turn signal light (on outside rear- view mirror) use an LED instead of the bulb. Check with an authorized Mitsubishi Motors dealer or repair facility of your choice when either light needs to be repaired or replaced.
BK0229600US.bo
ok 30 ページ 2015年10月1日 木曜日 午後2時29分
Page 367 of 398
Replacement of light bulbs
Vehicle care and maintenance 9-31
9
N00950401672
* : If so equipped
N00901801144
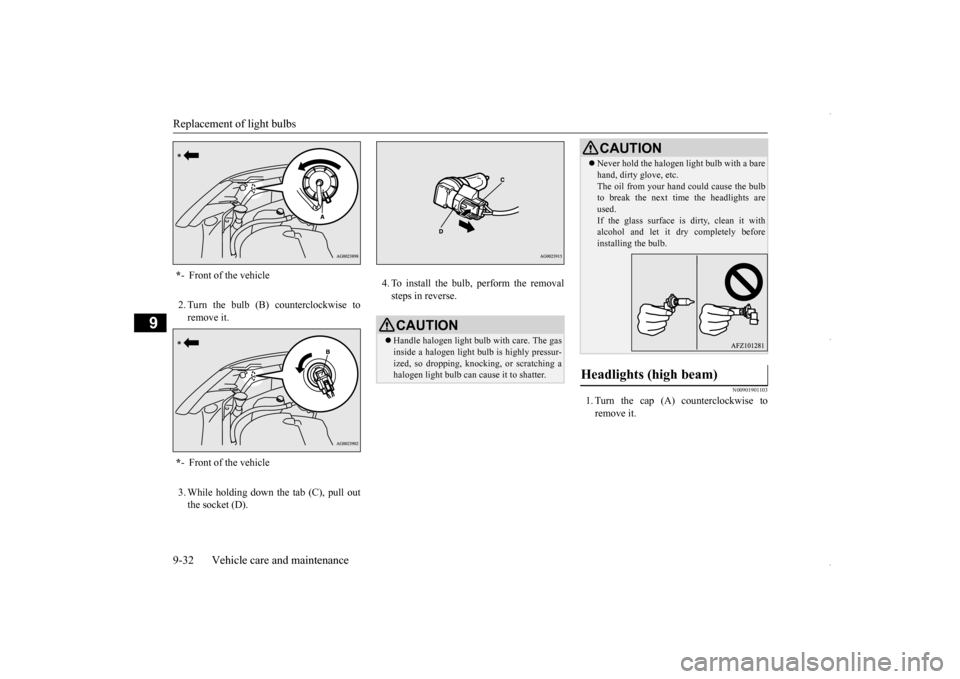
1. Turn the cap (A) counterclockwise to remove it.
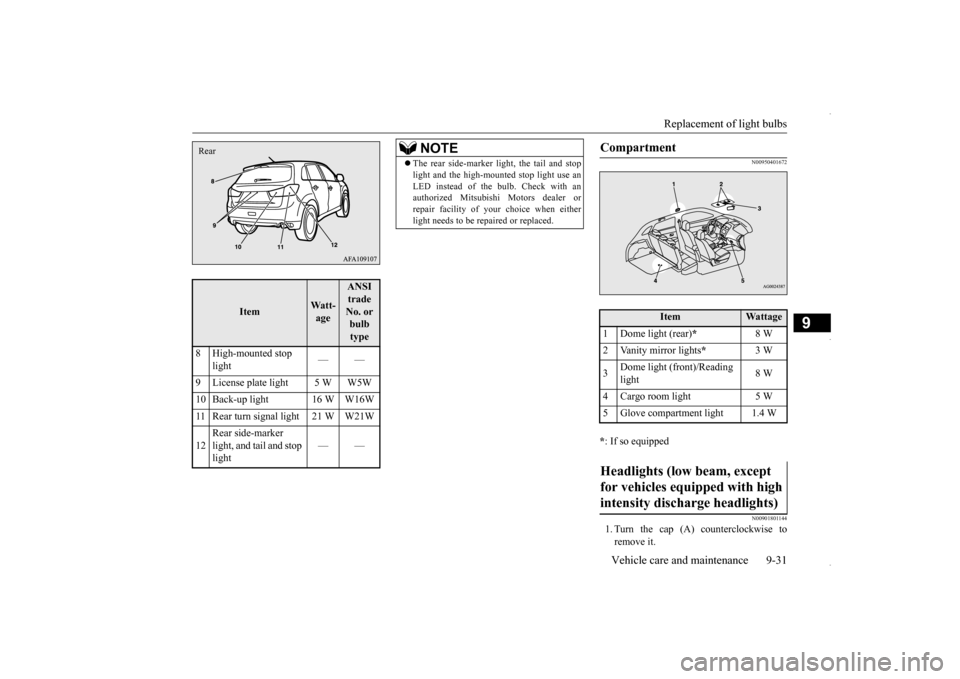
Item
Watt-age
ANSI trade No. or bulb type
8 High-mounted stop
light
——
9 License plate light 5 W W5W 10 Back-up light 16 W W16W11 Rear turn signal light 21 W W21W 12
Rear side-marker light, and tail and stop light
——
Rear
NOTE
The rear side-marker light, the tail and stop light and the high-mounted stop light use an LED instead of the bulb. Check with an authorized Mitsubishi Motors dealer or repair facility of your
choice when either
light needs to be repaired or replaced.
Compartment
Item
Wattage
1 Dome light (rear)
*
8 W
2 Vanity mirror lights
*
3 W
3
Dome light (front)/Reading light
8 W
4 Cargo room light 5 W 5 Glove compartment light 1.4 WHeadlights (low beam, except for vehicles equipped with high intensity discharge headlights)
BK0229600US.bo
ok 31 ページ 2015年10月1日 木曜日 午後2時29分
Page 368 of 398
Replacement of light bulbs 9-32 Vehicle care and maintenance
9
2. Turn the bulb (B) counterclockwise to remove it. 3. While holding down the tab (C), pull out the socket (D).
4. To install the bulb, perform the removal steps in reverse.
N00901901103
1. Turn the cap (A) counterclockwise to remove it.
* - Front of the vehicle * - Front of the vehicle
CAUTIONHandle halogen light bulb with care. The gas inside a halogen light bulb is highly pressur- ized, so dropping, knocking, or scratching a halogen light bulb can cause it to shatter.
Never hold the halogen light bulb with a bare hand, dirty glove, etc. The oil from your hand could cause the bulb to break the next time the headlights are used.If the glass surface is dirty, clean it with alcohol and let it dry completely before installing the bulb.
Headlights (high beam)
CAUTION
BK0229600US.bo
ok 32 ページ 2015年10月1日 木曜日 午後2時29分
Page 369 of 398
Replacement of light bulbs
Vehicle care and maintenance 9-33
9
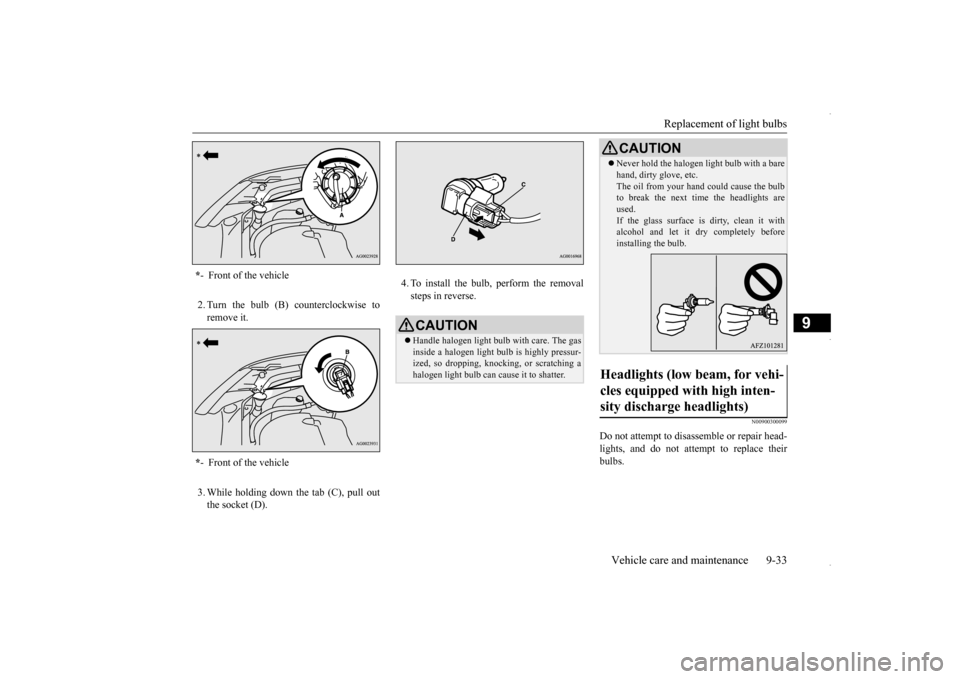
2. Turn the bulb (B) counterclockwise to remove it. 3. While holding down the tab (C), pull out the socket (D).
4. To install the bulb, perform the removal steps in reverse.
N00900300099
Do not attempt to disassemble or repair head- lights, and do not attempt to replace their bulbs.
* - Front of the vehicle * - Front of the vehicle
CAUTIONHandle halogen light bulb with care. The gas inside a halogen light bulb is highly pressur-ized, so dropping, knocking, or scratching a halogen light bulb can cause it to shatter.
Never hold the halogen light bulb with a bare hand, dirty glove, etc. The oil from your hand could cause the bulb to break the next time the headlights are used.If the glass surface is dirty, clean it with alcohol and let it dry completely before installing the bulb.
Headlights (low beam, for vehi- cles equipped with high inten- sity discharge headlights)
CAUTION
BK0229600US.bo
ok 33 ページ 2015年10月1日 木曜日 午後2時29分