2016 MITSUBISHI OUTLANDER SPORT remove seats
[x] Cancel search: remove seatsPage 36 of 398
Seat belts 4-16 Seat and restraint systems
4
If you then drive with the seat belt unfastened for longer than a minute from when the igni- tion switch or the engine switch is operated, the warning light will come on and blinkrepeatedly and the tone will sound intermit- tently. The warning light and the tone will stop afterapproximately 90 seconds. If you then repeatedly stop and start your vehicle with the seat belt unfastened, thewarning light/display and tone will remindyou to fasten your seat belt every time the vehicle starts moving. You will also be reminded to fasten your seat belt in this waywhen you remove your seat belt while driv- ing. The warning light and the tone go off when the seat belt is fastened.
N00418300194
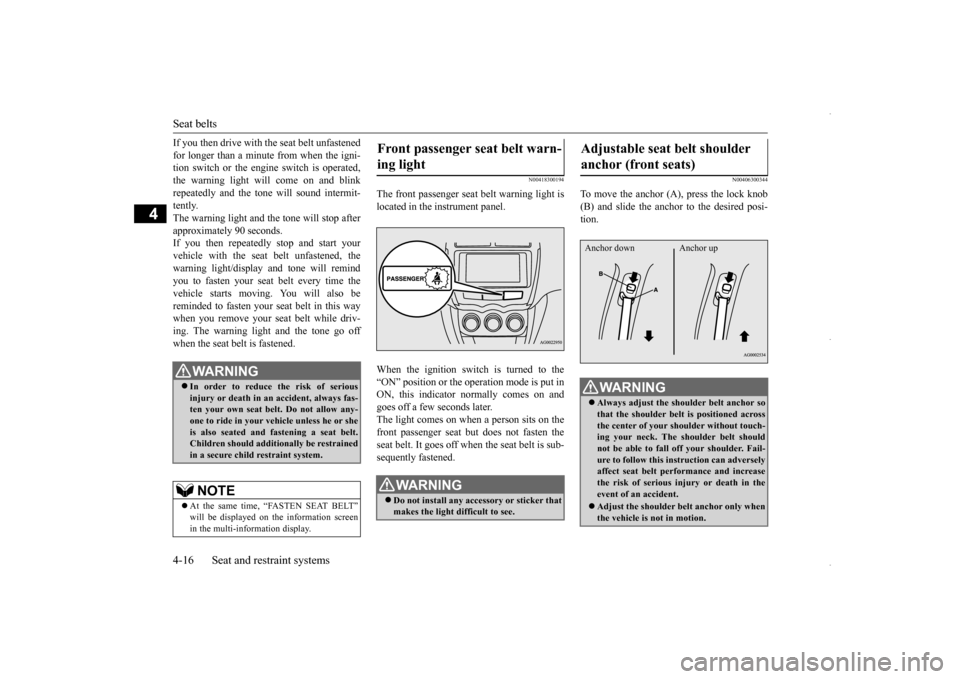
The front passenger seat belt warning light islocated in the instrument panel. When the ignition switch is turned to the “ON” position or the operation mode is put inON, this indicator normally comes on andgoes off a few seconds later. The light comes on when a person sits on the front passenger seat but does not fasten theseat belt. It goes off when the seat belt is sub- sequently fastened.
N00406300344
To move the anchor (A), press the lock knob (B) and slide the anchor to the desired posi- tion.
WA R N I N G In order to reduce the risk of serious injury or death in an accident, always fas- ten your own seat belt. Do not allow any-one to ride in your vehicle unless he or she is also seated and fastening a seat belt. Children should additionally be restrained in a secure child restraint system.NOTE
At the same time, “FASTEN SEAT BELT” in the multi-information display.
Front passenger seat belt warn- ing light
WA R N I N G Do not install any accessory or sticker that makes the light difficult to see.
Adjustable seat belt shoulder anchor (front seats)
WA R N I N G Always adjust the shoulder belt anchor so that the shoulder belt is positioned acrossthe center of your shoulder without touch- ing your neck. The shoulder belt should not be able to fall off your shoulder. Fail-ure to follow this instruction can adversely affect seat belt performance and increase the risk of serious injury or death in theevent of an accident. Adjust the shoulder belt anchor only when the vehicle is not in motion.
Anchor down Anchor up
BK0229600US.bo
ok 16 ページ 2015年10月1日 木曜日 午後2時29分
Page 37 of 398

Seat belt use during pregnancy
Seat and restraint systems 4-17
4
N00406701228
When your seat belt, even fully extended, is not long enough, a seat belt extender must be obtained. The extender may be used for either of the front seats.
N00406800134
Seat belts work for ev
eryone, including preg-
nant women. Like all occupants, pregnantwomen are more likely to be seriously injured or killed in an accident if they do not wear seat belts.
N00417700641
The driver’s and front passenger’s seats eachhave a seat belt equipped with a pre-tensioner system.
The driver and front passenger seat belts are equipped with a seat belt pre-tensioner sys-tem. In a moderate-to-severe frontal or side collision or when a rollover or overturning of the vehicle is detected, the pre-tensioner sys-tem operates simultaneously with the deploy- ment of the front airbags, side airbags or curtain airbags.The seat belt pre-tensioners are located withinthe seat belt retractors (A). When activated, the pre-tensioners quickly draw back seat belt webbing and increase seat belt performance. The seat belt pre-tensioner system includes the following components:
Make sure the anchor is securely locked in position after adjusting it.
Seat belt extender
WA R N I N G The extender should only be used if the existing belt is not long enough. Anyone who can use the standard seat belt shouldnot use an extender. Unnecessary use of an extender can adversely affect seat belt performance in an accident. When not required, the extender must be removed and stowed.WA R N I N G
Seat belt use during preg- nancy
WA R N I N G To reduce the risk of serious injury or death to pregnant women and unbornchildren in an accident, pregnant women should always wear a seat belt. The lap portion of the seat belt should be wornsnug and low across the hips and below the rounding. Consult your doctor if you have any additional questions or concerns.
Seat belt pre-tensioner and force limiter systems
Pre-tensioner system
BK0229600US.bo
ok 17 ページ 2015年10月1日 木曜日 午後2時29分
Page 42 of 398
Child restraint systems 4-22 Seat and restraint systems
4
N00419001209 N00419101268
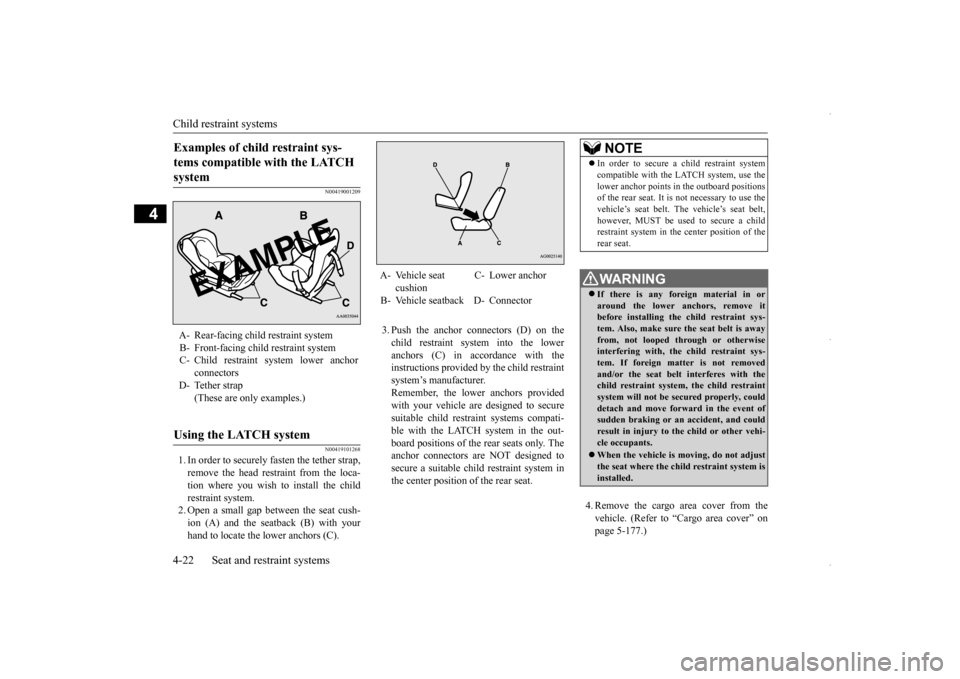
1. In order to securely fasten the tether strap, remove the head restraint from the loca- tion where you wish to install the childrestraint system. 2. Open a small gap between the seat cush- ion (A) and the seatback (B) with yourhand to locate the lower anchors (C).
3. Push the anchor connectors (D) on the child restraint system into the loweranchors (C) in accordance with the instructions provided by the child restraint system’s manufacturer.Remember, the lower anchors providedwith your vehicle are designed to secure suitable child restraint systems compati- ble with the LATCH system in the out-board positions of the rear seats only. The anchor connectors are NOT designed to secure a suitable child restraint system inthe center position of the rear seat.
4. Remove the cargo area cover from the vehicle. (Refer to “Cargo area cover” onpage 5-177.)
Examples of child restraint sys- tems compatible with the LATCH system A- Rear-facing child restraint system B- Front-facing child restraint systemC- Child restraint system lower anchor
connectors
D- Tether strap
(These are only examples.)
Using the LATCH system
A- Vehicle seat
cushion
C- Lower anchor
B- Vehicle seatback D- Connector
NOTE
In order to secure a child restraint system compatible with the LATCH system, use the lower anchor points in the outboard positions of the rear seat. It is not necessary to use the vehicle’s seat belt. The vehicle’s seat belt,however, MUST be used to secure a child restraint system in the center position of the rear seat.WA R N I N G If there is any foreign material in or around the lower anchors, remove it before installing the child restraint sys-tem. Also, make sure the seat belt is away from, not looped through or otherwise interfering with, the child restraint sys-tem. If foreign matter is not removed and/or the seat belt interferes with the child restraint system, the child restraintsystem will not be secured properly, could detach and move forward in the event of sudden braking or an accident, and couldresult in injury to the child or other vehi- cle occupants. When the vehicle is moving, do not adjust the seat where the child restraint system isinstalled.
BK0229600US.bo
ok 22 ページ 2015年10月1日 木曜日 午後2時29分
Page 45 of 398
Maintenance and inspection of seat belts
Seat and restraint systems 4-25
4
8. Before putting your child in the restraint, push and pull the restraint in all directions to be sure it is firmly secure. Do this before each use. If the child restraint sys-tem is not firmly secure, repeat steps 1 through 7. 9. To remove a child restraint system fromthe vehicle and deactivate the ALR mode, remove the child from the restraint. Unlatch the buckle. Then remove the beltfrom the restraint and let the belt fully retract.
10. Reinstall the head restraint.
Refer to “Head restraints” on page 4-7.
N00407601673
Children who have outgrown a child restraint system should be seated in the rear seat and wear the seat belt. If the shoulder belt crossestheir face or neck, and/or the lap belt crosses
their stomach, a commercially available booster seat must be used to raise the child so that the shoulder belt crosses their shoulder and the lap belt remains positioned lowacross their hips. The booster seat should fit the vehicle seat and have a label certifying compliance with Federal Motor VehicleSafety Standards or Motor Vehicle Restraint Systems and Booster Seats Safety Regula- tions.
N00407000221
The seat belt webbing may be cleaned withmild soap or detergent solution. Do not use anorganic solvent. Allow the belts to dry in the shade. Do not allow them to retract until com- pletely dry. Do not attempt to bleach or re-dye the belts. The color may rub off and the webbing strength may be affected. Regularly check your seat belt buckles and their release mechanisms for positive engage- ment and release of the latch plate. Check theretractors for automatic locking when in the Automatic Locking Retractor function. The entire seat belt assembly should be replaced if the webbing shows any obviouscuts, tears, increase in thickness in any sec- tion of the webbing from broken fibers, or severe fading from sunlight. All of these con-ditions indicate a weakening of the belt, which may adversely affect seat belt perfor- mance in an accident.
WA R N I N G Child restraint system tether anchors are designed only to withstand loads from cor- rectly fitted child restraint systems. Under no circumstances are they to be used for adult seat belts, or harnesses, or forattaching other items or equipment to the vehicle.
Children who have outgrown child restraint systems
WA R N I N G Any child who is too small to properly wear a seat belt must be properlyrestrained in an appropriate child restraint system, to reduce their risk of serious injury or death in an accident. A child should never be left unattended in, or unsupervised around, your vehicle.When you leave the vehicle, always take the child out as well. Children can die from heat stroke if left or trapped inside the vehicle, especially on hot days. Keep your vehicle locked when not in use. Keep your vehicle keys away from chil- dren.
Maintenance and inspection of seat belts
BK0229600US.bo
ok 25 ページ 2015年10月1日 木曜日 午後2時29分
Page 51 of 398
Supplemental Restraint System (SRS) - airbag
Seat and restraint systems 4-31
4
N00418100280
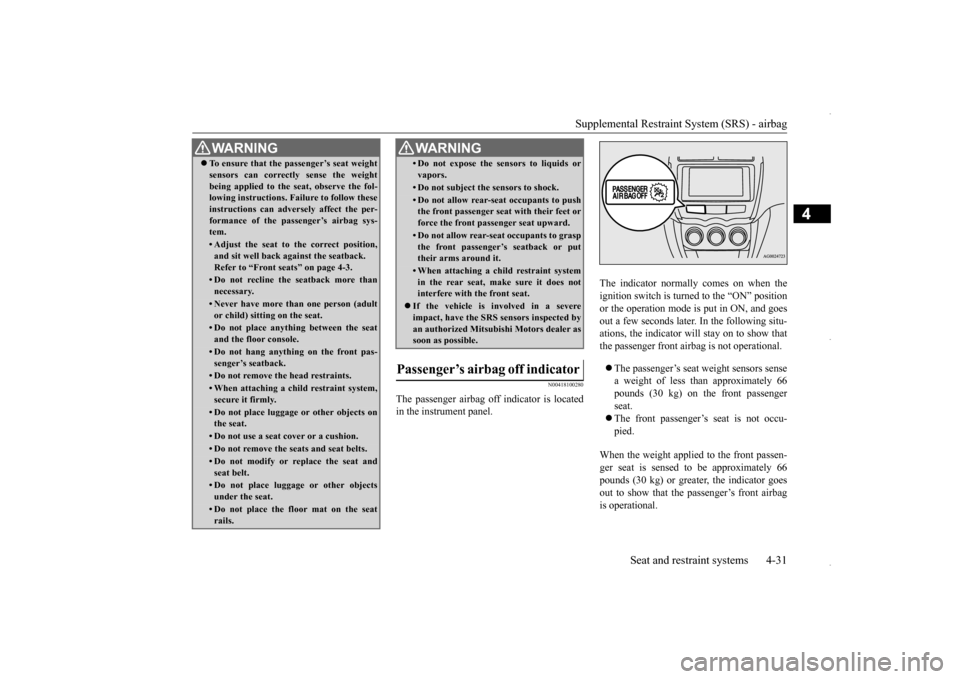
The passenger airbag off indicator is located in the instrument panel.
The indicator normally comes on when the ignition switch is turned to the “ON” position or the operation mode is put in ON, and goesout a few seconds later. In the following situ- ations, the indicator will stay on to show that the passenger front airbag is not operational. The passenger’s seat weight sensors sense a weight of less than approximately 66pounds (30 kg) on the front passenger seat. The front passenger’s seat is not occu- pied.
When the weight applied to the front passen- ger seat is sensed to be approximately 66 pounds (30 kg) or greater, the indicator goesout to show that the passenger’s front airbag is operational.
To ensure that the passenger’s seat weight sensors can correctly sense the weight being applied to the seat, observe the fol- lowing instructions. Failure to follow these instructions can adversely affect the per-formance of the passenger’s airbag sys- tem.• Adjust the seat to the correct position,and sit well back against the seatback. Refer to “Front seats” on page 4-3.• Do not recline the seatback more thannecessary.• Never have more than one person (adultor child) sitting on the seat.• Do not place anything between the seatand the floor console.• Do not hang anything on the front pas-senger’s seatback.• Do not remove the head restraints.• When attaching a child restraint system, secure it firmly.• Do not place luggage or other objects onthe seat.• Do not use a seat cover or a cushion.• Do not remove the seats and seat belts.• Do not modify or replace the seat and seat belt.• Do not place luggage or other objectsunder the seat.• Do not place the floor mat on the seatrails.WA R N I N G
• Do not expose the sensors to liquids or vapors.• Do not subject the sensors to shock.• Do not allow rear-seat occupants to pushthe front passenger seat with their feet or force the front passenger seat upward.• Do not allow rear-seat occupants to graspthe front passenger’s seatback or puttheir arms around it.• When attaching a child restraint systemin the rear seat, make sure it does not interfere with the front seat.
If the vehicle is involved in a severe impact, have the SRS sensors inspected by an authorized Mitsubishi Motors dealer assoon as possible.
Passenger’s airbag off indicator
WA R N I N G
BK0229600US.bo
ok 31 ページ 2015年10月1日 木曜日 午後2時29分
Page 61 of 398
Supplemental Restraint System (SRS) - airbag
Seat and restraint systems 4-41
4
N00408500698
SRS servicing
WA R N I N G Any maintenance performed on or near the components of the SRS should be per- formed only by an authorized Mitsubishi Motors dealer. Do not permit anyone elseto do any service, inspection, maintenance or repair on any SRS components or wir- ing. Similarly, no part of the SRS shouldever be handled, removed or disposed by anyone except an authorized Mitsubishi Motors dealer.Improper work methods on the SRS com- ponents or wiring could result in an acci- dental airbag deployment or could makethe SRS inoperable. Either of these situa- tions could result in serious injury or death. Do not modify your steering wheel or any other SRS component or related vehiclepart. For example, replacement of the steering wheel, or modifications to the front bumper or body structure canadversely affect SRS performance and may lead to injury. If your vehicle has received any damage, you should have the SRS inspected by an authorized Mitsubishi Motors dealer to make sure it is in proper working order.
Do not modify your front seats, center pil- lar or center console. Such modifications can adversely affect SRS performance and may lead to injury. Also, if you discover any tear or openseam in the seat fabric near the side air- bag, have the seat inspected by an autho- rized Mitsubishi Motors dealer. If you have found any scratch, crack or damage to the portion of the front andrear pillars and roof side rail, you should have the SRS inspected by an authorized Mitsubishi Motors dealer.NOTE
When you transfer ownership of the vehicle to another person, we urge you to alert the new owner that it is equipped with the SRS and refer that owner to the applicable sec-tions in this owner’s manual. If you decide to junk or scrap your vehicle, we urge you to first take
it to an authorized
Mitsubishi Motors dealer so that the SRS can be made safe for disposal. If any of the following parts needs to be modified for use by a handicapped person, the advanced airbag system will be greatly affected. Please consult an authorizedMitsubishi Motors dealer. • Driver’s seat• Front passenger seat • Front seat beltWA R N I N G
• Steering wheel • Instrument panel[For vehicles sold in U.S.A.] To contact Mitsubishi Motors North America, Inc. call 1-888-648-7820 or write to:Mitsubishi Motors North America, Inc. Customer Relations Department P.O. Box 6400Cypress, CA 90630-0064 [For vehicles sold in Canada] To contact Mitsubishi Motor Sales of Canada, Inc. call 1-888-576-4878 or write to:Mitsubishi Motor Sales of Canada, Inc. Customer Relations Department P.O. Box 410094141 Dixie Road Mississauga, ON L4W 5C9 [For vehicles sold in Puerto Rico] To contact Mitsubishi Motor Sales ofCaribbean, Inc. call 1-787-251-8715 or write to: Mitsubishi Motor Sales of Caribbean,Inc. Customer Service Department P.O. Box 192216SAN JUAN PR 00919-2216NOTE
BK0229600US.bo
ok 41 ページ 2015年10月1日 木曜日 午後2時29分
Page 249 of 398
Loading information Driving safety 6-7
6
Always remove the key from the ignition switch and lock all doors and the liftgatewhen leaving the vehicle unattended. Always try to park your vehicle in a well lit area.
N00629900408
It is very importan
t to know how much
weight your vehicle can carry. This weight is called the vehicle capacity weight andincludes the weight of all occupants, cargo (including the roof load), non-factory- installed options, if any, being towed. The tireand loading information placard located on the driver’s door sill of your vehicle will show how much weight it may properly carry. It is important to fami
liarize yourself with the
following terms before loading your vehicle:
Vehicle maximum load on the tire: load on an individual tire that is determined by distributing to each axle its share of the maximum loaded vehicle weight anddividing by two. Vehicle normal load on the tire: load on an individual tire that is determined bydistributing to each axle its share of the curb weight, accessory weight, and nor- mal occupant weight and dividing by two. Maximum loaded vehicle weight: the sum of - (a) Curb weight; (b) Accessory weight;(c) Vehicle capacity weight; and (d) Production options weight. Curb weight: the weight of a motor vehi- cle with standard equipment including the maximum capacity of fuel, oil, and cool- ant. Accessory weight: the combined weight (in excess of those standard items which may be replaced) of automatic transmis-sion, power steering, power brakes, power windows, power seats, radio, and heater, to the extent that these items are availableas factory- installed equipment (whether installed or not). Vehicle capacity weight: the rated cargo and luggage load plus 150 lbs (68 kg)
*
times the vehicle’s designated seating capacity.
Production options weight: the combined weight of those installed regular produc- tion options weighing over 5 lbs (2.3 kg) in excess of those standard items whichthey replace, not previously considered in curb weight or accessory weight, includ- ing heavy duty brakes, ride levelers, roofrack, heavy duty battery, and special trim. Normal occupant weight: 150 lbs (68 kg)
* times the number of specified
occupants. (In your vehicle the number is3) Occupant distribution: Occupant distribu- tion within the passenger compartment (Inyour vehicle the distribution is 2 in front, 1 in second row seat)
N00630100383
The tire and loading information placard is located on the inside sill of the driver’s door.
When leaving the vehicle Loading information
WA R N I N G Never overload your vehicle. Overloading can damage your vehicle, adversely affect vehicle performance, including handling and braking, cause tire failure, and result in an accident.
* :150 lbs (68 kg) is the weight of one per- son as defined by U.S.A. and Canadian regulations.
Tire and loading information placard
BK0229600US.bo
ok 7 ページ 2015年10月1日 木曜日 午後2時29分
Page 377 of 398
Cleaning the outside of your vehicle Vehicle care and maintenance 9-41
9
Use a vacuum cleaner and brush to clean the seats. If stained, vinyl and synthetic leather should be cleaned with an appro- priate cleaner. Cloth fabrics can becleaned with either upholstery cleaner or a 3% solution of gentle soap in lukewarm water.2. Clean the carpeting with a vacuum cleaner and remove any stains with carpet cleaner. Oil and grease can be removed bylightly dabbing with a clean white clothand spot remover.
N00945600187
1. To clean, lightly wipe the leather with a soft cloth soaked in a 5% solution of gen- tle soap and water.2. To rinse, dip the cloth in fresh water, wring it out well, and wipe off all the soap.3. To preserve and protect, use a leather pro- tecting agent on the genuine leather sur- face.
N00945700058
To protect your vehicle’s finish, wash it often and thoroughly. If desired, you may wax your vehicle using a nonabrasive automobile wax.
N00945800033
Industrial pollution, road tar, bird droppings,tree sap, insect remains, sea water and otherforeign matters can damage the finish on your vehicle. Generally, the longer any foreign materialstays on the finish, the worse the damage. Wash your vehicle as s
oon as possible when-
ever the finish gets soiled.
N00945900597
Chemicals contained in the dirt and dust picked up from air, rain
, snow, or road sur-
faces can damage the paint and body of yourvehicle if left on. Frequent washing and waxing is the best way to protect your vehicle from this damage.Do not wash the vehicle in direct sunlight. Park the vehicle in the shade and spray it with water to remove dust. Next, using plenty ofclean water and a car washing mitt or sponge, wash the vehicle from top to bottom. Use a mild car washing soap if necessary.Rinse thoroughly and wipe dry with a cham- ois or soft cloth. After washing the vehicle, carefully clean the joints and flanges of thedoors, hood, etc., where dirt is likely to remain.
NOTE
If fuzzing is difficult to remove from the seat upholstery, draw a suitable defuzzing brush over the surface in one direction.
Genuine leather
(if so equipped)
NOTE
If genuine leather is wet with water, wipe it with a dry, soft cloth. If left damp, mildew may grow. The genuine leather surface can be damaged if brushed with a nylon or synthetic fiber brush. Organic solvents such as benzine, kerosene, alcohol, gasoline, or acid or alkaline solvents can discolor the genuine leather surface andshould not be used. Genuine leather can mildew if not kept clean. Clean up any oil stains immediately. The genuine leather surface may harden and shrink if it is exposed to the direct sunlight for long hours. When your vehicle is parked, place it in the shade as much as possible. When the temperature of the vehicle interior rises in summer, vinyl products left on thegenuine leather seat may deteriorate and stick to the seat.
Cleaning the outside of your vehicle
Foreign material Wa s h i n g
BK0229600US.bo
ok 41 ページ 2015年10月1日 木曜日 午後2時29分