Page 363 of 398
Fuses
Vehicle care and maintenance 9-27
9
* : Fusible link Some fuses may not be installed on your vehicle, depending on the vehicle model or specifications. The table above shows the main equip- ment corresponding to each fuse. 20
Power window con-
trol
30 A
*
21 Defogger 30 A
*
22 Heated door mirror 7.5 A 23
Passenger’s power
seat
25 (20) A
24 Driver’s power seat
25 (20) A
25 Heated seats 30 ANo.
Sym- bol
Electrical system
Capac-ity
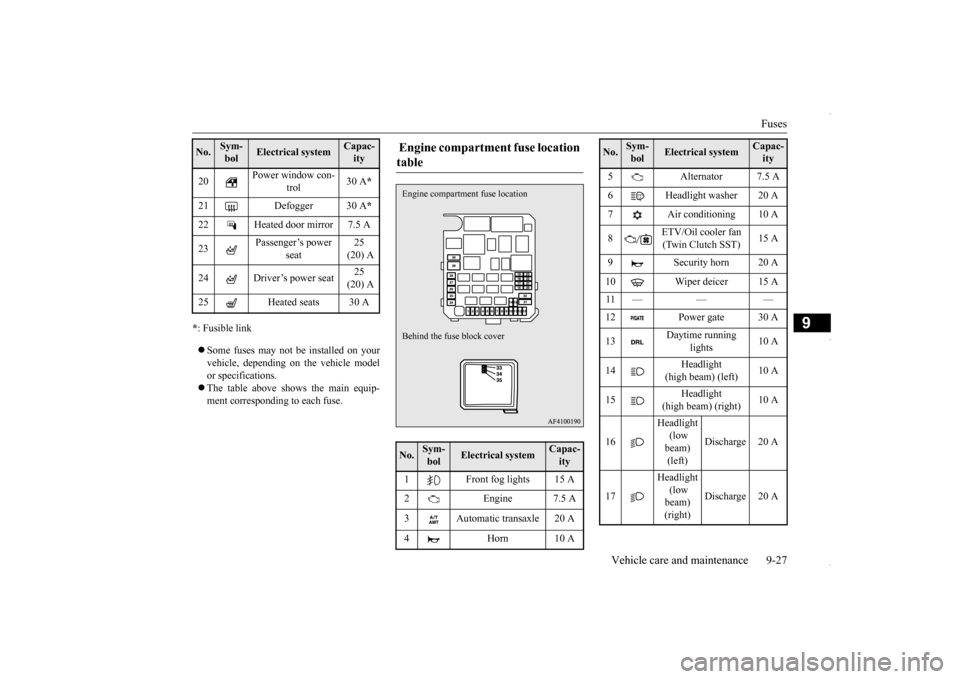
Engine compartment fuse location table No.
Sym- bol
Electrical system
Capac-ity
1 Front fog lights 15 A 2 Engine 7.5 A 3 Automatic transaxle 20 A 4 Horn 10 AEngine compartment
fuse location
Behind the fuse block cover
5 Alternator 7.5 A 6 Headlight washer 20 A 7 Air conditioning 10 A 8
ETV/Oil cooler fan (Twin Clutch SST)
15 A
9 Security horn 20 A 10 Wiper deicer 15 A 11 — — — 13
Daytime running
lights
10 A
14
Headlight
(high beam) (left)
10 A
15
Headlight
(high beam) (right)
10 A
16
Headlight (low beam) (left)
17
Headlight (low beam) (right)
Discharge 20 A
No.
Sym- bol
Electrical system
Capac-ity
BK0229600US.bo
ok 27 ページ 2015年10月1日 木曜日 午後2時29分
Page 364 of 398
Fuses 9-28 Vehicle care and maintenance
9
* : Fusible link Some fuses may not be installed on your vehicle, depending on the vehicle model or specifications. The table above shows the main equip- ment corresponding to each fuse.
There are no 7.5 A, 25 A or 30 A spare fuses. If a fuse of one of these capacities blows,replace it temporarily by borrowing one ofthe fuses indicated below. 7.5 A: 10 A spare fuse 25 A: 20 A spare fuse30 A: 30 A audio amplifier fuse Replace the borrowed fuse with a fuse that has the correct capacity as soon as possible.
N00954900128
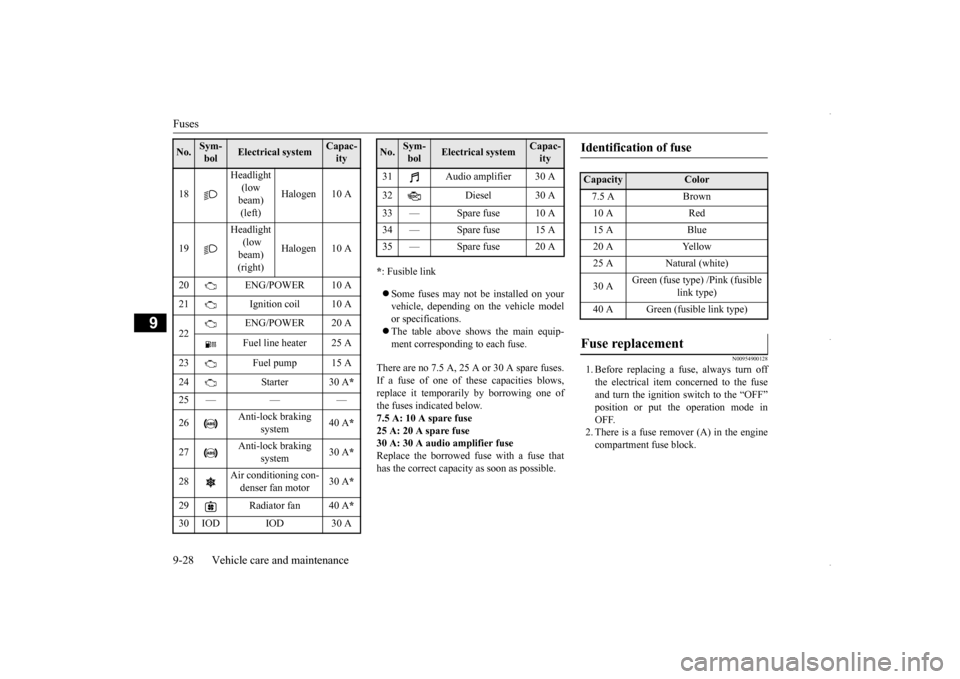
1. Before replacing a fuse, always turn off the electrical item concerned to the fuse and turn the ignition switch to the “OFF”position or put the operation mode in OFF. 2. There is a fuse remover (A) in the enginecompartment fuse block.
18
Headlight (low beam) (left)
Halogen 10 A
19
Headlight (low beam) (right)
Halogen 10 A
20 ENG/POWER 10 A 21 Ignition coil 10 A 22
ENG/POWER 20 A Fuel line heater 25 A
23 Fuel pump 15 A 24 Starter 30 A
*
25 — — —
Anti-lock braking
system
40 A
*
27
Anti-lock braking
system
30 A
*
28
Air conditioning con- denser fan motor
30 A
*
29 Radiator fan 40 A
*
30 IOD IOD 30 ANo.
Sym- bol
Electrical system
Capac-ity
31 Audio amplifier 30 A 32 Diesel 30 A 33 — Spare fuse 10 A 34 — Spare fuse 15 A35 — Spare fuse 20 ANo.
Sym- bol
Electrical system
Capac-ity
Identification of fuse Capacity
Color
7.5 A Brown10 A Red15 A Blue20 A Yellow25 A Natural (white) 30 A
Green (fuse type) /Pink (fusible
link type)
40 A Green (fusible link type)
Fuse replacement
BK0229600US.bo
ok 28 ページ 2015年10月1日 木曜日 午後2時29分
Page 365 of 398
Replacement of light bulbs
Vehicle care and maintenance 9-29
9
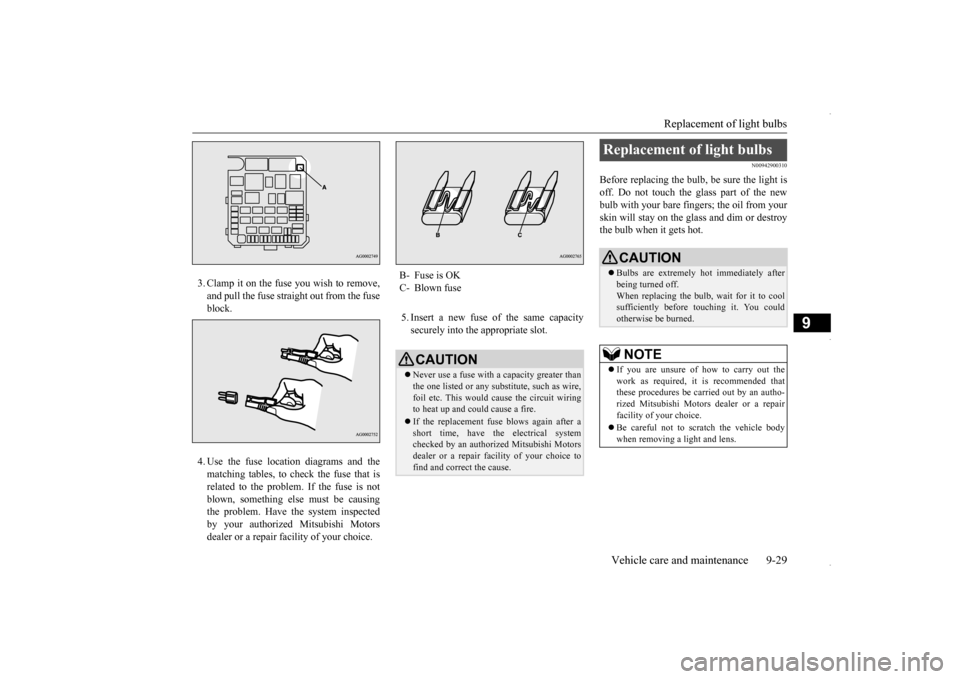
3. Clamp it on the fuse you wish to remove, and pull the fuse straight out from the fuse block. 4. Use the fuse location diagrams and the matching tables, to check the fuse that isrelated to the problem. If the fuse is notblown, something else must be causing the problem. Have the system inspected by your authorized Mitsubishi Motorsdealer or a repair facility of your choice.
5. Insert a new fuse of the same capacity securely into the appropriate slot.
N00942900310
Before replacing the bulb, be sure the light is off. Do not touch the glass part of the newbulb with your bare fingers; the oil from your skin will stay on the glass and dim or destroy the bulb when it gets hot.
B- Fuse is OKC- Blown fuse
CAUTION Never use a fuse with a capacity greater than the one listed or any substitute, such as wire, foil etc. This would cause the circuit wiring to heat up and could cause a fire. If the replacement fuse blows again after a short time, have the electrical systemchecked by an authorized Mitsubishi Motors dealer or a repair facility of your choice to find and correct the cause.
Replacement of light bulbs
CAUTION Bulbs are extremely hot immediately after being turned off.When replacing the bulb, wait for it to cool sufficiently before touching it. You could otherwise be burned.NOTE
If you are unsure of how to carry out the work as required, it is recommended that these procedures be carried out by an autho-rized Mitsubishi Motors dealer or a repair facility of your choice. Be careful not to scratch the vehicle body when removing a light and lens.
BK0229600US.bo
ok 29 ページ 2015年10月1日 木曜日 午後2時29分
Page 367 of 398
Replacement of light bulbs
Vehicle care and maintenance 9-31
9
N00950401672
* : If so equipped
N00901801144
1. Turn the cap (A) counterclockwise to remove it.
Item
Watt-age
ANSI trade No. or bulb type
8 High-mounted stop
light
——
9 License plate light 5 W W5W 10 Back-up light 16 W W16W11 Rear turn signal light 21 W W21W 12
Rear side-marker light, and tail and stop light
——
Rear
NOTE
The rear side-marker light, the tail and stop light and the high-mounted stop light use an LED instead of the bulb. Check with an authorized Mitsubishi Motors dealer or repair facility of your
choice when either
light needs to be repaired or replaced.
Compartment
Item
Wattage
1 Dome light (rear)
*
8 W
2 Vanity mirror lights
*
3 W
3
Dome light (front)/Reading light
8 W
4 Cargo room light 5 W 5 Glove compartment light 1.4 WHeadlights (low beam, except for vehicles equipped with high intensity discharge headlights)
BK0229600US.bo
ok 31 ページ 2015年10月1日 木曜日 午後2時29分
Page 368 of 398
Replacement of light bulbs 9-32 Vehicle care and maintenance
9
2. Turn the bulb (B) counterclockwise to remove it. 3. While holding down the tab (C), pull out the socket (D).
4. To install the bulb, perform the removal steps in reverse.
N00901901103
1. Turn the cap (A) counterclockwise to remove it.
* - Front of the vehicle * - Front of the vehicle
CAUTIONHandle halogen light bulb with care. The gas inside a halogen light bulb is highly pressur- ized, so dropping, knocking, or scratching a halogen light bulb can cause it to shatter.
Never hold the halogen light bulb with a bare hand, dirty glove, etc. The oil from your hand could cause the bulb to break the next time the headlights are used.If the glass surface is dirty, clean it with alcohol and let it dry completely before installing the bulb.
Headlights (high beam)
CAUTION
BK0229600US.bo
ok 32 ページ 2015年10月1日 木曜日 午後2時29分
Page 369 of 398
Replacement of light bulbs
Vehicle care and maintenance 9-33
9
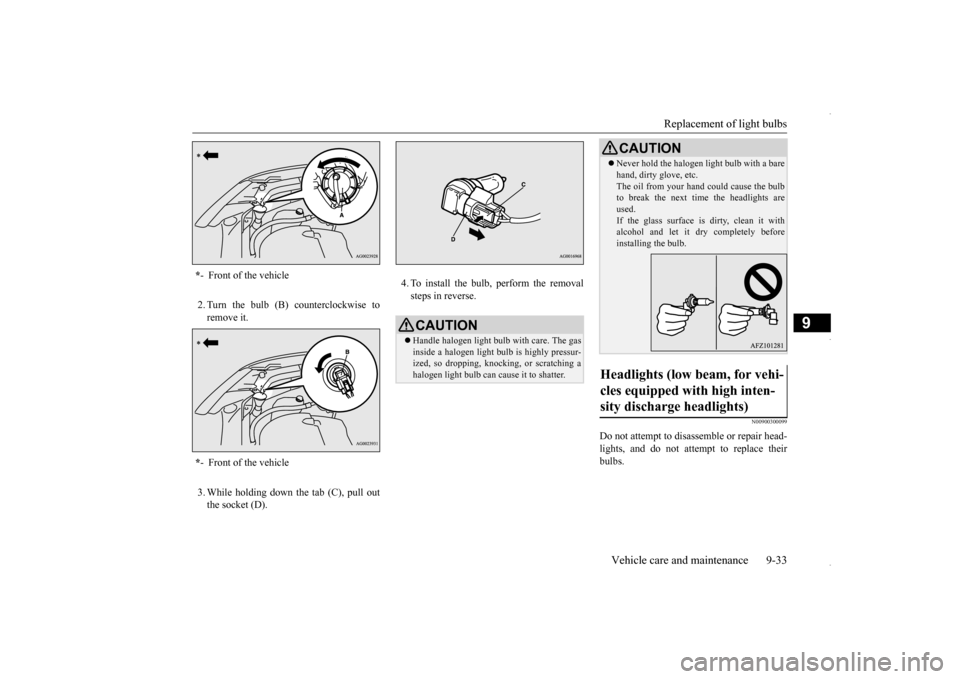
2. Turn the bulb (B) counterclockwise to remove it. 3. While holding down the tab (C), pull out the socket (D).
4. To install the bulb, perform the removal steps in reverse.
N00900300099
Do not attempt to disassemble or repair head- lights, and do not attempt to replace their bulbs.
* - Front of the vehicle * - Front of the vehicle
CAUTIONHandle halogen light bulb with care. The gas inside a halogen light bulb is highly pressur-ized, so dropping, knocking, or scratching a halogen light bulb can cause it to shatter.
Never hold the halogen light bulb with a bare hand, dirty glove, etc. The oil from your hand could cause the bulb to break the next time the headlights are used.If the glass surface is dirty, clean it with alcohol and let it dry completely before installing the bulb.
Headlights (low beam, for vehi- cles equipped with high inten- sity discharge headlights)
CAUTION
BK0229600US.bo
ok 33 ページ 2015年10月1日 木曜日 午後2時29分
Page 370 of 398
Replacement of light bulbs 9-34 Vehicle care and maintenance
9
N00943200121
The alignment of the headlights should be checked by an authorized Mitsubishi Motorsdealer or a repair facility of your choice.
N00917301652
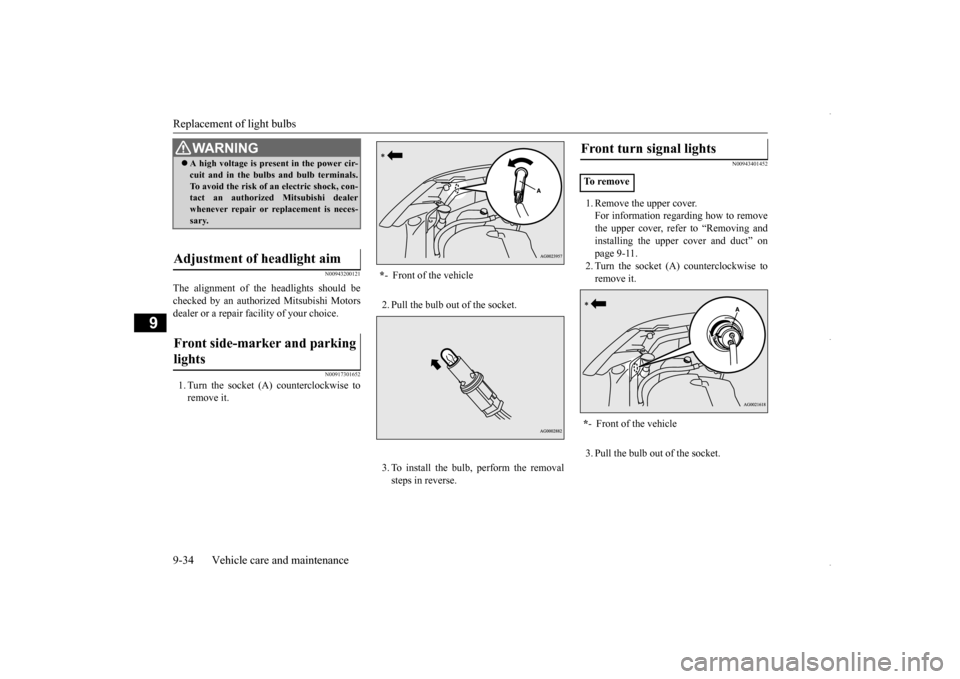
1. Turn the socket (A) counterclockwise to remove it.
2. Pull the bulb out of the socket. 3. To install the bulb, perform the removal steps in reverse.
N00943401452
1. Remove the upper cover.For information regarding how to remove the upper cover, refer to “Removing andinstalling the upper cover and duct” on page 9-11. 2. Turn the socket (A) counterclockwise toremove it. 3. Pull the bulb out of the socket.
WA R N I N G A high voltage is present in the power cir- cuit and in the bulbs and bulb terminals. To avoid the risk of an electric shock, con- tact an authorized Mitsubishi dealer whenever repair or replacement is neces-sary.
Adjustment of headlight aim Front side-marker and parking lights
* - Front of the vehicle
Front turn signal lights To r e m o v e * - Front of the vehicle
BK0229600US.bo
ok 34 ページ 2015年10月1日 木曜日 午後2時29分
Page 372 of 398
Replacement of light bulbs 9-36 Vehicle care and maintenance
9
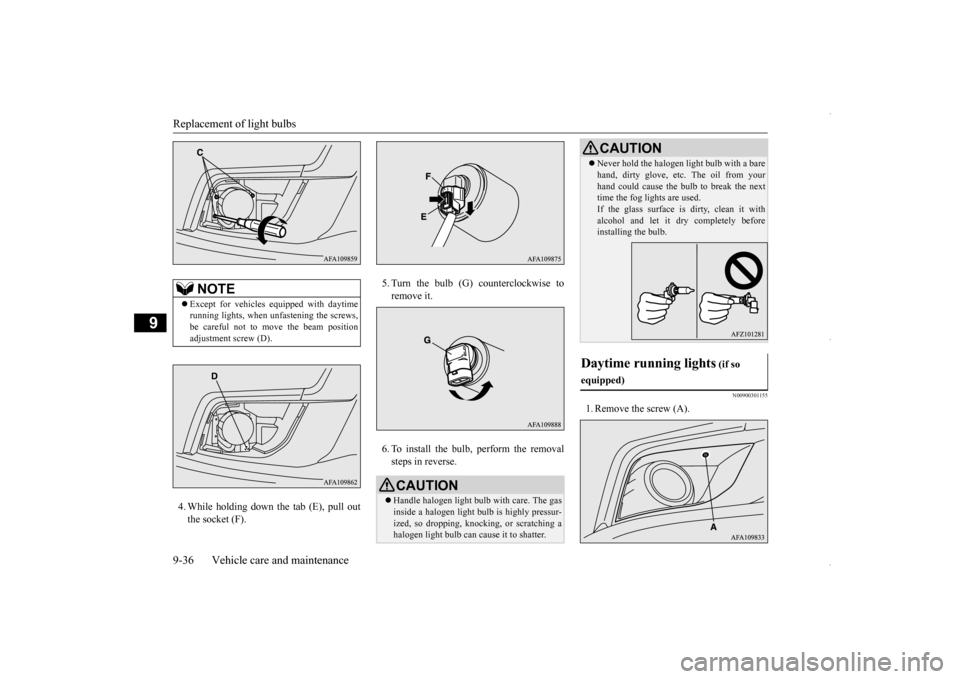
4. While holding down the tab (E), pull out the socket (F).
5. Turn the bulb (G) counterclockwise to remove it. 6. To install the bulb, perform the removal steps in reverse.
N00900301155
1. Remove the screw (A).
NOTE
Except for vehicles equipped with daytime running lights, when unfastening the screws, be careful not to move the beam position adjustment screw (D).
CAUTION Handle halogen light bulb with care. The gas inside a halogen light bulb is highly pressur- ized, so dropping, knocking, or scratching ahalogen light bulb can cause it to shatter.
Never hold the halogen light bulb with a bare hand, dirty glove, etc. The oil from your hand could cause the bulb to break the next time the fog lights are used. If the glass surface is dirty, clean it withalcohol and let it dry completely before installing the bulb.
Daytime running lights
(if so
equipped)
CAUTION
BK0229600US.bo
ok 36 ページ 2015年10月1日 木曜日 午後2時29分