2016 MITSUBISHI OUTLANDER SPORT lock
[x] Cancel search: lockPage 313 of 398
System Settings
Comfort controls 7-57
7
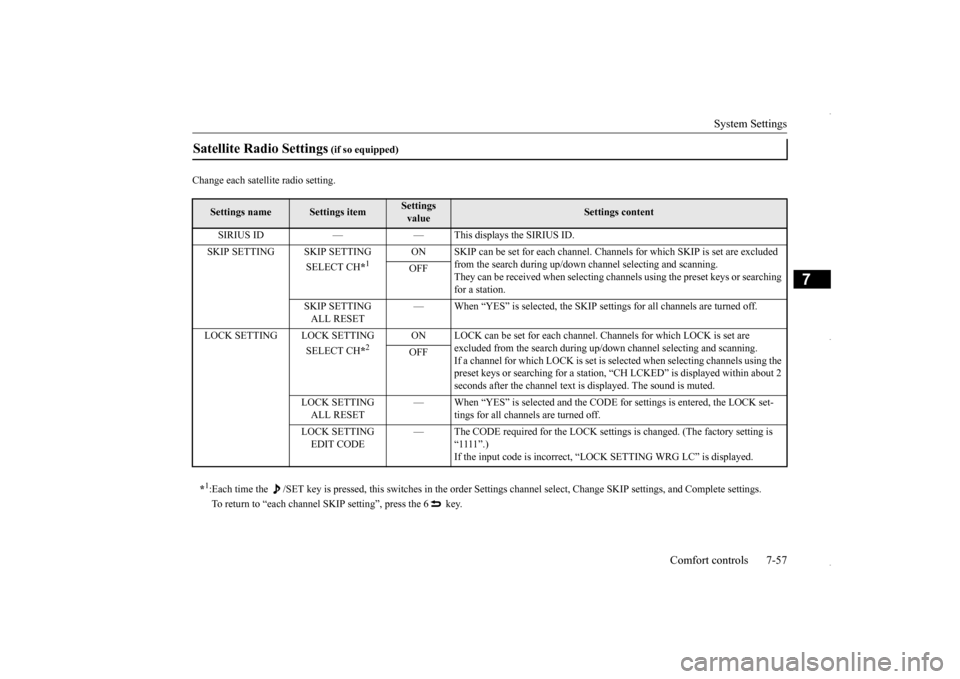
Change each satellite radio setting.Satellite Radio Settings
(if so equipped)
Settings name
Settings item
Settings value
Settings content
SIRIUS ID — — This displays the SIRIUS ID. SKIP SETTING SKIP SETTING
SELECT CH
*1
ON SKIP can be set for each channel. Channe
ls for which SKIP is set are excluded
from the search during up/down ch
annel selecting and scanning.
They can be received when selecting channe
ls using the preset keys or searching
for a station.
OFF
SKIP SETTING ALL RESET
— When “YES” is selected, the SKIP set
tings for all channels are turned off.
LOCK SETTING LOCK SETTING
SELECT CH
*2
ON LOCK can be set for each channel. Channels for which LOCK is set are
excluded from the search during up/do
wn channel selecting and scanning.
If a channel for which LOCK is set is sel
ected when selecting channels using the
preset keys or searching for a station,
“CH LCKED” is displayed within about 2
seconds after the channel text is displayed. The sound is muted.
OFF
LOCK SETTING ALL RESET
— When “YES” is selected and the CODE for settings is entered, the LOCK set-
tings for all channels are turned off.
LOCK SETTING EDIT CODE
— The CODE required for the LOCK settings is changed. (The factory setting is
“1111”.)If the input code is incorrect, “L
OCK SETTING WRG LC” is displayed.
*1: Each time the /SET key is pressed, this switches in the order Sett
ings channel select, Change SKIP settings, and Complete setti
ngs.
To return to “each channel SKIP setting”, press the 6 key.
BK0229600US.bo
ok 57 ページ 2015年10月1日 木曜日 午後2時29分
Page 314 of 398

System Settings 7-58 Comfort controls
7
Set the time manually. 1. Select “YES” at the “Adjust time” screen, and press the /SEL key. 2. Press the various keys to adjust. 3. Press the /SEL key.
This completes the adjustment.
Change the mobile phone voice cut- in set- tings and the Bluetooth
® 2.0 interface lan-
guage. Depending on the vehicle, PHONE settingsmay not be possible.
Supported profiles
*2:Once the CODE (passcode) of your choice is
entered, each time the /SET key is pressed,
this switches in the order Settings chan
nel select,
Change LOCK settings, and Complete settings. To return to “each channel LOCK setting”, press the 6 ke
y. Input the CODE from the 1 RPT key to the 6 key.
Time Setting
H - “Hour” setting
Press this key to fast-forward the “hours”.
M - “Minutes” setting
Press this key to fast-forward the “minutes”.
/SEL
M
H
NOTE
In order to finish adjusting the time, hold down the /SEL key until the seconds are reset to “00”. The time can also be set using another proce- dure. Refer to “CLOCK” on page 7-62.
PHONE Settings
NOTE
Cancel functions such as the mobile phone “dial lock”, and connect while on the standby screen. While connected, mobile phone (receiving calls, etc.) operations may not function cor- rectly.
Depending on the distance between the prod- uct and the mobile phone, the conditions within the vehicle, and types of screening,connection may not be possible. In these cases, situate the mobile phone as close as possible to the product. Even though a Bluetooth-capable mobile phone, characteristics and specifications may mean that correct operation may not be pos- sible. For safety’s sake, do not operate the mobile phone while driving. When operating themobile phone, first stop the vehicle in a safe location. Even though a mobile phone is Bluetooth capable, phone specifications and settings may result in differences in display, or pre-vent correct operation. Some models may not be confirmed as con- nected, or may not connect.Hands-free
HFP(v1.5)
Phonebook transfer
OPP(v1.1), PBAP(v1.0)
NOTE
BK0229600US.bo
ok 58 ページ 2015年10月1日 木曜日 午後2時29分
Page 318 of 398
Antenna 7-62 Comfort controls
7
N00734200439
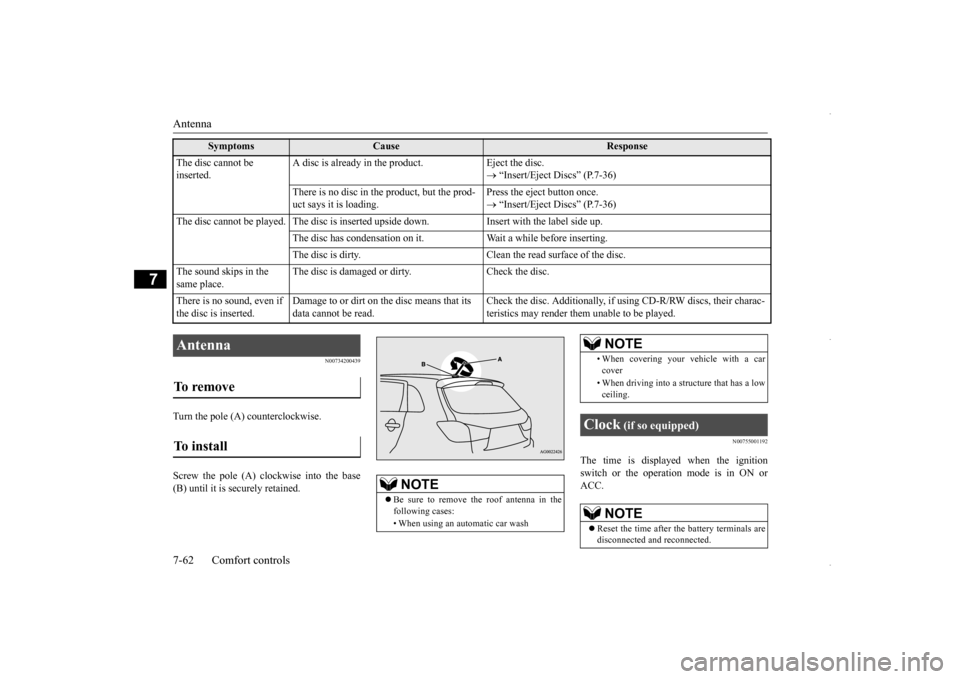
Turn the pole (A) counterclockwise. Screw the pole (A) clockwise into the base (B) until it is securely retained.
N00755001192
The time is displayed when the ignitionswitch or the operation mode is in ON or ACC.
The disc cannot be inserted.
A disc is already in the product. Eject the disc.
“Insert/Eject Discs” (P.7-36)
There is no disc in the product, but the prod- uct says it is loading.
Press the eject button once. “Insert/Eject Discs” (P.7-36)
The disc cannot be played. The disc is inserted upside down. Insert with the label side up.
The disc has condensation on it. W
ait a while before inserting.
The disc is dirty. Clean the read surface of the disc.
The sound skips in the same place.
The disc is damaged or dirty. Check the disc.
There is no sound, even if the disc is inserted.
Damage to or dirt on the disc means that its data cannot be read.
Check the disc. Additionally, if using CD-R/RW discs, their charac- teristics may render them unable to be played.
Symptoms
Cause
Response
Antenna To remove To install
NOTE
Be sure to remove the roof antenna in the following cases: • When using an automatic car wash
• When covering your vehicle with a car cover • When driving into a structure that has a low ceiling.
Clock
(if so equipped)
NOTE
Reset the time after the battery terminals are disconnected and reconnected.NOTE
BK0229600US.bo
ok 62 ページ 2015年10月1日 木曜日 午後2時29分
Page 319 of 398
General information about your radio
Comfort controls 7-63
7
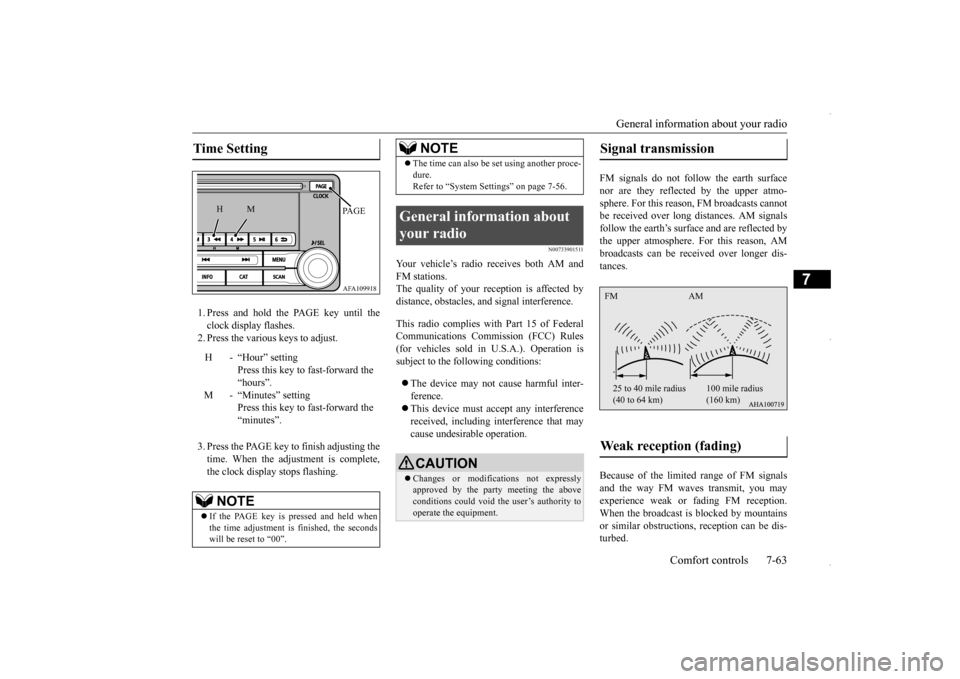
1. Press and hold the PAGE key until the clock display flashes.2. Press the various keys to adjust. 3. Press the PAGE key to finish adjusting the time. When the adjustment is complete, the clock display stops flashing.
N00733901511
Your vehicle’s radio receives both AM and FM stations. The quality of your reception is affected bydistance, obstacles, and signal interference. This radio complies with Part 15 of Federal Communications Commission (FCC) Rules (for vehicles sold in U.S.A.). Operation issubject to the following conditions: The device may not cause harmful inter- ference. This device must accept any interference received, including interference that may cause undesirable operation.
FM signals do not follow the earth surface nor are they reflected by the upper atmo-sphere. For this reason, FM broadcasts cannot be received over long distances. AM signals follow the earth’s surface and are reflected bythe upper atmosphere. For this reason, AM broadcasts can be received over longer dis- tances. Because of the limited range of FM signals and the way FM waves transmit, you may experience weak or fading FM reception.When the broadcast is blocked by mountains or similar obstructions, reception can be dis- turbed.
Time Setting
H - “Hour” setting
Press this key to fast-forward the“hours”.
M - “Minutes” setting
Press this key to fast-forward the “minutes”.
NOTE
If the PAGE key is pressed and held when the time adjustment is finished, the seconds will be reset to “00”.
AFA109918PA G E
M
H
The time can also be set using another proce- dure. Refer to “System Settings” on page 7-56.
General information about your radio
CAUTION Changes or modifications not expressly approved by the party meeting the above conditions could void the user’s authority to operate the equipment.NOTE
Signal transmission Weak reception (fading) FM AM 25 to 40 mile radius (40 to 64 km)
100 mile radius (160 km)
BK0229600US.bo
ok 63 ページ 2015年10月1日 木曜日 午後2時29分
Page 323 of 398
Jump-starting the engine For emergencies 8-3
8
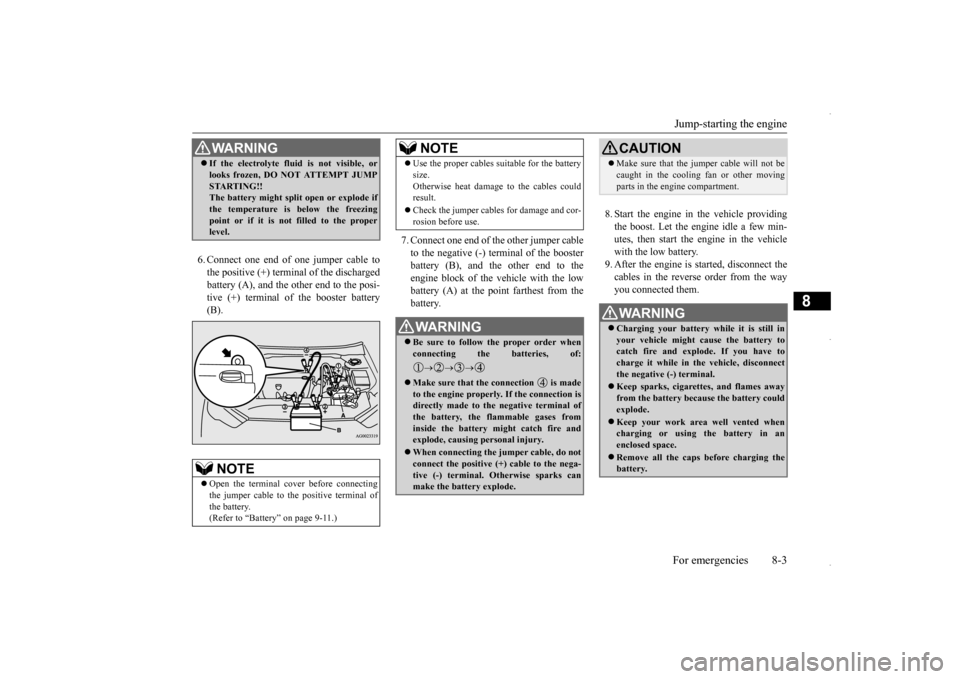
6. Connect one end of one jumper cable to the positive (+) terminal of the discharged battery (A), and the other end to the posi- tive (+) terminal of the booster battery(B).
7. Connect one end of the other jumper cable to the negative (-) terminal of the boosterbattery (B), and the other end to the engine block of the vehicle with the low battery (A) at the point farthest from thebattery.
8. Start the engine in the vehicle providing the boost. Let the engine idle a few min-utes, then start the engine in the vehicle with the low battery. 9. After the engine is started, disconnect thecables in the reverse order from the wayyou connected them.
WA R N I N G If the electrolyte fluid is not visible, or looks frozen, DO NOT ATTEMPT JUMP STARTING!! The battery might split open or explode if the temperature is below the freezingpoint or if it is not filled to the proper level.NOTE
Open the terminal cover before connecting the jumper cable to the positive terminal of the battery.(Refer to “Battery” on page 9-11.)
Use the proper cables suitable for the battery size. Otherwise heat damage to the cables could result. Check the jumper cables for damage and cor- rosion before use.WA R N I N G Be sure to follow the proper order when connecting the batteries, of:
Make sure that the connection is made to the engine properly. If the connection isdirectly made to the negative terminal of the battery, the flammable gases from inside the battery might catch fire andexplode, causing personal injury. When connecting the jumper cable, do not connect the positive (+) cable to the nega- tive (-) terminal. Otherwise sparks can make the battery explode.NOTE
CAUTION Make sure that the jumper cable will not be caught in the cooling fan or other moving parts in the engine compartment.WA R N I N G Charging your battery while it is still in your vehicle might cause the battery to catch fire and explode. If you have tocharge it while in the vehicle, disconnect the negative (-) terminal. Keep sparks, cigarettes, and flames away from the battery because the battery could explode. Keep your work area well vented when charging or using the battery in anenclosed space. Remove all the caps before charging the battery.
BK0229600US.bo
ok 3 ページ 2015年10月1日 木曜日 午後2時29分
Page 324 of 398
Engine overheating 8-4 For emergencies
8
If you drive your vehicle with a low battery charge after the engine has been started by using jumper cables, the engine may misfire. This can cause the anti-lock braking systemwarning light to blink on and off. This is only due to the low battery voltage. It is not a problem with the brake system. If this hap-pens, fully charge the battery and ensure the charging system is operating properly.
N00836500352
When the engine is overheating, the informa-tion screen in the multi-information display
will be interrupted and the engine coolant temperature warning display will appear. Also “ ” blink. If this happens: 1. Stop the vehicle in a safe place. Turn on the hazard warning flashers.2. With the engine still running, carefully raise the engine hood to vent the engine compartment.3. Check that the cooling fan is running. Ifthe fan is not turning, stop the engine immediately and contact an authorized Mitsubishi Motors dealer or a repair facil-ity of your choice for assistance. 4. If you see steam or spray coming from under the hood, turn off the engine. 5. If you do not see steam or spray comingfrom under the hood, leave the engine on until the bar graph for the engine coolant temperature warning display on the multi-information display goes down. When it is in the middle of the normal zone, you can start driving again. If the bar graphstays in the red zone, turn off the engine.
6. When you do not see any more steam or spray, open the hood. Look for obvious leaks, such as a split radiator hose. Be careful as components will be hot. Anyleak source must be repaired. 7. If there is no obvious leak source, check the coolant level in the engine coolantreserve tank. If there is none, or if it is too low, slowly add coolant. 8. If the engine coolant reserve tank needscoolant, you will probably also need to add coolant to the radiator. Do not loosen or remove the radiator cap until the enginehas cooled down.
Electrolyte (battery acid) is made of corro- sive diluted sulfuric acid. If electrolyte comes in contact with your hands, eyes, clothes, or the painted surface of your vehicle, thoroughly flush with water. Ifelectrolyte gets in your eyes, flush them immediately and thoroughly with water, and get prompt medical attention. Always wear protective clothing and gog- gles when working near the battery. Keep the battery out of the reach of chil- dren.
As your vehicle has anti-lock brakes Engine overheating
WA R N I N G
WA R N I N G To avoid personal injury, keep hands, hair, jewelry and clothes away from the cooling fan. The cooling fan can start atany time.
WA R N I N G Before raising the engine hood, check to see if there is steam or spray coming from under the hood. Steam or spray coming from an overheated engine could seriously scald you.Do not open the hood until there is no steam or spray.
BK0229600US.bo
ok 4 ページ 2015年10月1日 木曜日 午後2時29分
Page 325 of 398
Jack and tools
For emergencies 8-5
8
9. Start the engine, and slowly add coolant, up to the bottom of the filler neck. Useplain water if you have to (and replace it with the right coolant as soon as possible).
10. Replace the radiator cap and tighten it
fully. Check the engine coolant tempera- ture display on the multi-information dis- play. You can start driving again whenthe bar graph for the engine coolant tem- perature display returns to the normal zone.
11. Have the system inspected by your autho-
rized Mitsubishi Motors dealer or a repair facility of your choice.
N00836600337
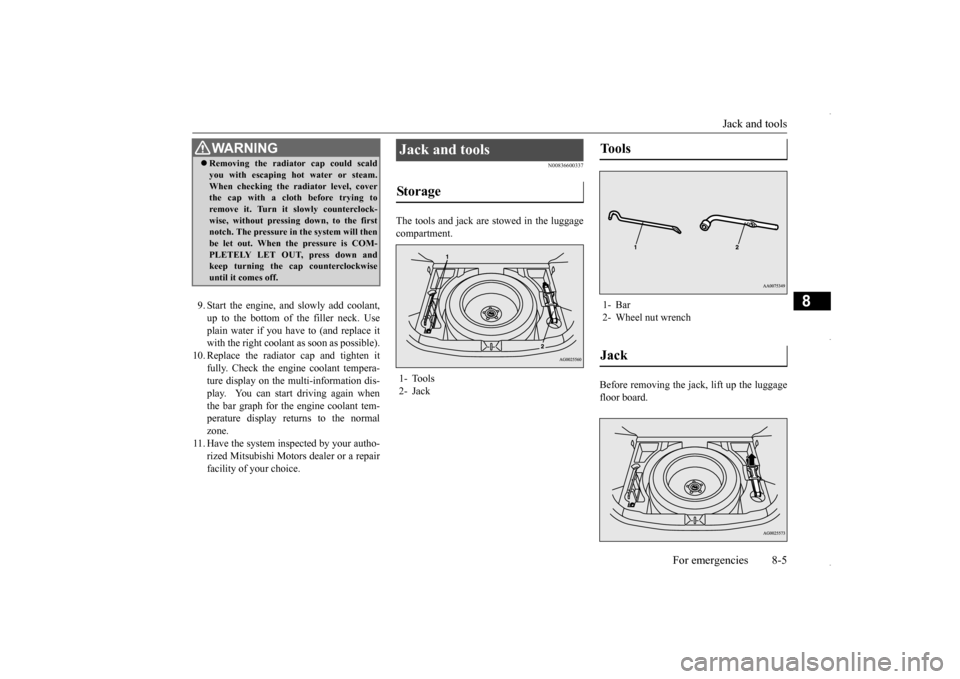
The tools and jack are stowed in the luggagecompartment.
Before removing the jack, lift up the luggage floor board.
WA R N I N G Removing the radiator cap could scald you with escaping hot water or steam. When checking the radiator level, cover the cap with a cloth before trying to remove it. Turn it slowly counterclock-wise, without pressing down, to the first notch. The pressure in the system will then be let out. When the pressure is COM-PLETELY LET OUT, press down and keep turning the cap counterclockwise until it comes off.
Jack and tools Storage 1- Tools 2- Jack
Tools 1- Bar2- Wheel nut wrenchJack
BK0229600US.bo
ok 5 ページ 2015年10月1日 木曜日 午後2時29分
Page 326 of 398
How to change a tire 8-6 For emergencies
8
N00836901832
Before changing a tire, first stop your vehicle in a safe, flat location. 1. Park the vehicle on level and stable ground. 2. Set the parking brake firmly.3. On vehicles equipped with manual trans- axle, stop the engine and move the gear- shift lever to the “R” (Reverse) position.On vehicles equipped with continuously variable transmission (CVT), move the selector lever to the “P” (PARK) position,and stop the engine. 4. Turn on the hazard flashers and set up a warning triangle, flashing signal light,etc., at an adequate distance from the vehicle, and have all your passengers leave the vehicle.
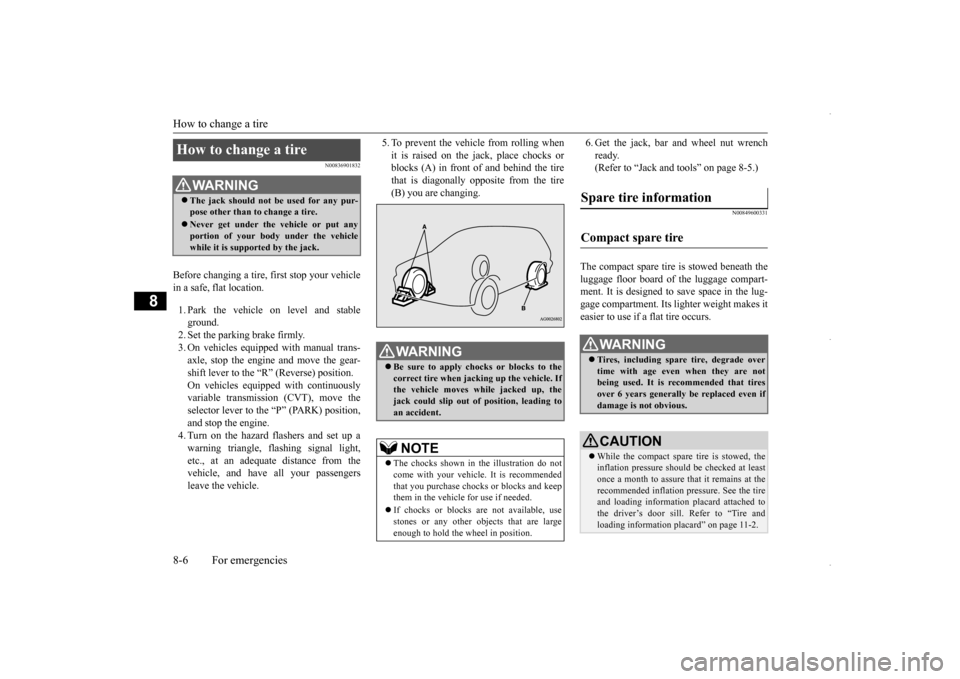
5. To prevent the vehicle from rolling when it is raised on the jack, place chocks or blocks (A) in front of and behind the tire that is diagonally opposite from the tire(B) you are changing.
6. Get the jack, bar and wheel nut wrench ready. (Refer to “Jack and tools” on page 8-5.)
N00849600331
The compact spare tire is stowed beneath the luggage floor board of the luggage compart- ment. It is designed to save space in the lug- gage compartment. Its lighter weight makes iteasier to use if a flat tire occurs.
How to change a tire
WA R N I N G The jack should not be used for any pur- pose other than to change a tire. Never get under the vehicle or put any portion of your body under the vehicle while it is supported by the jack.
WA R N I N G Be sure to apply chocks or blocks to the correct tire when jacking up the vehicle. Ifthe vehicle moves while jacked up, the jack could slip out of position, leading to an accident.NOTE
The chocks shown in the illustration do not come with your vehicle. It is recommended that you purchase chocks or blocks and keepthem in the vehicle for use if needed. If chocks or blocks are not available, use stones or any other objects that are large enough to hold the wheel in position.
Spare tire information Compact spare tire
WA R N I N G Tires, including spare tire, degrade over time with age even when they are not being used. It is recommended that tires over 6 years generally be replaced even ifdamage is not obvious.CAUTION While the compact spare tire is stowed, the inflation pressure should be checked at least once a month to assure that it remains at the recommended inflation pressure. See the tireand loading information placard attached to the driver’s door sill. Refer to “Tire and loading information placard” on page 11-2.
BK0229600US.bo
ok 6 ページ 2015年10月1日 木曜日 午後2時29分