2016 MERCEDES-BENZ SL-CLASS ROADSTER warning lights
[x] Cancel search: warning lightsPage 67 of 614
be released. The6restraint system warn-
ing lamp lights up.
Only in rare cases will the bang affect your
hearing. The powder that is released gener-
ally does not constitute a health hazard, but it may cause short-term breathing difficulties in
people with asthma or other respiratory prob-
lems. To avoid this, you may wish to get out of
the vehicle or open the windows as soon as it
is safe to do so.
Air bags and pyrotechnic Emergency Tension-
ing Devices (ETDs) contain perchlorate mate-
rial, which may require special handling and
regard for the environment. National guide-
lines must be observed during disposal. In
California, see www.dtsc.ca.gov/
HazardousWaste/Perchlorate/
index.cfm .
Method of operation
During the first stage of a collision, the
restraint system control unit evaluates impor-
tant physical data relating to vehicle deceler-
ation or acceleration, such as:
Rduration
Rdirection
Rintensity
Based on the evaluation of this data, the
restraint system control unit triggers the
Emergency Tensioning Devices during a fron-
tal or rear collision.
An Emergency Tensioning Device can only be triggered, if:
Rthe ignition is switched on
Rthe components of the restraint system are
operational; see "Restraint system warning
lamp" (
Ypage 51)
Rthe belt tongue has engaged in the belt
buckle of the respective seat
If the restraint system control unit detects a
more severe accident, further components of
the restraint system are activated independ- ently of each other in certain frontal collision
situations:
RFront air bags as well as driver's and front-
passenger knee bags
The front-passenger front air bag is activated or deactivated depending on the person on
the front-passenger seat. The front-
passenger front air bag can only deploy in an
accident if the PASSENGER AIR BAG ON indi- cator lamp is lit. Observe the information on
the PASSENGER AIR BAG indicator lamps
(
Ypage 51).
Your vehicle has two-stage front air bags.
During the first deployment stage, the front
air bag is filled with propellant gas to reduce
the risk of injuries. The front air bag is fully
deployed with the maximum amount of pro-
pellant gas if a second deployment threshold
is reached within a few milliseconds.
The activation threshold of the Emergency
Tensioning Devices and the air bag are deter-
mined by evaluating the rate of vehicle decel-
eration or acceleration which occurs at vari-
ous points in the vehicle. This process is pre- emptive in nature. Deployment should take
place in good time at the start of the collision.
The rat
e of vehicle deceleration or accelera-
tion and the direction of the force are essen-
tially determined by:
Rthe distribution of forces during the colli-
sion
Rthe collision angle
Rthe deformation characteristics of the vehi-
cle
Rthe characteristics of the object with which
the vehicle has collided
Factors which can only be seen and measured
after a collision has occurred do not play a
decisive role in the deployment of an air bag.
Nor do they provide an indication of air bag
deployment.
The vehicle can be deformed considerably,
without an air bag being deployed. This is the
case if only parts which are relatively easily
deformed are affected and the rate of decel-
eration is not high. Conversely, air bags may
Occupant safety65
Safety
Z
Page 74 of 614
ABS (Anti-lock Braking System)
Gene ral inform ation
ABSregulates brak epressur ein suc h away
that th ewheels do no tloc kwhen you brake.
This allows you to continu esteering th evehi-
cle when braking .
The ! ABSwarning lamp in th einstrumen t
cluste rlights up when th eignition is switched
on .It goes out when th eengin eis running.
AB Sworks from aspee dof about 5mph
(8 km/h), regardless of road-surface condi-
tions. AB Sworks on slippery surfaces, eve n
when you only brak egently.
Import ant safety notes
iObserveth e"Importan tsafet ynotes" sec -
tion (
Ypage 71).
GWARNIN G
If AB Sis faulty, th ewheels could loc kwhen
braking .The steerabilit yand braking charac -
teristics may be severely impaired. Addition -
ally, further drivin gsafet ysystems are deac -
tivated. There is an increased danger of skid-
din gand accidents .
Drive on carefully. Hav eAB Schecke dimme-
diately at aqualified specialis tworkshop .
When ABSis malfunctioning ,other systems ,
includin gdriving safet ysystems ,will also
become inoperative. Observeth einformation
on th eAB Swarning lamp (
Ypage 272) and
display message swhic hmay be shown in th e
instrumen tcluste r (
Ypage 240).
Braking
XIf ABS intervenes: continueto depress th e
brak epedal vigorously until th ebraking sit -
uation is over.
XTo make a full brak eapplication:
depress th ebrak epedal wit hfull force .
If AB Sintervenes when braking ,you will fee l a
pulsing in th ebrak epedal . The pulsating brak
epedal can be an indica-
tion of hazardous road condition s,and func-
tion sas areminder to tak eextr acar ewhile
driving .
BAS (Brake Assist System)
Gene ral inform ation
BASoperate sin emergenc ybraking situa-
tions. If you depress th ebrak epedal quickly,
BA Sautomatically boosts th ebraking force ,
thus shortening th e stopping distance.
Important safety notes
iObserveth e"Importan t safetynotes" sec-
tion (
Ypage 71) .
GWARNIN G
If BA Sis malfunctioning ,th ebraking distanc e
in an emergenc ybraking situation is
increased. There is aris kof an accident.
In an emergenc ybraking situation ,depress
th ebrak epedal wit hfull force .AB Sprevents
th ewheels from locking .
Braking
XKeepth ebrak epedal firmly depressed until
th eemergenc ybraking situation is over.
AB Sprevents th ewheels from locking .
The brakes will function as usual once you
release th ebrak epedal .BA Sis deactivated.
BAS PLUS (Brake Assist System
PLUS)
Gene ral inform ation
BASPLU Scan help you to minimiz eth eris kof
a collision wit h avehicl eor reduce th eeffects
of such a collision .If BA S PLUS detects a
danger of collision ,you are assisted when
braking .
iObserveth e"Importan t safetynotes" sec-
tion (
Ypage 71) .
72Driving safety systems
Safety
Page 77 of 614

If ESP®intervenes, the÷ESP®warning
lamp flashes in the instrument cluster.
If ESP
®intervenes:
XDo not deactivate ESP®under any circum-
stances.
XOnly depress the accelerator pedal as far as
necessary when pulling away.
XAdapt your driving style to suit the prevail-
ing road and weather conditions.
ECO start/stop function
The ECO start/stop function switches the
engine off automatically when the vehicle
stops moving. The engine starts automati-
cally when the driver wants to pull away again.
ESP
®remains in its previously selected sta-
tus. Example: if ESP®was deactivated before
the engine was switched off, ESP®remains
deactivated when the engine is switched on
again.
Deactivating/activating ESP®(except
Mercedes‑AMG vehicles)
Important safety notes
iObserve the "Important safety notes" sec-
tion (
Ypage 71).
You can select between the following states
of ESP
®:
RESP®is activated.
RESP®is deactivated.
GWARNING
If you deactivate ESP
®, ESP®no longer sta-
bilizes the vehicle. There is an increased risk
of skidding and an accident.
Only deactivate ESP
®in the situations descri-
bed in the following.
It may be best to deactivate ESP®in the fol-
lowing situations:
Rwhen using snow chains
Rin deep snow
Ron sand or gravel
iActivate ESP®as soon as the situations
described above no longer apply. ESP®will
otherwise not be able to stabilize the vehi-
cle if the vehicle starts to skid or a wheel
starts to spin.
!Avoid spinning the driven wheels for an
extended period with ESP®deactivated.
You could otherwise damage the drivetrain.
Deactivating/activating ESP
®
XTo deactivate: press button:.
The å ESP®OFF warning lamp in the
instrument cluster lights up.
XTo activate: press button :.
The å ESP®OFF warning lamp in the
instrument cluster goes out.
Characteristics when ESP
®is deactivated
If ESP
®is deactivated and one or more wheels
start to spin, the ÷ESP®warning lamp in
the instrument cluster flashes. In such situa-
tions, ESP
®will not stabilize the vehicle.
If you deactivate ESP
®:
RESP®no longer improves driving stability.
Rengine torque is no longer limited and the
drive wheels are able to spin.
The spinning of the wheels results in a cut-
ting action for better traction on loose sur-
faces.
Rtraction control is still activated.
RESP®still provides support when you brake
firmly.
Driving safety systems75
Safety
Z
Page 78 of 614
Deactivating/activating ESP®
(Mercedes‑AM Gvehicles )
Important safet ynotes
iObserv eth e"Important safet ynotes" sec -
tion (
Ypage 71) .
You can selec tbetween th efollowing states
of ES P
®:
RESP®is activated.
RSPORT handlin gmode is activated.
RES P®is deactivated.
GWARNING
Whe nSPORT handlin gmode is activated,
there is agreater ris kof skidding and acci-
dents .
Only activat eSPORT handlin gmode in th esit -
uation sdescribed in th efollowing.
GWARNING
If you deactivat eES P
®,ES P®no longer sta-
bilizes th evehicle. There is an increase dris k
of skidding and an accident.
Only deactivat eES P
®in th esituation sdescri-
bed in th efollowing.
In th efollowing situations, it may be bette rto
activat eSPORT handlin gmode or deactivat e
ES P
®:
Rwhen usin gsnow chain s
Rin deep snow
Ron sandor grave l
Ron specially designated roads when th e
vehicle' sown oversteering and understeer-
in g characteristics are desire d
Driving in SPORT handlin gmode or without
ES P
®require san extremely qualified and
experience ddriver .
iActivat eES P®as soo nas th esituation s
described abov eno longer apply. ES P®will
otherwise no tbe able to stabilize th evehi-
cl e if th evehicle start sto skid or awhee l
start sto spin.
!Avoid spinnin gth edriven wheels fo ran
extended period wit hES P®deactivated.
You could otherwise damage th edrivetrain .
Deactivating/activating ESP
®
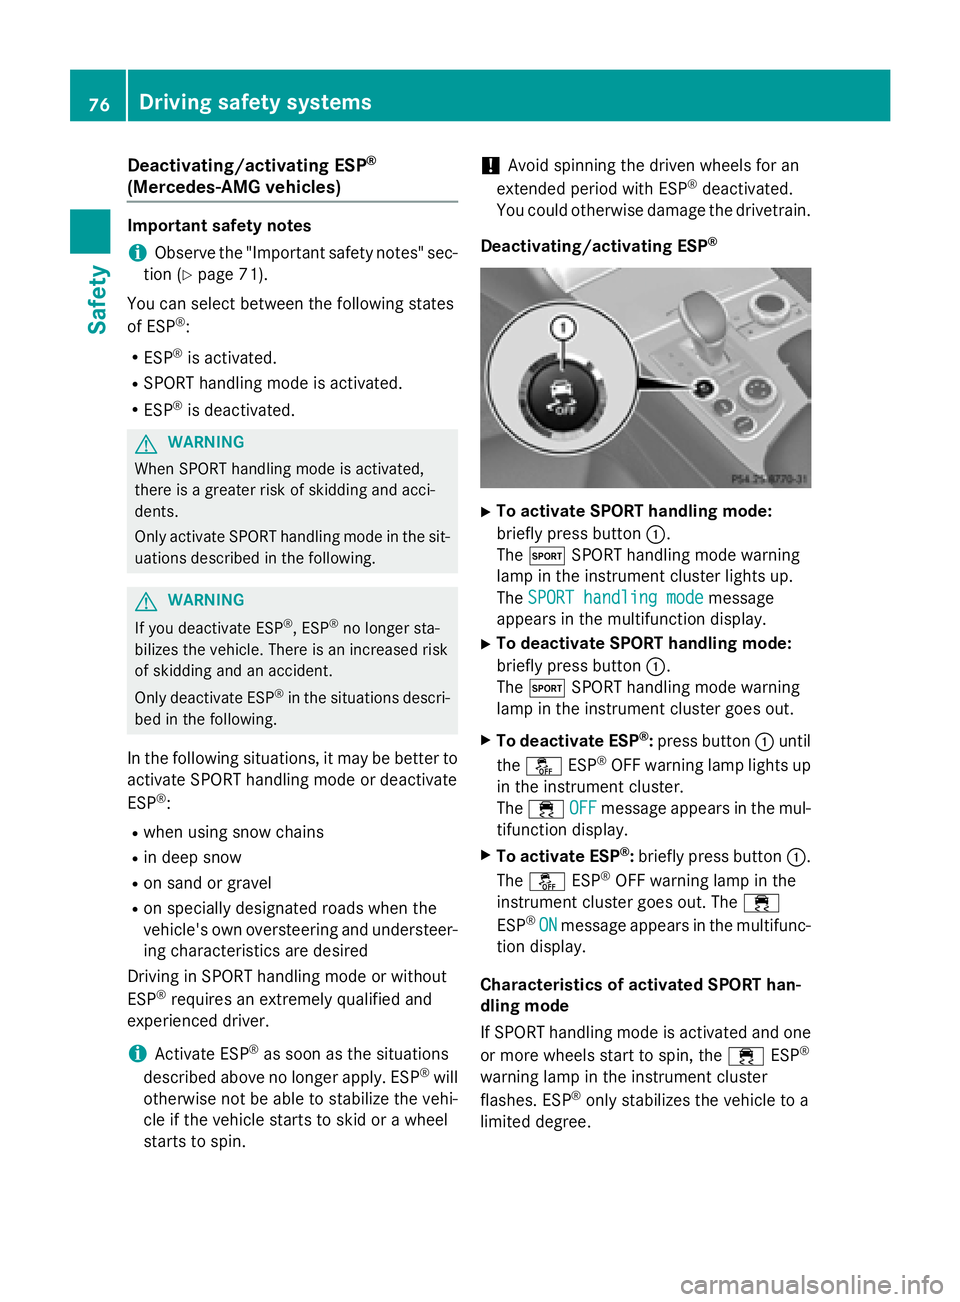
XTo activate SPORT handling mode:
briefly press butto n:.
The M SPORT handlin gmode warnin g
lamp in th einstrumen tcluster lights up.
The SPORT handling mod e
message
appears in th emultifunction display.
XTo deactivate SPORT handling mode:
briefly press butto n:.
The M SPORT handlin gmode warnin g
lamp in th einstrumen tcluster goe sout .
XTo deactivate ESP®:press butto n: until
th eå ESP®OF Fwarnin glamp lights up
in th einstrumen tcluster.
The ÷ OFF
message appears in th emul-
tifunction display.
XTo activate ESP®: briefly press butto n:.
The å ESP®OF Fwarnin glamp in th e
instrumen tcluster goe sout .The ÷
ES P
®ONmessage appears in th emultifunc-
tion display.
Characteristics of activate dSPORT han-
dling mode
If SPORT handlin gmode is activated and on e
or more wheels start to spin, th e÷ ESP
®
warnin glamp in th einstrumen tcluster
flashes .ES P®only stabilize sth evehicle to a
limited degree .
76Driving safety systems
Safety
Page 87 of 614
If you unlock the vehicle using the mechanical
key, the fuel filler flap will not be unlocked
automatically.
XTo unlock the fuel filler flap:insert the
SmartKey into the ignition lock.
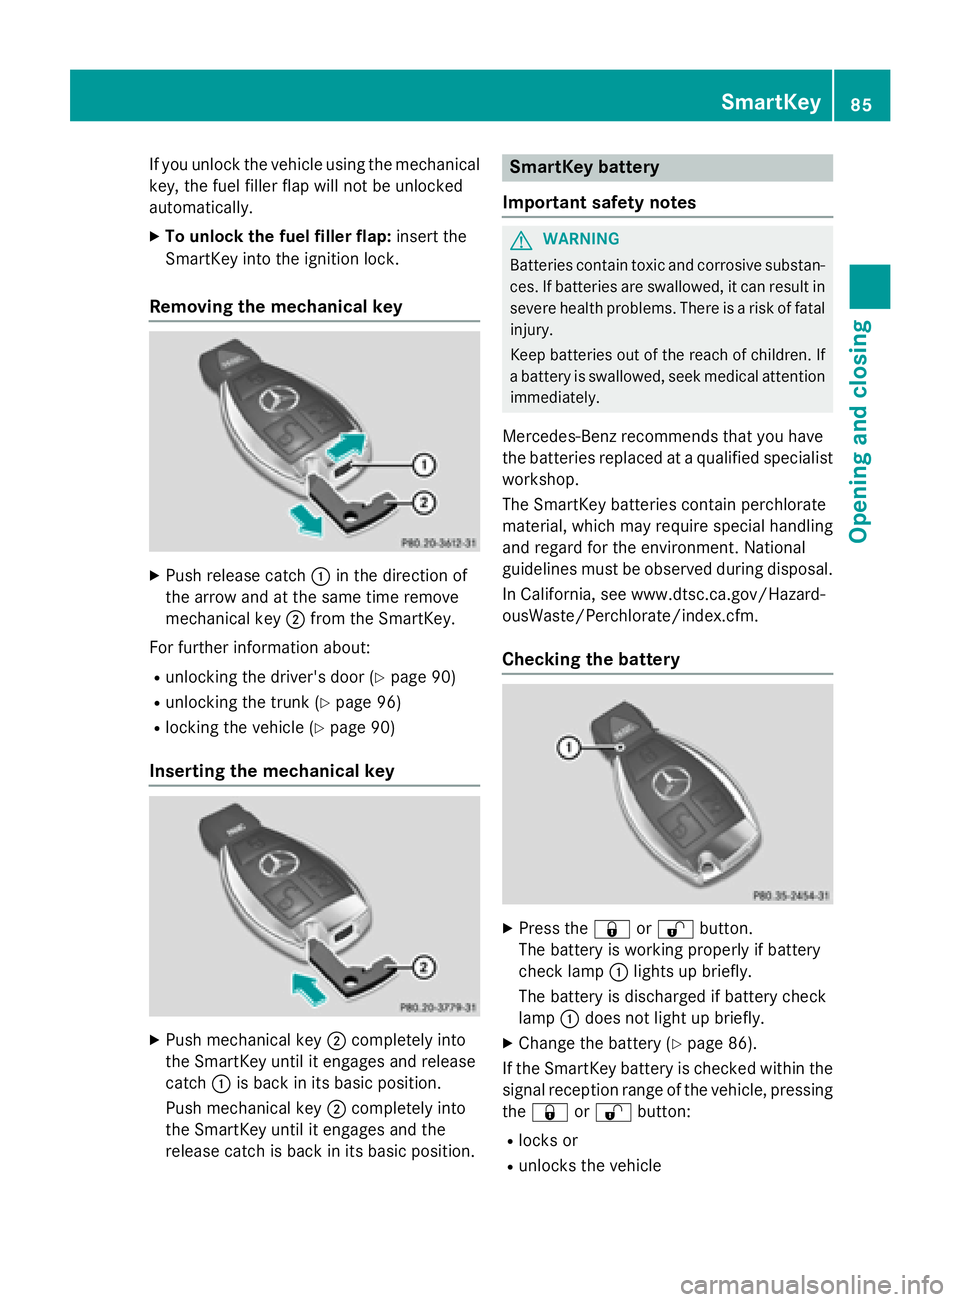
Removing the mechanical key
XPush release catch :in the direction of
the arrow and at the same time remove
mechanical key ;from the SmartKey.
For further information about:
Runlocking the driver's door (Ypage 90)
Runlocking the trunk (Ypage 96)
Rlocking the vehicle (Ypage 90)
Inserting the mechanical key
XPush mechanical key ;completely into
the SmartKey until it engages and release
catch :is back in its basic position.
Push mechanical key ;completely into
the SmartKey until it engages and the
release catch is back in its basic position.
SmartKey battery
Important safety notes
GWARNING
Batteries contain toxic and corrosive substan- ces. If batteries are swallowed, it can result in
severe health problems. There is a risk of fatalinjury.
Keep batteries out of the reach of children. If
a battery is swallowed, seek medical attention immediately.
Mercedes-Benz recommends that you have
the batteries replaced at a qualified specialist
workshop.
The SmartKey batteries contain perchlorate
material, which may require special handling
and regard for the environment. National
guidelines must be observed during disposal.
In California, see www.dtsc.ca.gov/Hazard-
ousWaste/Perchlorate/index.cfm.
Checking the battery
XPress the &or% button.
The battery is working properly if battery
check lamp :lights up briefly.
The battery is discharged if battery check
lamp :does not light up briefly.
XChange the battery (Ypage 86).
If the SmartKey battery is checked within the
signal reception range of the vehicle, pressing
the & or% button:
Rlocks or
Runlocks the vehicle
SmartKey85
Opening and closing
Z
Page 93 of 614
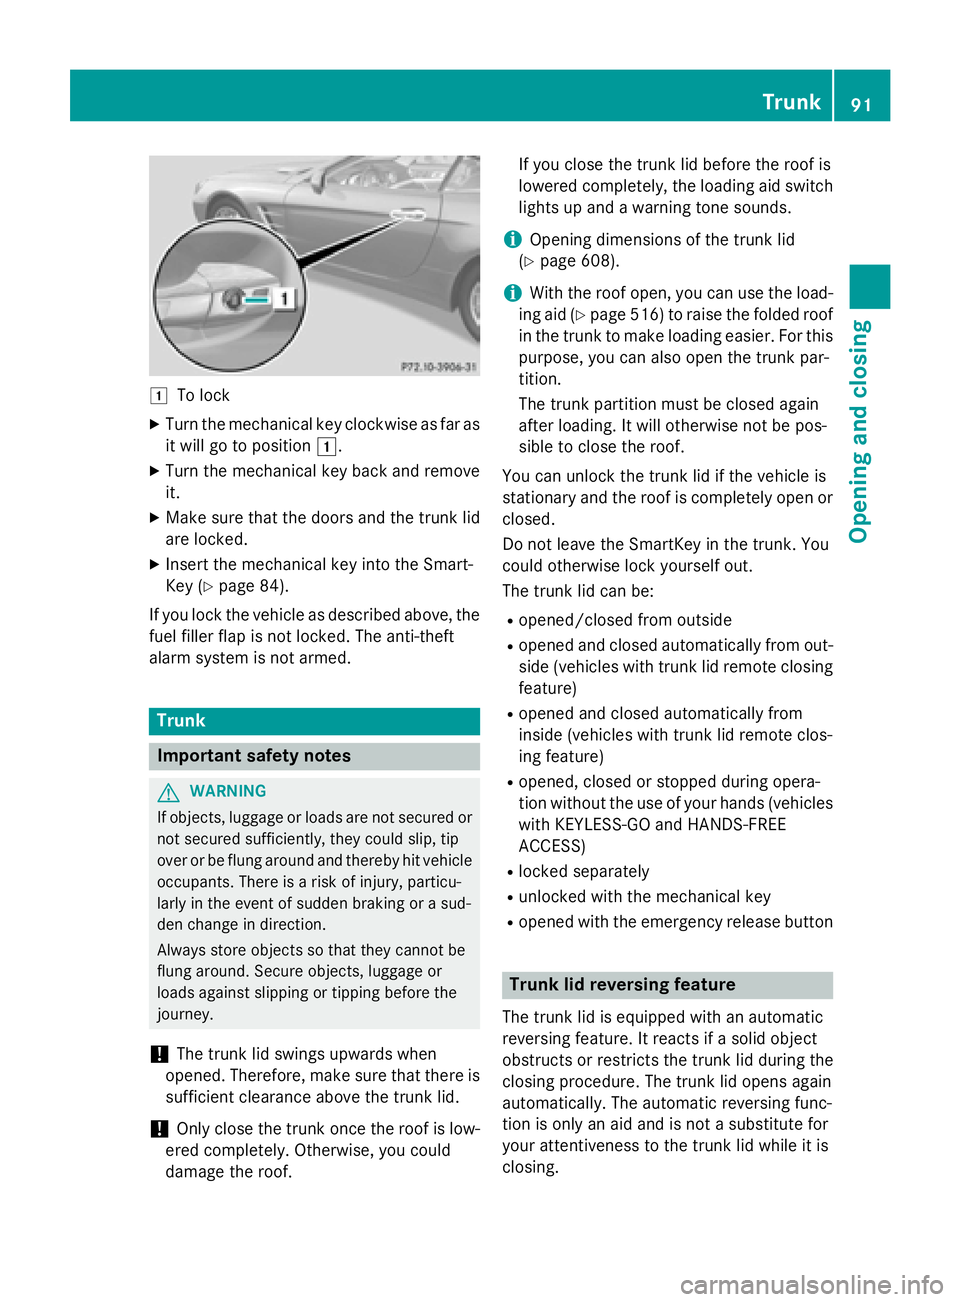
1To lock
XTurn the mechanical key clockwise as far as
it will go to position1.
XTurn the mechanical key back and remove
it.
XMake sure that the doors and the trunk lid
are locked.
XInsert the mechanical key into the Smart-
Key (
Ypage 84).
If you lock the vehicle as described above, the
fuel filler flap is not locked. The anti-theft
alarm system is not armed.
Trunk
Important safety notes
GWARNING
If objects, luggage or loads are not secured or
not secured sufficiently, they could slip, tip
over or be flung around and thereby hit vehicle
occupants. There is a risk of injury, particu-
larly in the event of sudden braking or a sud-
den change in direction.
Always store objects so that they cannot be
flung around. Secure objects, luggage or
loads against slipping or tipping before the
journey.
!The trunk lid swings upwards when
opened. Therefore, make sure that there is
sufficient clearance above the trunk lid.
!Only close the trunk once the roof is low-
ered completely. Otherwise, you could
damage the roof. If you close the trunk lid before the roof is
lowered completely, the loading aid switch
lights up and a warning tone sounds.
iOpening dimensions of the trunk lid
(
Ypage 608).
iWith the roof open, you can use the load-
ing aid (
Ypage 516) to raise the folded roof
in the trunk to make loading easier. For this
purpose, you can also open the trunk par-
tition.
The trunk partition must be closed again
after loading. It will otherwise not be pos-
sible to close the roof.
You can unlock the trunk lid if the vehicle is
stationary and the roof is completely open or
closed.
Do not leave the SmartKey in the trunk. You
could otherwise lock yourself out.
The trunk lid can be:
Ropened/closed from outside
Ropened and closed automatically from out-
side (vehicles with trunk lid remote closing
feature)
Ropened and closed automatically from
inside (vehicles with trunk lid remote clos-
ing feature)
Ropened, closed or stopped during opera-
tion without the use of your hands (vehicles with KEYLESS-GO and HANDS-FREE
ACCESS)
Rlocked separately
Runlocked with the mechanical key
Ropened with the emergency release button
Trunk lid reversing feature
The trunk lid is equipped with an automatic
reversing feature. It reacts if a solid object
obstructs or restricts the trunk lid during the
closing procedure. The trunk lid opens again
automatically. The automatic reversing func-
tion is only an aid and is not a substitute for
your attentiveness to the trunk lid while it is
closing.
Trunk91
Opening and closing
Z
Page 118 of 614
Position of the steering wheel for driv-
ing
The steering wheel is moved to the last selec-
ted position when:
Rthe driver's door is closed
Ryou insert the SmartKey into the ignition
lock
or
Ryou press the Start/Stop button once on
vehicles with KEYLESS-GO
When you close the driver's door with the
ignition switched on, the steering wheel is
also automatically moved to the previously
set position.
The last position of the steering wheel is
stored when you switch off the ignition or
when you store the setting with the memory
function (
Ypage 119).
Crash-responsive EASY-EXIT feature
If the crash-responsive EASY-EXIT feature is
triggered in an accident, the steering column
will move upwards when the driver's door is
opened. This occurs irrespective of the posi-
tion of the SmartKey in the ignition lock. This
makes it easier to exit the vehicle and rescue the occupants.
The crash-responsive EASY-EXIT feature is
only operational if the EASY-EXIT/ENTRY fea-
ture is activated in the on-board computer
(
Ypage 235).
Mirrors
Exterior mirrors
Adjusting the exterior mirrors
GWARNING
You could lose control of your vehicle if you do the following while driving:
Radjust the driver's seat, head restraint,
steering wheel or mirrors
Rfasten the seat belt
There is a risk of an accident.
Adjust the driver's seat, head restraint, steer-ing wheel and mirror and fasten your seat belt
before starting the engine.
GWARNING
The exterior mirror on the front-passenger
side reduces the size of the image. Visible
objects are actually closer than they appear.
This means that you could misjudge the dis-
tance from road users traveling behind, e.g.
when changing lane. There is a risk of an acci-
dent.
For this reason, always make sure of the
actual distance from the road users traveling
behind by glancing over your shoulder.
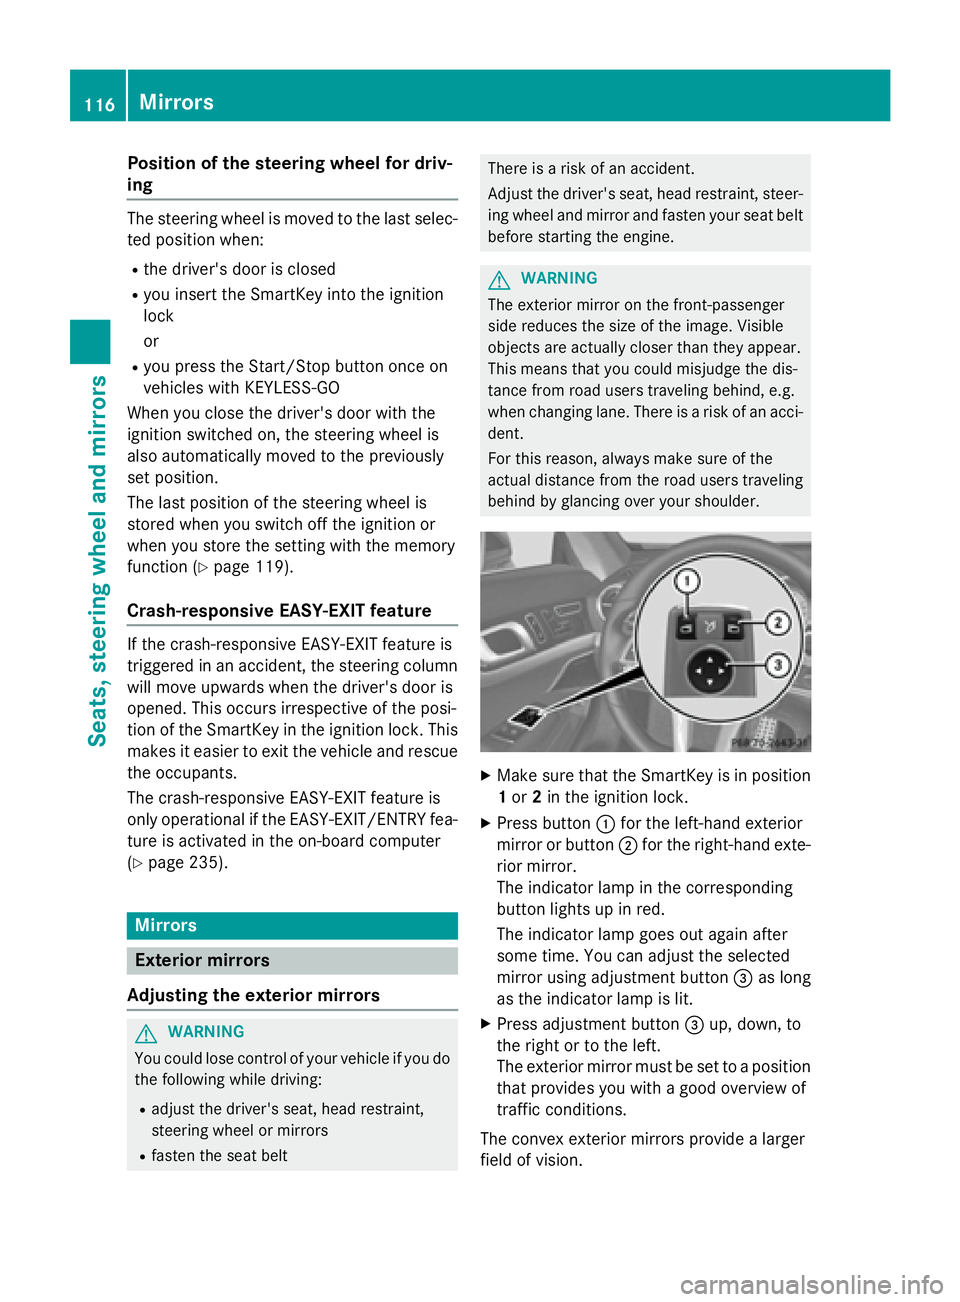
XMake sure that the SmartKey is in position 1 or 2in the ignition lock.
XPress button :for the left-hand exterior
mirror or button ;for the right-hand exte-
rior mirror.
The indicator lamp in the corresponding
button lights up in red.
The indicator lamp goes out again after
some time. You can adjust the selected
mirror using adjustment button =as long
as the indicator lamp is lit.
XPress adjustment button =up, down, to
the right or to the left.
The exterior mirror must be set to a position
that provides you with a good overview of
traffic conditions.
The convex exterior mirrors provide a larger
field of vision.
116Mirrors
Seats, steering wheel and mirrors
Page 124 of 614

Useful information
i
This Operator's Manual describes all
models and all standard and optional equip-
ment of your vehicle available at the time of
publication of the Operator's Manual.
Country-specific differences are possible.
Please note that your vehicle may not be
equipped with all features described. This
also applies to safety-related systems and
functions.
iRead the information on qualified special-
ist workshops (
Ypage 34).
Exterior lighting
General notes
For reasons of safety, Mercedes-Benz recom-
mends that you drive with the lights switched
on even during the daytime. In some coun-
tries, operation of the headlamps varies due
to legal requirements and self-imposed obli-
gations.
Setting the exterior lighting
Setting options
Exterior lighting can be set using:
Rthe light switch
Rthe combination switch (Ypage 125)
Rthe on-board computer (Ypage 233)
Light switch
Operation
1 WLeft-hand standing lamps
2XRight-hand standing lamps
3TParking lamps, license plate and
instrument cluster lighting
4ÃAutomatic headlamp mode, control-
led by the light sensor
5LLow-beam/high-beam headlamps
If you hear a warning tone when you leave the
vehicle, the lights may still be switched on.
XTurn the light switch to Ã.
The exterior lighting (except the parking/
standing lamps) switches off automatically if
you:
Rremove the SmartKey from the ignition lock
Ropen the driver's door with the SmartKey in position 0
Automatic headlamp mode
GWARNING
When the light switch is set to Ã, the low-
beam headlamps may not be switched on
automatically if there is fog, snow or other
causes of poor visibility due to the weather
conditions such as spray. There is a risk of an
accident.
In such situations, turn the light switch to
L.
The automatic headlamp feature is only an
aid. The driver is responsible for the vehicle's
lighting at all times.
122Exterior lighting
Lights and windshield wipers