2016 MERCEDES-BENZ SL-CLASS ROADSTER warning lights
[x] Cancel search: warning lightsPage 125 of 614

1WLeft-hand standing lamps
2XRight-hand standing lamps
3TParking lamps, license plate and
instrument cluster lighting
4ÃAutomatic headlamp mode, control-
led by the light sensor
5LLow-beam/high-beam headlamps
à is the favored light switch setting. The
light setting is automatically selected accord-
ing to the brightness of the ambient light
(exception: poor visibility due to weather con-
ditions such as fog, snow or spray):
RSmartKey in position 1in the ignition lock:
the parking lamps are switched on or off
automatically depending on the brightness
of the ambient light.
RWith the engine running: if you have acti-
vated the daytime running lamps function
via the on-board computer, the daytime
running lamps or the parking lamps and the
low-beam headlamps are switched on or off
automatically depending on the brightness
of the ambient light.
XTo switch on automatic headlamp
mode: turn the light switch to Ã.
Only for Canada:
The daytime running lamps improve the visi-
bility of your vehicle during the day. The day-
time running lamps function is required by law
in Canada. It cannot therefore be deactivated.
When the engine is running and the vehicle is
stationary: if you move the selector lever from
a drive position to P, the daytime running lamps/low-beam headlamps go out after
three minutes.
When the engine is running, the vehicle is
stationary and in bright ambient light: if you
turn the light switch to
T, the daytime
running lamps and parking lamps switch on.
If the engine is running and you turn the light
switch to L, the manual settings take
precedence over the daytime running lamps.
USA only:
The daytime running lamps improve the visi-
bility of your vehicle during the day. To do this,
the daytime running lamps function must be
switched on using the on-board computer
(
Ypage 233).
If the engine is running a
nd you turn the light
switch to TorL, the manual settings
take precedence over the daytime running
lamps.
Low-beam headlamps
GWARNING
When the light switch is set to Ã, the low-
beam headlamps may not be switched on
automatically if there is fog, snow or other
causes of poor visibility due to the weather
conditions such as spray. There is a risk of an
accident.
In such situations, turn the light switch to
L.
1 WLeft-hand standing lamps
2XRight-hand standing lamps
3TParking lamps, license plate and
instrument cluster lighting
Exterior lighting123
Lights and windshield wipers
Z
Page 128 of 614
XTo switch on:turn the SmartKey in the
ignition lock to position 1or 2or start the
engine.
XPull the combination switch in the direction of arrow =.
Hazard warning lamps
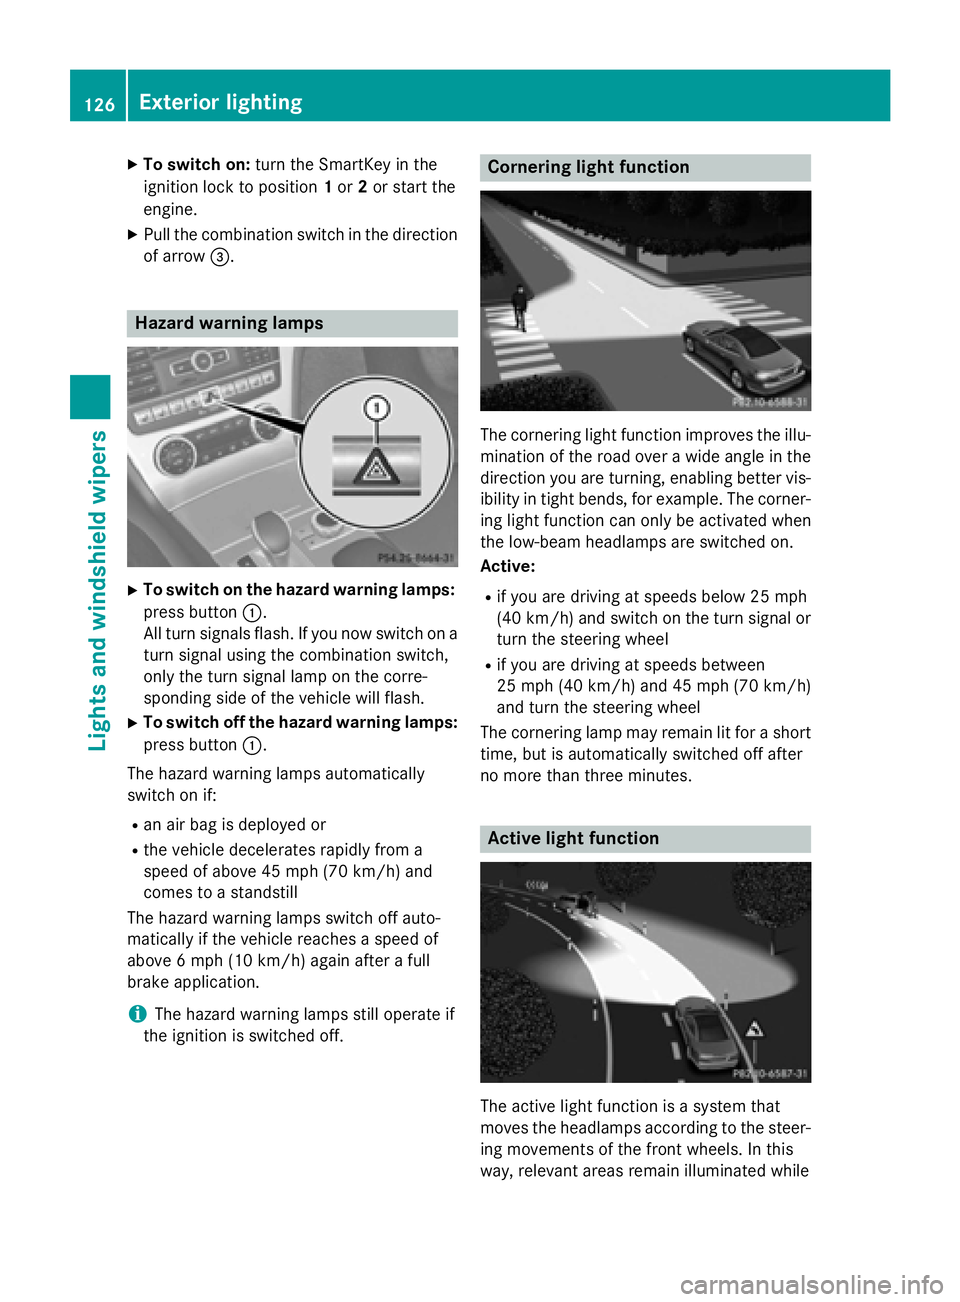
XTo switch on the hazard warning lamps:
press button :.
All turn signals flash. If you now switch on a
turn signal using the combination switch,
only the turn signal lamp on the corre-
sponding side of the vehicle will flash.
XTo switch off the hazard warning lamps:
press button :.
The hazard warning lamps automatically
switch on if:
Ran air bag is deployed or
Rthe vehicle decelerates rapidly from a
speed of above 45 mph (70 km/h) and
comes to a standstill
The hazard warning lamps switch off auto-
matically if the vehicle reaches a speed of
above 6 mph (10 km/h) again after a full
brake application.
iThe hazard warning lamps still operate if
the ignition is switched off.
Cornering light function
The cornering light function improves the illu-
mination of the road over a wide angle in the
direction you are turning, enabling better vis-
ibility in tight bends, for example. The corner-
ing light function can only be activated when
the low-beam headlamps are switched on.
Active:
Rif you are driving at speeds below 25 mph
(40 km/h) and switch on the turn signal or
turn the steering wheel
Rif you are driving at speeds between
25 mph (40 km/h) and 45 mph (70 km/h)
and turn the steering wheel
The cornering lamp may remain lit for a short
time, but is automatically switched off after
no more than three minutes.
Active light function
The active light function is a system that
moves the headlamps according to the steer-
ing movements of the front wheels. In this
way, relevant areas remain illuminated while
126Exterior lighting
Lights and windshield wiper s
Page 129 of 614

driving. This allows you to identify pedes-
trians, cyclists and animals.
Active:when the lights are switched on.
Adaptive Highbeam Assist
General notes
You can use this function to set the head-
lamps to change between low beam and high beam automatically. The system recognizes
vehicles with their lights on, either approach-
ing from the opposite direction or traveling in
front of your vehicle, and consequently
switches the headlamps from high beam to
low beam.
The system automatically adapts the low-
beam headlamp range depending on the dis-
tance to the other vehicle. Once the system
no longer detects any other vehicles, it reac-
tivates the high-beam headlamps.
The system's optical sensor is located behind
the windshield near the overhead control
panel.
Important safety notes
GWARNING
Adaptive Highbeam Assist does not recognize
road users:
Rwho have no lights, e.g. pedestrians
Rwho have poor lighting, e.g. cyclists
Rwhose lighting is blocked, e.g. by a barrier
In very rare cases, Adaptive Highbeam Assist
may fail to recognize other road users that
have lights, or may recognize them too late. In this or similar situations, the automatic high-
beam headlamps will not be deactivated or
activated regardless. There is a risk of an acci-
dent.
Always carefully observe the traffic conditions
and switch off the high-beam headlamps in
good time.
Adaptive Highbeam Assist cannot take into
account road, weather or traffic conditions.
Adaptive Highbeam Assist is only an aid. Youare responsible for adjusting the vehicle's
lighting to the prevailing light, visibility and
traffic conditions.
In particular, the detection of obstacles can
be restricted if there is:
Rpoor visibility, e.g. due to fog, heavy rain or
snow
Rdirt on the sensors or the sensors are
obscured
Exterior lighting127
Lights and windshield wipers
Z
Page 131 of 614
Interior lighting control
General notes
In order to prevent the vehicle's battery from
disc harging, the interior lighting functions are
automatical lydeactivated after some time
unless the SmartKey is inposition 2in the
ignit ion lock.
Automatic interior lighting control
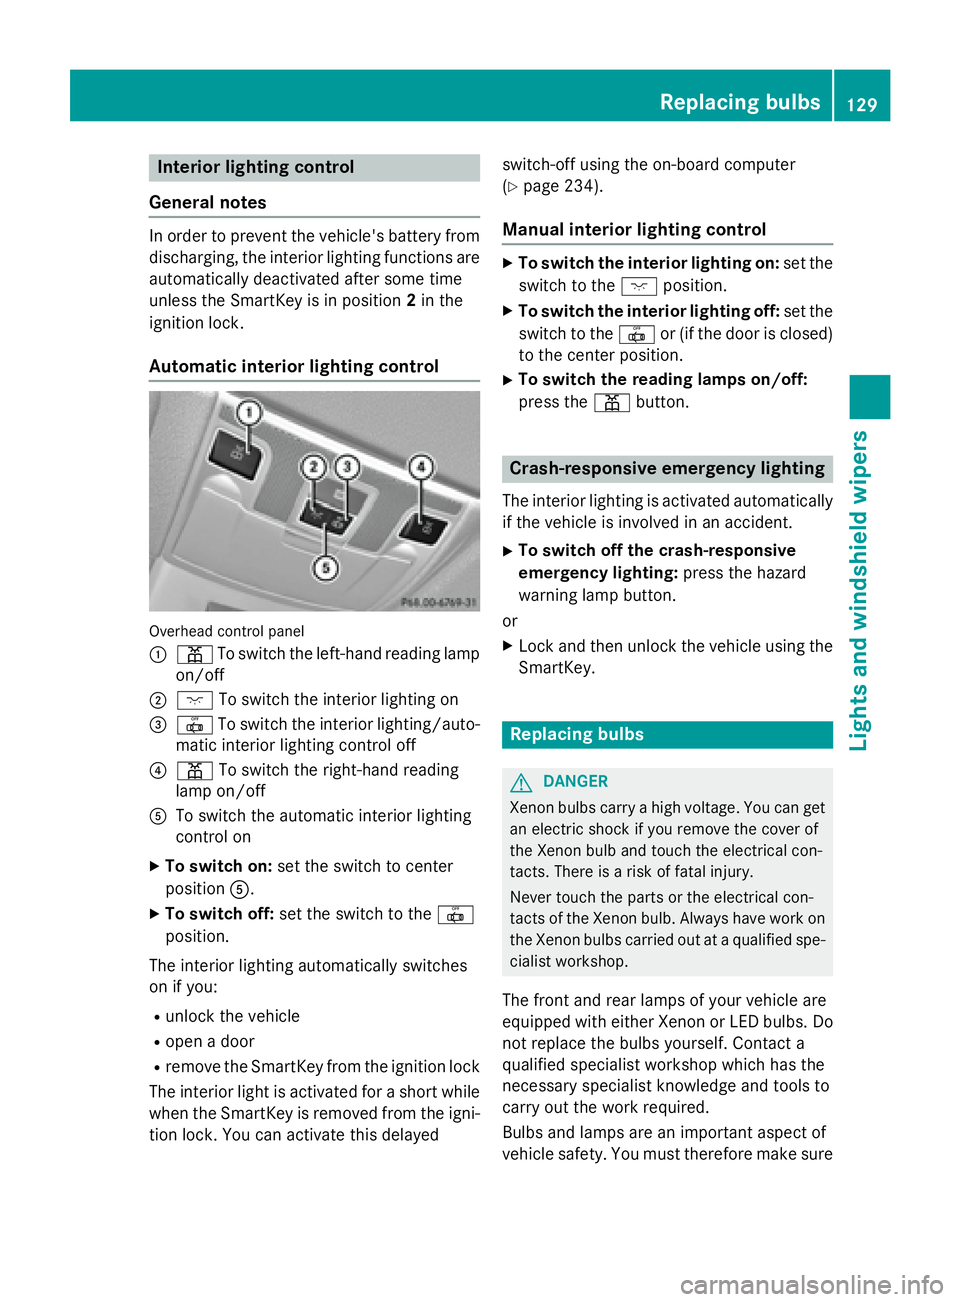
Overhead control panel
:
p Toswit ch the left-hand reading lamp
on/o ff
;c Toswit ch the interior lighting on
=| Toswit ch the interior lighting/auto-
mat icinterior lighting control off
?p To switch the right-hand reading
lamp on/o ff
AToswit ch the automat icinterior lighting
control on
XTo switch on: set the switch to center
position A.
XTo switch off: set the switch to the |
position.
The interior lighting automatically switches
on ifyou:
Runlock the vehicle
Ropen a door
Rremove the SmartKey from the ignit ion lock
The interior lightis activated for a short while
when the SmartKey is removed from the igni-
tion lock. You can activate th isdelayed switch-off using the on-board computer
(
Ypage 234).
Manual interior lighting control
XTo switch
the interi orlighti ng on: set the
switch to the cposition.
XTo switch the interi orlighti ng off: set the
switch to the |or (if the door isclosed)
to the center posit ion.
XTo switchthe reading lamps on/off:
press the pbutton.
Crash-responsive emergency lighting
The interior lighting isactivated automatical ly
if the vehicle isinvolved inan acc ident.
XTo switch off the crash-responsive
eme rgency lighti ng:press the hazard
warning lamp button.
or
XLock and then unlock the vehicle using the Sm artKey.
Replacing bulbs
GDANGER
Xenon bulbs carry ahigh voltage. You can get
an electric shock if you remove th ecover of
th eXenon bulb and touch th eelectrical con-
tacts .Ther eis aris kof fatal injury.
Never touch th epart sor th eelectrical con-
tacts of th eXenon bulb. Always hav ewor kon
th eXenon bulbs carrie dout at aqualified spe-
cialist workshop.
The front and rear lamps of your vehicle are
equipp edwith either Xenon or LED bulbs. Do
not replace the bulbs yourself. Contact a
qualif ied specialist workshop which has the
necessary specialist knowledge and tools to
carry out the work required.
Bulbs and lamps are an important aspect of
vehicle safety. You must therefore make sure
Replacing bulbs129
Lights and windshield wipers
Z
Page 133 of 614
Replacing the wiper blades
Important safety notes
GWARNING
If the windshield wipers begin to move while
you are changing the wiper blades, you could be trapped by the wiper arm. There is a risk of
injury.
Always switch off the windshield wipers and
ignition before changing the wiper blades.
!To avoid damaging the wiper blades,
make sure that you touch only the wiper
arm of the wiper.
!Never open the hood if a windshield wiper
arm has been folded away from the wind-
shield.
Never fold a windshield wiper arm without a
wiper blade back onto the windshield.
Hold the windshield wiper arm firmly when
you change the wiper blade. If you release
the windshield wiper arm without a wiper
blade and it falls onto the windshield, the
windshield may be damaged by the force of
the impact.
Mercedes-Benz recommends that you have
the wiper blades changed at a qualified
specialist workshop.
!Always position the windshield wiper
arms vertically before folding them away
from the windshield. By doing so, you will
avoid damage to the hood.
Changing the windshield wiper blades
Moving the wiper arm to a vertical posi-
tion
On vehicles without KEYLESS-GO:
XTurn the SmartKey to position 1or 2in the
ignition lock.
XSet the windshield wiper to position °.
XWhen the wiper arms have reached the ver-
tical position, turn the SmartKey to position
0 and remove it from the ignition lock.
XFold the wiper arm away from the wind-
shield until it engages.
On vehicles with KEYLESS-GO:
XSwitch off the engine.
XRemove your foot from the brake pedal.
XSet the windshield wiper to the °posi-
tion.
XPress the Start/Stop button repeatedly
until the windshield wiper starts.
XWhen the wiper arms have reached a ver-
tical position, press the Start/Stop button.
XFold the wiper arm away from the wind-
shield until it engages.
Removing a wiper blade
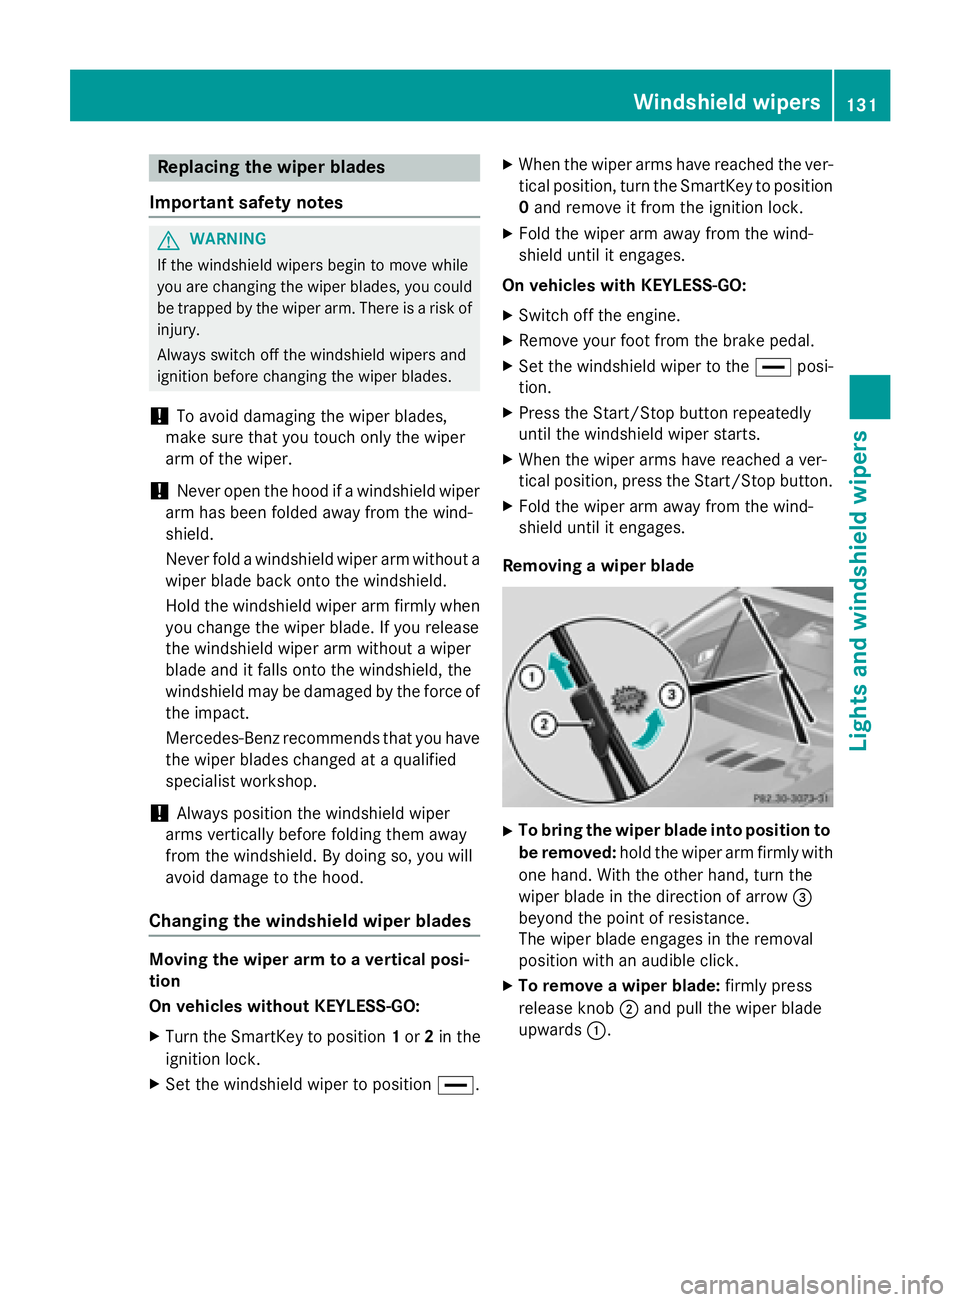
XTo bring the wiper blade into position to
be removed: hold the wiper arm firmly with
one hand. With the other hand, turn the
wiper blade in the direction of arrow =
beyond the point of resistance.
The wiper blade engages in the removal
position with an audible click.
XTo remove a wiper blade: firmly press
release knob ;and pull the wiper blade
upwards :.
Windshield wipers131
Lights and windshield wipers
Z
Page 149 of 614
The residual heat function is only available on
vehicles for Canada.
It is possible to make use of the residual heat
of the engine to continue heating the station-
ary vehicle for up to 30 minutesafter the
engine has been switched off. The heating
time depends on the set interior temperature.
Activating or deactivating
XTurn the SmartKey to position0in the igni-
tion lock or remove it (
Ypage 151).
XTo activate: press theÌbutton.
The indicator lamp in the Ìbutton lights
up.
iThe blower will run at a low speed regard-
less of the airflow setting.
iIf you activate the residual heat function
at high temperatures, only the ventilation
will be activated. The blower runs at
medium speed.
XTo deactivate: press theÌbutton.
The indicator lamp in the Ìbutton goes
out.
Residual heat is deactivated automatically:
Rafter approximately 30 minutes
Rwhen the ignition is switched on
Rif the battery voltage drops
Setting the air vents
Important safety notes
GWARNING
Very hot or very cold air can flow from the air
vents. This could result in burns or frostbite in
the immediate vicinity of the air vents. There
is a risk of injury.
Make sure that all vehicle occupants always
maintain a sufficient distance to the air out-
lets. If necessary, redirect the airflow to
another area of the vehicle interior.
GWARNING
When AIRSCARF is switched on, very hot air
can flow from the vents in the head restraints. This could result in burns in the immediate
vicinity of the air vents. There is a risk of injury.
Reduce the heater output before it becomes
too hot.
In order to ensure the direct flow of fresh air
through the air vents into the vehicle interior,
please observe the following notes:
Rkeep the air inlet grille on the hood and in
the engine compartment on the front-
passenger side free of blockages, such as
ice, snow or leaves.
Rnever cover the air vents or air intake grilles
in the vehicle interior.
iYou can move the adjusters for the air
vents vertically or horizontally to set the
direction of the airflow.
iFor optimal climate control in the vehicle,
open the air vents completely and set the
adjusters to the central position.
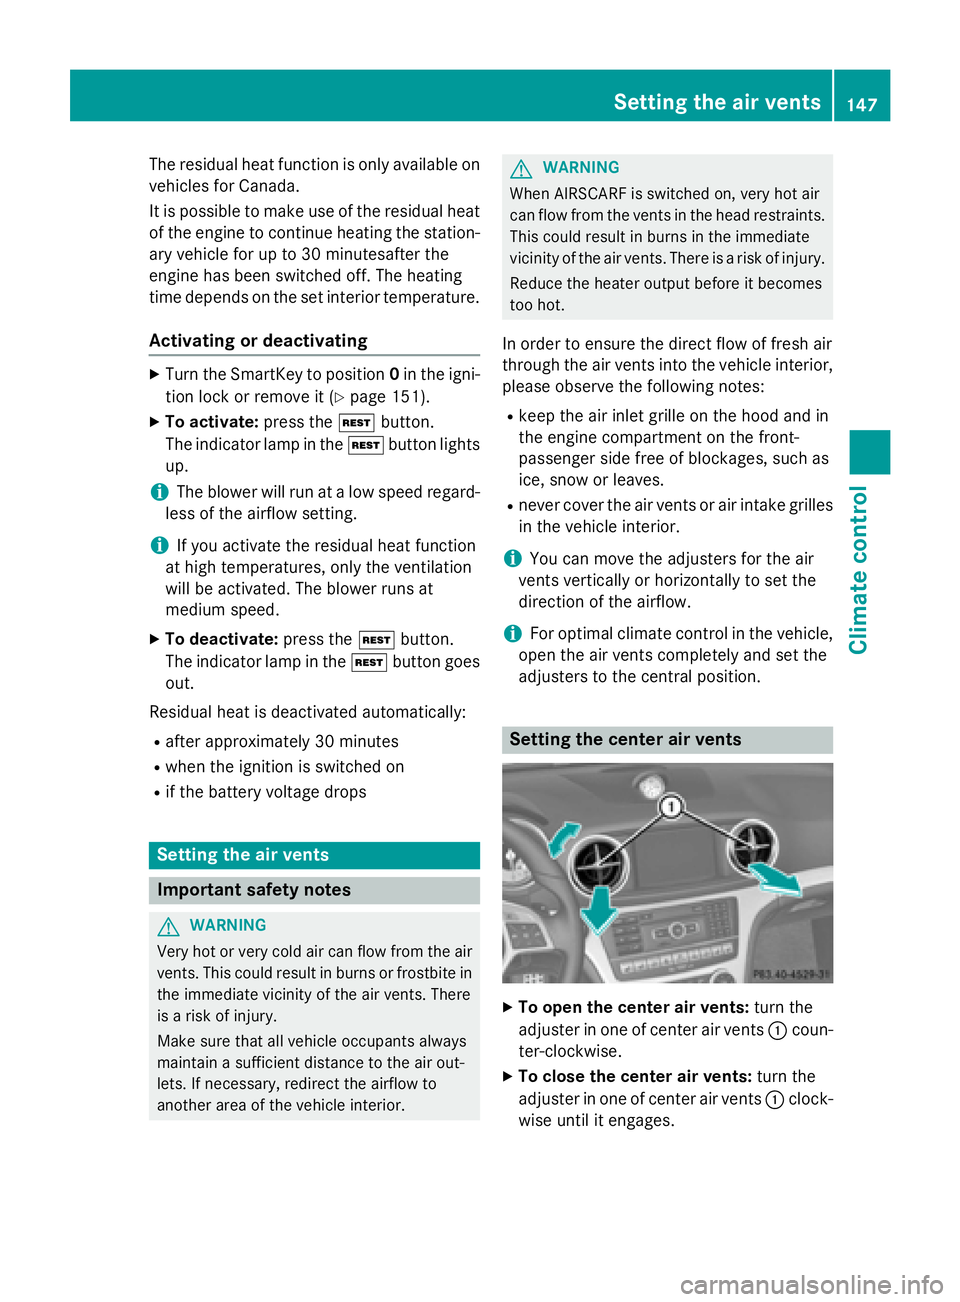
Setting the center air vents
XTo open the center air vents: turn the
adjuster in one of center air vents :coun-
ter-clockwise.
XTo close the center air vents: turn the
adjuster in one of center air vents :clock-
wise until it engages.
Setting the air vents147
Climate control
Z
Page 179 of 614
!Depressing the brake pedal constantly
results in excessive and premature wear to
the brake pads.
If the brakes have been subjected to a heavy
load, do not stop the vehicle immediately, but
drive on for a short while. This allows the air-
flow to cool the brakes more quickly.
Wet roads
If you have driven for a long time in heavy rain
without braking, there may be a delayed reac-
tion from the brakes when braking for the first
time. This may also occur after the vehicle has been washed or driven through deep water.
You then have to depress the brake pedal
more firmly. Maintain a greater distance from
the vehicle in front.
After driving on a wet road or having the vehi- cle washed, brake firmly while paying atten-
tion to the traffic conditions. This will warm up
the brake discs, thereby drying them more
quickly and protecting them against corro-
sion.
Limited braking performance on salt-
treated roads
If you drive on salted roads, a layer of salt
residue may form on the brake discs and
brake pads. This can result in a significantly
longer braking distance.
RBrake occasionally to remove any possible
salt residue. Make sure that you do not
endanger other road users when doing so.
RCarefully depress the brake pedal and the
beginning and end of a journey.
RMaintain a greater distance to the vehicle
ahead.
Servicing the brakes
!If the brake warning lamp lights up in the
instrument cluster and you hear a warning
tone even though the parking brake has
been released, the brake fluid level may be too low. Observe additional warning mes-
sages in the multifunction display.
The brake fluid level may be too low due to
brake pad wear or leaking brake lines.
Have the brake system checked immedi-
ately. This work should be carried out at a
qualified specialist workshop.
!As the ESP®system operates automati-
cally, the engine and the ignition system
must be switched off (SmartKey in position
0 or 1in the ignition lock or Start/Stop
button in position 0or 1) when:
Rtesting the parking brake on a brake
dynamometer.
Ryou intend to have the vehicle towed with
the front axle raised.
Braking maneuvers triggered automatically by ESP
®may seriously damage the brake
system.
All checks and maintenance work on the
brake system must be carried out at a quali-
fied specialist workshop.
Have brake pads installed and brake fluid
replaced at a qualified specialist workshop.
If the brake system has only been subject to
moderate loads, you should test the function-
ality of your brakes at regular intervals.
Information on BAS (Brake Assist)
(
Ypage 72).
Mercedes-Benz recommends that you only
have brake pads/linings installed on your
vehicle which have been approved for
Mercedes-Benz vehicles or which correspond
to an equivalent quality standard. Brake
pads/linings which have not been approved
for Mercedes-Benz vehicles or which are not
of an equivalent quality could affect your vehi-
cle's operating safety.
Mercedes-Benz recommends that you only
use brake fluid that has been specially
approved for your vehicle by Mercedes-Benz,
or which corresponds to an equivalent quality
standard. Brake fluid which has not been
approved for Mercedes-Benz vehicles or
Driving tips177
Driving and parking
Z
Page 193 of 614
because of its narrow width. The distance to
the vehicle in front will be too short.
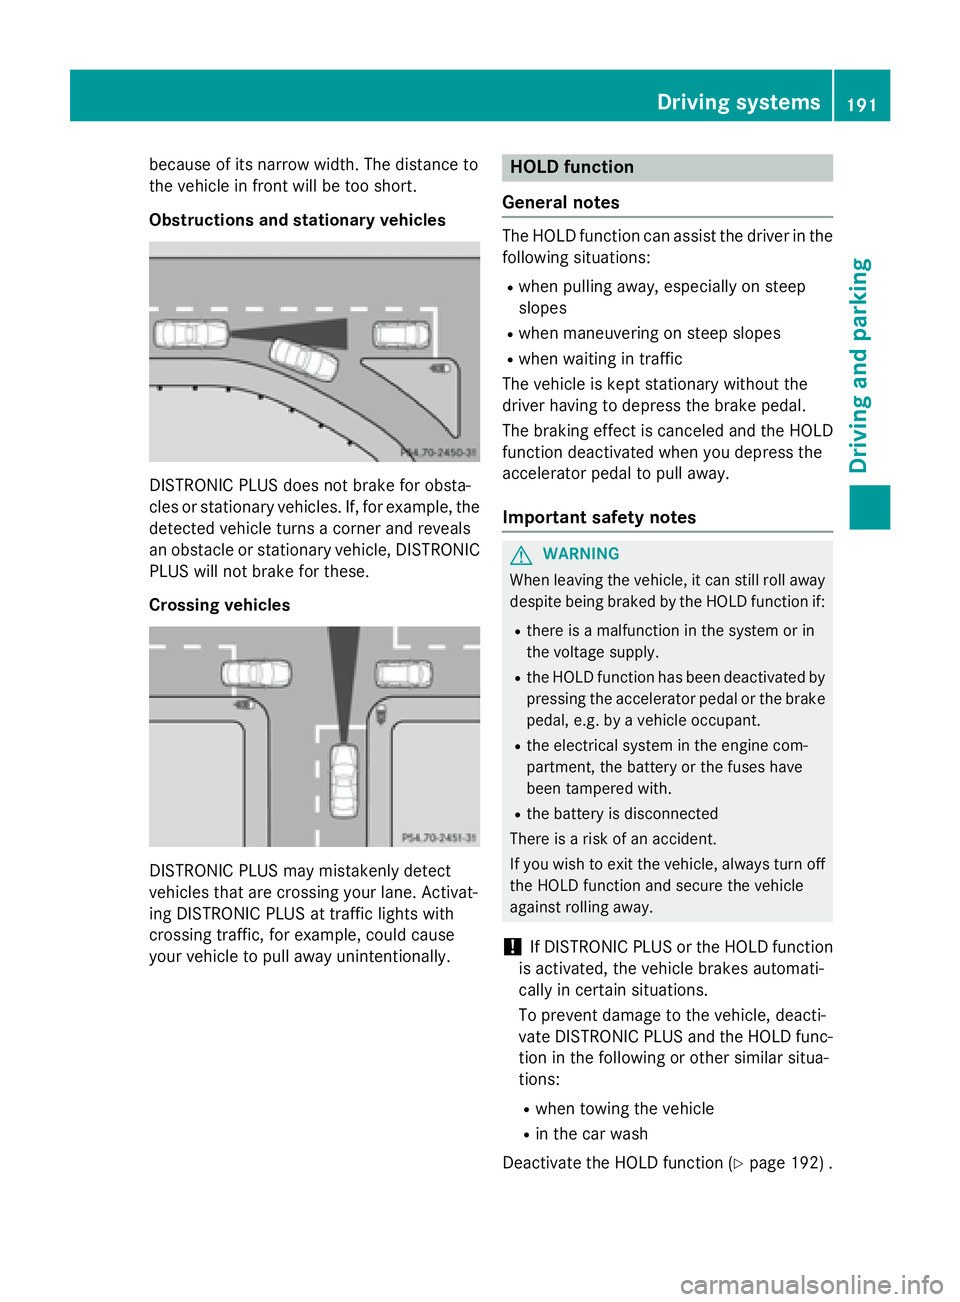
Obstructions and stationary vehicles
DISTRONIC PLUS does not brake for obsta-
cles or stationary vehicles. If, for example, the
detected vehicle turns a corner and reveals
an obstacle or stationary vehicle, DISTRONIC
PLUS will not brake for these.
Crossing vehicles
DISTRONIC PLUS may mistakenly detect
vehicles that are crossing your lane. Activat-
ing DISTRONIC PLUS at traffic lights with
crossing traffic, for example, could cause
your vehicle to pull away unintentionally.
HOLD function
General notes
The HOLD function can assist the driver in the
following situations:
Rwhen pulling away, especially on steep
slopes
Rwhen maneuvering on steep slopes
Rwhen waiting in traffic
The vehicle is kept stationary without the
driver having to depress the brake pedal.
The braking effect is canceled and the HOLD
function deactivated when you depress the
accelerator pedal to pull away.
Important safety notes
GWARNING
When leaving the vehicle, it can still roll away despite being braked by the HOLD function if:
Rthere is a malfunction in the system or in
the voltage supply.
Rthe HOLD function has been deactivated by
pressing the accelerator pedal or the brake
pedal, e.g. by a vehicle occupant.
Rthe electrical system in the engine com-
partment, the battery or the fuses have
been tampered with.
Rthe battery is disconnected
There is a risk of an accident.
If you wish to exit the vehicle, always turn off the HOLD function and secure the vehicle
against rolling away.
!If DISTRONIC PLUS or the HOLD function
is activated, the vehicle brakes automati-
cally in certain situations.
To prevent damage to the vehicle, deacti-
vate DISTRONIC PLUS and the HOLD func-
tion in the following or other similar situa-
tions:
Rwhen towing the vehicle
Rin the car wash
Deactivate the HOLD function (
Ypage 192) .
Driving systems191
Driving and parking
Z