2016 MERCEDES-BENZ S-Class SEDAN Cool
[x] Cancel search: CoolPage 327 of 438
Useful information
i
This Operator's Manual describes all models
and all standard and optional equipment of
your vehicle available at the time of publica-
tion of the Operator's Manual. Country-spe-
cific differences are possible. Please note
that your vehicle may not be equipped with all
features described. This also applies to
safety-related systems and functions.
iRead the information on qualified specialist
workshops (Ypage 28).
Stowage areas
Loading guidelines
GWARNING
Combustion engines emit poisonous exhaust
gases such as carbon monoxide. Exhaust
gases can enter the vehicle interior if the
trunk lid is open when the engine is running,
especially if the vehicle is in motion. There is a
risk of poisoning.
Always switch off the engine before opening
the trunk lid. Never drive with the trunk lid
open.
GWARNING
If objects, luggage or loads are not secured or
not secured sufficiently, they could slip, tip
over or be flung around and thereby hit vehicle
occupants. There is a risk of injury, particu-
larly in the event of sudden braking or a sud-
den change in direction.
Always store objects so that they cannot be
flung around. Secure objects, luggage or
loads against slipping or tipping before the
journey.
GWARNING
The exhaust tail pipe and tail pipe trim can
become very hot. If you come into contact
with these parts of the vehicle, you could burn
yourself. There is a risk of injury.
Always be particularly careful around the
exhaust tail pipe and the tail pipe trim. Allow
these components to cool down before touch-
ing them.
The handling characteristics of a laden vehicle
are dependent on the distribution of the load
within the vehicle. For this reason, you should
observe the following notes when transporting a
load:
RNever exceed the maximum permissible
gross vehicle weight or the gross axle weight
rating of the vehicle (including occupants).
The values are specified on the vehicle iden-
tification plate on the B-pillar of the driver's
door.
RThe trunk is the preferred place to carry
objects.
RPosition heavy loads as far forwards as pos-
sible and as low down in the trunk as possible.
RThe load must not protrude above the upper
edge of the seat backrests.
RAlways place the load behind unoccupied
seats if possible.
RSecure the load with sufficiently strong and
wear-resistant tie-downs. Pad sharp edges for
protection.
Stowage spaces
Important safety notes
GWARNING
If objects in the passenger compartment are
stowed incorrectly, they can slide or be
thrown around and hit vehicle occupants. In
addition, cupholders, open stowage spaces
and mobile phone brackets cannot always
retain all objects they contain. There is a risk of injury, particularly in the event of sudden
braking or a sudden change in direction.
RAlways stow objects so that they cannot be
thrown around in such situations.
RAlways make sure that objects do not pro-
trude from stowage spaces, parcel nets or
stowage nets.
Stowage areas325
Stowage and features
Z
Page 328 of 438
RClose the lockablestowage spaces before
starting a journey.
RAlwa ys stow and secure heavy, hard, poin-
te d, sharp-edged, fragile or bulky objects in
the trunk.
Observe the loading guidelines (
Ypage 325).
Stowage compartments in the front
Glove box
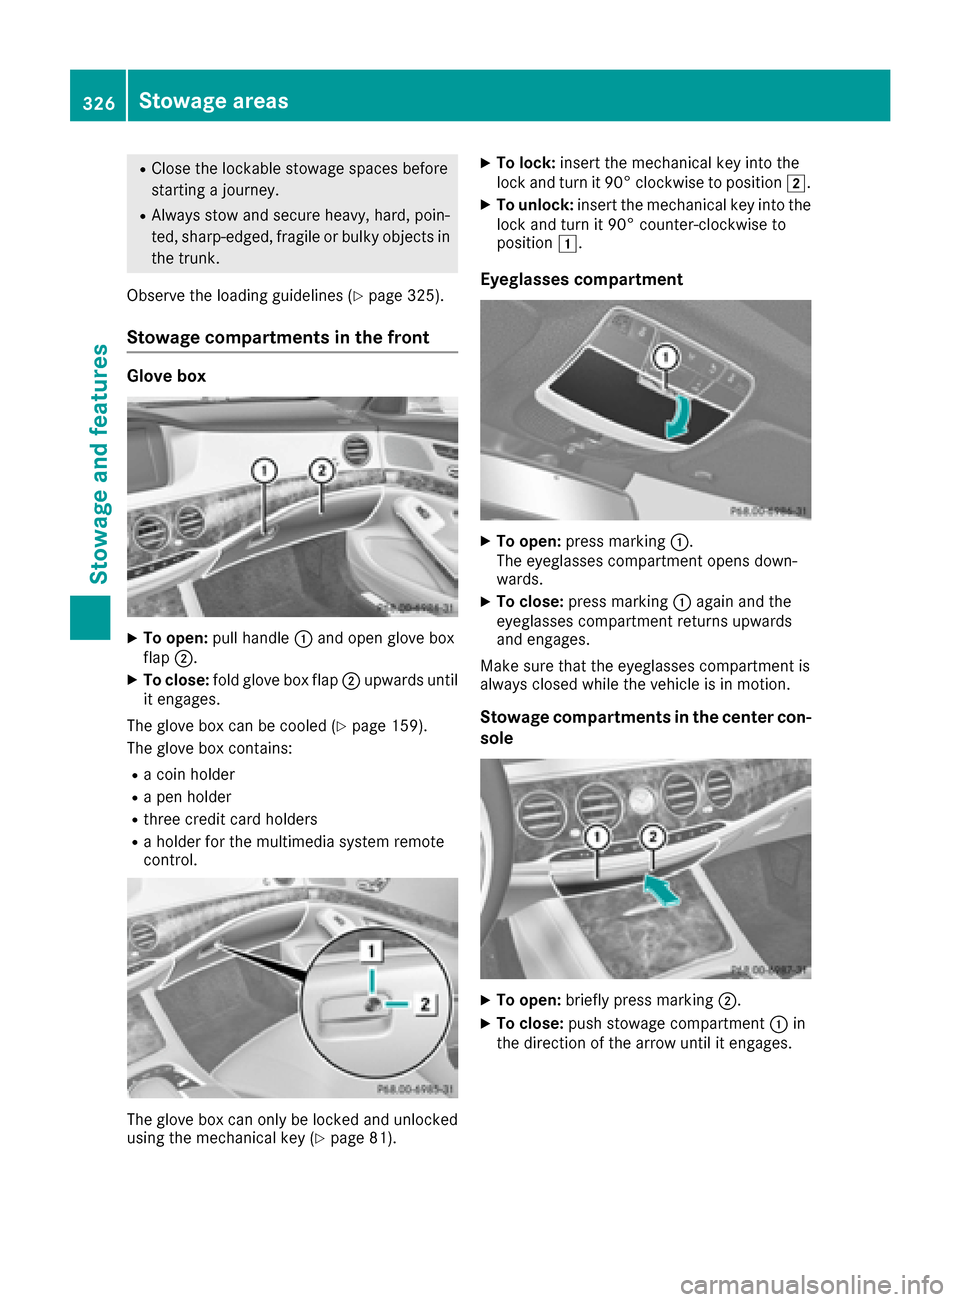
XTo open: pullhandle :and open glove box
flap ;.
XTo close: fold glove box flap ;upwards unt il
it engages.
The glove box can becooled (
Ypage 159).
The glove box contains:
Ra co inholder
Ra pen holder
Rthree cr editcard holders
Ra holder for the multimedia system remote
control.
The glove box can only be locked and unlocked
using the mechanical key (Ypage 81).
XTo lock: insert the mechanical key into the
lock and turn it 90° clockwise to position 2.
XTo unlock:insert the mechanical key into the
lock and turn it90° counter-clockwise to
position 1.
Eyeglasses compartment
XTo open: press marking :.
The eyeglasses compartment opens down-
wards.
XTo close: press marking :again and the
eyeglasses compartment returns upwards
and engages.
Make sure that the eyeglasses compartment is
always closed while the vehicle isin motion.
Stowage compartments in the center con-
sole
XTo open: briefly press marking ;.
XTo close:push stowage compartment :in
the direction of the arrow until it engages.
326Stowage areas
Stowage and features
Page 334 of 438
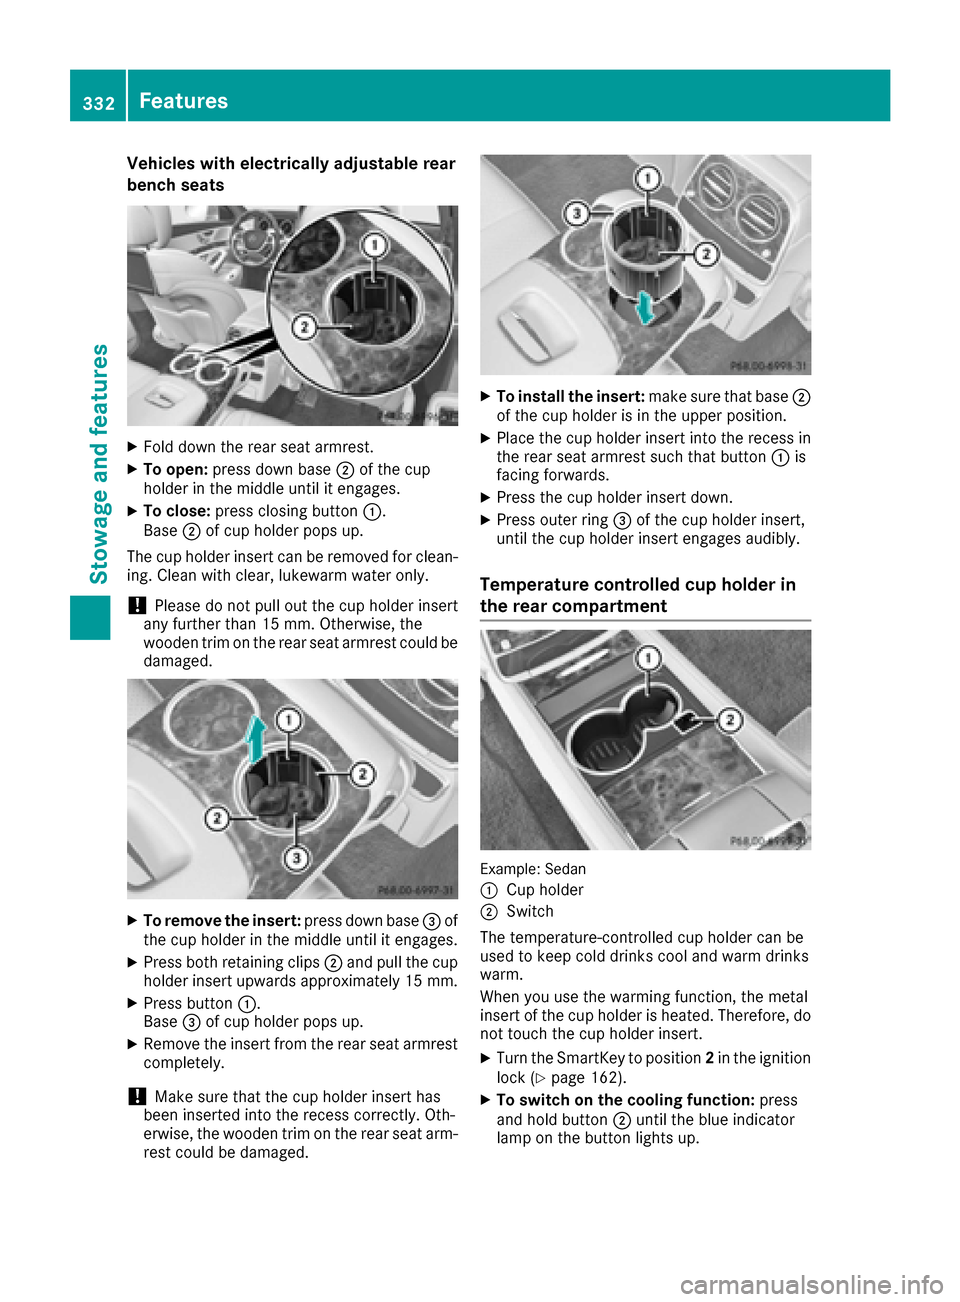
Vehicles with electrically adjustable rear
bench seats
XFold down the rear seat armrest.
XTo open:press down base ;of the cup
holder in the middle until it engages.
XTo close: press closing button :.
Base ;of cup holder pops up.
The cup holder insert can be removed for clean-
ing. Clean with clear, lukewarm water only.
!Please do not pull out the cup holder insert
any further than 15 mm. Otherwise, the
wooden trim on the rear seat armrest could be
damaged.
XTo remove the insert: press down base=of
the cup holder in the middle until it engages.
XPress both retaining clips ;and pull the cup
holder insert upwards approximately 15 mm.
XPress button :.
Base =of cup holder pops up.
XRemove the insert from the rear seat armrest
completely.
!Make sure that the cup holder insert has
been inserted into the recess correctly. Oth-
erwise, the wooden trim on the rear seat arm-
rest could be damaged.
XTo install the insert: make sure that base;
of the cup holder is in the upper position.
XPlace the cup holder insert into the recess in
the rear seat armrest such that button :is
facing forwards.
XPress the cup holder insert down.
XPress outer ring =of the cup holder insert,
until the cup holder insert engages audibly.
Temperature controlled cup holder in
the rear compartment
Example: Sedan
:
Cup holder
;Switch
The temperature-controlled cup holder can be
used to keep cold drinks cool and warm drinks
warm.
When you use the warming function, the metal
insert of the cup holder is heated. Therefore, do
not touch the cup holder insert.
XTurn the SmartKey to position 2in the ignition
lock (Ypage 162).
XTo switch on the cooling function: press
and hold button ;until the blue indicator
lamp on the button lights up.
332Features
Stowage and features
Page 341 of 438

Problems with the 115 V power socket
ProblemPossible causes/consequences andMSolutions
The warning lamp on the
115 V power socket is
not lit.The on-board voltage is too low because the battery is too weak.
XStart the engine.
or
XCharge the battery (Ypage 374).
If the indicator lamp still does not light up:
XVisit a qualified specialist workshop.
The temperature of the DC/AC converter is temporarily too high.
XRemove the electronic device connector from the 115 V socket.
XLet the DC/AC converter cool down.
If the indicator lamp still does not light up after cooling down the
converter:
XVisit a qualified specialist workshop.
You have connected an electronic device that has a constant nominal
power of less than 150 watts, but has a very high switch-on current.
This device will not work. If you connect such a device, the 115 V
power socket will not supply it with power.
XConnect a suitable electronic device.
Coolbox in the rear compartment
Important safety notes
GWARNING
If you cover the ventilation grille for the cool-
box, it may overheat. There is a risk of fire.
Always make sure that the ventilation grille is not covered.
The ventilation grille for the coolbox is in the
trunk.
The coolbox can bear a maximum load of 7.7 lb (3.5 kg).
If you want to store a bottle in the upper com-
partment of the coolbox, the capacity of the
bottle must not exceed 17 fl. oz. (0.5 l).
Store only plastic bottles in the upper compart-
ment of the coolbox.
Using the coolbox
XVehicles with rear seat armrest: fold down
the rear seat armrest.
XPull handle :and fold down cover ;.
Features339
Stowage and features
Z
Page 342 of 438
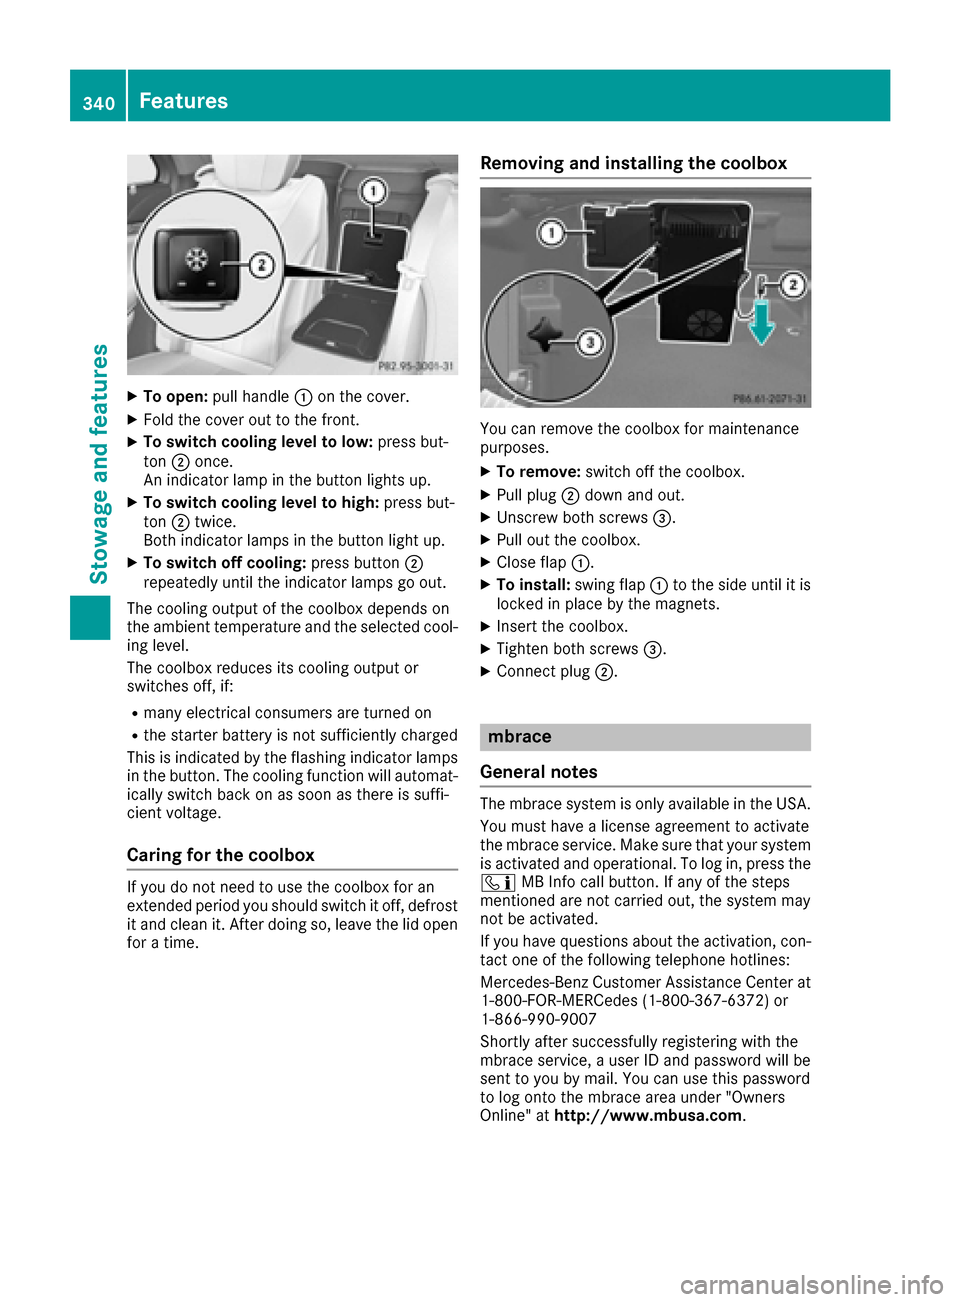
XTo open:pull handle :on the cover.
XFold the cover out to the front.
XTo switch cooling level to low: press but-
ton ;once.
An indicator lamp in the button lights up.
XTo switch cooling level to high: press but-
ton ;twice.
Both indicator lamps in the button light up.
XTo switch off cooling: press button;
repeatedly until the indicator lamps go out.
The cooling output of the coolbox depends on
the ambient temperature and the selected cool-
ing level.
The coolbox reduces its cooling output or
switches off, if:
Rmany electrical consumers are turned on
Rthe starter battery is not sufficiently charged
This is indicated by the flashing indicator lamps
in the button. The cooling function will automat- ically switch back on as soon as there is suffi-
cient voltage.
Caring for the coolbox
If you do not need to use the coolbox for an
extended period you should switch it off, defrost
it and clean it. After doing so, leave the lid open
for a time.
Removing and installing the coolbox
You can remove the coolbox for maintenance
purposes.
XTo remove: switch off the coolbox.
XPull plug;down and out.
XUnscrew both screws =.
XPull out the coolbox.
XClose flap:.
XTo install: swing flap:to the side until it is
locked in place by the magnets.
XInsert the coolbox.
XTighten both screws =.
XConnect plug;.
mbrace
General notes
The mbrace system is only available in the USA.
You must have a license agreement to activate
the mbrace service. Make sure that your system
is activated and operational. To log in, press the
ï MB Info call button. If any of the steps
mentioned are not carried out, the system may
not be activated.
If you have questions about the activation, con-
tact one of the following telephone hotlines:
Mercedes-Benz Customer Assistance Center at
1-800-FOR-MERCedes (1-800-367-6372) or
1-866-990-9007
Shortly after successfully registering with the
mbrace service, a user ID and password will be
sent to you by mail. You can use this password
to log onto the mbrace area under "Owners
Online" at http://www.mbusa.com .
340Features
Stowagean d features
Page 354 of 438
Useful information
i
This Operator's Manual describes all models
and all standard and optional equipment of
your vehicle available at the time of publica-
tion of the Operator's Manual. Country-spe-
cific differences are possible. Please note
that your vehicle may not be equipped with all
features described. This also applies to
safety-related systems and functions.
iRead the information on qualified specialist
workshops (Ypage 28).
Engine compartment
Hood
Important safety notes
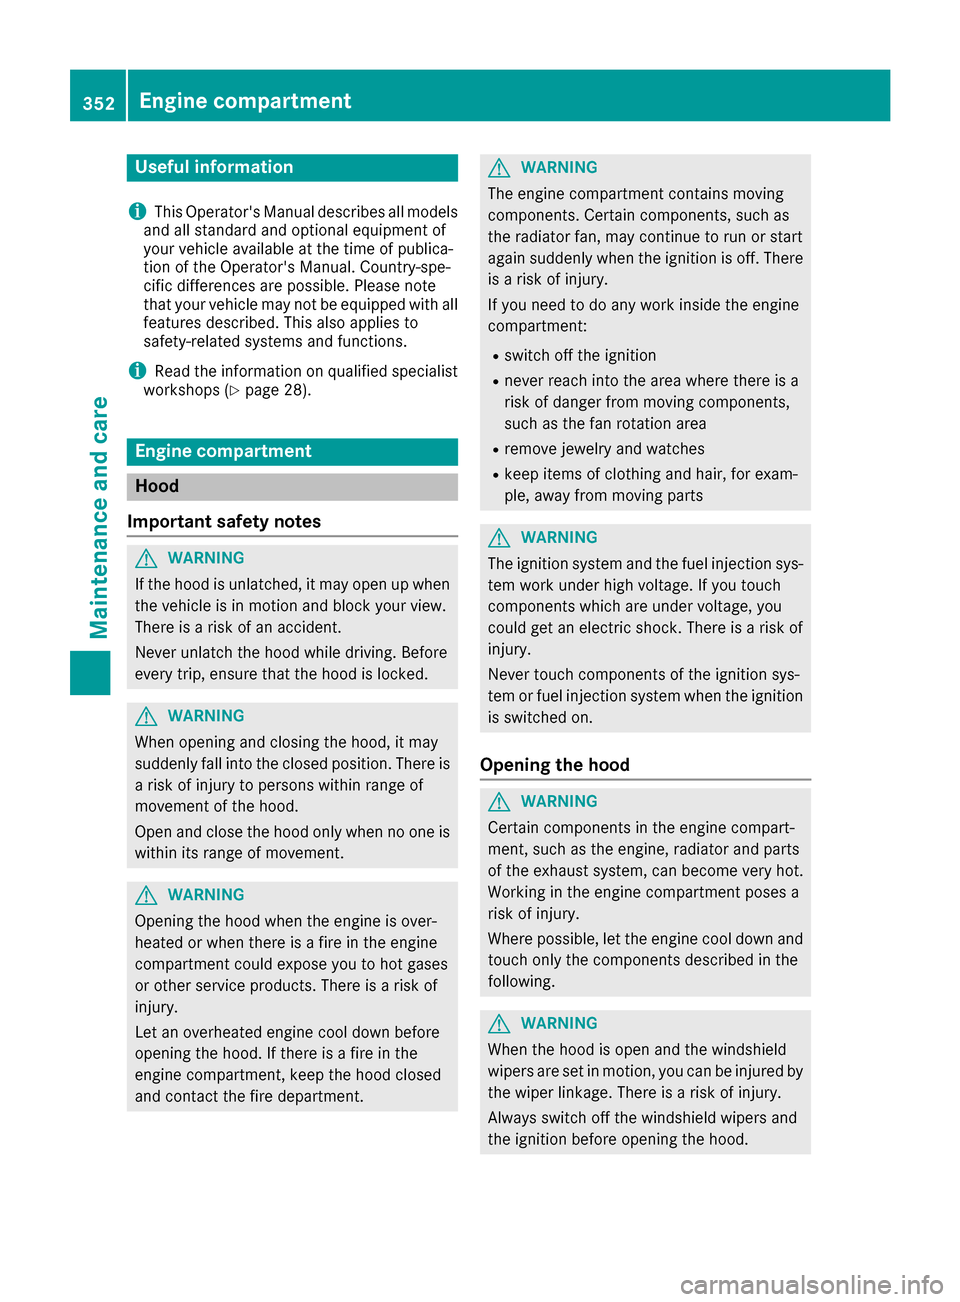
GWARNING
If the hood is unlatched, it may open up when the vehicle is in motion and block your view.
There is a risk of an accident.
Never unlatch the hood while driving. Before
every trip, ensure that the hood is locked.
GWARNING
When opening and closing the hood, it may
suddenly fall into the closed position. There is a risk of injury to persons within range of
movement of the hood.
Open and close the hood only when no one is
within its range of movement.
GWARNING
Opening the hood when the engine is over-
heated or when there is a fire in the engine
compartment could expose you to hot gases
or other service products. There is a risk of
injury.
Let an overheated engine cool down before
opening the hood. If there is a fire in the
engine compartment, keep the hood closed
and contact the fire department.
GWARNING
The engine compartment contains moving
components. Certain components, such as
the radiator fan, may continue to run or start
again suddenly when the ignition is off. There is a risk of injury.
If you need to do any work inside the engine
compartment:
Rswitch off the ignition
Rnever reach into the area where there is a
risk of danger from moving components,
such as the fan rotation area
Rremove jewelry and watches
Rkeep items of clothing and hair, for exam-
ple, away from moving parts
GWARNING
The ignition system and the fuel injection sys-
tem work under high voltage. If you touch
components which are under voltage, you
could get an electric shock. There is a risk of
injury.
Never touch components of the ignition sys-
tem or fuel injection system when the ignition
is switched on.
Opening the hood
GWARNING
Certain components in the engine compart-
ment, such as the engine, radiator and parts
of the exhaust system, can become very hot.
Working in the engine compartment poses a
risk of injury.
Where possible, let the engine cool down and touch only the components described in the
following.
GWARNING
When the hood is open and the windshield
wipers are set in motion, you can be injured by
the wiper linkage. There is a risk of injury.
Always switch off the windshield wipers and
the ignition before opening the hood.
352Engine compartment
Maintenance and care
Page 355 of 438
!Make sure that the windshield wipers are
not folded away from the windshield. You
could otherwise damage the windshield wip-
ers or the hood.
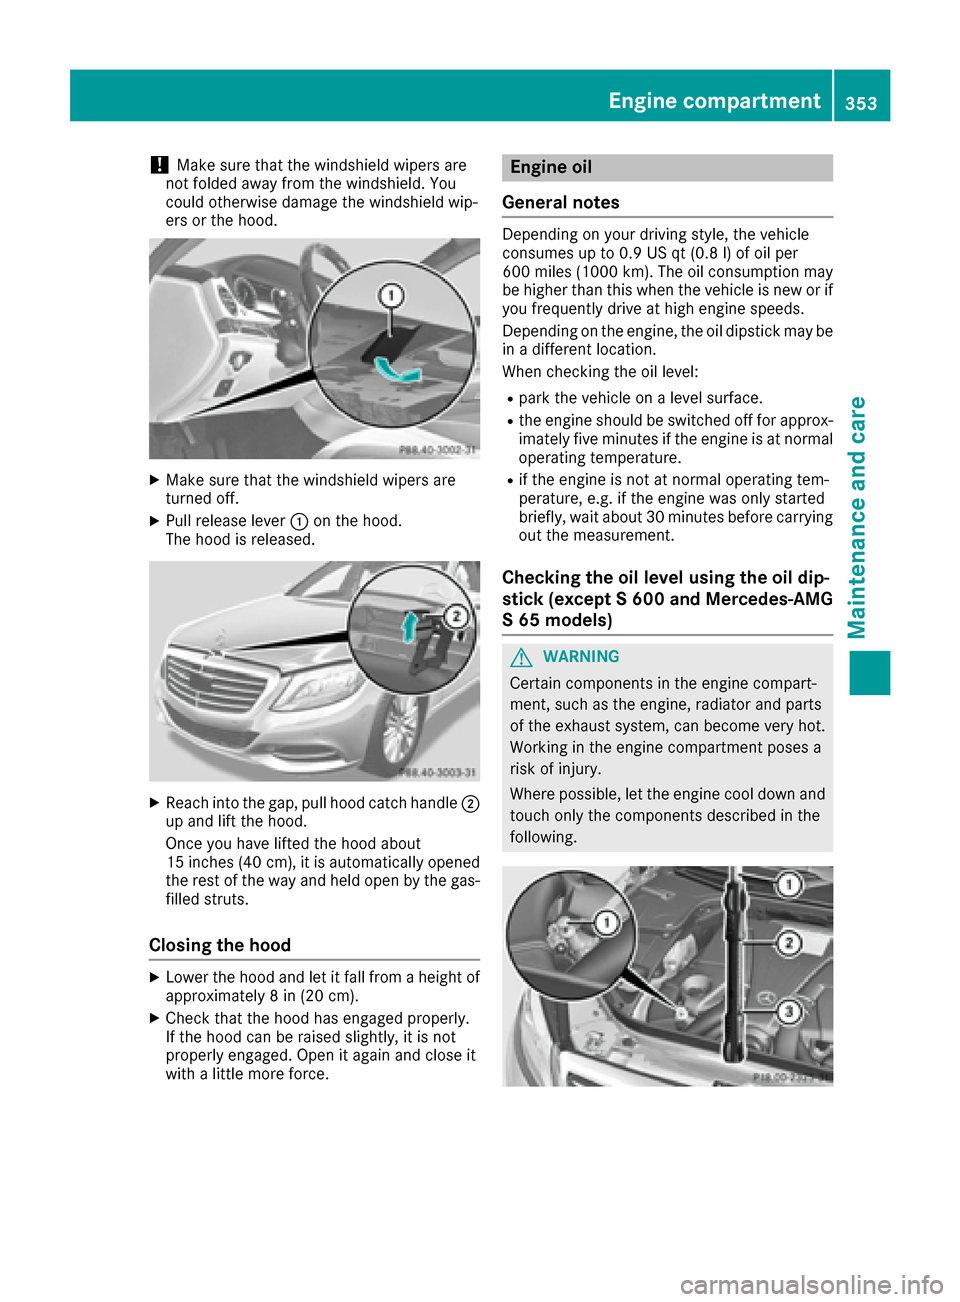
XMake sure that the windshield wipers are
turned off.
XPull release lever :on the hood.
The hood is released.
XReach into the gap, pull hood catch handle ;
up and lift the hood.
Once you have lifted the hood about
15 inches (40 cm), it is automatically opened
the rest of the way and held open by the gas-
filled struts.
Closing the hood
XLower the hood and let it fall from a height of
approximately 8 in (20 cm).
XCheck that the hood has engaged properly.
If the hood can be raised slightly, it is not
properly engaged. Open it again and close it
with a little more force.
Engine oil
General notes
Depending on your driving style, the vehicle
consumes up to 0.9 US qt (0.8 l) of oil per
600 miles (1000 km). The oil consumption may
be higher than this when the vehicle is new or if
you frequently drive at high engine speeds.
Depending on the engine, the oil dipstick may be
in a different location.
When checking the oil level:
Rpark the vehicle on a level surface.
Rthe engine should be switched off for approx-
imately five minutes if the engine is at normal
operating temperature.
Rif the engine is not at normal operating tem-
perature, e.g. if the engine was only started
briefly, wait about 30 minutes before carrying
out the measurement.
Checking the oil level using the oil dip-
stick (except S 600 and Mercedes-AMG
S 65 models)
GWARNING
Certain components in the engine compart-
ment, such as the engine, radiator and parts
of the exhaust system, can become very hot.
Working in the engine compartment poses a
risk of injury.
Where possible, let the engine cool down and touch only the components described in the
following.
Engine compartment353
Maintenance and care
Z
Page 357 of 438
Checking the oil level using the on-board computer (S 600 and Mercedes-AMG S 65
models)
XMake sure that the SmartKey is in position2in the ignition lock.
XUse ò on the steering wheel to call up the list of menus.
XPress the :or9 button on the steering wheel to select the Servicemenu.
XConfirm by pressingaon the steering wheel.
XUse: or9 to select the Engine Oil Levelsubmenu.
XPressato confirm the selection.
The Measuring Engine Oil Level Accurate Only When Vehicle Is Levelmessage
appears in the multifunction display.
The measurement takes a few seconds. You will see one of the following messages in the multi-
function display:
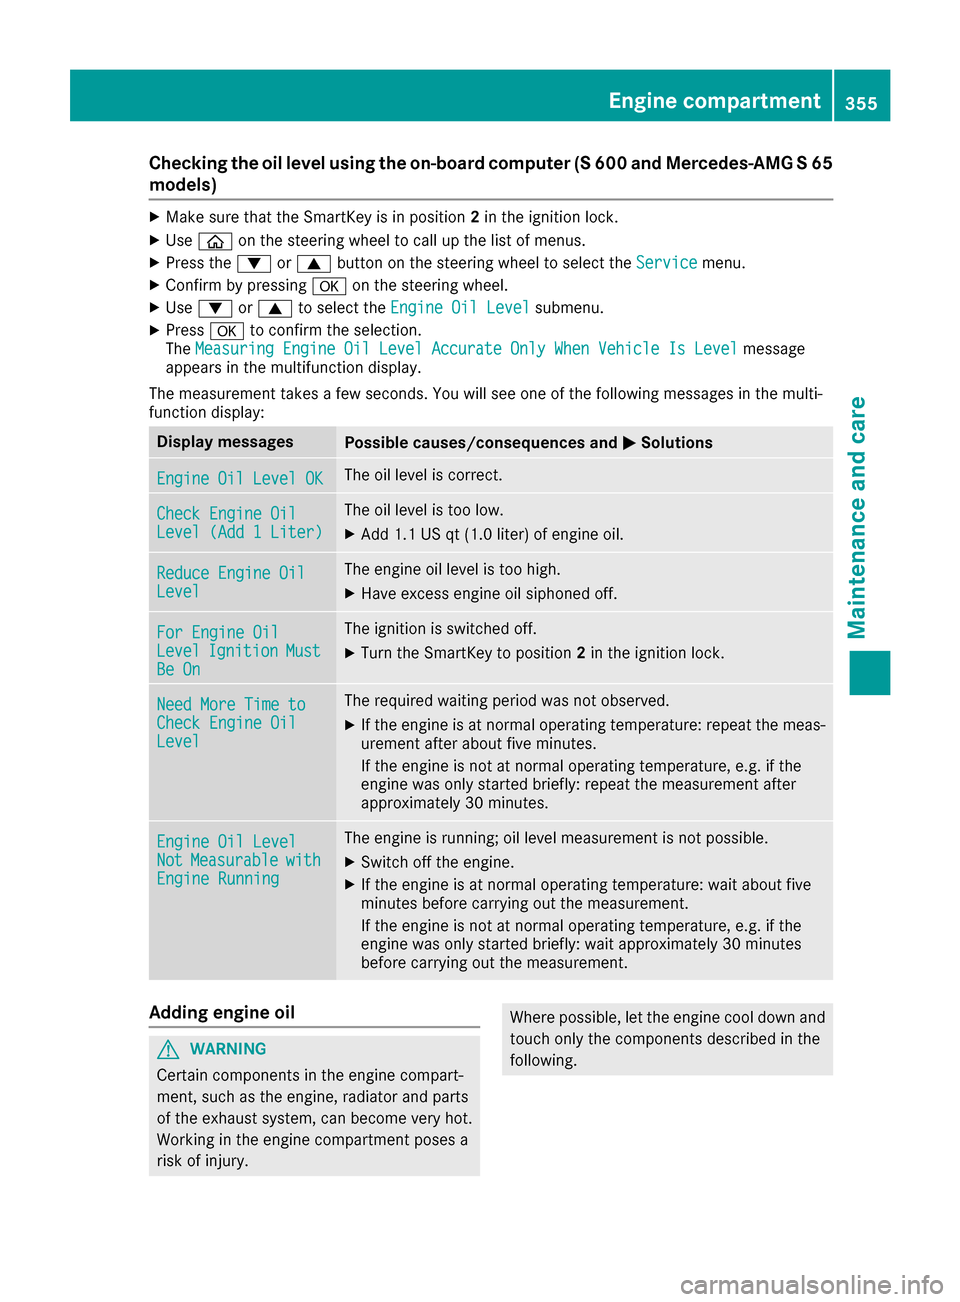
Display messagesPossible causes/consequences and MSolutions
Engine Oil Level OKThe oil level is correct.
Check Engine OilLevel (Add 1 Liter)
The oil level is too low.
XAdd 1.1 US qt (1.0 liter) of engine oil.
Reduce Engine OilLevel
The engine oil level is too high.
XHave excess engine oil siphoned off.
For Engine OilLevelIgnitionMustBe On
The ignition is switched off.
XTurn the SmartKey to position2in the ignition lock.
Need More Time toCheck Engine OilLevel
The required waiting period was not observed.
XIf the engine is at normal operating temperature: repeat the meas-
urement after about five minutes.
If the engine is not at normal operating temperature, e.g. if the
engine was only started briefly: repeat the measurement after
approximately 30 minutes.
Engine Oil LevelNotMeasurablewithEngine Running
The engine is running; oil level measurement is not possible.
XSwitch off the engine.
XIf the engine is at normal operating temperature: wait about five
minutes before carrying out the measurement.
If the engine is not at normal operating temperature, e.g. if the
engine was only started briefly: wait approximately 30 minutes
before carrying out the measurement.
Adding engine oil
GWARNING
Certain components in the engine compart-
ment, such as the engine, radiator and parts
of the exhaust system, can become very hot.
Working in the engine compartment poses a
risk of injury.
Where possible, let the engine cool down and touch only the components described in the
following.
Engine compartment355
Maintenance and care
Z