2016 MERCEDES-BENZ S-Class SEDAN trunk release
[x] Cancel search: trunk releasePage 11 of 438

ECO displayFunction/notes ............................ .193
On-board computer ....................... 262
ECO start/stop function
Automatic engine start .................. 167
Automatic engine switch-off .......... 166
Deactivating/activating ................. 167
General information ....................... 166
Important safety notes .................. 166
Introduction ................................... 166
Electronic Stability Program
see ESP
®(Electronic Stability Program)
Emergency
Automatic measures after an acci-
dent ................................................. 61
Emergency release
Driver's door ....................................8 7
Trunk ............................................... 94
Vehicle ............................................. 87
Emergency Tensioning Devices
Activation ......................................... 57
Emissions control
Service and warranty information ....2 5
Engine
Check Engine warning lamp .......... .320
Display message ............................ 294
ECO start/stop function ................ 166
Engine number ............................... 427
Irregular running ............................ 169
Jump-starting ................................. 376
Starting (important safety notes) ... 164
Starting problems .......................... 169
Starting the engine with the
SmartKey ....................................... 164
Starting via smartphone ................ 164
Starting with the Start/Stop but-
ton ................................................. 164
Switching off .................................. 190
Switching off with the Start/Stop
button ............................................ 190
Switching off with the vehicle key .. 190
Tow-starting (vehicle) ..................... 381
Engine electronics
Problem (malfunction) ................... 169
Engine oil
Adding ...........................................3 55
Additives ........................................ 430
Checking the oil leve l ..................... 353 C
hecking the oil level using the
dipstick .......................................... 353
Checking the oil level using the
on-board computer ........................ 355
Display message ............................ 296
Filling capacity ............................... 430
General notes ................................ 429
Notes about oil grades ................... 429
Notes on oil level/consumption .... 353
Temperature (on-board computer,
Mercedes-AMG vehicles) ...............2 75
Viscosity ........................................ 430
ESP
®(Electronic Stability Pro-
gram)
AMG menu (on-board computer) ... 276
Characteristics ................................. 73
Deactivating/activating ................. 269
Deactivating/activating (notes) ....... 74
Display message ............................ 278
Function/notes ................................ 73
General notes .................................. 73
Important safety information ........... 73
Trailer stabilization ........................... 74
Warning lamp ................................. 317
ETS/4ETS (Electronic Traction Sys-
tem) ...................................................... 73
Exhaust
see Exhaust pipe
Exhaust check ................................... 193
Exhaust pipe
Cleaning ......................................... 363
Exhaustive discharging (high-volt-
age battery) ....................................... 374
Exterior lighting
Cleaning ......................................... 362
see Lights
Exterior mirrors
Adjusting ....................................... 123
Dipping (automatic) ....................... 124
Folding in/out (automatically) ....... 124
Folding in/out (electrically) ........... 124
Out of position (troubleshooting) ... 124
Setting ........................................... 124
Storing settings (memory func-
tion) ............................................... 126
Storing the parking position .......... 125
Eyeglasses compartment ................. 326
Index9
Page 23 of 438

Tire bead (definition) ...................... 404
Tire pressure (definition) ................ 404
Tire pressures (recommended) ...... 403
Tire size (data) ............................... 410
Tire size designation, load-bearing
capacity, speed rating .................... 400
Tire tread ....................................... 385
Tire tread (definition) ..................... 404
Total load limit (definition) ............. 405
Traction ......................................... 399
Traction (definition) ....................... 405
Tread wear ..................................... 399
Uniform Tire Quality Grading
Standards ...................................... 398
Uniform Tire Quality Grading
Standards (definition) .................... 403
Wear indicator (definition) ............. 405
Wheel and tire combination ........... 412
Wheel rim (definition) .................... 403
see Flat tire
Top Tether ............................................ 64
Tow-starting
Emergency engine starting ............ 381
Important safety notes .................. 379
Towing a trailer
ESP
®(Electronic Stability Pro-
gram) ............................................... 74
Towing away
Important safety guidelines ........... 379
Installing the towing eye ................ 380
Notes for 4MATIC vehicles ............ 381
Removing the towing eye ............... 380
Transporting the vehicle ................ 381
With both axles on the ground ....... 380
Towing eye ......................................... 367
Traffic Sign Assist
Activating ....................................... 229
Display message ............................ 303
Function/notes ............................. 229
Important safety notes .................. 229
Instrument cluster display ............. 230
Switching on/off ........................... 270
Transfer case ..................................... 177
Transmission
see Automatic transmission
Transporting the vehicle .................. 381Trim pieces (cleaning instruc-
tions)
.................................................. 365
Trip computer (on-board com-
puter) .................................................. 262
Trip odometer
Calling up ....................................... 261
Resetti ng (
on-board computer) ...... 263
Trunk
Emergency release .......................... 93
Important safety notes .................... 88
Locking separately ........................... 93
Opening/closing (automatically
from inside) ...................................... 92
Opening/closing (automatically
from outside) ................................... 90
Opening/closing (from outside,
HANDS-FREE ACCESS) .................... 91
Opening/closing (manually from
outside) ............................................ 89
Power closing .................................. 87
Trunk lid
Display message ............................ 309
Obstacle recognition ........................ 89
Opening dimensions ...................... 433
Opening/closing .............................. 88
Trunk load (maximum) ...................... 433
Turn signals
Display message ............................ 291
Switching on/off ........................... 131
Two-way radio
Frequencies ................................... 425
Installation ..................................... 425
Transmission output (maximum) .... 425
Windshield (infrared reflective) ...... 351
Type identification plate
see Vehicle identification plate
U
UnlockingEmergency unlocking ....................... 87
From inside the vehicle (central
unlocking button) ............................. 86
Upshift indicator (on-board com-
puter, Mercedes-AMG vehicles) ....... 275
Index21
Page 45 of 438
Deactivate the hybrid system manually if:
Rthe6 restraint system warning lamp in the
instrument cluster lights up after an accident
Rthe vehicle is badly damaged, e.g. after an
accident, and the restraint system compo-
nents were not activated
Rthe vehicle is badly damaged and has to be
towed or transported
XIf possible, move the vehicle out of the
danger zone: shift the automatic transmis-
sion into position N.
XRelease the electric parking brake.
XRoll the vehicle to a safe place and park it
safely.
Get assistance from others if necessary.
iThe vehicle is locked automatically when
the ignition is switched on and the wheels are
turning. There is therefore a risk of being
locked out if the vehicle is being pushed or
tested on a dynamometer.
XSwitch the ignition off.
XShift the automatic transmission to park posi-
tion P(Ypage 170).
Depress the electric parking brake
(
Ypage 190).
Secure the vehicle against rolling away
(
Ypage 406).
XTo use the high-voltage switch-off device:
open the trunk lid.
XLift the trunk floor upwards (Ypage 329).
XRemove the right-hand paneling in the trunk.
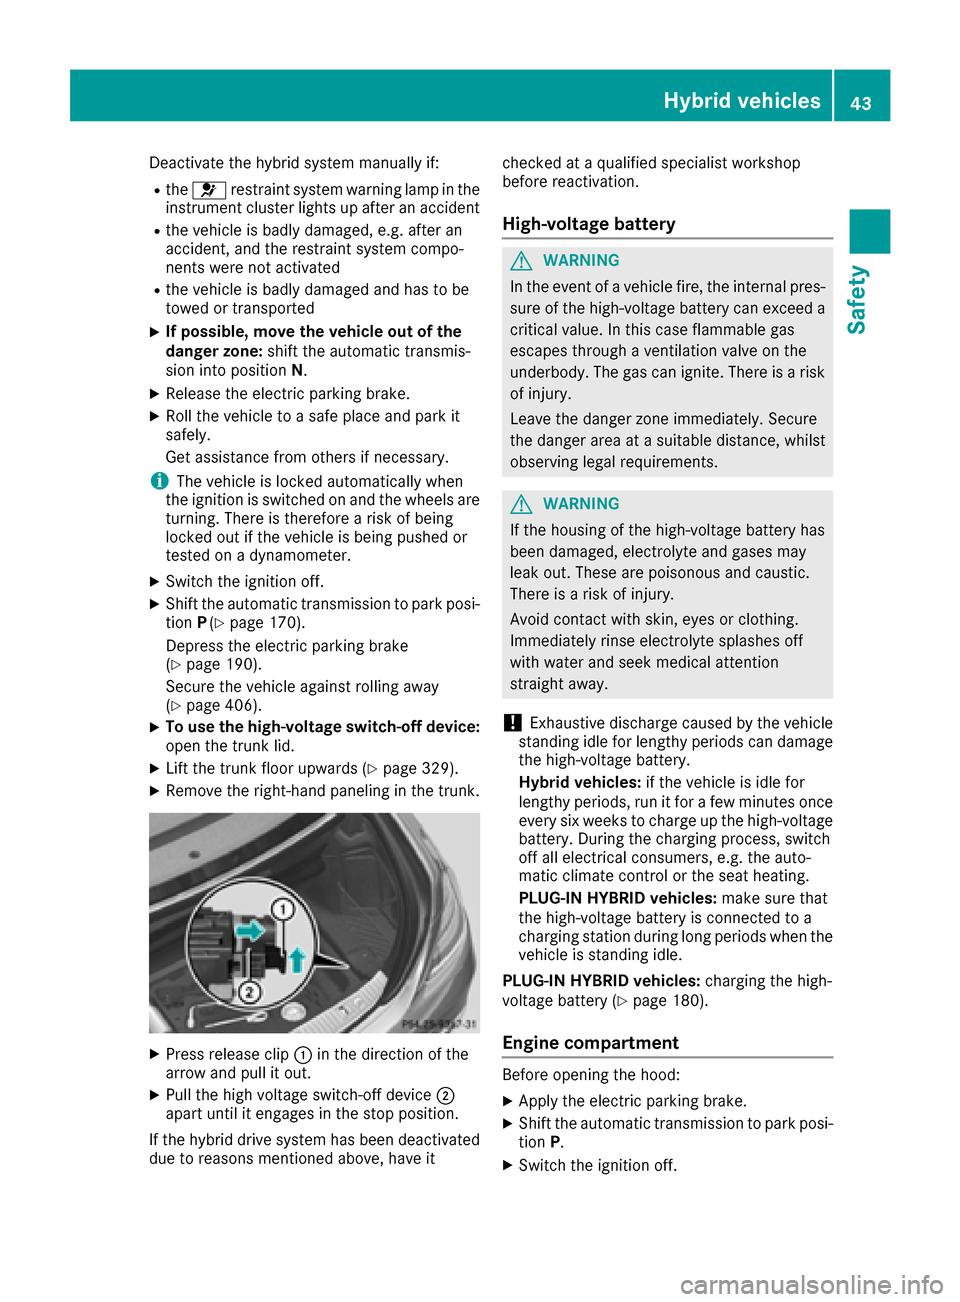
XPress release clip :in the direction of the
arrow and pull it out.
XPull the high voltage switch-off device ;
apart until it engages in the stop position.
If the hybrid drive system has been deactivated
due to reasons mentioned above, have it checked at a qualified specialist workshop
before reactivation.
High-voltage battery
GWARNING
In the event of a vehicle fire, the internal pres- sure of the high-voltage battery can exceed a
critical value. In this case flammable gas
escapes through a ventilation valve on the
underbody. The gas can ignite. There is a risk
of injury.
Leave the danger zone immediately. Secure
the danger area at a suitable distance, whilst
observing legal requirements.
GWARNING
If the housing of the high-voltage battery has
been damaged, electrolyte and gases may
leak out. These are poisonous and caustic.
There is a risk of injury.
Avoid contact with skin, eyes or clothing.
Immediately rinse electrolyte splashes off
with water and seek medical attention
straight away.
!Exhaustive discharge caused by the vehicle
standing idle for lengthy periods can damage
the high-voltage battery.
Hybrid vehicles: if the vehicle is idle for
lengthy periods, run it for a few minutes once every six weeks to charge up the high-voltage
battery. During the charging process, switch
off all electrical consumers, e.g. the auto-
matic climate control or the seat heating.
PLUG-IN HYBRID vehicles: make sure that
the high-voltage battery is connected to a
charging station during long periods when the
vehicle is standing idle.
PLUG-IN HYBRID vehicles: charging the high-
voltage battery (
Ypage 180).
Engine compartment
Before opening the hood:
XApply the electric parking brake.
XShift the automatic transmission to park posi-
tion P.
XSwitch the ignition off.
Hybrid vehicles43
Safety
Z
Page 81 of 438
Useful information
i
This Operator's Manual describes all models
and all standard and optional equipment of
your vehicle available at the time of publica-
tion of the Operator's Manual. Country-spe-
cific differences are possible. Please note
that your vehicle may not be equipped with all
features described. This also applies to
safety-related systems and functions.
iRead the information on qualified specialist
workshops (Ypage 28).
SmartKey
Important safety notes
GWARNING
If children are left unsupervised in the vehicle,
they could:
Ropen the doors, thus endangering other
people or road users.
Rget out and disrupt traffic.
Roperate the vehicle's equipment.
Additionally, children could set the vehicle in
motion if, for example, they:
Rrelease the parking brake.
Rshifting the automatic transmission out of
park position P
RStart the engine.
There is a risk of an accident and injury.
When leaving the vehicle, always take the
SmartKey with you and lock the vehicle. Never
leave children or animals unattended in the
vehicle. Always keep the SmartKey out of
reach of children.
GWARNING
If you attach heavy or large objects to the
SmartKey, the SmartKey could be uninten-
tionally turned in the ignition lock. This could
cause the engine to be switched off. There is a risk of an accident.
Do not attach any heavy or large objects to theSmartKey. Remove any bulky key rings before
inserting the SmartKey into the ignition lock.
!Keep the SmartKey away from strong mag-
netic fields. Otherwise, the remote control
function could be affected.
Strong magnetic fields can occur in the vicin-
ity of powerful electrical installations.
Do not keep the SmartKey:
Rwith electronic devices, e.g. a mobile phone
or another SmartKey.
Rwith metallic objects, e.g. coins or metal foil.
Rinside metallic objects, e.g. a metal case.
This can affect the functionality of the Smart-
Key.
Do not keep the SmartKey in the temperature-
controlled cup holder (
Ypage 332). On vehicles
with the KEYLESS-GO start function, do not
keep it on the parcel shelf or in the trunk. Oth-
erwise, the SmartKey may not be detected, e.g. when starting the engine using the Start/Stop
button.
A check which periodically establishes a radio
connection between the vehicle and the Smart-
Key determines whether a valid SmartKey is in
the vehicle. This occurs, for example:
Rwhen starting the engine
Rwhilst driving
Rwhen using HANDS-FREE ACCESS
Rwhen the external door handles are touched
Rduring convenience closing
SmartKey functions
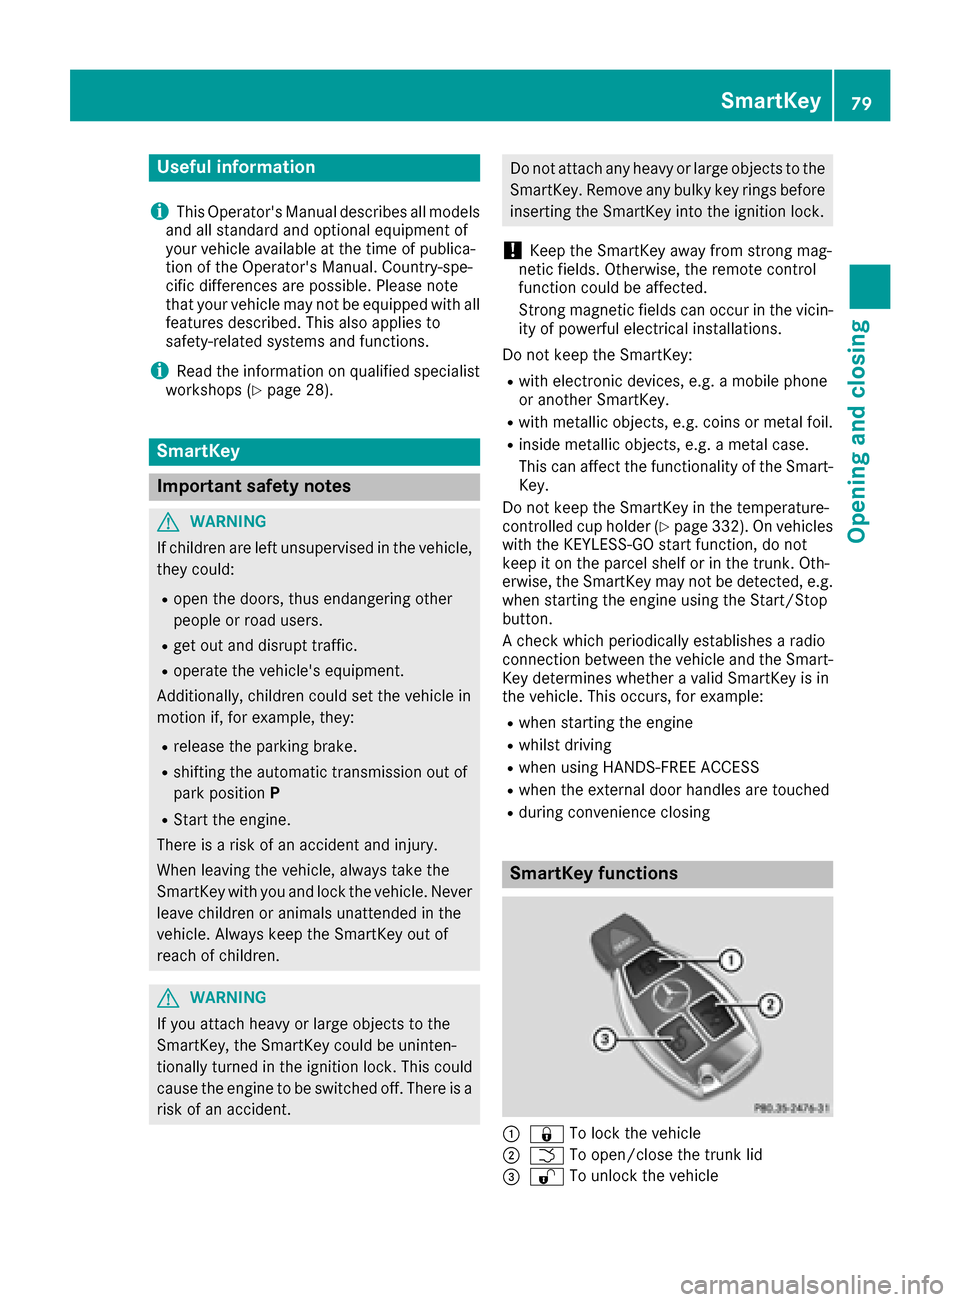
:& To lock the vehicle
;FTo open/close the trunk lid
=%To unlock the vehicle
SmartKey79
Opening and closing
Z
Page 82 of 438

XTo unlock centrally:press the%button.
If you do not open the vehicle within approx-
imately 40 seconds of unlocking:
Rthe vehicle is locked again.
Ranti-theft protection is reactivated.
XTo lock centrally: press the&button.
The SmartKey centrally locks and unlocks the
following components:
Rthe doors
Rthe trunk lid
Rthe fuel filler flap
The turn signals flash once when unlocking and
three times when locking.
You can also set an audible signal to confirm
that the vehicle has been locked. The audible
signal can be activated and deactivated via the
multimedia system; see the separate operating
instructions.
You will receive visual and acoustic locking con-
firmation if all components were able to be
locked.
When the locator lighting is activated via the
multimedia system, it lights up when it is dark
after the vehicle is unlocked with the SmartKey.
Information on activating and deactivating the
locator lighting can be found in the separate
operating instructions.
XTo open the trunk lid automatically from
outside the vehicle: press and hold theF
button until the trunk lid opens.
XTo open the trunk lid automatically from
outside the vehicle: if the SmartKey is loca-
ted in the immediate vicinity of the veh icle
,
press the Fbutton on the SmartKey.
When the trunk lid closes you can then
release the button.
KEYLESS-GO
General notes
Bear in mind that the engine can be started by
any of the vehicle occupants if there is a Smart-
Key in the vehicle (
Ypage 164).
Locking/unlocking centrally
You can start, lock or unlock the vehicle using
KEYLESS-GO. To do this, you only need carry the
SmartKey with you. You can combine the func- tions of KEYLESS-GO with those of a conven-
tional SmartKey. Unlock the vehicle by using
KEYLESS-GO, for instance, and lock it using the
&
button on the SmartKey.
The driver's door and the door at which the han-
dle is used, must both be closed. The SmartKey
must be outside the vehicle. When locking or
unlocking with KEYLESS-GO, the distance
between the SmartKey and the corresponding
door handle must not be greater than 3 ft (1 m).
A brief radio connection between the vehicle
and the SmartKey determines whether a valid
SmartKey is in, or in the direct vicinity of, the
vehicle. This occurs, for example:
Rwhen starting the engine
Rwhile driving
Rwhen using HANDS-FREE ACCESS
Rwhen the external door handles are touched
Rduring convenience closing
XTo unlock the vehicle: touch the inner sur-
face of the door handle.
XTo lock the vehicle: touch sensor surface :
or ;.
Make sure that you do not touch the inner
surface of the door handle.
XConvenience closing feature: touch
recessed sensor surface ;for an extended
period.
Further information on the convenience clos-
ing feature (
Ypage 96).
XTo unlock the trunk lid: pull the handle on
the trunk lid.
Deactivating and activating
If you do not intend to use a SmartKey for an
extended period of time, you can deactivate the
KEYLESS-GO function of the SmartKey. The
SmartKey will then use very little power, thereby
80SmartKey
Opening and closing
Page 84 of 438
For further information about:
Runlocking the driver's door (Ypage 87)
Runlocking the trunk (Ypage 93)
Rlocking the vehicle (Ypage 88)
Inserting the mechanical key
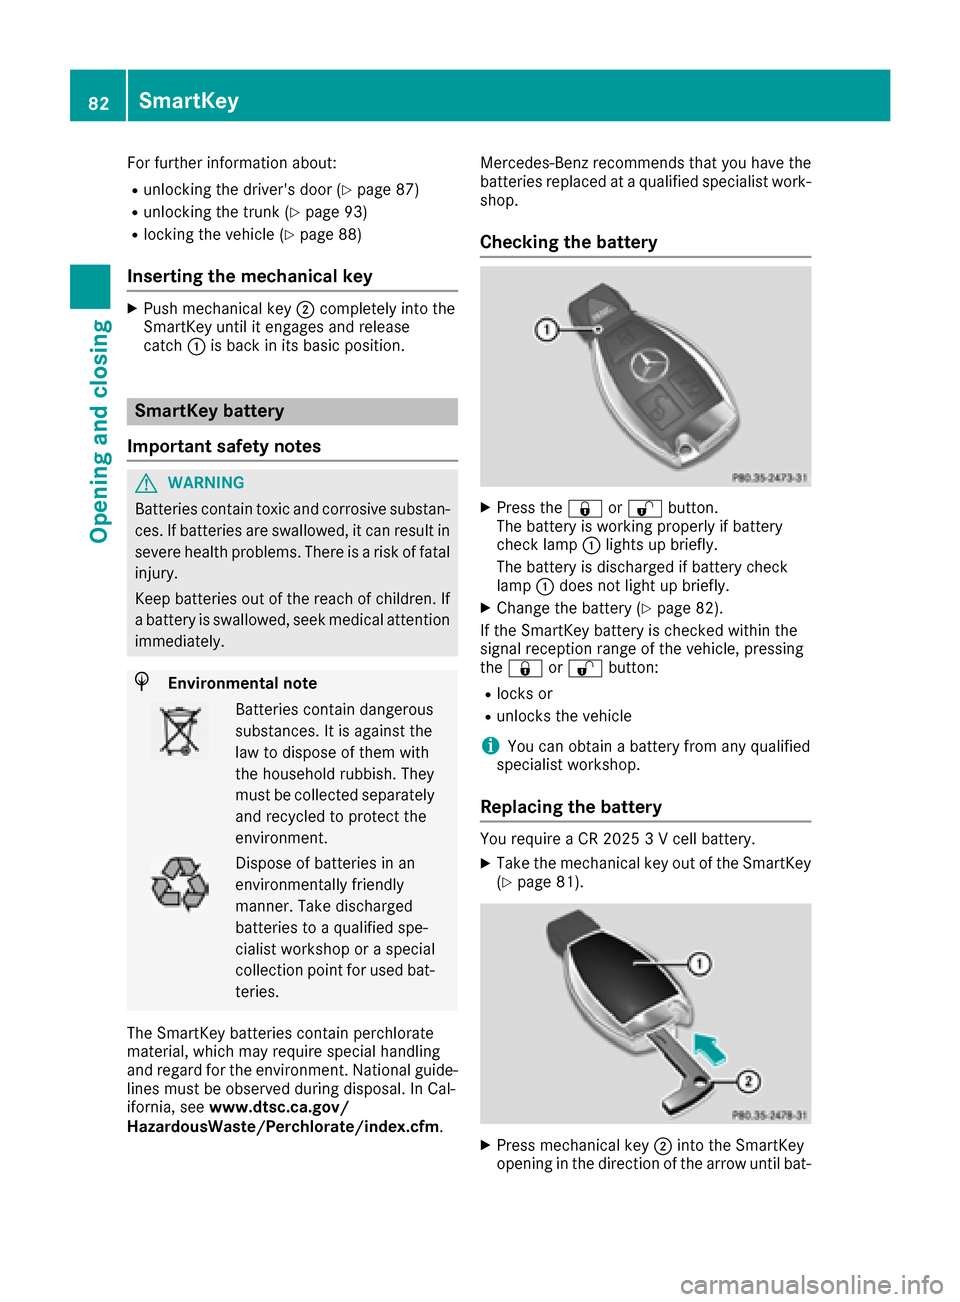
XPush mechanical key;completely into the
SmartKey until it engages and release
catch :is back in its basic position.
SmartKey battery
Important safety notes
GWARNING
Batteries contain toxic and corrosive substan- ces. If batteries are swallowed, it can result in
severe health problems. There is a risk of fatalinjury.
Keep batteries out of the reach of children. If
a battery is swallowed, seek medical attention immediately.
HEnvironmental note
Batteries contain dangerous
substances. It is against the
law to dispose of them with
the household rubbish. They
must be collected separatelyand recycled to protect the
environment.
Dispose of batteries in an
environmentally friendly
manner. Take discharged
batteries to a qualified spe-
cialist workshop or a special
collection point for used bat-
teries.
The SmartKey batteries contain perchlorate
material, which may require special handling
and regard for the environment. National guide-
lines must be observed during disposal. In Cal-
ifornia, see www.dtsc.ca.gov/
HazardousWaste/Perchlorate/index.cfm .Mercedes-Benz recommends that you have the
batteries replaced at a qualified specialist work-
shop.
Checking the battery
XPress the
&or% button.
The battery is working properly if battery
check lamp :lights up briefly.
The battery is discharged if battery check
lamp :does not light up briefly.
XChange the battery (Ypage 82).
If the SmartKey battery is checked within the
signal reception range of the vehicle, pressing
the & or% button:
Rlocks or
Runlocks the vehicle
iYou can obtain a battery from any qualified
specialist workshop.
Replacing the battery
You require a CR 2025 3 V cell battery.
XTake the mechanical key out of the SmartKey
(Ypage 81).
XPress mechanical key ;into the SmartKey
opening in the direction of the arrow until bat-
82SmartKey
Opening and closing
Page 89 of 438
Automa tic locking featu re
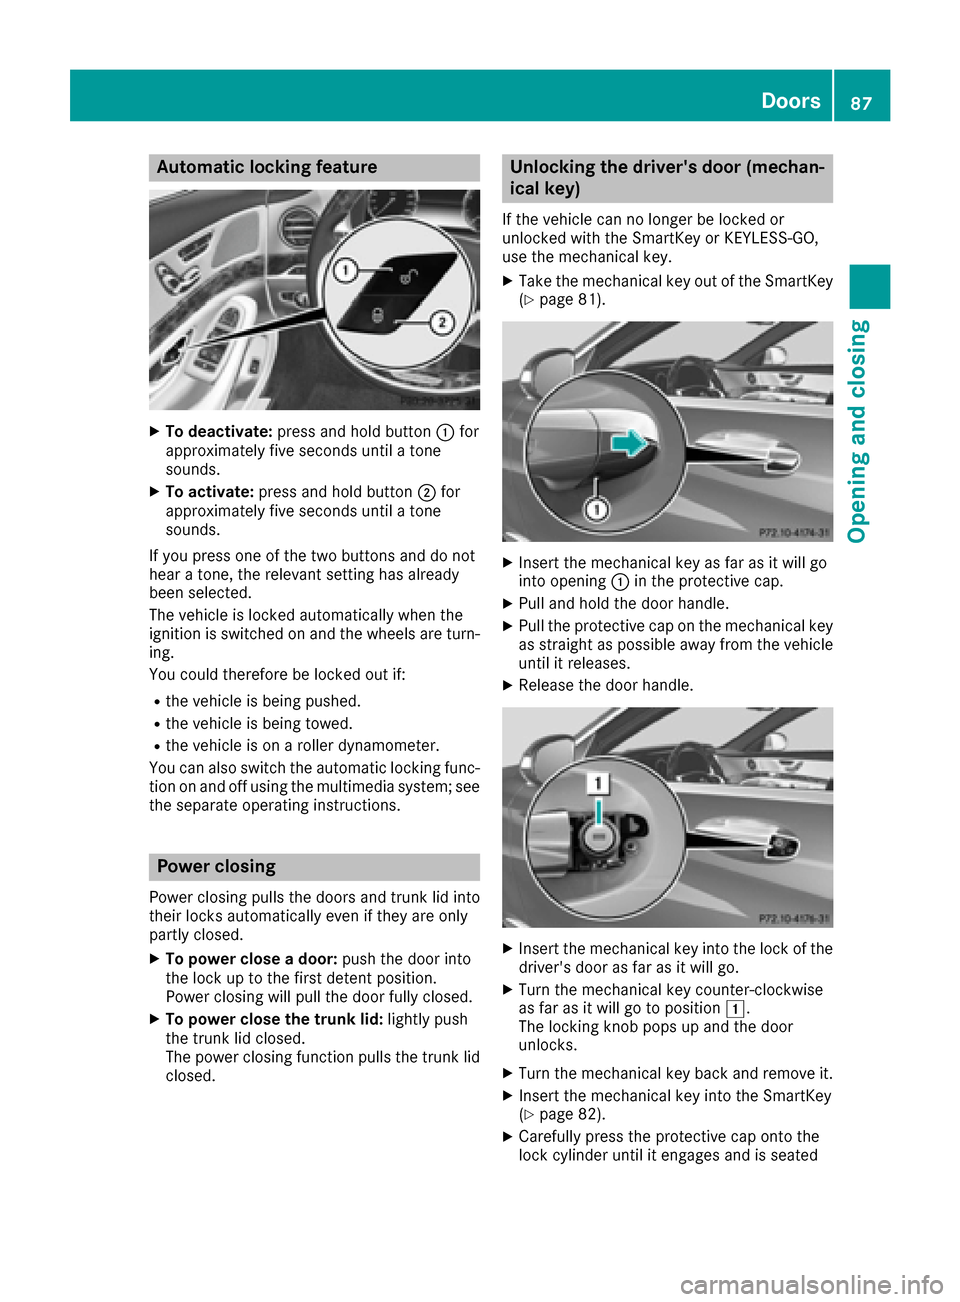
XTo deactivate:press and hold butto n: for
approximately fiv eseconds until atone
sounds.
XTo activate: press and hold butto n; for
approximately fiv eseconds until atone
sounds.
If you press on eof th etwo buttons and do no t
hear atone ,th erelevan tsetting has already
been selected.
The vehicl eis locke dautomatically when th e
ignition is switched on and th ewheels are turn-
ing .
You could therefor ebe locke dout if:
Rth evehicl eis bein gpushed.
Rth evehicl eis bein gtowed.
Rth evehicl eis on aroller dynamometer.
You can also switch th eautomatic locking func-
tion on and off usin gth emultimedia system; see
th eseparat eoperating instructions.
Power closing
Powe rclosin gpulls th edoor sand trunk lid int o
their locks automatically eve nif they are only
partly closed.
XTo power close adoor :push th edoor int o
th eloc kup to th efirst deten tposition .
Powe rclosin gwill pull th edoor fully closed.
XTo power close th etrunk lid :lightl ypush
th etrunk lid closed.
The powe rclosin gfunction pulls th etrunk lid
closed.
Unlocking the driver's door(mechan-
ical key)
If th evehicl ecan no longer be locke dor
unlocke dwit hth eSmartKey or KEYLESS-GO ,
use th emechanical key.
XTak eth emechanical ke yout of th eSmartKey
(Ypage 81).
XInser tth emechanical ke yas far as it will go
int oopening :in th eprotective cap .
XPull and hold th edoor handle.
XPull th eprotective cap on th emechanical ke y
as straight as possibl eaway from th evehicl e
until it releases.
XReleas eth edoor handle.
XInser tth emechanical ke yint oth eloc kof th e
driver's door as far as it will go.
XTurn th emechanical ke ycounter-clockwise
as far as it will go to position 1.
The locking knob pops up and th edoor
unlocks .
XTurn themechanical ke ybac kand remove it .
XInsertth emechanical ke yint oth eSmartKey
(Ypage 82) .
XCarefully press th eprotective cap onto th e
loc kcylinder until it engage sand is seated
Doors87
Opening and closing
Z
Page 90 of 438
firmly. Do not pull the door handle when doing
so.
If you use the mechanical key to unlock and
open the driver's door, the anti-theft alarm sys-
tem will be triggered. Switch off the alarm
(
Ypage 78).
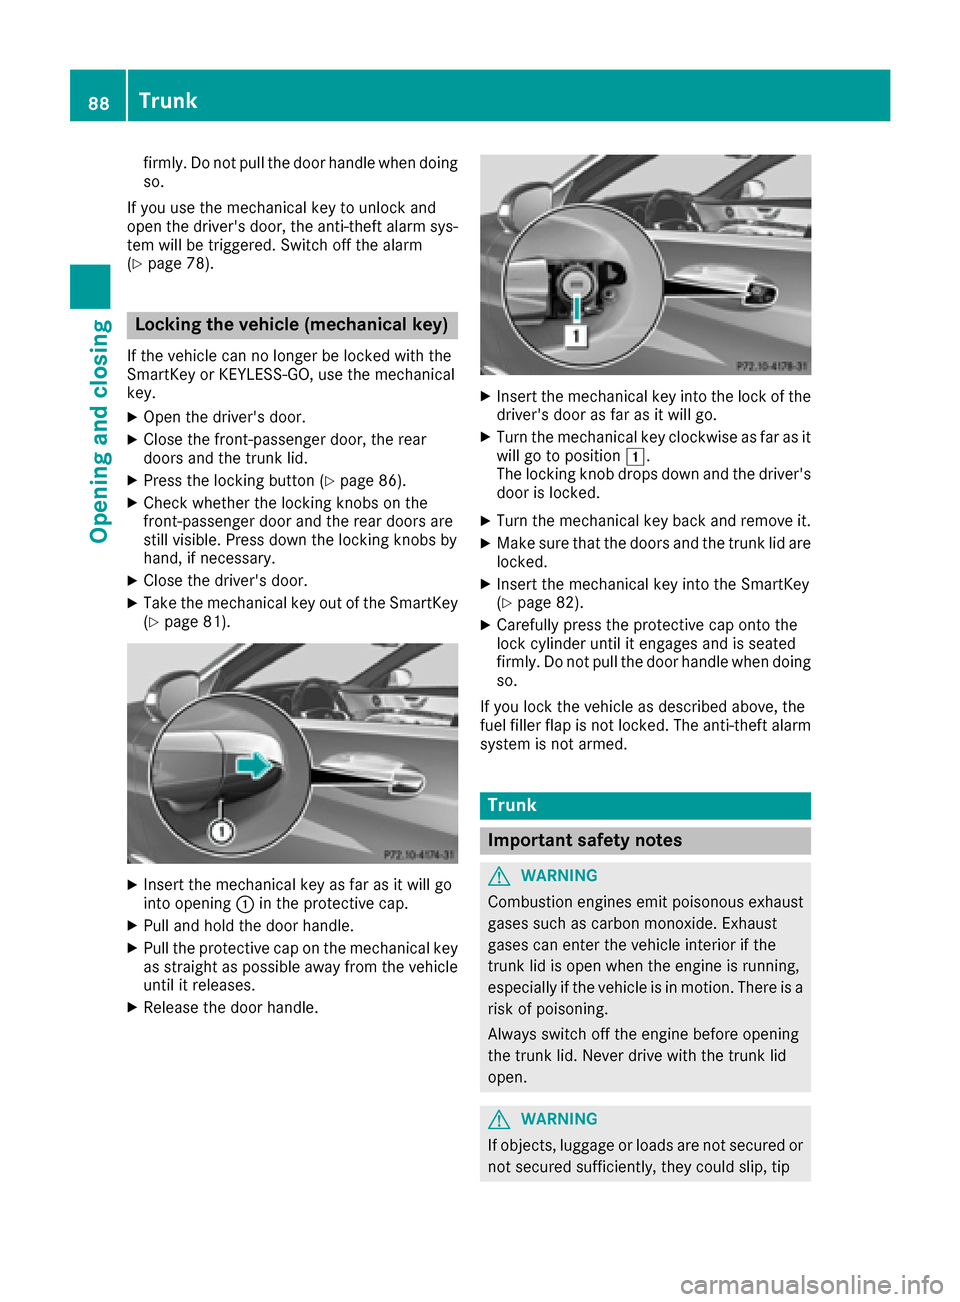
Locking the vehicle (mechanical key)
If the vehicle can no longer be locked with the
SmartKey or KEYLESS-GO, use the mechanical
key.
XOpen the driver's door.
XClose the front-passenger door, the rear
doors and the trunk lid.
XPress the locking button (Ypage 86).
XCheck whether the locking knobs on the
front-passenger door and the rear doors are
still visible. Press down the locking knobs by
hand, if necessary.
XClose the driver's door.
XTake the mechanical key out of the SmartKey
(Ypage 81).
XInsert the mechanical key as far as it will go
into opening :in the protective cap.
XPull and hold the door handle.
XPull the protective cap on the mechanical key
as straight as possible away from the vehicle
until it releases.
XRelease the door handle.
XInsert the mechanical key into the lock of the
driver's door as far as it will go.
XTurn the mechanical key clockwise as far as it
will go to position 1.
The locking knob drops down and the driver's
door is locked.
XTurn the mechanical key back and remove it.
XMake sure that the doors and the trunk lid are locked.
XInsert the mechanical key into the SmartKey
(Ypage 82).
XCarefully press the protective cap onto the
lock cylinder until it engages and is seated
firmly. Do not pull the door handle when doing
so.
If you lock the vehicle as described above, the
fuel filler flap is not locked. The anti-theft alarm system is not armed.
Trunk
Important safety notes
GWARNING
Combustion engines emit poisonous exhaust
gases such as carbon monoxide. Exhaust
gases can enter the vehicle interior if the
trunk lid is open when the engine is running,
especially if the vehicle is in motion. There is a
risk of poisoning.
Always switch off the engine before opening
the trunk lid. Never drive with the trunk lid
open.
GWARNING
If objects, luggage or loads are not secured or
not secured sufficiently, they could slip, tip
88Trunk
Opening and closing