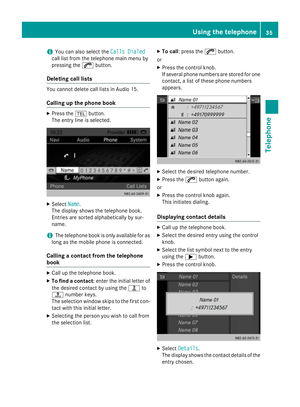
Page 17 of 54

The rear view camera is only an aid. It cannot
replace your own awareness of the immedi-
ate surroundings. You are responsible for
safe maneuvering, parking and pulling away.
When maneuvering and parking, make sure
that there are no persons, animals or objects
in the maneuvering area.
The rear view camera may show obstacles in
perspectival distortion, incorrectly or not at
all. The rear view camera cannot display all
objects located very near and/or under the
rear bumper. It does not warn you of a colli-
sion, persons or objects.
The area behind the vehicle is displayed in a
mirrored fashion, as in the rear-view mirror or
the exterior mirrors.
The rear view camera covers the immediate
surroundings of the vehicle and assists you,
for example, when parking.
Under the following circumstances, the rear
view camera will not function, or will function
in a limited manner:
Rthere is very heavy rain, snow or fog
Rat night or when the vehicle is in very dark
places
Rif you are parked somewhere very dark
Rthe surrounding area is illuminated with flu-
orescent light. The display may flicker.
Rif there is a sudden change in temperature,
e.g. when driving into a heated garage in
winter
Rif the ambient temperature is very high
Rif the camera lens is dirty or obstructed
Rif the rear of the vehicle is damaged. In this
case, have the camera position and setting
checked at a qualified specialist workshop
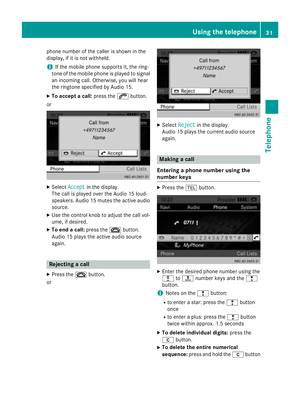
Rear view camera operation
The image from the rear view camera is
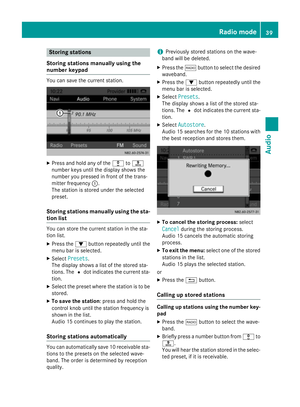
shown in the display when reverse gear is
engaged if:
Ryour vehicle is equipped with a rear view
camera
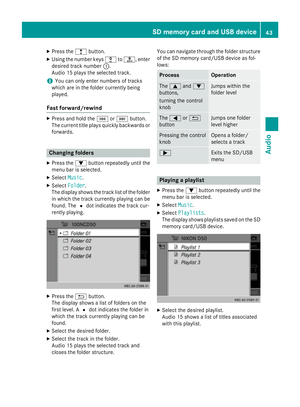
Rthe ignition is switched on Guide lines in the display (depending on the
vehicle's equipment) help you with backing
up.
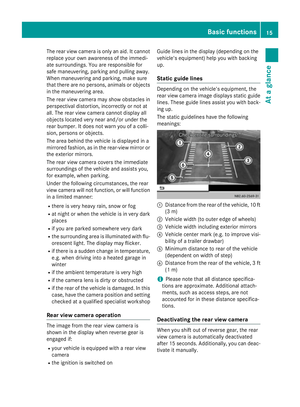
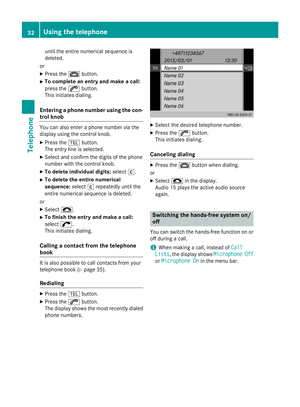
Static guide lines
Depending on the vehicle's equipment, the
rear view camera image displays static guide
lines. These guide lines assist you with back-
ing up.
The static guidelines have the following
meanings:
:Distance from the rear of the vehicle, 10 ft
(3 m)
;Vehicle width (to outer edge of wheels)
=Vehicle width including exterior mirrors
?Vehicle center mark (e.g. to improve visi-
bility of a trailer drawbar)
AMinimum distance to rear of the vehicle
(dependent on width of step)
BDistance from the rear of the vehicle, 3 ft
(1 m)
iPlease note that all distance specifica-
tions are approximate. Additional attach-
ments, such as access steps, are not
accounted for in these distance specifica-
tions.
Deactivating the rear view camera
When you shift out of reverse gear, the rear
view camera is automatically deactivated
after 15 seconds. Additionally, you can deac-
tivate it manually.
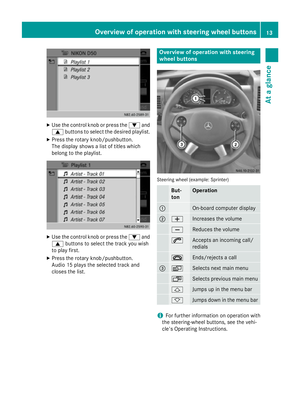
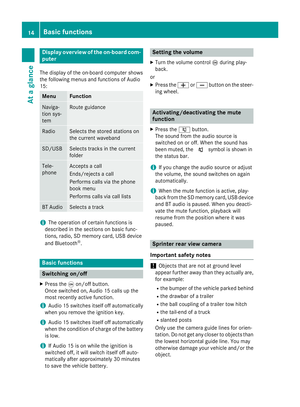
Basic functions15
At a glance
Page 18 of 54

XPress theØ,$, Õ,%,ior
% button.
or
XSelect %in the menu bar.
The display shows the previous view.
Activating the rear view camera image
when driving forwards
This function is available for the Sprinter.
iWhen driving forwards, the display shows
no guide lines.
XPress the ibutton for longer than two
seconds.
The display shows the rear view camera
image.
or
XPress the ibutton.
XPress the :button repeatedly until the
menu bar is selected.
XSelect Rear View Camera.
The display shows the rear view camera
image without guide lines.
Vito rear view camera
Rear view camera operation
The image from the rear view camera is
shown in the display when reverse gear is
engaged if:
Ryour vehicle is equipped with a rear view
camera
Rthe ignition is switched on
Guide lines in the display (depending on the
vehicle's equipment) help you with backing
up.
When the function is activated, the display
automatically switches back to the previously
selected display if:
Ryou select transmission position P
Rdrive forwards slightly
Deactivating the rear view camera
When you shift out of reverse gear, the rear
view camera is automatically deactivated
after 15 seconds. Additionally, you can deac-
tivate it manually.
XPress theØ,$,Õ,%,ior
% button.
or
XSelect %in the menu bar.
The display shows the previous view.
If the vehicle is equipped with Active Parking
Assist: the rear view camera is available dur-
ing the entire automatic parking procedure
after the reverse gear has been engaged for
the first time.
Information in the vehicle's Operating
Instructions
You can find further information about the
rear view camera in the vehicle's Operating
Instructions.
16Basic functions
At a glance
Page 19 of 54
Display settings.................................. .18
Sound settings .................................... 19
Bluetoot h
®settings ............................ 20
Syste mlanguage ................................ .25
Resetting to factory settings .............26
17
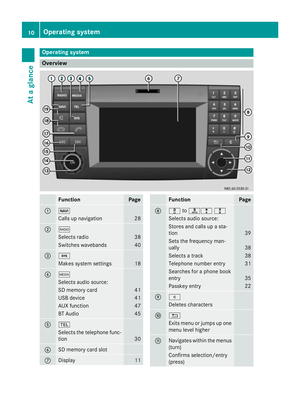
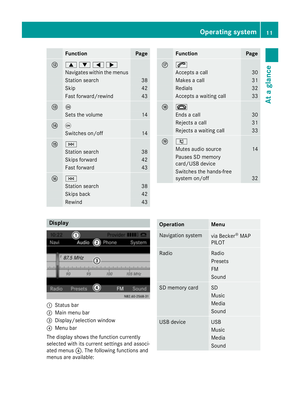
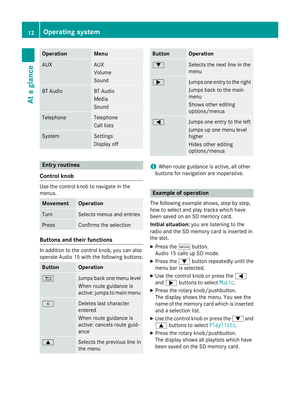
System settings
Page 20 of 54

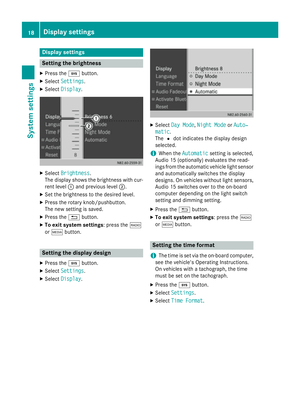
Display settings
Setting thebrightness
XPress th ei button.
XSelectSettings.
XSelec tDispla y.
XSelectBrightnes s.
The display shows th ebrightness wit hcur -
ren tlevel :and previous level ;.
XSetth ebrightness to th edesire dlevel.
XPress th erotary knob/pushbutton.
The ne wsetting is saved.
XPress th e% button.
XTo exit syste msettings :press th e$
or Õ button.
Setting th edisplay design
XPress th ei button.
XSelectSettings.
XSelec tDispla y.
XSelectDay Mod e,Night Mod eorAuto‐
matic.
The #dot indicates th edisplay design
selected.
iWhe nth eAutomaticsetting is selected,
Audio 15 (optionally) evaluates th eread-
ings from th eautomatic vehicle ligh tsensor
and automatically switches th edisplay
designs. On vehicles without ligh tsensors,
Audio 15 switches over to th eon-boar d
compute rdependin gon th eligh tswitch
setting and dimmin gsetting .
XPress th e% button.
XTo exit syste msettings :press th e$
or Õ button.
Setting th etime forma t
i
The time is set via th eon-boar dcomputer,
see th evehicle' sOperatin gInstructions.
On vehicles wit h atachograph, th etime
mus tbe set on th etachograph.
XPress th ei button.
XSelectSettings.
XSelec tTim eFormat.
18Display settings
System settings
Page 21 of 54
XSet the desired time format:
RHH:MM (24 hrs): 24-h format, e.g.
13:15
RHH:MM (AM/PM): 12-h format, e.g.
1:15 pm
The #dot indicates the selected time for-
mat.
XPress the %button.
XTo exit system settings : press the$
or Õ button.
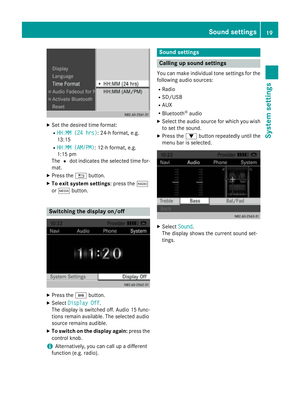
Switching the display on/off
XPress the ibutton.
XSelect Display Off.
The display is switched off. Audio 15 func-
tions remain available. The selected audio
source remains audible.
XTo switch on the display again: press the
control knob.
iAlternatively, you can call up a different
function (e.g. radio).
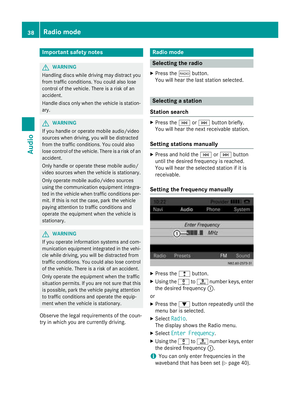
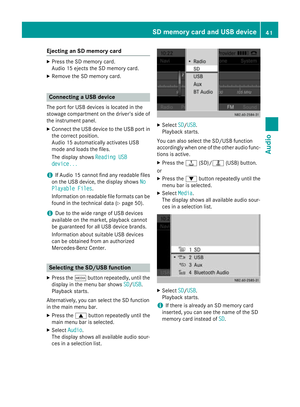
Sound settings
Calling up sound settings
You can make individual tone settings for the
following audio sources:
RRadio
RSD/USB
RAUX
RBluetooth®audio
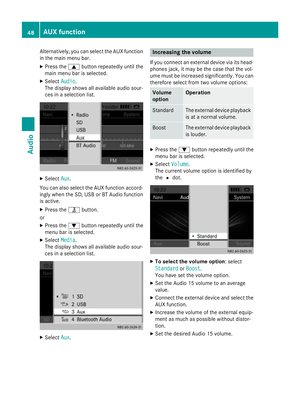
XSelect the audio source for which you wish to set the sound.
XPress the :button repeatedly until the
menu bar is selected.
XSelect Sound.
The display shows the current sound set-
tings.
Sound settings19
System settings
Page 22 of 54

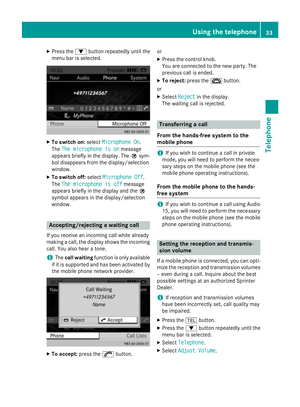
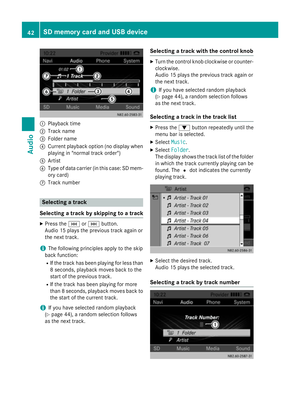
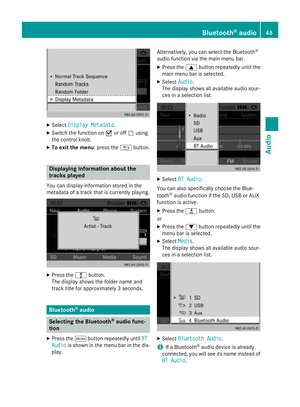
Adjusting treble and bass
XCall up thesoun dsettings.
XSelec tTrebleor Bas s.
The display shows th esoun dsetting wit h
curren tsoun dlevel :and previous soun d
level ;.
XSelec tth edesired soun dlevel (-10to +10).
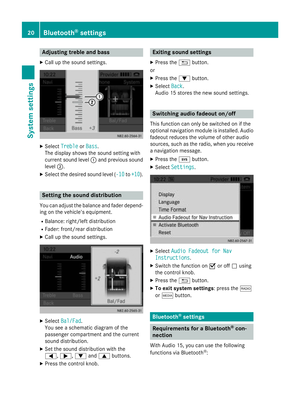
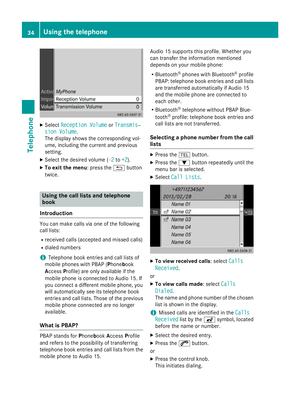
Setting the sound distributi on
You can adjust thebalance and fade rdepend -
ing on th evehicle's equipment.
RBalance :right/left distribution
RFader: front/rear distribution
XCall up th esoun dsettings.
XSelec tBal/Fa d.
You see aschemati cdiagram of th e
passenger compartmen tand th ecurren t
soun ddistribution .
XSetth esoun ddistribution wit hth e
=, ;,:and9 buttons .
XPress th econtrol knob.
Exiting sound settings
XPre ssthe% button.
or
XPre ssthe: button.
XSelectBac k.
Audio 15 storesth ene wsoun d setting s.
Switching audio fadeout on/off
This function can only be switched on if th e
optional navigation module is installed. Audio
fadeout reduce sth evolume of other audio
source s, such as theradio, when you receiv e
a navigation message .
XPressthei button.
XSelectSettings.
XSelec tAudio Fadeou tfor Nav
Instructions.
XSwitc hth efunction on Oor off ªusin g
th econtrol knob.
XPress th e% button.
XTo exit system settings: press the$
or Õ button.
Bluetooth®settings
Requirements for a Bluetooth®con-
nection
Wit hAudio 15 ,you can use th efollowin g
function svia Bluetoot h®:
20Bluetooth®settings
System settings
Page 23 of 54

Rmake a phone call using a mobile phone
Rplay an audio file via an audio device
To do so, the following conditions must be
met:
Ryou require a mobile phone with Blue-
tooth®or an audio device with Bluetooth®
(Bluetooth®device).
Rthe Bluetooth®device must be located
inside the vehicle in the vicinity of Audio 15.
Rthe Bluetooth®function of Audio 15 is acti-
vated (
Ypage 21).
Rthe Bluetooth®function of the Bluetooth®
device is activated.
Rthe device must support the A2DP and
AVRCP audio profiles.
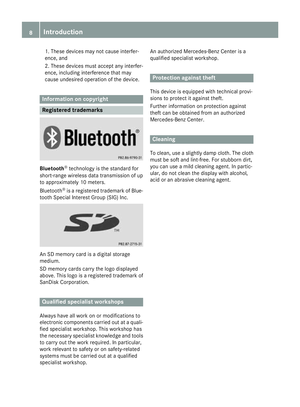
iInformation on the Bluetooth®mobile
phones and audio devices recommended
by Mercedes-Benz is available from quali-
fied specialist workshops.
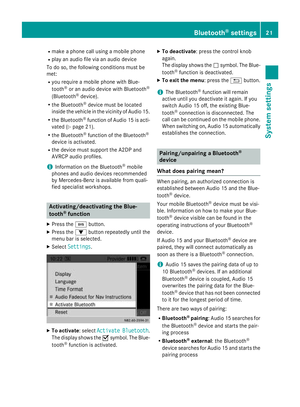
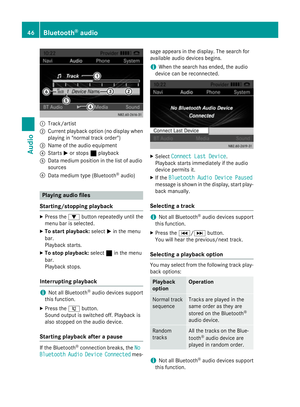
Activating/deactivating the Blue-
tooth®function
XPress the ibutton.
XPress the :button repeatedly until the
menu bar is selected.
XSelect Settings.
XTo activate : selectActivateBluetooth.
The display shows the Osymbol. The Blue-
tooth
®function is activated.
XTo deactivate : press the control knob
again.
The display shows the ªsymbol. The Blue-
tooth
®function is deactivated.
XTo exit the menu : press the%button.
iThe Bluetooth®function will remain
active until you deactivate it again. If you
switch Audio 15 off, the existing Blue-
tooth
®connection is disconnected. The
call can be continued on the mobile phone.
When switching on, Audio 15 automatically establishes the connection.
Pairing/unpairing a Bluetooth®
device
What does pairing mean?
When pairing, an authorized connection is
established between Audio 15 and the Blue-
tooth
®device.
Your mobile Bluetooth
®device must be visi-
ble. Information on how to make your Blue-
tooth
®device visible can be found in the
operating instructions of your Bluetooth®
device.
If Audio 15 and your Bluetooth
®device are
paired, they will connect automatically as
soon as there is a Bluetooth
®connection.
iAudio 15 saves the pairing data of up to
10 Bluetooth®devices. If an additional
Bluetooth®device is coupled, Audio 15
overwrites the pairing data for the Blue-
tooth
®device that has not been connected
to it for the longest period of time.
There are two ways of pairing:
RBluetooth®pairing: Audio 15 searches for
the Bluetooth®device and starts the pair-
ing process
RBluetooth®external : the Bluetooth®
device searches for Audio 15 and starts the
pairing process
Bluetooth®settings21
System settings
Page 24 of 54

iIf you pair a mobile phone as an audio
device, it is automatically paired as a
mobile phone as well, as long as your
mobile phone supports this.
Pairing a Bluetooth®device (mobile
phone/audio device) using Bluetooth®
pairing
XPress the %button.
or
XSelect the Bluetooth®audio function.
XPress the :button repeatedly until the
menu bar is selected.
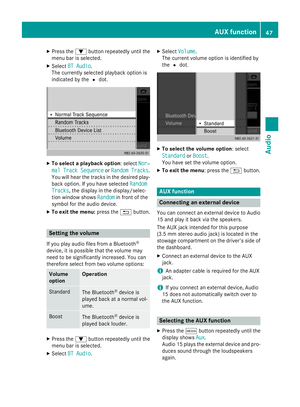
XSelect Telephone/BT Audio.
XConnect Phones/Bluetooth Device
List.
XSelectUpdate.
Audio 15 searches for Bluetooth®devices
within range for a certain period of time.
If at least one Bluetooth
®device is found,
the display shows the Bluetooth®name of
the device.
If Audio 15 does not find a Bluetooth
®
device, the Search for Bluetooth
devices failedmessage is shown in the
display.
XTo search again: select Update.
XSelect the desired Bluetooth®device using
the control knob.
The display shows the input menu for the
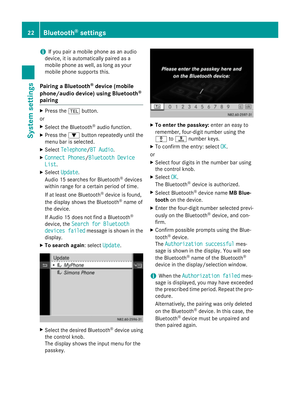
passkey.
XTo enter the passkey: enter an easy to
remember, four-digit number using the
x tos number keys.
XTo confirm the entry: select OK.
or
XSelect four digits in the number bar using
the control knob.
XSelect OK.
The Bluetooth®device is authorized.
XSelect Bluetooth®device name MB Blue-
tooth on the device.
XEnter the four-digit number selected previ-
ously on the Bluetooth®device, and con-
firm.
XConfirm possible prompts using the Blue-
tooth®device.
The Authorization successful
mes-
sage is shown in the display. You will see
the Bluetooth
®name of the Bluetooth®
device in the display/selection window.
iWhen the Authorization failedmes-
sage is displayed, you may have exceeded
the prescribed time period. Repeat the pro-
cedure.
Alternatively, the pairing was only deleted
on the Bluetooth
®device. In this case, the
Bluetooth®device must be unpaired and
then paired again.
22Bluetooth®settings
System settings


: 24-h format, e.g.
13:15
RHH:MM (AM/PM): 12-h format, e.g.
1:15 pm
The #dot indicates the selected time for-
mat.
XPress the %button.
XTo exit system sett")