2016 MERCEDES-BENZ GLS SUV warning
[x] Cancel search: warningPage 306 of 397
General notes
The section on the multimedia system in this
manual describes the basic principles for oper-
ation. More information can be found in the Dig-
ital Owner's Manual. Important safety notes
G
WARNING
Operating the integrated information systems and communications equipment in the vehicle
while driving will distract you from traffic con-
ditions. You could then lose control of the
vehicle. There is a risk of an accident.
Only operate these devices if road traffic con-
ditions permit. If you are unsure about the
surrounding conditions, pull over to a safe
location and make entries only while the vehi-
cle is stationary.
You must observe the legal requirements for the country in which you are currently driving whenoperating the multimedia system.
The multimedia system calculates the route to
the destination without taking the following into
account, for example:
R traffic lights
R stop and give way signs
R parking or stopping restrictions
R road narrowing
R other road and traffic rules and regulations
The multimedia system may give incorrect driv-
ing recommendations if the actual road/traffic
situation does not correspond with the digital
map data.
For example:
R a diverted route
R the road layout or the direction of a one-way
street has been changed
For this reason, you must always observe road
and traffic rules and regulations during your
journey. Road and traffic rules and regulations
always have priority over multimedia system
driving recommendations. Function restrictions
For safety reasons, some functions are restric-
ted or unavailable while the vehicle is in motion.
You will notice this, for example, because either
you will not be able to select certain menu items or a message will appear to this effect. Operating system
Overview
General notes !
Do not use the space in front of the display
for storage. Objects placed here could dam-
age the display or impair its function. Avoid
any direct contact with the display surface.
Pressure on the display surface may result in
impairments to the display, which could be
irreversible.
Wearing polarised sunglasses may impair your
ability to read the display.
The display has an automatic temperature-con- trolled switch-off feature. The brightness is
automatically reduced if the temperature is too
high. If necessary, the display may temporarily
switch off completely.
Cleaning instructions !
Do not touch the display. The display has a
very sensitive high-gloss surface; there is a
risk of scratching. If you have to clean the
screen, however, use a mild cleaning agent
and a soft, lint-free cloth.
The display must be switched off and have
cooled down before you start cleaning. Do not
apply pressure to the display surface when
cleaning it, as this could cause irreversible dam- age to the display.
Switching the multimedia system
on/off X
Press the qcontrol knob. Operating system
303Multimedia system Z
Page 308 of 397
X
Select a favourite.
X Add a favourite at the desired position.
If a favourite has already been added at this
position, it will be overwritten.
Adding your own favourite
X Select Vehicle VehicleQ Climate control Climate control.
X Press and hold the gbutton until the
favourites are displayed.
X Add a favourite at the desired position.
If a favourite has already been added at this
position, it will be overwritten. Navigation mode
Important safety notes G
WARNING
Operating the integrated information systems and communications equipment in the vehicle
while driving will distract you from traffic con-
ditions. You could then lose control of the
vehicle. There is a risk of an accident.
Only operate these devices if road traffic con-
ditions permit. If you are unsure about the
surrounding conditions, pull over to a safe
location and make entries only while the vehi-
cle is stationary.
You must observe the legal requirements for the country in which you are currently driving whenoperating the navigation system.
General notes Correct functioning of the navigation system
depends, amongst other things, on GPS recep-
tion. In certain situations, GPS reception may be
impaired, there may be interference or there
may be no reception at all, e.g. in tunnels or
multi-storey car parks.
Audio 20 is equipped with Garmin ®
MAP PILOT;
see the manufacturer's operating instructions.
The Garmin ®
MAP PILOT operating instructions
are stored on the SD card as a PDF file. The SD card box contains a quick guide.
The following descriptions apply to navigation
with COMAND Online. Further information can
be found in the Digital Owner's Manual. Selecting a route type and route options Multimedia system:
X Select Navi
Navi QNavigationNavigation.
The map displays the current vehicle position.
X Slide 6the controller.
X Select Options OptionsQ Route settings
Route settings .
Notes for route types:
R Eco route
Eco route
R Dynamic route
Dynamic route
Traffic reports on the route are taken into
account for the route guidance (not available
in all countries).
R Dynamic route only after request Dynamic route only after request
You can decide whether or not current traffic
reports should be taken into account for route
calculation (not available in all countries).
R Calculate alternative routes Calculate alternative routes
Different routes are being calculated. In order
to do so, instead of Start Start, select the menu
item Continue
Continue .
X To avoid/use route options: selectAvoid
Avoid
options
options.
X Select a route option.
Notes for route options:
R Use toll roads
Use toll roads
The route calculation includes roads which
require you to pay a usage fee (toll).
R Use vignette roads Use vignette roads (not available in all
countries)
The route calculation includes roads which
require you to pay a time-based fee (vignette).
A vignette allows temporary use of the route
network, e. g. 10 days or 1 year.
Entering an address Multimedia system:
X Select Navi NaviQNavigationNavigation.
The map displays the current vehicle position.
X Slide 6the controller.
X Select Destination DestinationQ Address entry Address entry.
Enter an address, e.g. as follows:
R town or postcode, street, house number
R country, town or postcode
R town or postcode, centre
R street, town or postcode, junction Operating system
305Multimedia system Z
Page 314 of 397
Inserting/removing an SD card
Important safety notes
G
WARNING
SD cards are small parts. They can be swal-
lowed and cause choking. This poses an
increased risk of injury or even fatal injury.
Keep the SD card out of the reach of children. If a SD card is swallowed, seek medical atten-
tion immediately.
! If you are no longer using the SD card, you
should remove it and store it outside the vehi-
cle. High temperatures can damage the card.
Inserting an SD card
The SD card slot is on the control panel. X Insert the SD card into the SD card slot until
the SD card engages. The side with the con-
tacts must face downwards.
Removing an SD card X Press the SD card.
The SD card is ejected.
X Remove the SD card.
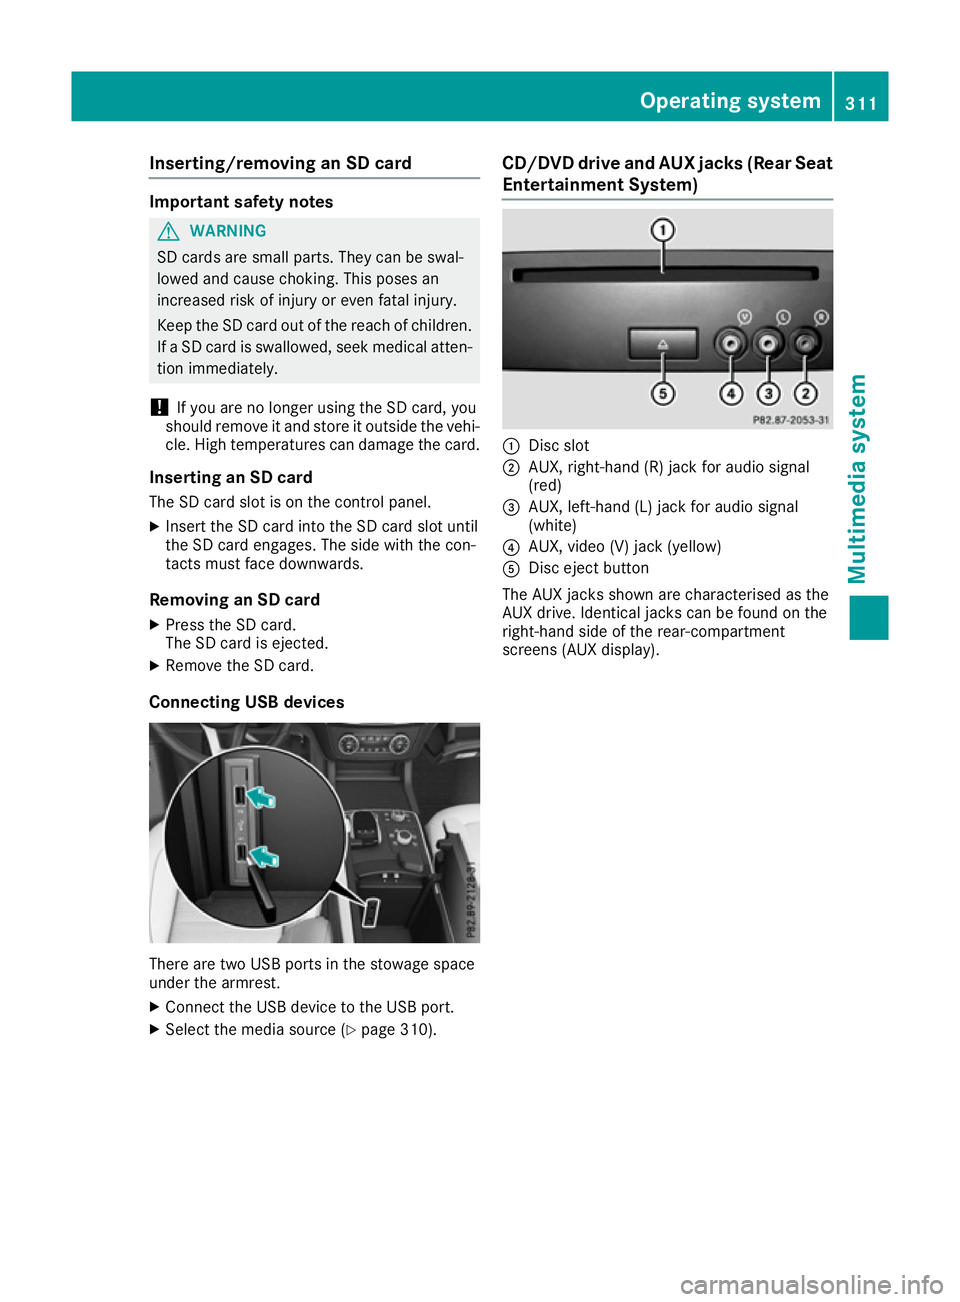
Connecting USB devices There are two USB ports in the stowage space
under the armrest.
X Connect the USB device to the USB port.
X Select the media source (Y page 310).CD/DVD drive and AUX jacks (Rear Seat
Entertainment System) :
Disc slot
; AUX, right-hand (R) jack for audio signal
(red)
= AUX, left-hand (L) jack for audio signal
(white)
? AUX, video (V) jack (yellow)
A Disc eject button
The AUX jacks shown are characterised as the
AUX drive. Identical jacks can be found on the
right-hand side of the rear-compartment
screens (AUX display). Operating system
311Multimedia system Z
Page 315 of 397
Stowage areas
Loading guidelines
G
WARNING
If objects, luggage or loads are not secured or not secured sufficiently, they could slip, tip
over or be flung around and thereby hit vehicle
occupants. There is a risk of injury, especially when braking or abruptly changing directions.
Always store objects so that they cannot be
flung around. Secure objects, luggage or
loads against slipping or tipping before the
journey. G
WARNING
Combustion engines emit poisonous exhaust
gases such as carbon monoxide. If the tailgate is open when the engine is running, particu-
larly if the vehicle is moving, exhaust fumes
could enter the passenger compartment.
There is a risk of poisoning.
Turn off the engine before opening the tail-
gate. Never drive with the tailgate open. G
WARNING
The exhaust tail pipe and tail pipe trim can
become very hot. If you come into contact
with these parts of the vehicle, you could burn
yourself. There is a risk of injury.
Always be particularly careful around the
exhaust tail pipe and the tail pipe trim. Allow
these components to cool down before touch-
ing them.
The handling characteristics of a laden vehicle
are dependent on the distribution of the load
within the vehicle. For this reason, you should
observe the following notes when transporting a
load:
R never exceed the maximum permissible gross
vehicle weight or the permissible axle loads
for the vehicle (including occupants).
R the luggage compartment is the preferred
place to store objects.
R position heavy loads as far forwards as pos-
sible and as low down in the load compart-
ment as possible. R
the load must not protrude above the upper
edge of the seat backrests.
R always place the load against the rear or front
seat backrests. Make sure that the seat
backrests are securely locked into place.
R always place the load behind unoccupied
seats if possible.
R use the lashing eyelets and the luggage nets
to transport loads and luggage.
R only use lashing eyelets and fastening com-
ponents that are suitable for the weight and
size of the load.
R secure the load with sufficiently strong and
wear-resistant lashing material. pad sharp
edges for protection.
i Load restraints are available at any qualified
specialist workshop, e.g. a Mercedes-Benz
Service Centre. Stowage compartments
Important safety notes G
WARNING
If you transport objects in the vehicle interior and these are not adequately secured, they
could slip or be flung around and thereby
strike vehicle occupants. In addition, cup
holders, open stowage spaces and mobile
phone brackets may not always be able to
hold the objects placed in them in the event of an accident. There is a risk of injury, particu-
larly in the event of sharp braking or sudden
changes of direction.
R Always stow objects in such a way that they
cannot be tossed about in these or similar
situations.
R Always make sure that objects do not proj-
ect from stowage spaces, luggage nets or
stowage nets.
R Ensure that closable stowage spaces are
shut before beginning your journey.
R Always stow and secure heavy, hard, poin-
ted, sharp-edged, fragile or outsize objects
in the load compartment.
Observe the loading guidelines (Y page 312).312
Stowage areasStowing and features
Page 318 of 397
:
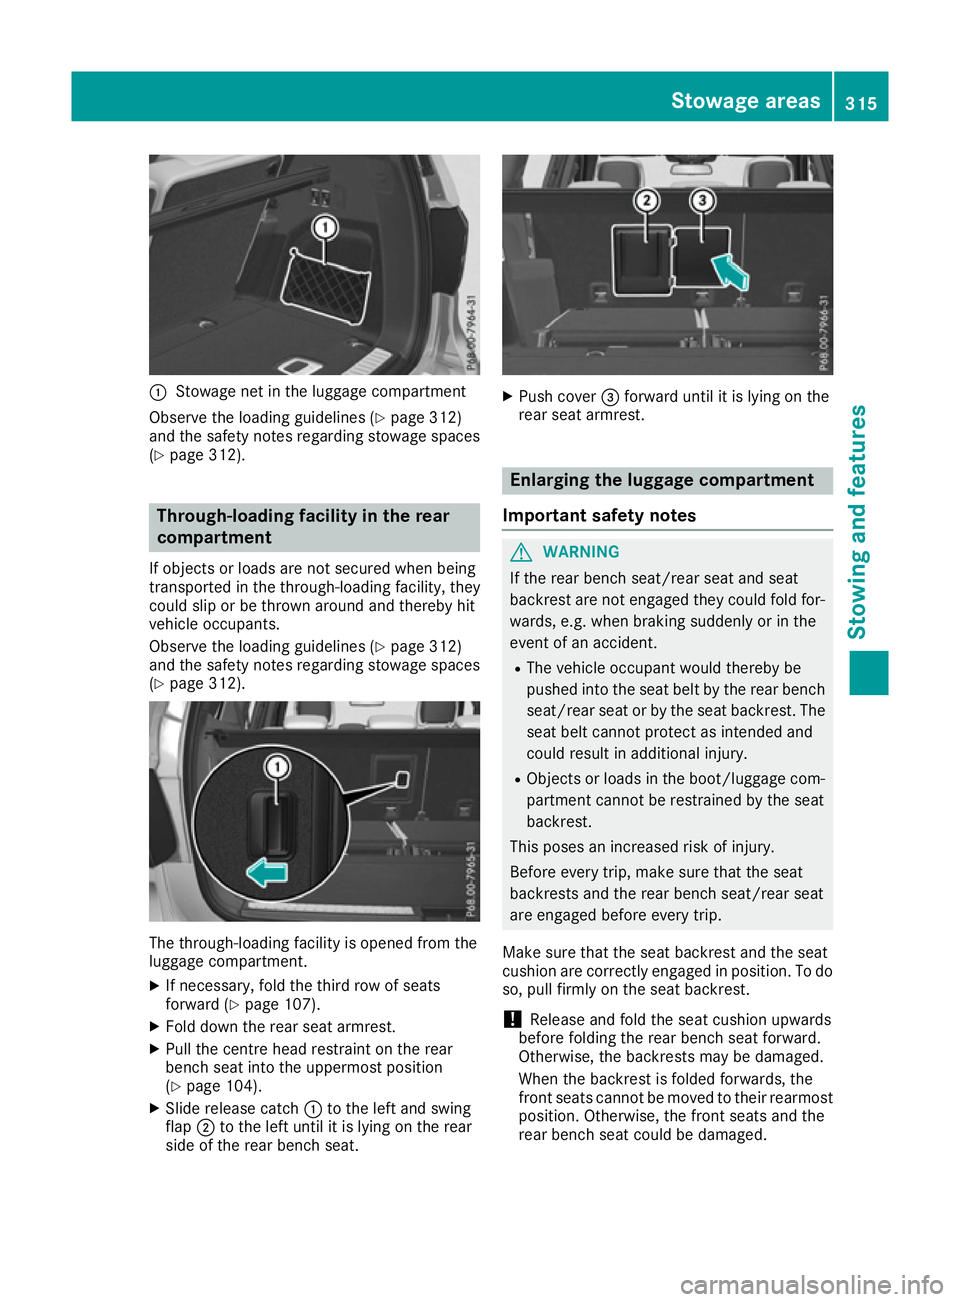
Stowage net in the luggage compartment
Observe the loading guidelines (Y page 312)
and the safety notes regarding stowage spaces
(Y page 312). Through-loading facility in the rear
compartment
If objects or loads are not secured when being
transported in the through-loading facility, they
could slip or be thrown around and thereby hit
vehicle occupants.
Observe the loading guidelines (Y page 312)
and the safety notes regarding stowage spaces
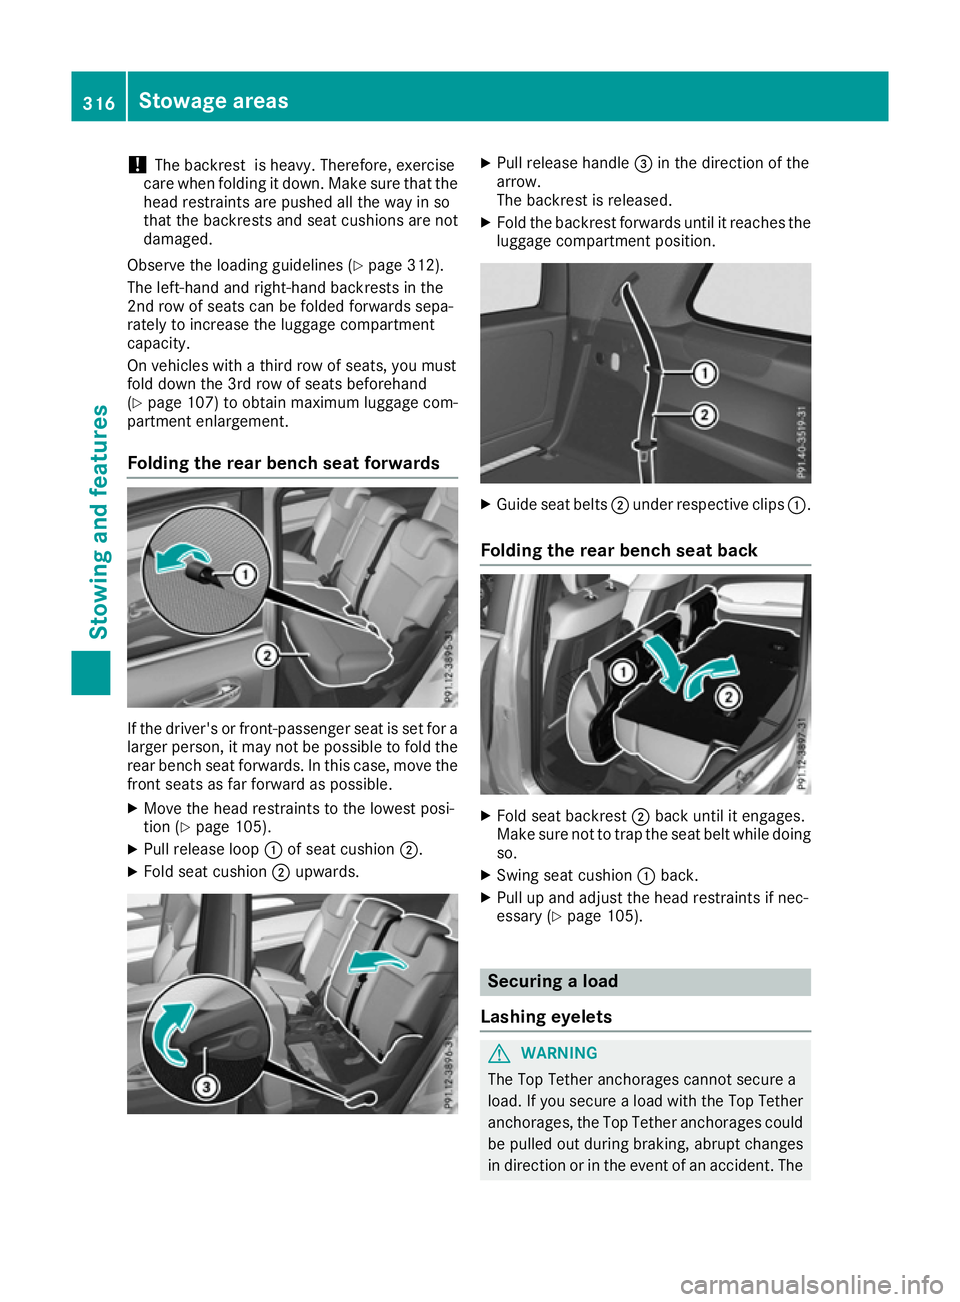
(Y page 312). The through-loading facility is opened from the
luggage compartment.
X If necessary, fold the third row of seats
forward (Y page 107).
X Fold down the rear seat armrest.
X Pull the centre head restraint on the rear
bench seat into the uppermost position
(Y page 104).
X Slide release catch :to the left and swing
flap ;to the left until it is lying on the rear
side of the rear bench seat. X
Push cover =forward until it is lying on the
rear seat armrest. Enlarging the luggage compartment
Important safety notes G
WARNING
If the rear bench seat/rear seat and seat
backrest are not engaged they could fold for- wards, e.g. when braking suddenly or in the
event of an accident.
R The vehicle occupant would thereby be
pushed into the seat belt by the rear bench
seat/rear seat or by the seat backrest. The
seat belt cannot protect as intended and
could result in additional injury.
R Objects or loads in the boot/luggage com-
partment cannot be restrained by the seat
backrest.
This poses an increased risk of injury.
Before every trip, make sure that the seat
backrests and the rear bench seat/rear seat
are engaged before every trip.
Make sure that the seat backrest and the seat
cushion are correctly engaged in position. To do
so, pull firmly on the seat backrest.
! Release and fold the seat cushion upwards
before folding the rear bench seat forward.
Otherwise, the backrests may be damaged.
When the backrest is folded forwards, the
front seats cannot be moved to their rearmost
position. Otherwise, the front seats and the
rear bench seat could be damaged. Stowage areas
315Stowing and features Z
Page 319 of 397
!
The backrest is heavy. Therefore, exercise
care when folding it down. Make sure that the
head restraints are pushed all the way in so
that the backrests and seat cushions are not
damaged.
Observe the loading guidelines (Y page 312).
The left-hand and right-hand backrests in the
2nd row of seats can be folded forwards sepa-
rately to increase the luggage compartment
capacity.
On vehicles with a third row of seats, you must
fold down the 3rd row of seats beforehand
(Y page 107) to obtain maximum luggage com-
partment enlargement.
Folding the rear bench seat forwards If the driver's or front-passenger seat is set for a
larger person, it may not be possible to fold the
rear bench seat forwards. In this case, move the front seats as far forward as possible.
X Move the head restraints to the lowest posi-
tion (Y page 105).
X Pull release loop :of seat cushion ;.
X Fold seat cushion ;upwards. X
Pull release handle =in the direction of the
arrow.
The backrest is released.
X Fold the backrest forwards until it reaches the
luggage compartment position. X
Guide seat belts ;under respective clips :.
Folding the rear bench seat back X
Fold seat backrest ;back until it engages.
Make sure not to trap the seat belt while doing so.
X Swing seat cushion :back.
X Pull up and adjust the head restraints if nec-
essary (Y page 105). Securing a load
Lashing eyelets G
WARNING
The Top Tether anchorages cannot secure a
load. If you secure a load with the Top Tether
anchorages, the Top Tether anchorages could be pulled out during braking, abrupt changes
in direction or in the event of an accident. The 316
Stowage areasStowing and features
Page 320 of 397
load could slip, tip over or be flung around and
thereby collide with vehicle occupants. There
is a risk of injury.
Only use the lashing eyelets when securing a
load.
Observe the following notes on securing loads: R Secure the load using the lashing eyelets.
R Distribute the load on the lashing eyelets
evenly.
R Do not use elastic straps or nets to secure a
load. These are only intended as an anti-slip
protection for light loads.
R Do not route lashing materials across sharp
edges or corners.
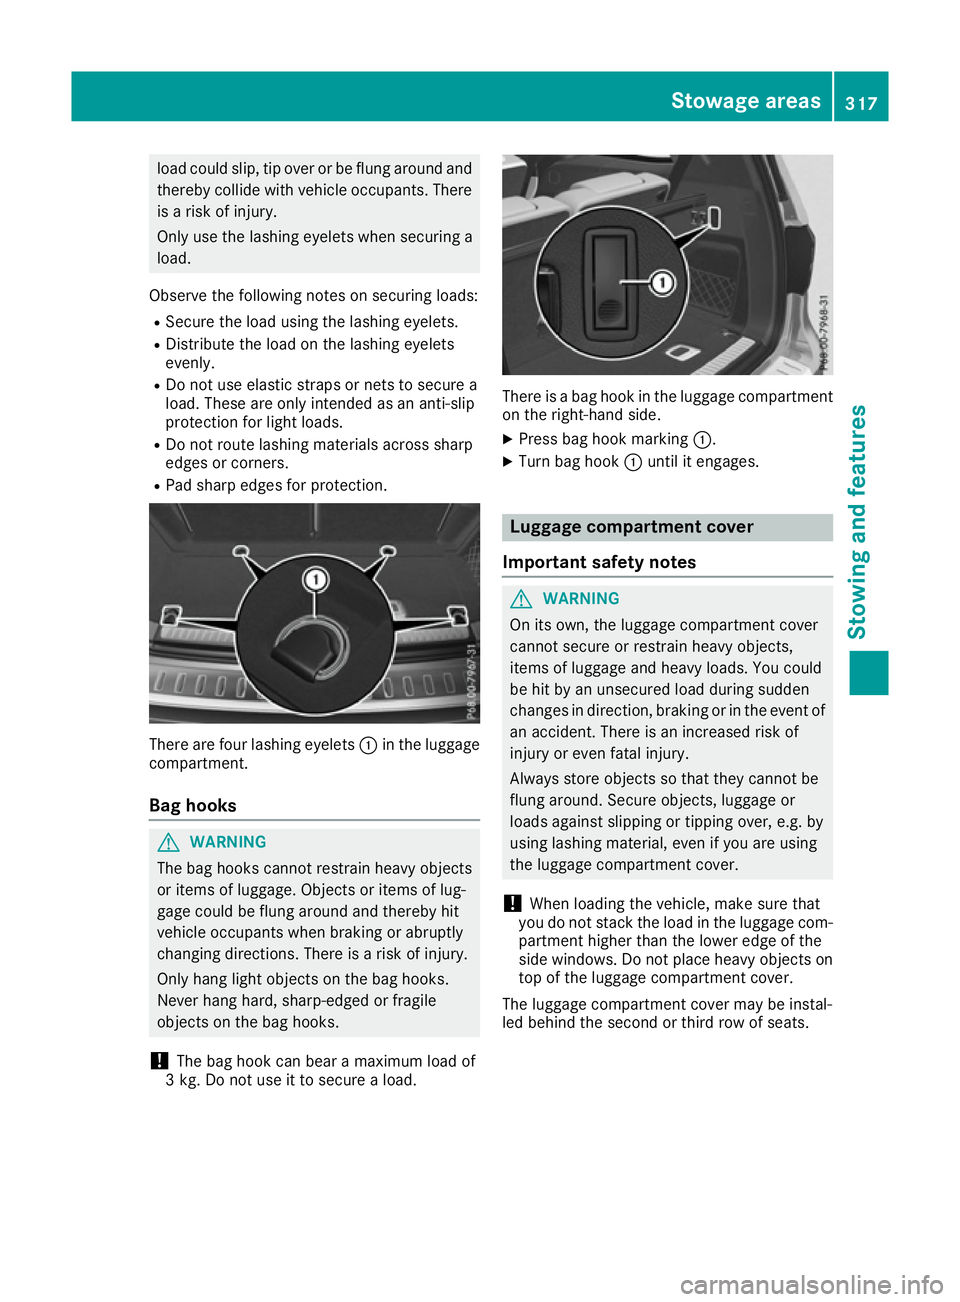
R Pad sharp edges for protection. There are four lashing eyelets
:in the luggage
compartment.
Bag hooks G
WARNING
The bag hooks cannot restrain heavy objects
or items of luggage. Objects or items of lug-
gage could be flung around and thereby hit
vehicle occupants when braking or abruptly
changing directions. There is a risk of injury.
Only hang light objects on the bag hooks.
Never hang hard, sharp-edged or fragile
objects on the bag hooks.
! The bag hook can bear a maximum load of
3 kg. Do not use it to secure a load. There is a bag hook in the luggage compartment
on the right-hand side.
X Press bag hook marking :.
X Turn bag hook :until it engages. Luggage compartment cover
Important safety notes G
WARNING
On its own, the luggage compartment cover
cannot secure or restrain heavy objects,
items of luggage and heavy loads. You could
be hit by an unsecured load during sudden
changes in direction, braking or in the event of an accident. There is an increased risk of
injury or even fatal injury.
Always store objects so that they cannot be
flung around. Secure objects, luggage or
loads against slipping or tipping over, e.g. by
using lashing material, even if you are using
the luggage compartment cover.
! When loading the vehicle, make sure that
you do not stack the load in the luggage com- partment higher than the lower edge of the
side windows. Do not place heavy objects ontop of the luggage compartment cover.
The luggage compartment cover may be instal-
led behind the second or third row of seats. Stowage areas
317Stowing and features Z
Page 321 of 397
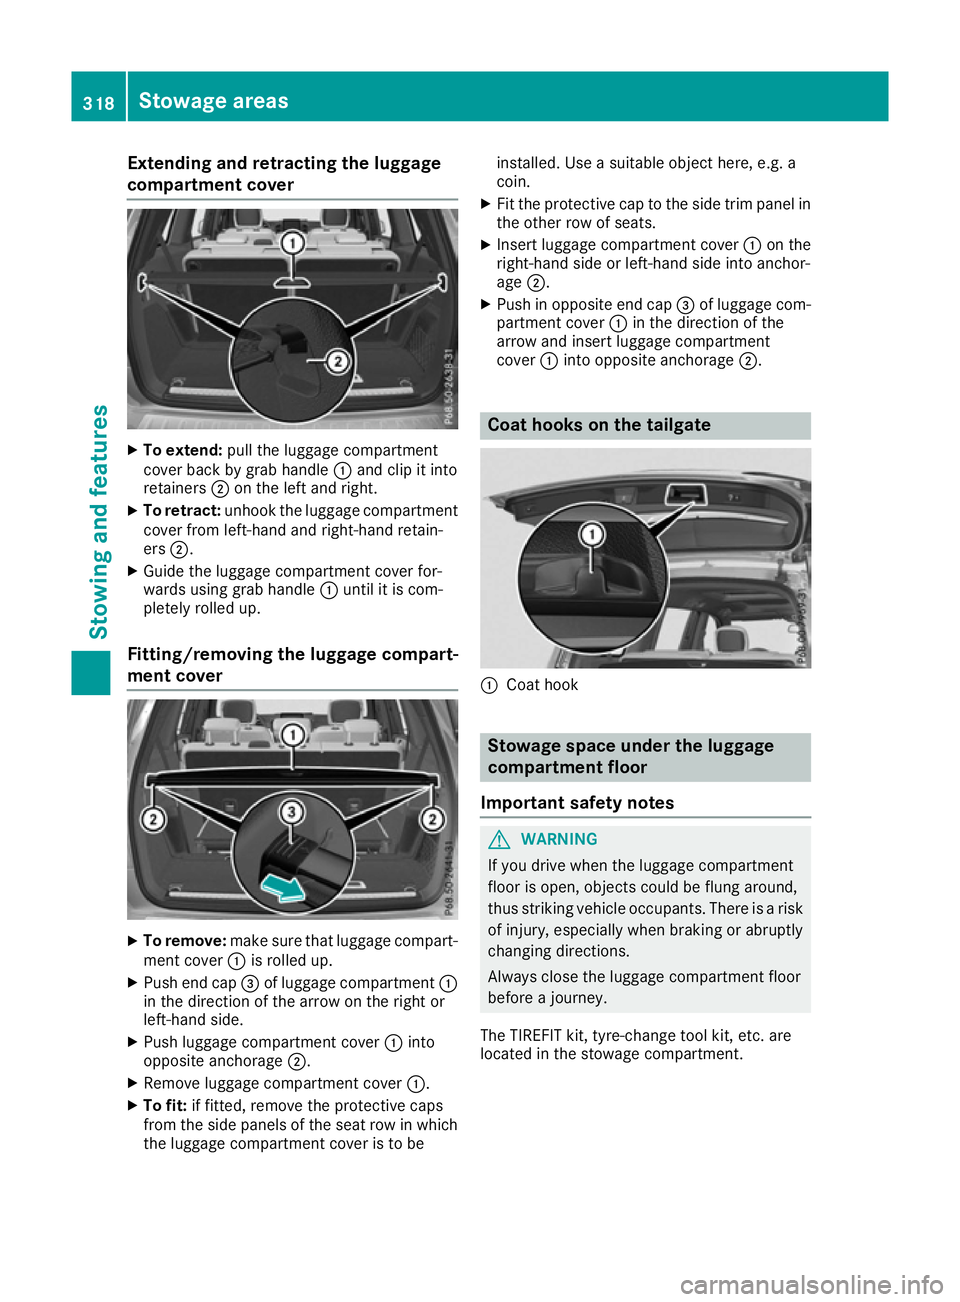
Extending and retracting the luggage
compartment cover X
To extend: pull the luggage compartment
cover back by grab handle :and clip it into
retainers ;on the left and right.
X To retract: unhook the luggage compartment
cover from left-hand and right-hand retain-
ers ;.
X Guide the luggage compartment cover for-
wards using grab handle :until it is com-
pletely rolled up.
Fitting/removing the luggage compart-
ment cover X
To remove: make sure that luggage compart-
ment cover :is rolled up.
X Push end cap =of luggage compartment :
in the direction of the arrow on the right or
left-hand side.
X Push luggage compartment cover :into
opposite anchorage ;.
X Remove luggage compartment cover :.
X To fit: if fitted, remove the protective caps
from the side panels of the seat row in which
the luggage compartment cover is to be installed. Use a suitable object here, e.g. a
coin.
X Fit the protective cap to the side trim panel in
the other row of seats.
X Insert luggage compartment cover :on the
right-hand side or left-hand side into anchor-
age ;.
X Push in opposite end cap =of luggage com-
partment cover :in the direction of the
arrow and insert luggage compartment
cover :into opposite anchorage ;. Coat hooks on the tailgate
:
Coat hook Stowage space under the luggage
compartment floor
Important safety notes G
WARNING
If you drive when the luggage compartment
floor is open, objects could be flung around,
thus striking vehicle occupants. There is a risk of injury, especially when braking or abruptly
changing directions.
Always close the luggage compartment floor
before a journey.
The TIREFIT kit, tyre-change tool kit, etc. are
located in the stowage compartment. 318
Stowage areasStowing and features